Deploy Scanner Instance Using Command Line
PERSCODE in the form of user data can also be provided through the command line. In this case, you will not be prompted to enter the code on the console.
The qVSA image does not yet support UEFI-compliant firmware, Secure Boot, or vTPM-protected Measured Boot.
Perform the following steps to provide the PERSCODE using the command line.
- Create a file and add the following line in it.
PERSCODE=xxxxxxxxxxxxxxPROXY_URL=username:password@proxyhost:port
(This is optional ) - Run the following commands to launch an instance.
Obtain your network-ID
openstack network list - Run the following command to create an instance without user data.
openstack server create --flavor < FLAVOR > --image < SCANNER IMAGE > --nic net-id= < NET_ID > --security-group < SECURITY_GROUP > --user-data < FILE > < INSTANCE_NAME >
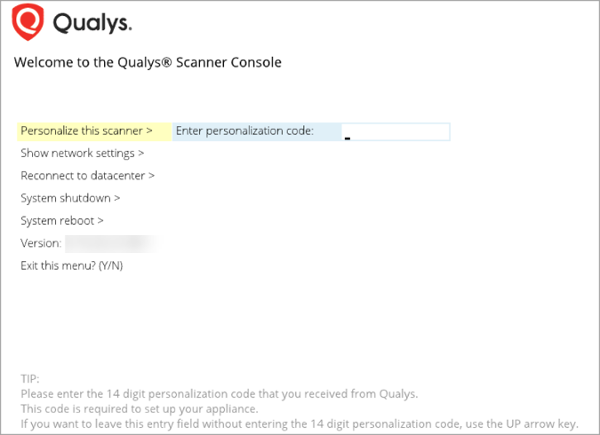
If you do not provide PERSCODE in the form of userdata, you are prompted to enter it on the Scanner Console.
-
Run the following commands on the Controller Node.
Obtain your network-ID
openstack network list
- Run the following command to create an instance:
-
Create Single-Network scanner instance using user data
openstack server create --flavor < FLAVOR > --image <

		IMAGE_NAME > --nic net-id= < NETWORK_ID > --security-group <

		SECURITY_GROUP > < INSTANCE_NAME > --config-drive true –wait

		--user-data <full path to user-data file>
Example of user-data file (PROXY_URL is optional):
PERSCODE=123456789012344PROXY_URL=user:pass@hostname:443PREFER_USER_DATA=TrueSet PREFER_USER_DATA to True if you require configurations set in user data to take precedence upon scanner reboot. If PREFER_USER_DATA is set to False, configurations made in Scanner Console will remain persistent even upon scanner reboot.
-
Create Split-Network scanner instance using user data
openstack server create --flavor < FLAVOR > --image <

		IMAGE_NAME > --nic net-id= < NETWORK_ID for LAN interface> -

		-nic net-id= < NETWORK_ID for WAN interface > --security-group < SECURITY_GROUP > < INSTANCE_NAME > --config-drive

		true –wait --user-data <full path to user-data file>
Example of user-data file (PROXY_URL is optional):
PERSCODE=123456789012344PROXY_URL=user:pass@hostname:443Enable_WAN_Interface=TruePREFER_USER_DATA=TrueSet PREFER_USER_DATA to True if you require configurations set in user data to take precedence upon scanner reboot. If PREFER_USER_DATA is set to False, configurations made in Scanner Console will remain persistent even upon scanner reboot.
-
Create IPv6-Only Mode scanner instance using user data
openstack server create --flavor < FLAVOR > --image <

		IMAGE_NAME > --nic net-id= < NETWORK_ID > --security-group <

		SECURITY_GROUP > < INSTANCE_NAME > --config-drive true –wait

		--user-data <full path to user-data file>
Example of user-data file (PROXY_URL is optional):
PERSCODE=123456789012344PROXY_URL=user:pass@[IPv6 proxy address]:443IPV6_ONLY=TruePREFER_USER_DATA=TrueSet PREFER_USER_DATA to True if you require configurations set in user data to take precedence upon scanner reboot. If PREFER_USER_DATA is set to False, configurations made in Scanner Console will remain persistent even upon scanner reboot.
If PERSCODE is not provided by the user, the following error is returned.
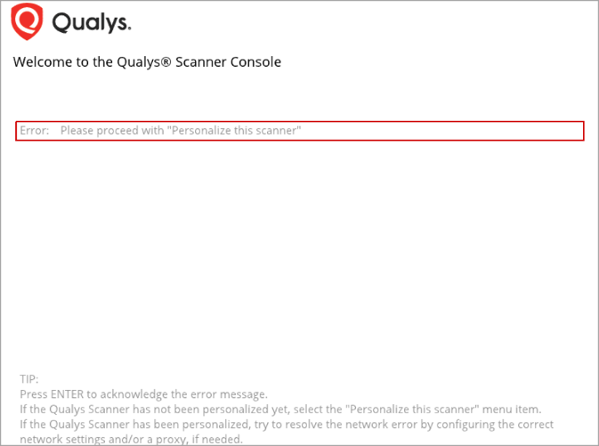
Press Enter and type in your personalization code.
The instance status will be ACTIVE after it is successfully launched.
-