TruRisk™ Mitigation
TruRisk™ Mitigation is integrated to strengthen risk management capabilities. Using the MTG application, you can mitigate vulnerabilities on Windows and Linux assets by creating mitigation jobs using actions and scripts. The mitigation and remediation counts on the Vulnerabilities Details page, previously accessible only to a limited set of VMDR users, are available to all users, regardless of their Patch Management or TruRisk™ Mitigate subscription status. This enhancement applies solely to vulnerabilities identified by Cloud Agents.
This provides greater visibility into vulnerability remediation strategies, empowering teams to address CISA Known Exploited Vulnerabilities (KEVs) proactively.
TruRisk™ Mitigation and Remediation: Know the Difference
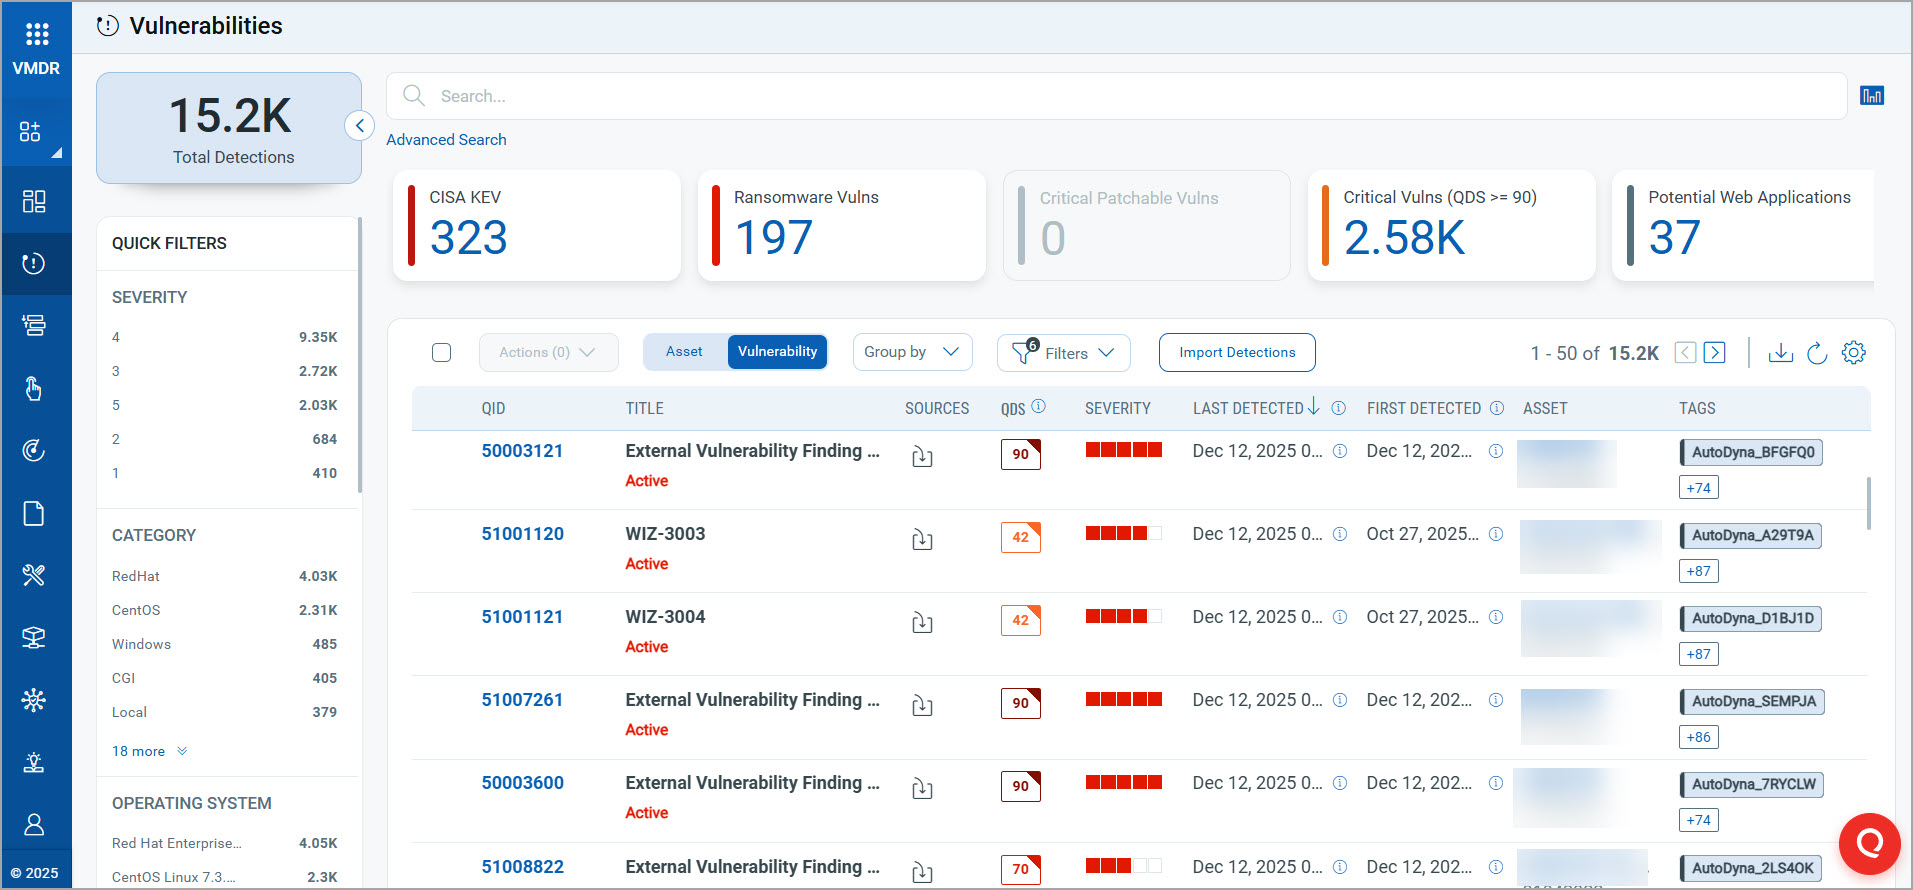
The vulnerability results matching the new QQL token now display two additional icons: one for Mitigation and one for Remediation, each showing their respective vulnerability counts.

- Mitigation: When a vulnerability cannot be patched, select the Mitigation option to apply compensating controls that reduce risk exposure.
- Remediation: To remediate a vulnerability, select the Remediation option and apply the required patch or fix.

This approach ensures that vulnerabilities are addressed directly or their associated risks are minimized.
To address CISA's Known Exploited Vulnerabilities (KEVs) and ransomware threats, an active TruRisk Eliminate™ subscription is necessary. For more details, read our blog or contact your Technical Account Manager (TAM).
Search Token
To view mitigable vulnerabilities, use the following token: vulnerabilities.isQualysMitigable
Use the values true | false to indicate whether Qualys can mitigate a detected vulnerability.
Example
Show findings with vulnerabilities that can be mitigated
vulnerabilities.isQualysMitigable:TRUE
View Risk Elimination for Mitigation
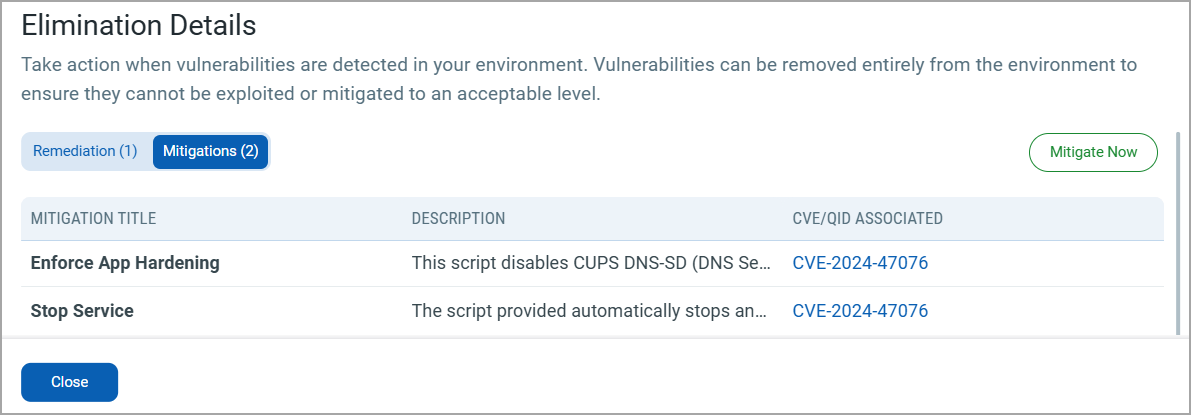
There are two types of Mitigations:
- Fix: This type of mitigation provides a fix for the detected vulnerability that cannot be restored. For example, uninstalling a service. After such mitigation is applied, the vulnerability status changes to Fix.
- Mitigation: This type of mitigation provides a temporary resolution for the detected vulnerability, for example, blocking a port. After such mitigation is applied, the vulnerability status changes to Mitigated.
You can navigate to the VMDR > Vulnerabilities tab to view the list of vulnerabilities for the various Windows, Linux, and Mac assets. However, mitigation is available only for Windows and Linux assets. With this workflow, you can select a total of 200 assets, with one asset for each QID. Both Mitigation and fix-type vulnerabilities are supported in this type of workflow.
To eliminate risk:
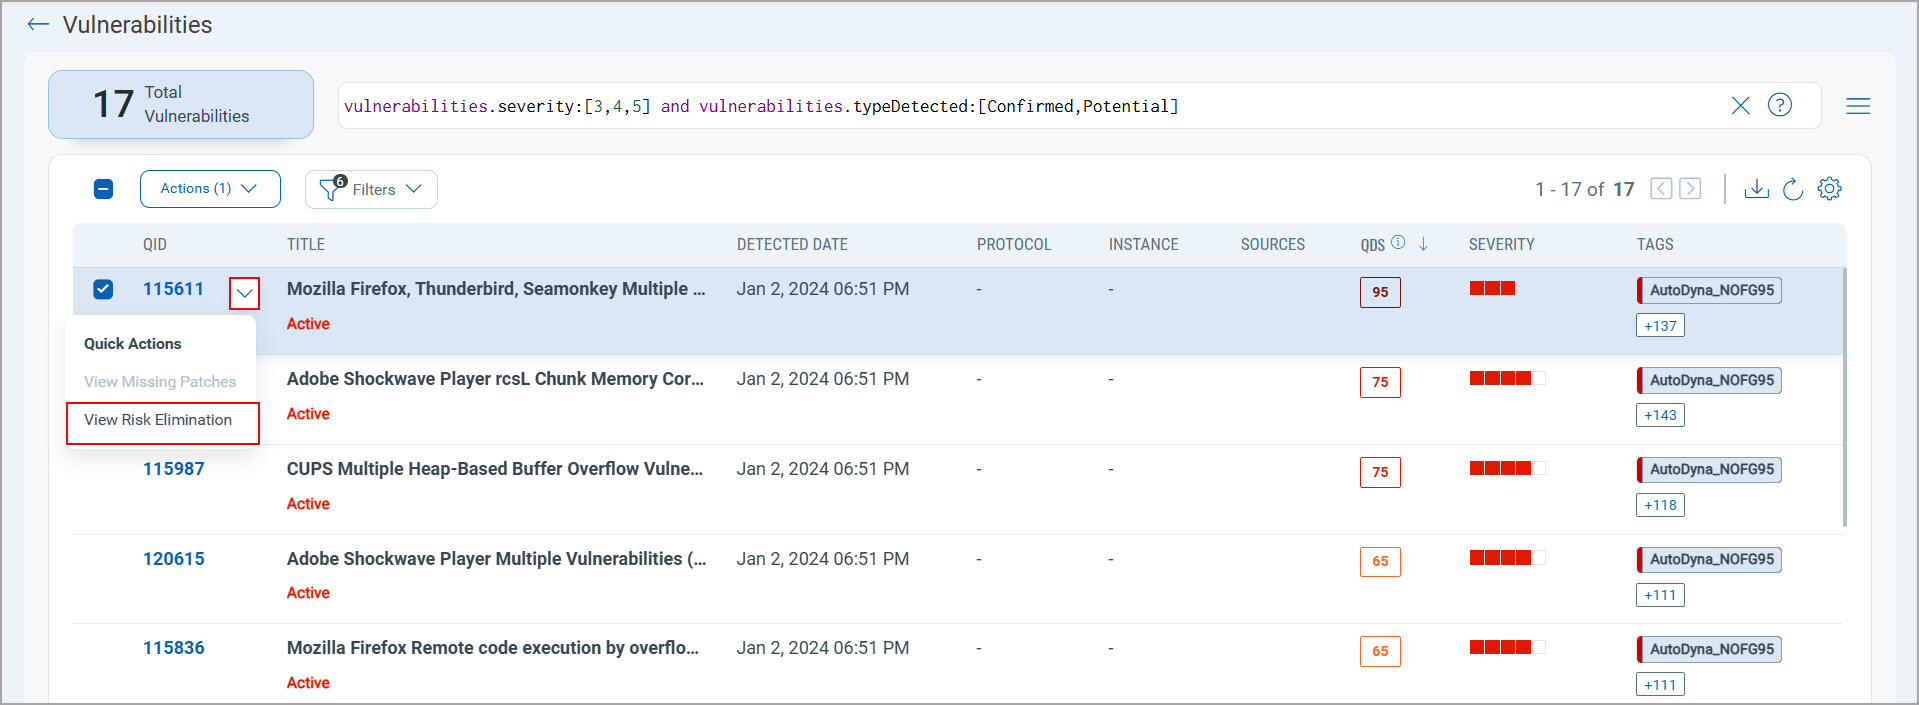
- Go to the VMDR > Vulnerabilities tab. You can view the QIDs for which mitigation jobs are available.
- In the Assets column, click an asset. The Asset Details page opens.
- Go to the Security section, click VMDR Vulnerabilities, and then click View All.
- To mitigate the QID, locate it, and then from the Quick Actions drop-down or Actions drop-down, click View Risk Elimination. This option navigates you to the Mitigation > Eliminations tab, where you can mitigate the selected QID.
View Mitigation Details of QIDs
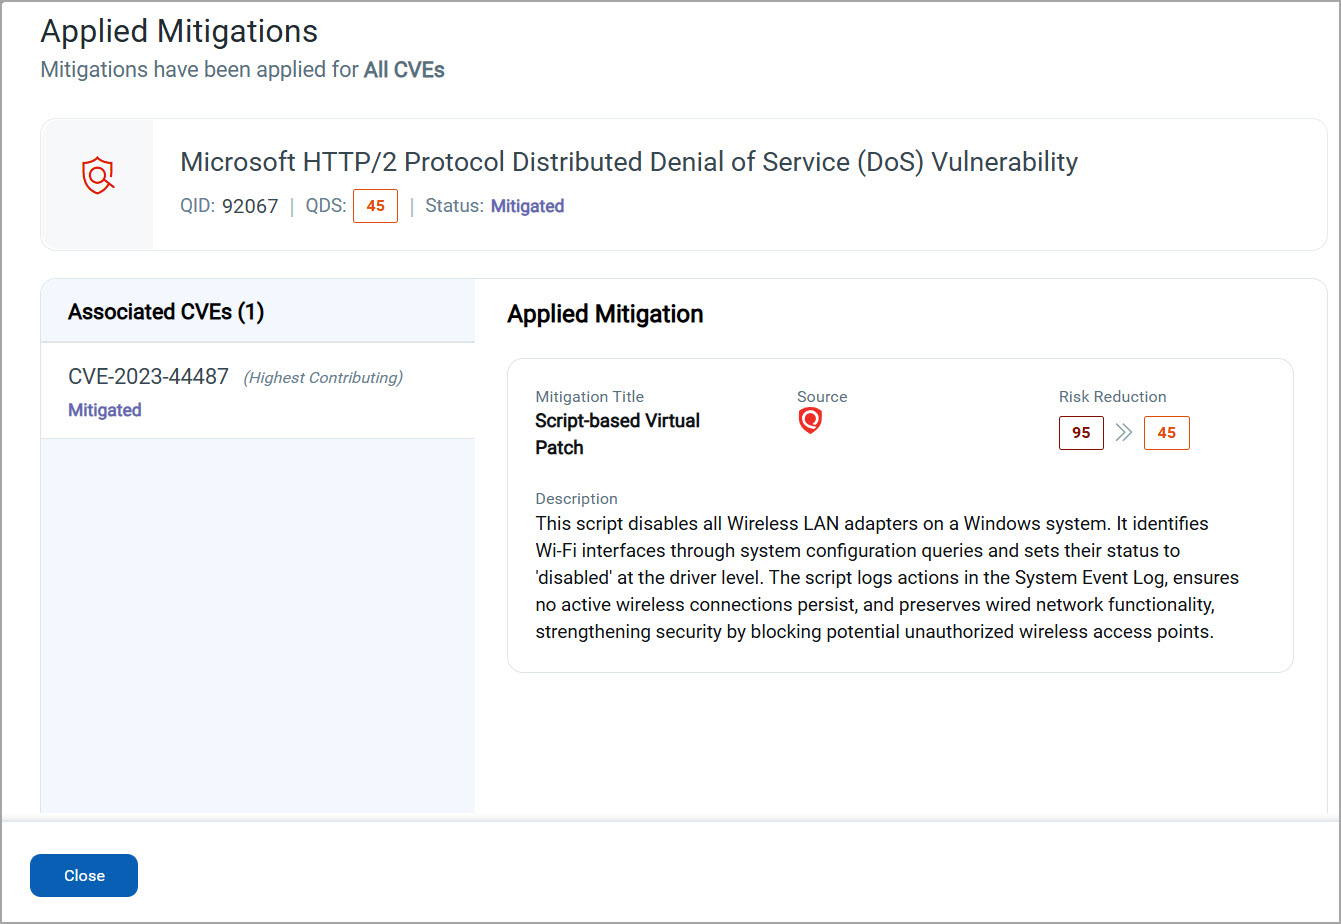
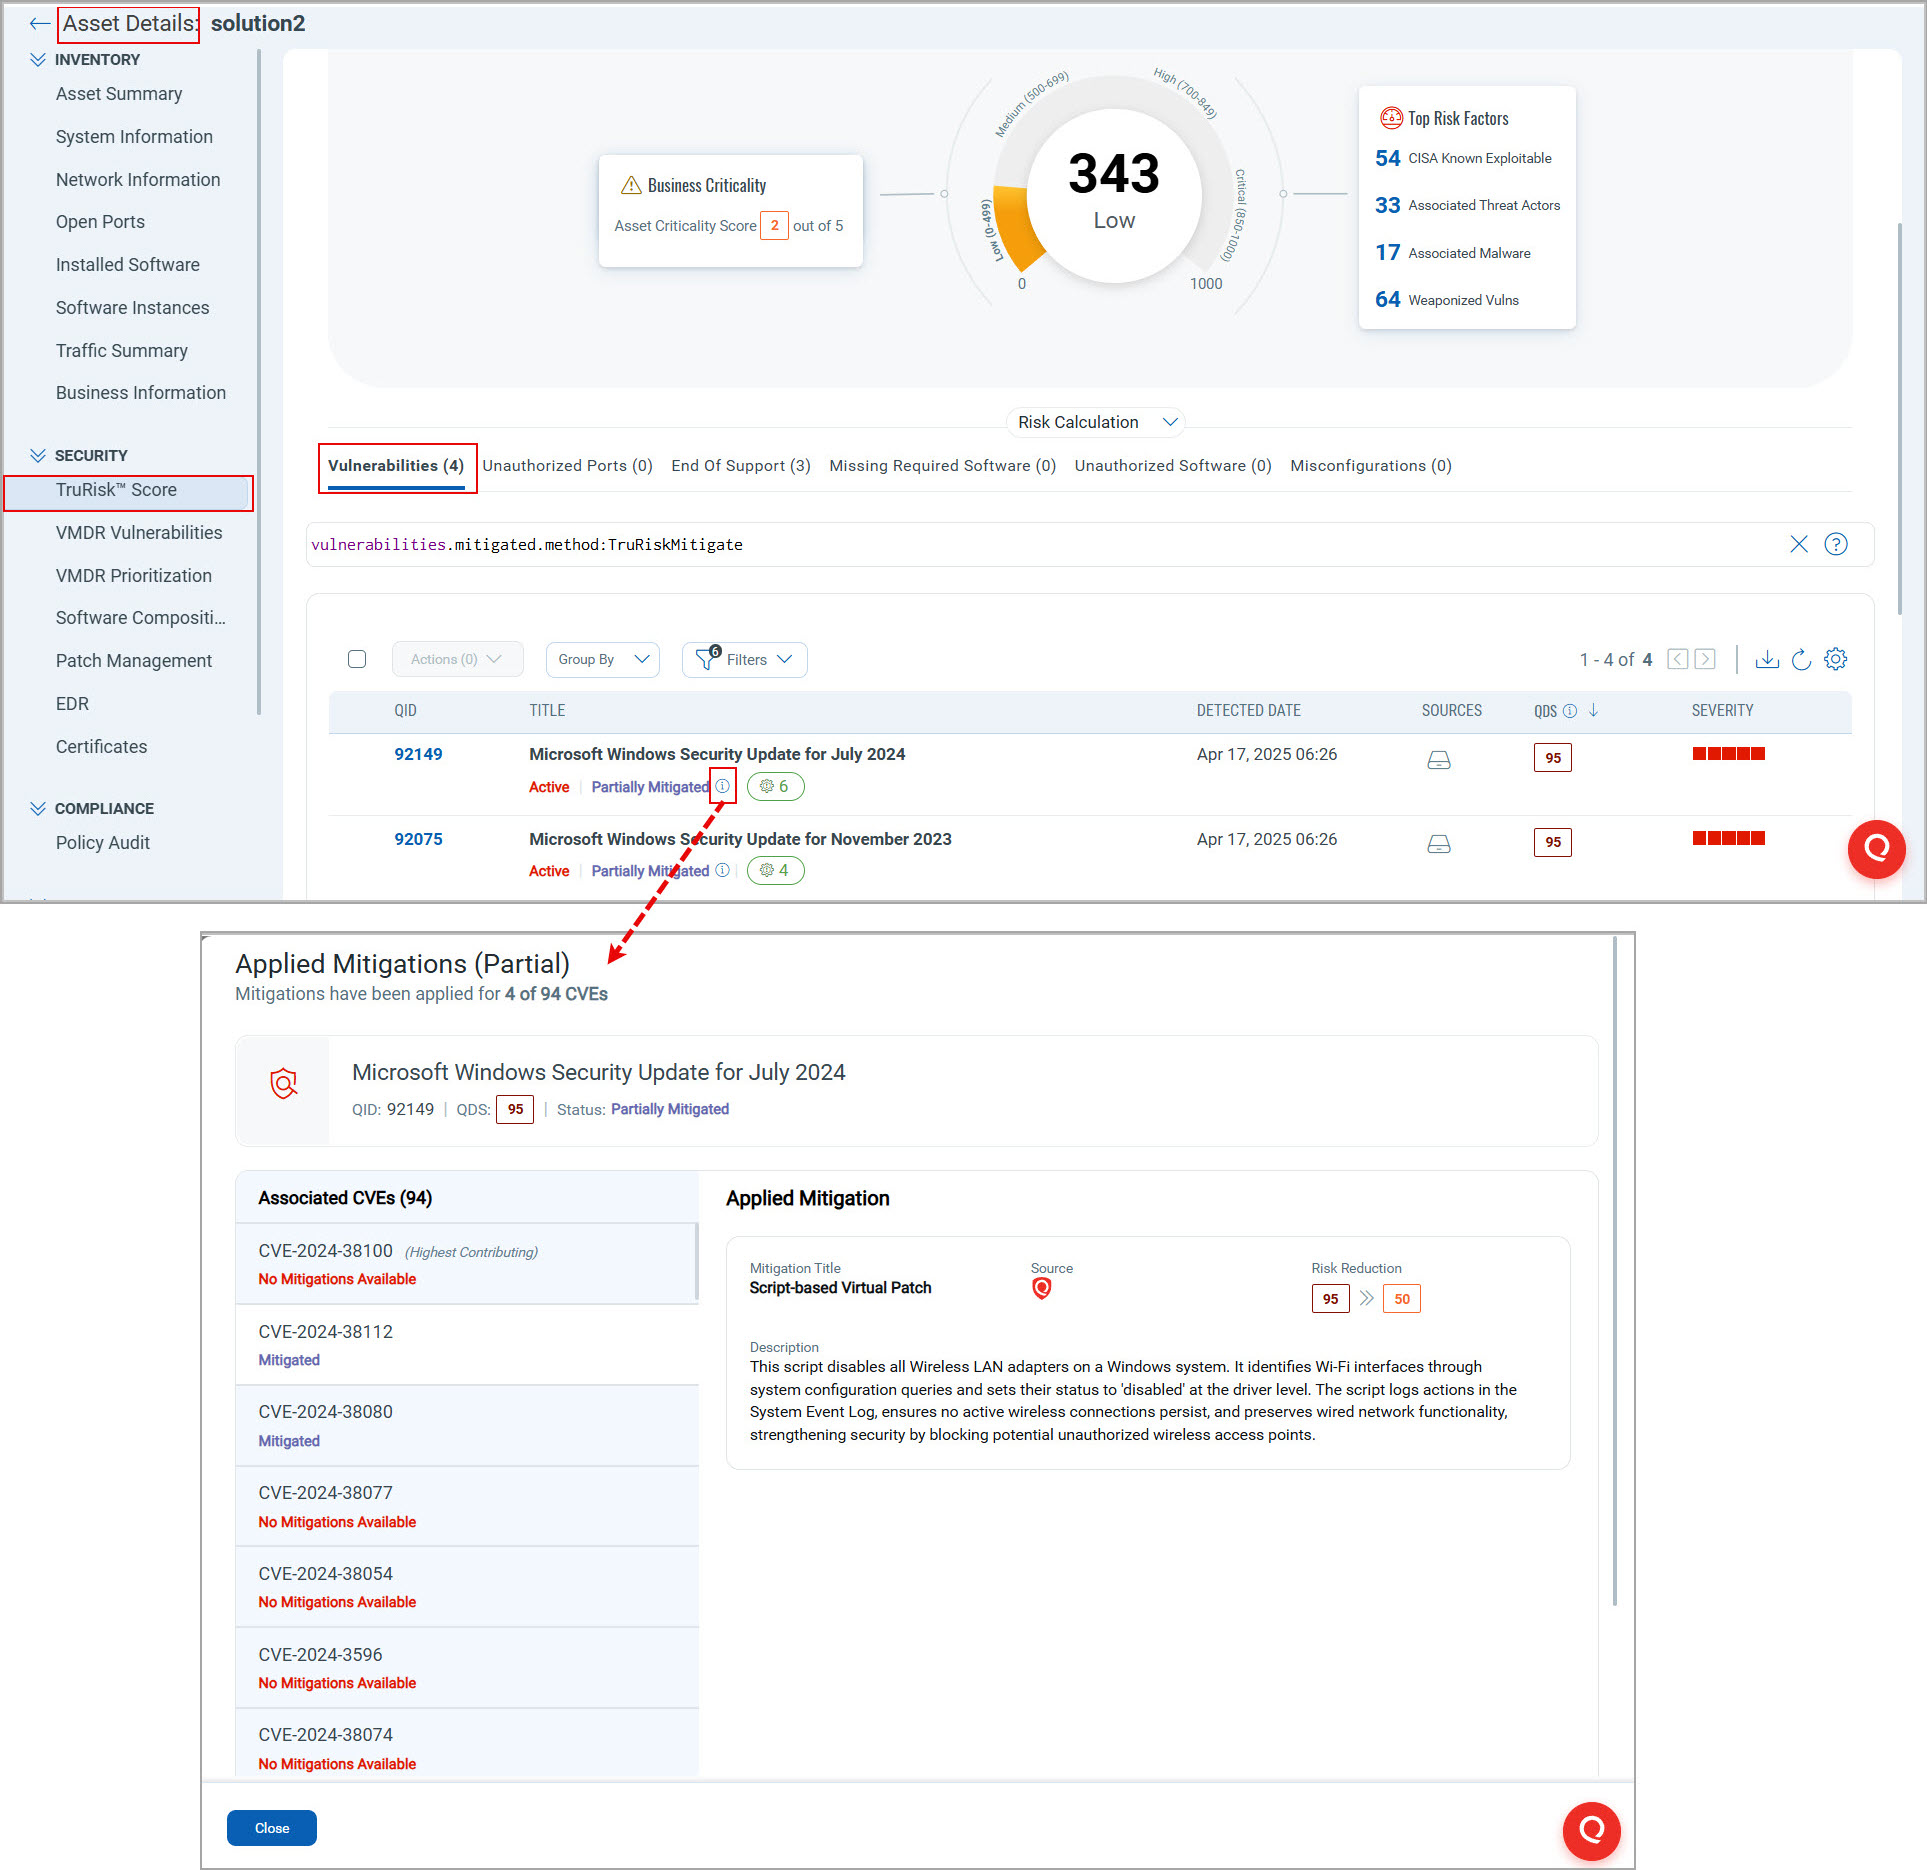
The Applied Mitigations dialog box displays the details of partially and fully mitigated QIDs. This dialog box has the following information:
- Qualys Vulnerability Score (QVS) of Common Vulnerabilities and Exposures (CVEs) before and after mitigation.
- Risk reduction after mitigation.
- Highest Contributing CVE (with the highest QVS score).
Following is the sample image of the Applied Mitigations dialog box:
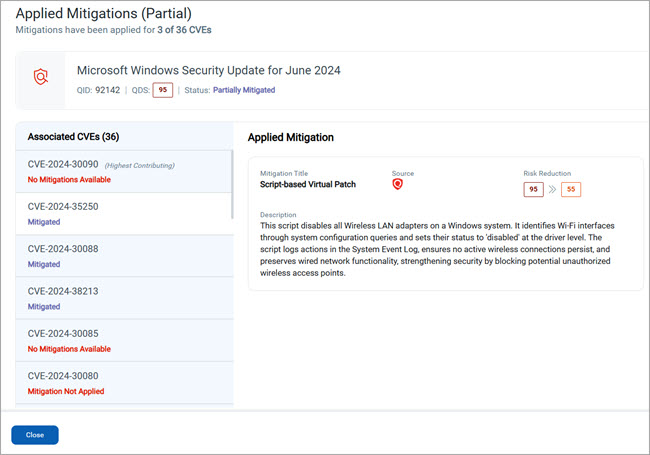
- Qualys ID (QID): a unique identifier for a vulnerability.
- Qualys Detection Score (QDS): a score assigned to the respective Qualys detection of a vulnerability.
- Status: a mitigation status indicating whether a vulnerability is fully mitigated or partially mitigated for a QID. You can also check the mitigation statuses of CVEs related to the respective QIDs.
- QID statuses: mitigation statuses of QIDs.
The Vulnerability and Assets tabs display the following mitigation statuses of QIDs:- Mitigated QIDMitigated QID
A mitigated (or fully mitigated) QID means that all the CVEs associated with a QID are mitigated.
- Partially Mitigated QIDPartially Mitigated QID
A partially mitigated QID means that at least one CVE associated with a QID is mitigated.
- Mitigated QIDMitigated QID
- CVE statuses: mitigation statuses of CVEs.
The Applied Mitigation dialog box displays the following CVE statuses:- Mitigated CVEMitigated CVE
Indicates whether a CVE is fully mitigated. A mitigated CVE indicates that the security vulnerability identified by its CVE ID is completely remediated and no longer poses a risk.
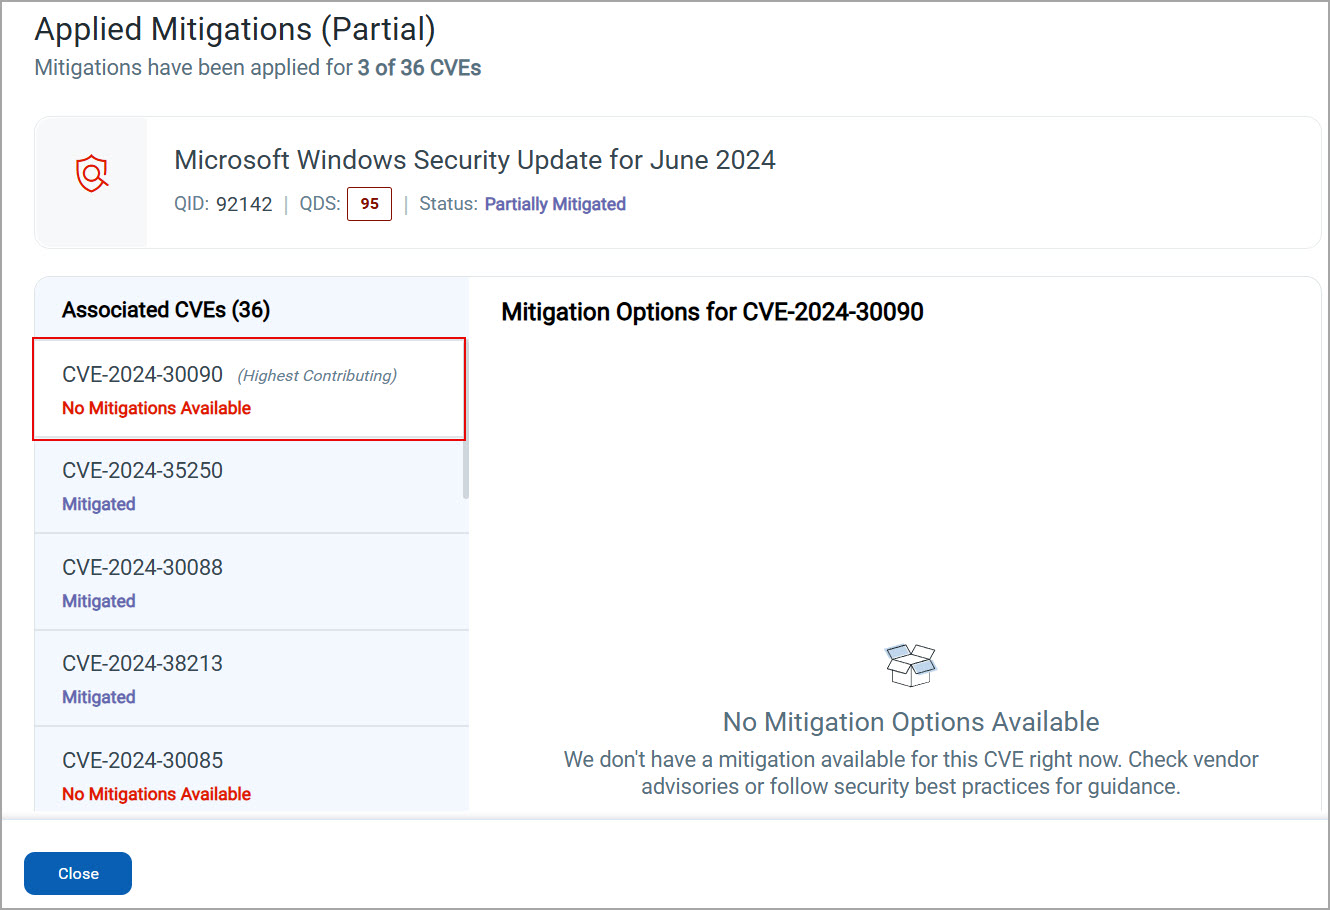
- CVE Not MitigatedCVE Not Mitigated
Indicates that CVE is not mitigated because there are no mitigations applied or no mitigations available for such CVE.
The following are the mitigation statuses for non-mitigated CVE:- Mitigation Not Applied: indicates that a mitigation is available, but is not applied to a CVE currently.
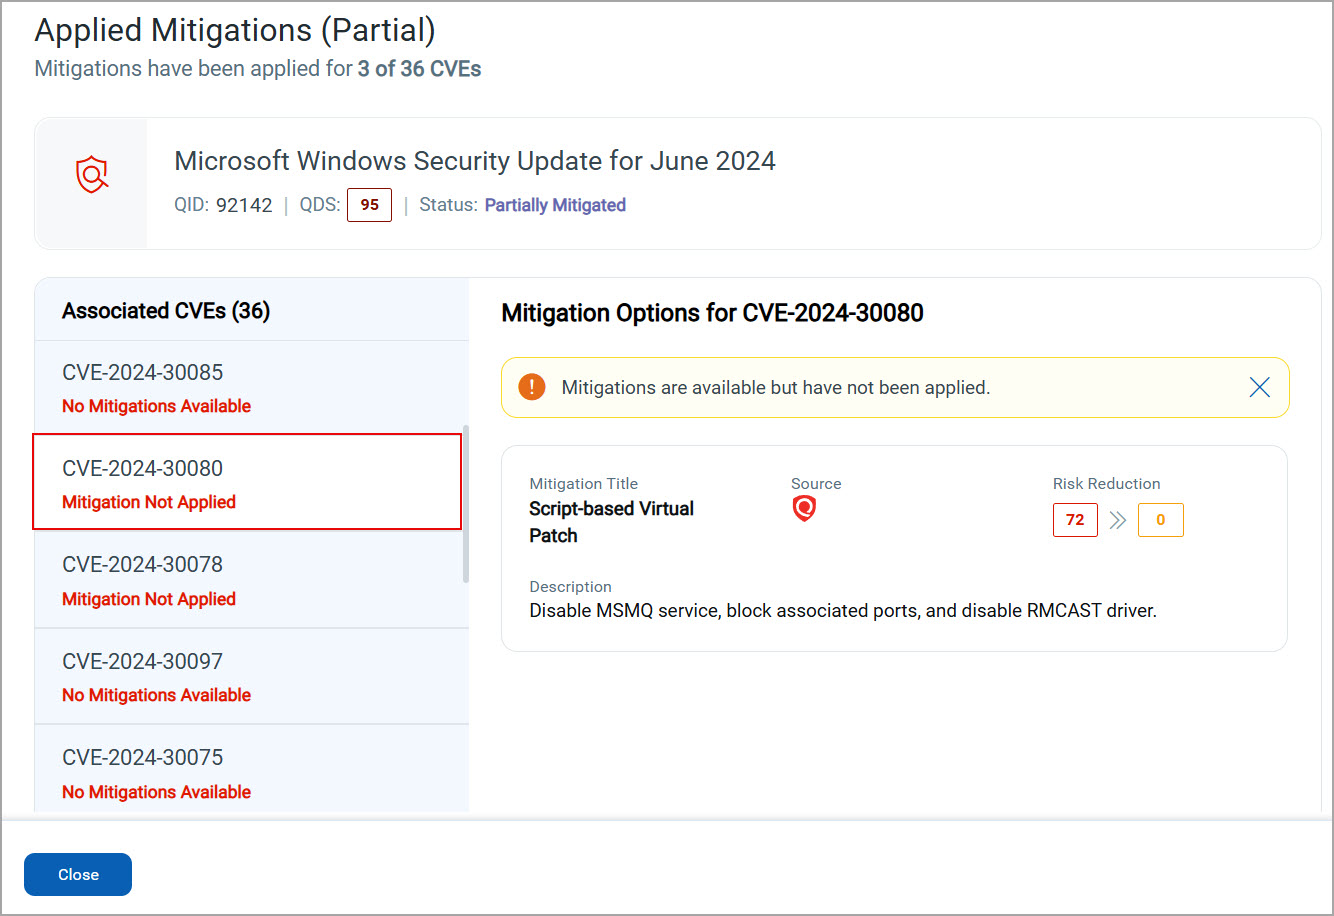
- No Mitigations Available: indicates that there are no mitigations available for a CVE currently.
- Mitigation Not Applied: indicates that a mitigation is available, but is not applied to a CVE currently.
- Mitigated CVEMitigated CVE
- QID statuses: mitigation statuses of QIDs.
- Number of Associated CVEs: a list of the total number of associated CVEs of a selected QID. The listed CVEs display their respective mitigation statuses.
- Mitigation Options for Related CVE: more information about the mitigation of a selected CVE.
- Applied Mitigation: more details about the applied mitigation, which include:
- Mitigation Title: a title for recommended mitigation action.
- Source: a source of mitigation, whether the mitigation option is available with Qualys or with you.
 indicates that a mitigation option is available with Qualys.
 indicates that a mitigation option is available with you.
- Risk Reduction: a Qualys Vulnerability Score (QVS) of a CVE before mitigation and a reduced QVS after mitigation. The score quantifies the impact of mitigation. A reduced score indicates the score available after the mitigation is applied to a CVE.
- Description: context about the mitigation of a selected CVE under Associated CVEs.
You may open the Applied Mitigations dialog box from the following locations in the VMDR module:
- Vulnerabilities tabVulnerabilities tab
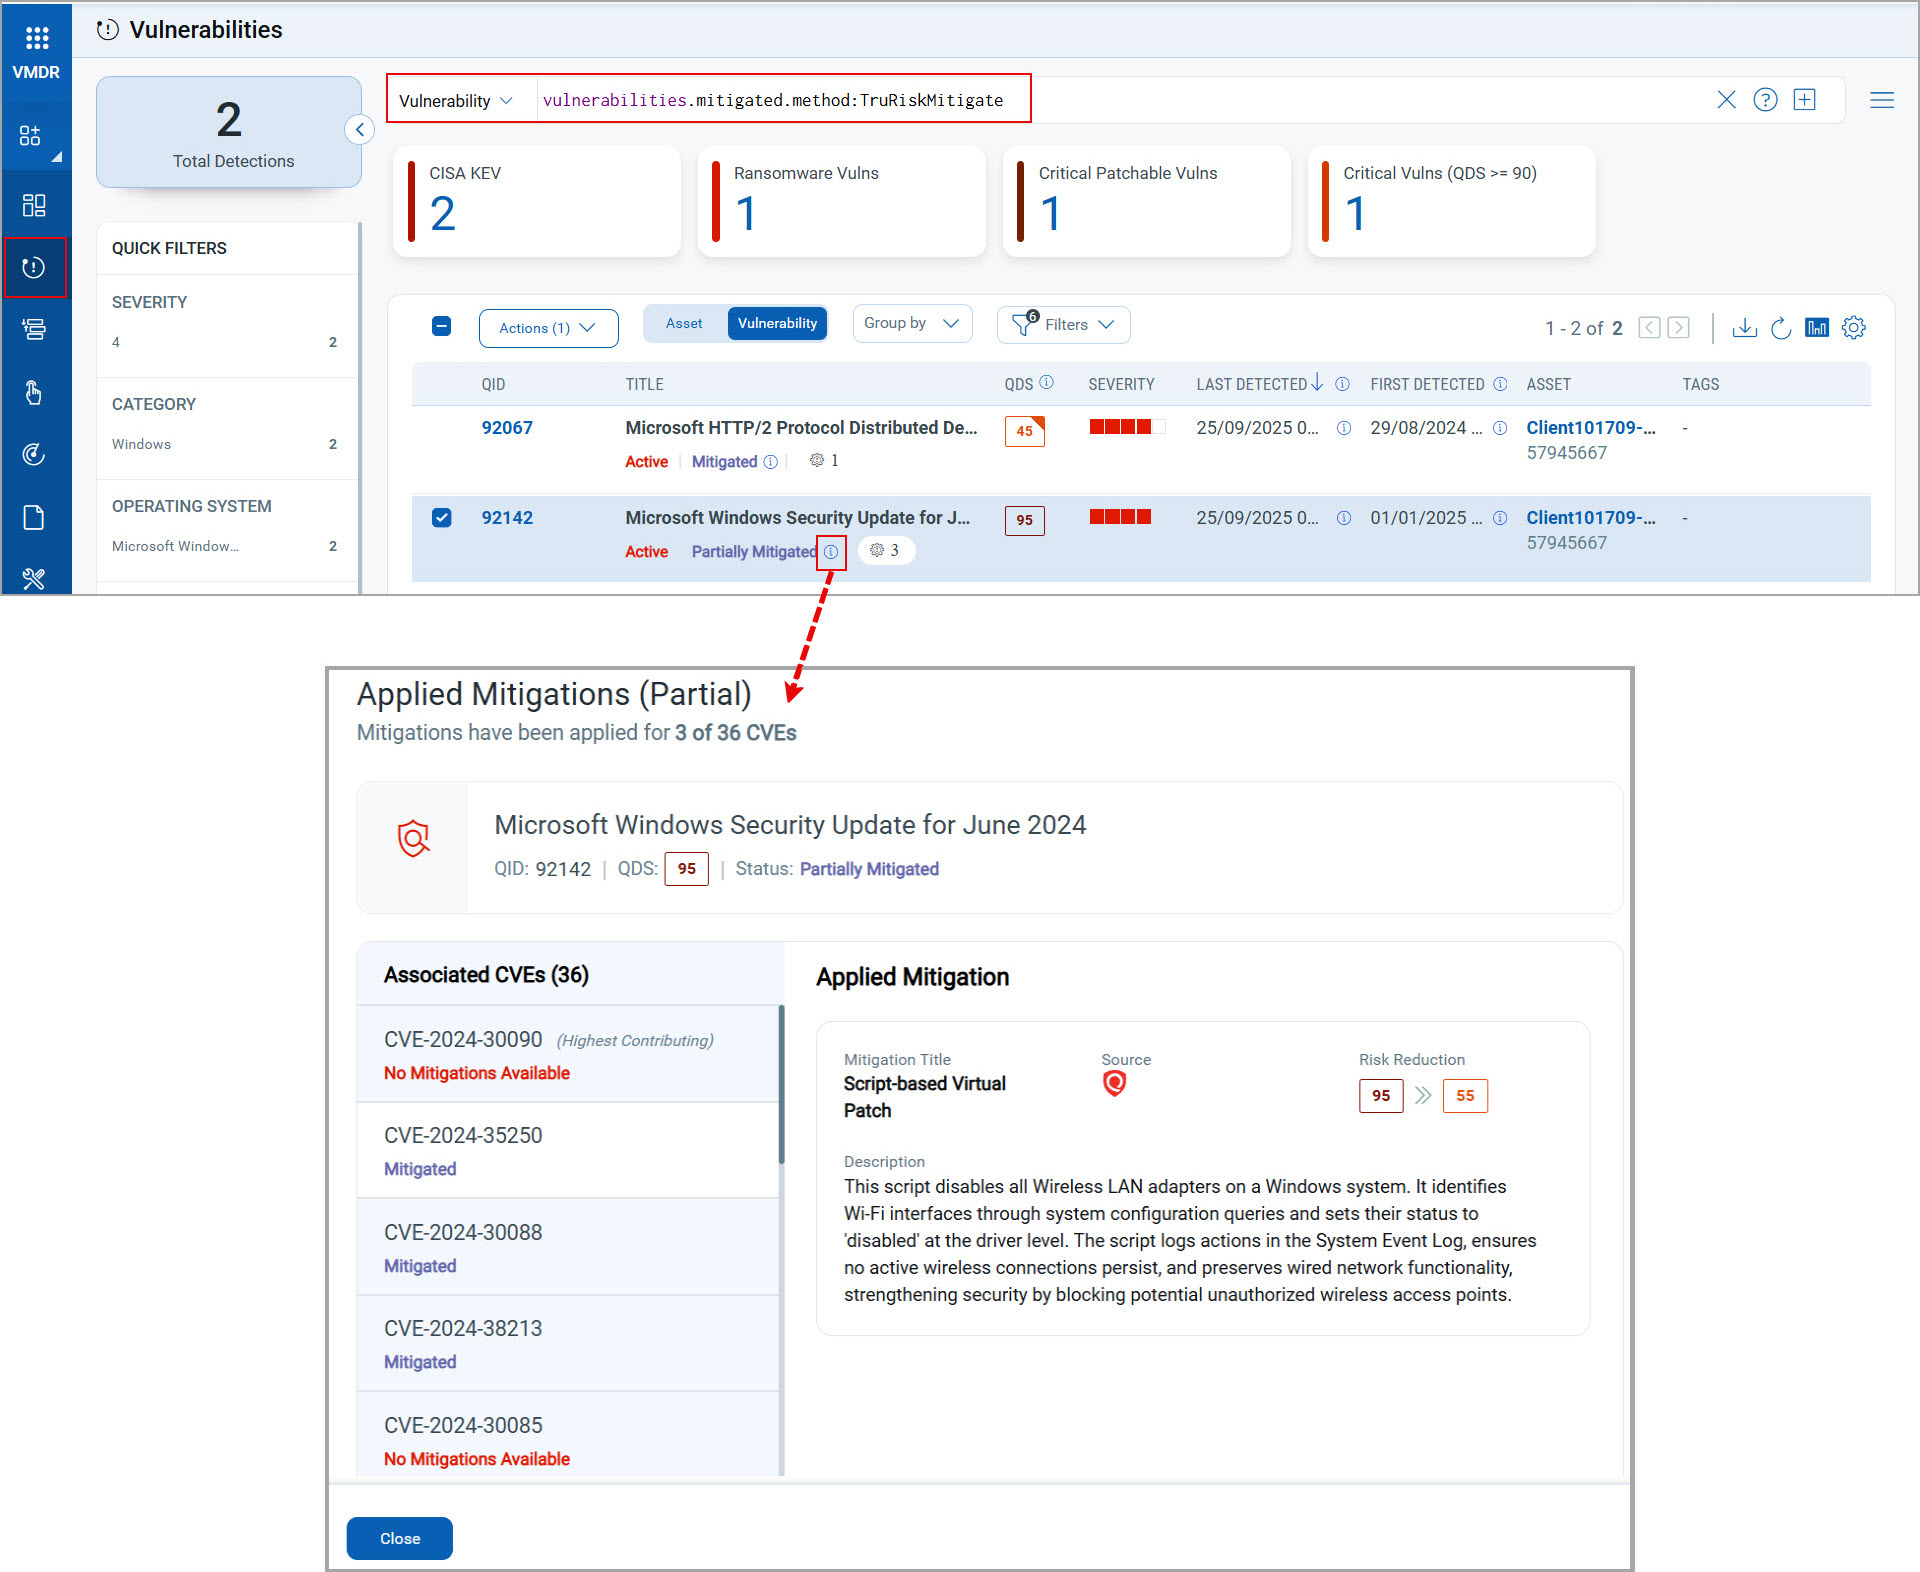
To open the Applied Mitigations dialog box from the Vulnerabilities tab:
- Go to the VMDR > Vulnerabilities tab.
You can view the QIDs with the related mitigation state (partial or full). - In the Vulnerability search box, search for QIDs, using the following QQL token:
vulnerabilities.mitigated.method:TruRiskMitigate.
A list of QIDs with the TruRisk™ mitigated vulnerabilities appears. - In a row of a required QID, in the column Title, click the info (
 ) icon.
The Applied Mitigations dialog box opens, displaying the mitigation details for a selected QID.
- Go to the VMDR > Vulnerabilities tab.
- Asset Details pageAsset Details page
To open the Applied Mitigations dialog box from the Asset Details page:
- Go to the VMDR > Vulnerabilities tab.
- In the Vulnerability search box, search for assets, using the following QQL:
vulnerabilities.mitigated.method:TruRiskMitigate.
A list of QIDs with the TruRisk™ mitigated vulnerabilities appears. - Click the Asset tab on the Vulnerabilities tab page.
- In a row of a required asset, in the column Name, click a required asset name.
Or,
In a row of a required asset, in the column Name, click the drop-down button > click View Details.
The Asset Details page opens. - In the left pane, under Security, click TruRisk™ Score.
The TruRisk™ Score page opens.- Scroll down to view Vulnerabilities.
- In a row of a required QID, in the column Title, click the info () icon.
The Applied Mitigations dialog box opens, displaying the mitigation details for a selected QID.
Or,- In the left pane, under Security, click VMDR Vulnerabilities.
The VMDR Vulnerabilities page opens. - In the upper-right corner of the VMDR Vulnerabilities page, click the View AllView All link.
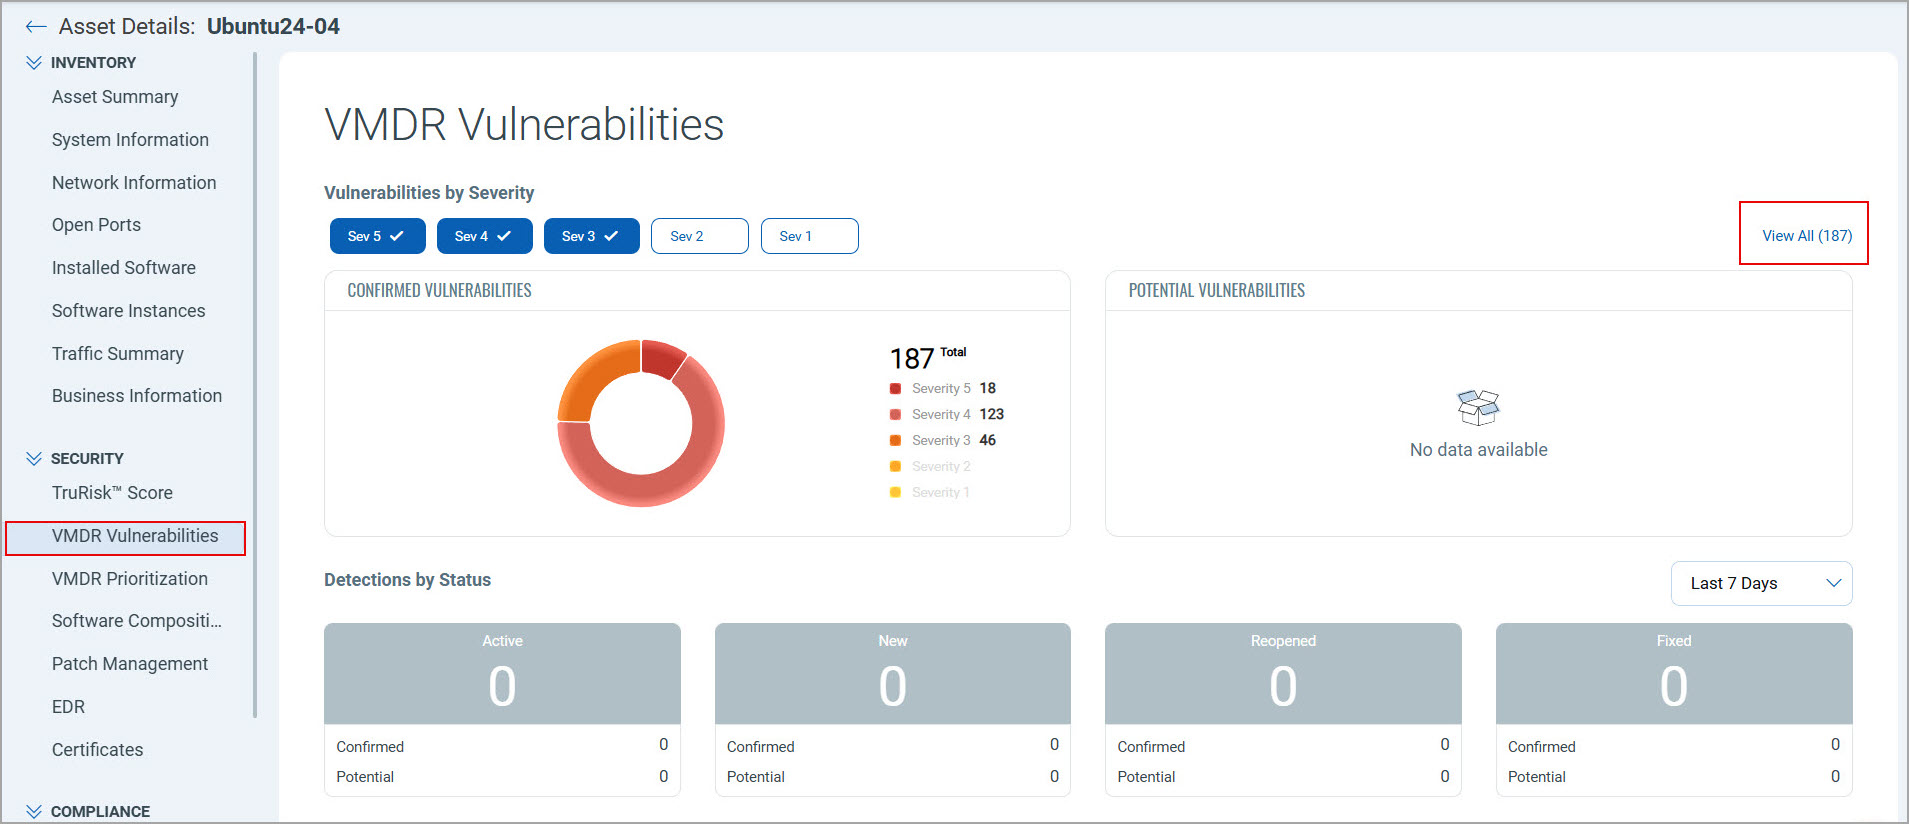
The Vulnerabilities page opens. - In a row of a required QID, in the column Title, click the info () icon.
The Applied Mitigations dialog box opens, displaying the mitigation details for a selected QID.
- In the left pane, under Security, click VMDR Vulnerabilities.
- Detection Details PageDetection Details Page
To open the Applied Mitigations dialog box from the Detection Details page:
- Go to the VMDR > Vulnerabilities tab.
- In the Vulnerability search box, search for vulnerability, using the following QQL:
vulnerabilities.mitigated.method:TruRiskMitigate.
A list of QIDs with the TruRisk™ mitigated vulnerabilities appears. - In a row of a required QID, in the column QID, click a required QID.
Or,
In a row of the required QID, click the drop-down button, and then under Quick Actions, click View Vulnerability Details.
The Vulnerability Details page opens. - In the left pane, click QDS Details.
The Qualys Detection Score (QDS) Details page opens. - In the Qualys Detection Score (QDS) Details page, under Mitigated, click the All CVEs link.
The Applied Mitigations dialog box opens, displaying the mitigation details for a selected QID.
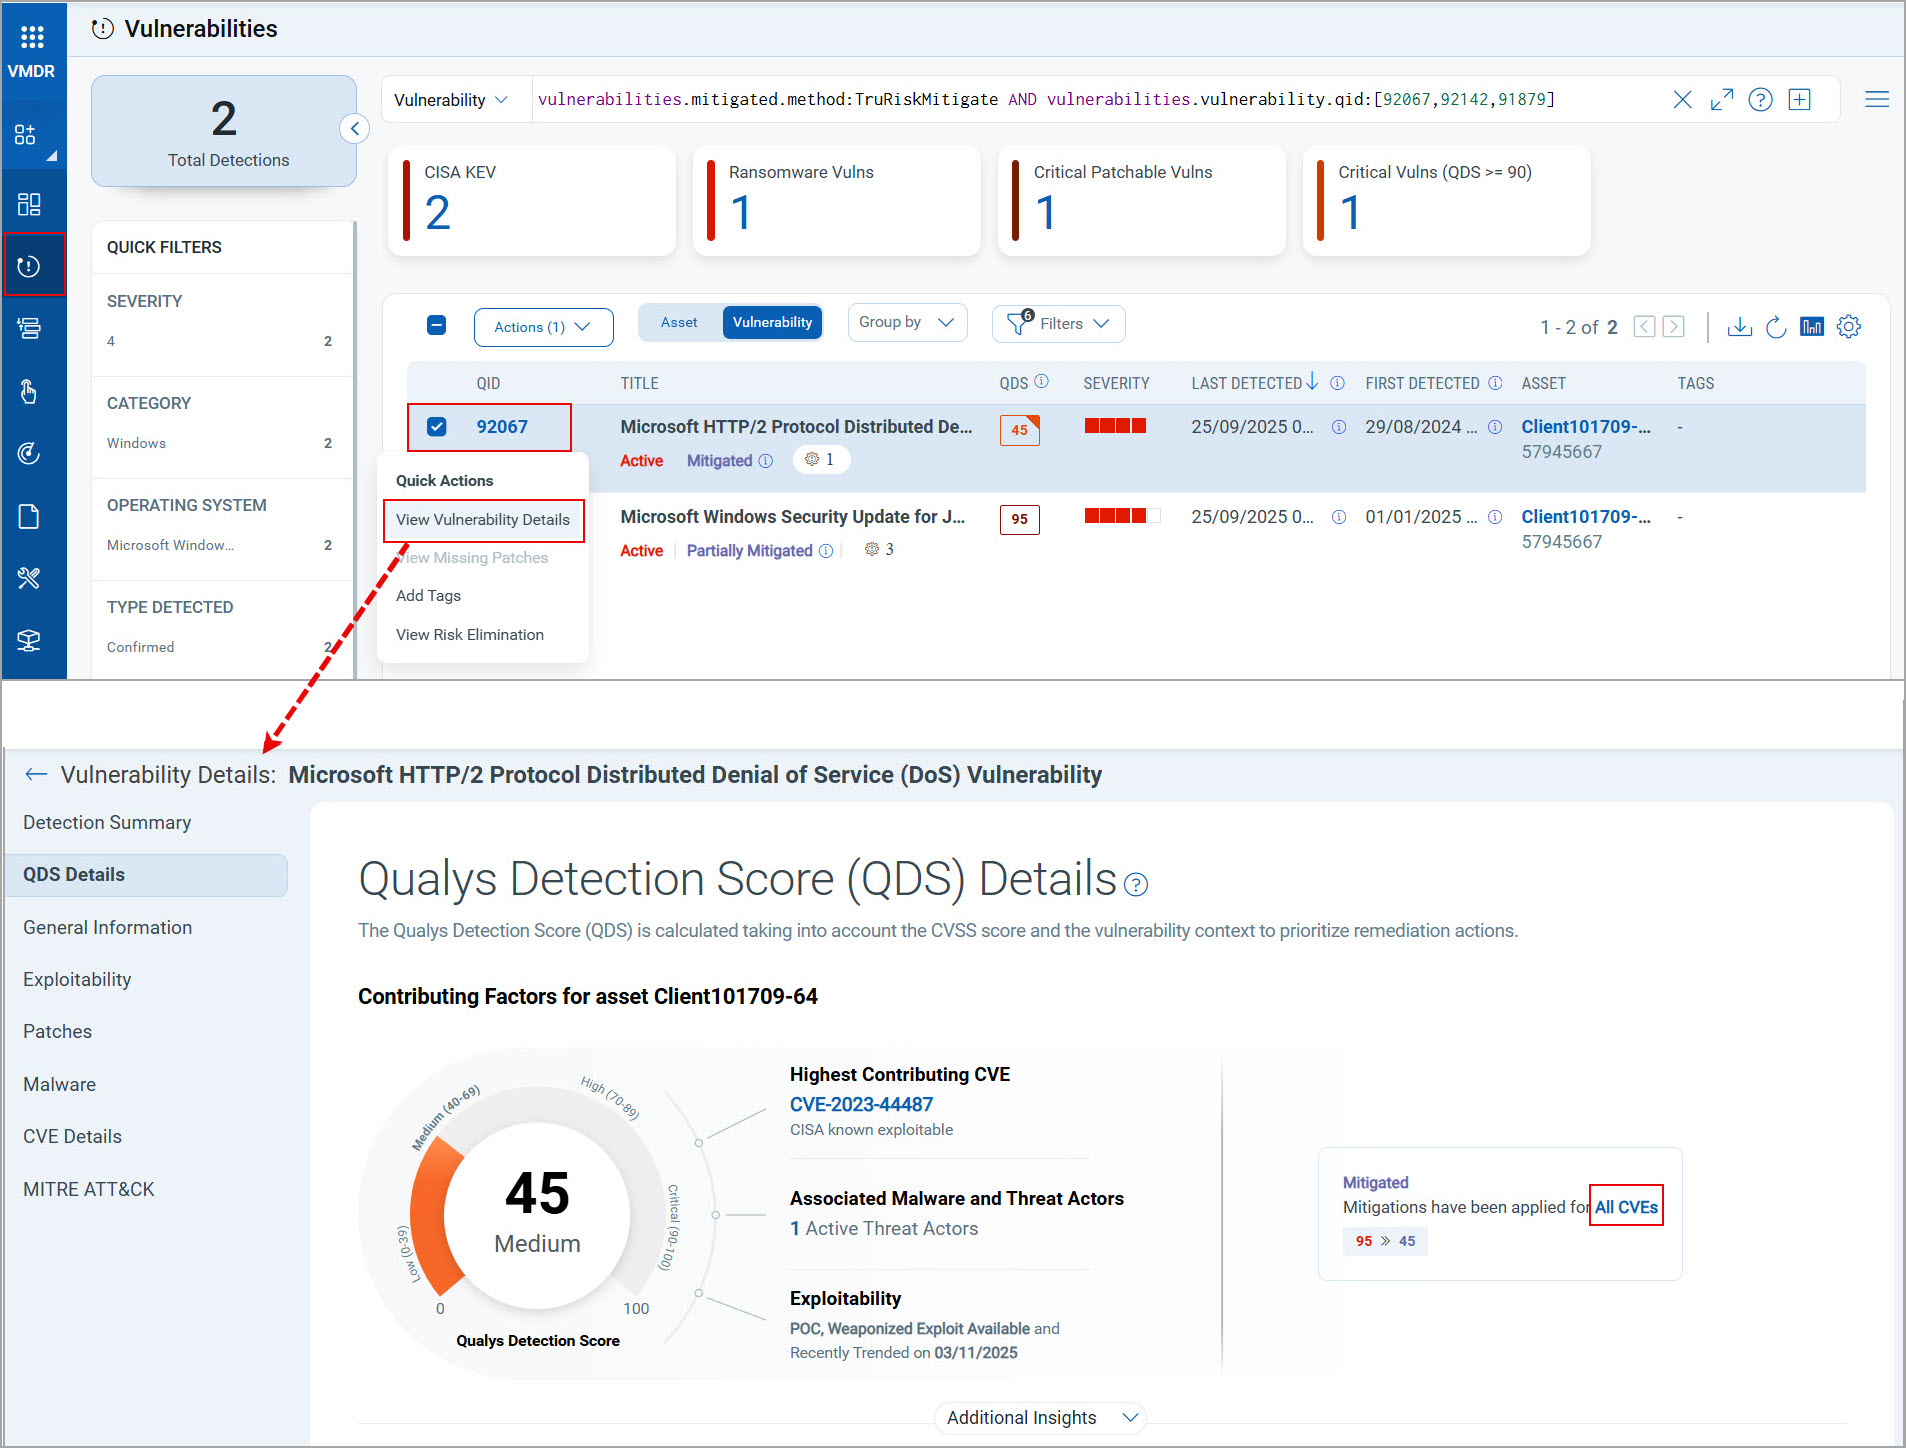
If the QIDs are mitigated, the All CVEs link appears under Mitigated in the Qualys Detection Score (QDS) Details page. If a QID is partially mitigated, the link appears under Partially Mitigated, displaying a number of mitigated CVEs out of the total number of CVEsnumber of mitigated CVEs out of the total number of CVEs
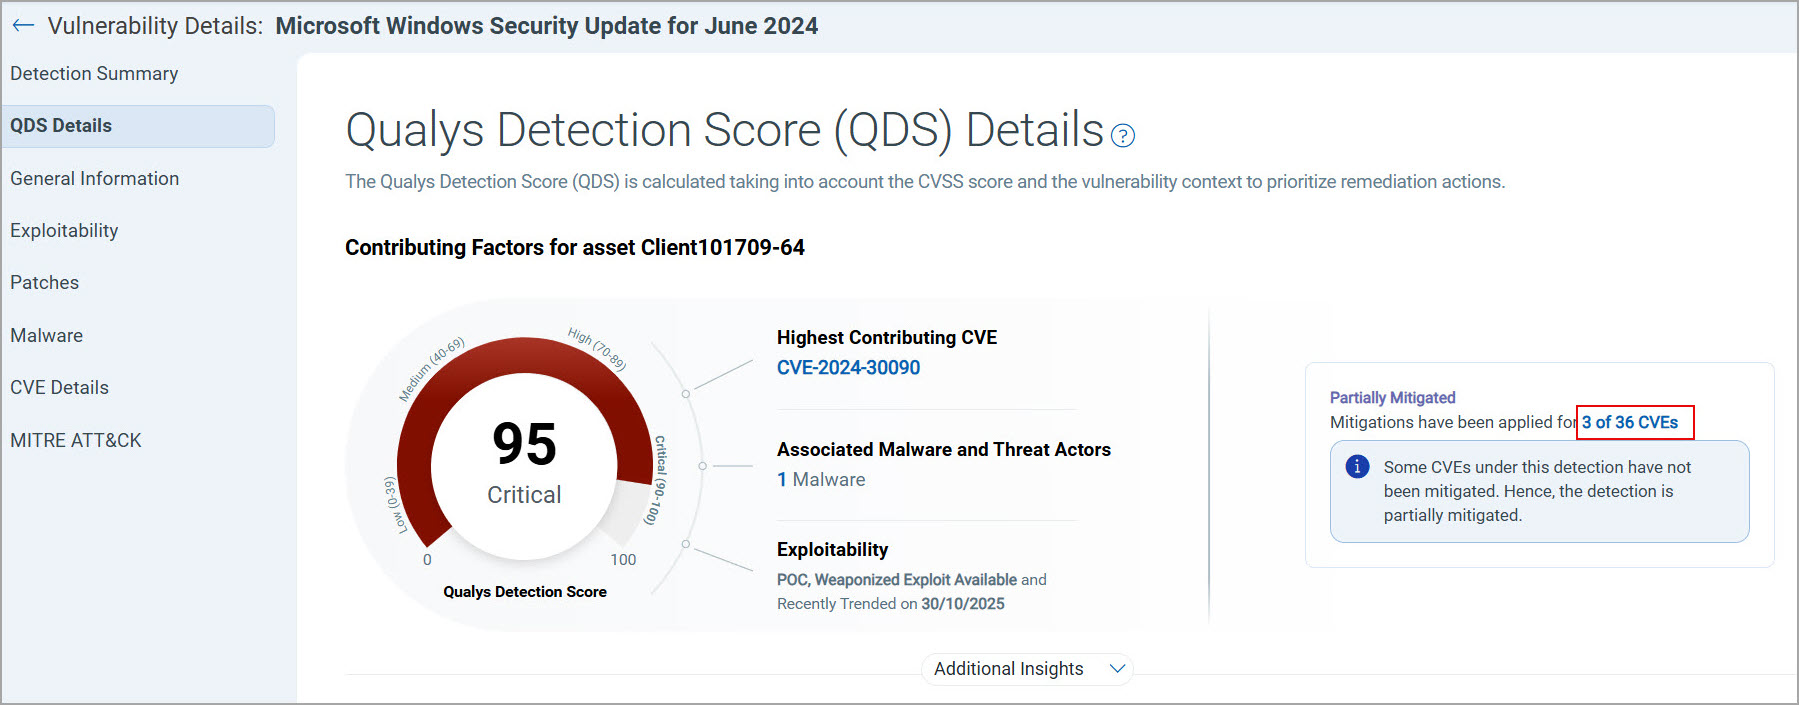 in the Qualys Detection Score (QDS) Details page.