Configure an Google Cloud Platform Internal Scan
Google Cloud Platform (GCP) Internal scans use internal Scanners configured on the GCP cloud platform for your subscription.
These scans are supported in VM/VMDR for vulnerability scanning.
See GCP Internal Scan Settings below for help with the settings that display in the GCP Internal Scan.
Requirements for GCP Compute Engine (CE)
Your account must have a Manager, Unit Manager, or Scanner User role.
GCP connector is required. Learn more about connectors.
Get Started with your GCP Internal Scan
GCP internal scans are scheduled - either for Now (a one-time scan job) or Recurring. Once saved, you can see the scan job on the Schedules list. When the scan job starts, it is displayed on your Scans list.
Follow these steps to create or edit an GCP Internal Scan:
1) Go to Scans > Scans.
2) Take one of these actions:
2a - To create a new Internal cloud scan, select New > Cloud Internal Scan > Cloud Information > Google Cloud Platform. You can also see this option on the Schedules tab.
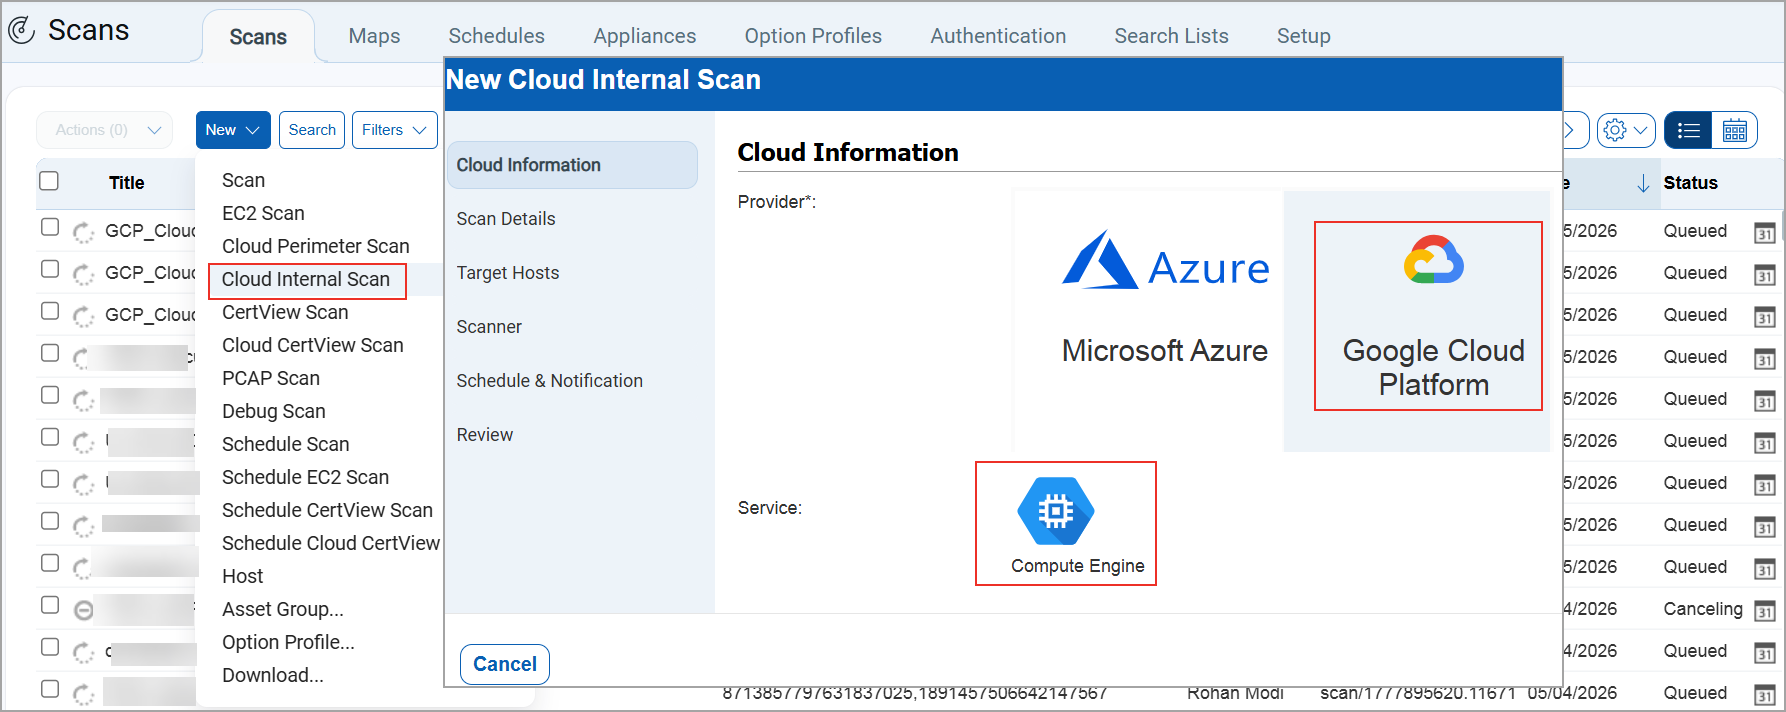
2b - To make changes to an existing GCP internal scan, select a record in the Scheduled list and choose Edit from the Quick Actions menu.
The New GCP Internal Scan or Edit GCP Internal Scan window is displayed (depending on the action taken). This is where you make your record settings.
3) Choose a tab on the left side of the GCP Internal Scan window to see the settings available. Provide the necessary inputs on each tab, then click Create Scan Job (for a new scan) or Update (when updating an existing scan).
GCP Internal Scan Settings
See the help below for the settings that appear on each tab within the GCP Internal Scan.
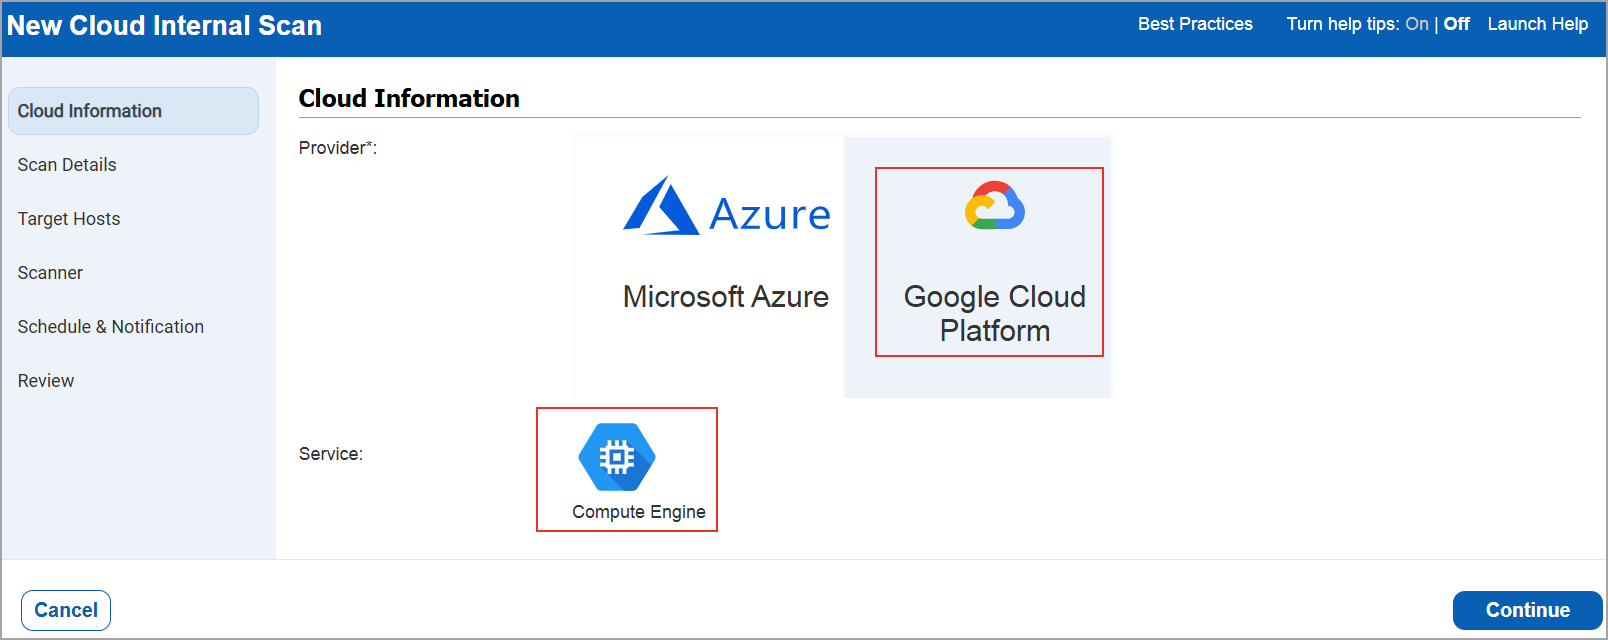
Cloud InformationCloud Information
This section provides the basic settings to select your cloud provider - Google Cloud Platform. See the requirements above.
This section is where you assign a scan name, select a scan profile, set a priority for processing, and define the scan job status.
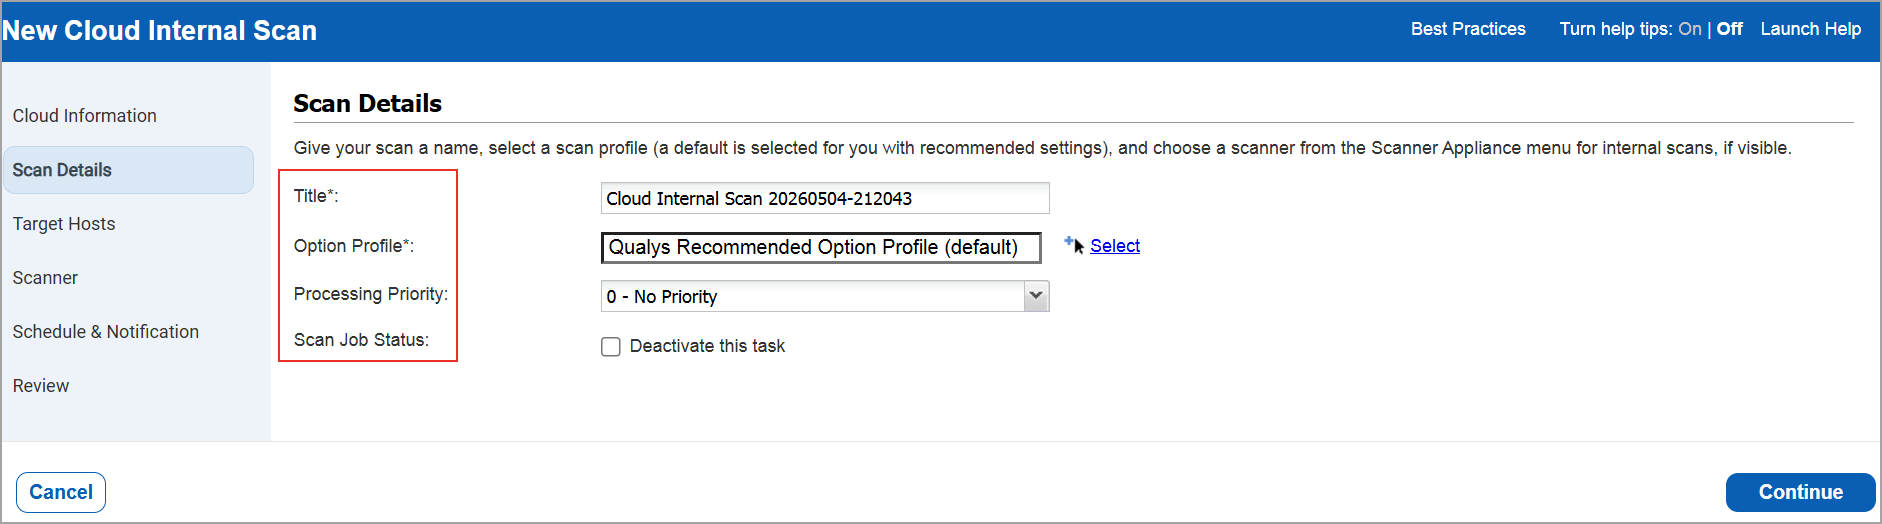
Title - Give your Internal Scan a title for easy identification.
Option Profile—Select the option profile. The profile you select determines the scan settings used.
Processing Priority -Select a priority level. Set priority in order to have this scan processed ahead of other scans. You can choose from nine priority levels with the highest priority being 1 – Emergency and the lowest priority being 9-Low. Scans with no priority will be processed after scans with priority.
Scan Job Status - Select this option to prevent the scan from running at its scheduled time. Clear this option to re-activate the schedule.
This section has target host settings where you can select the connector and target host for the internal scan.
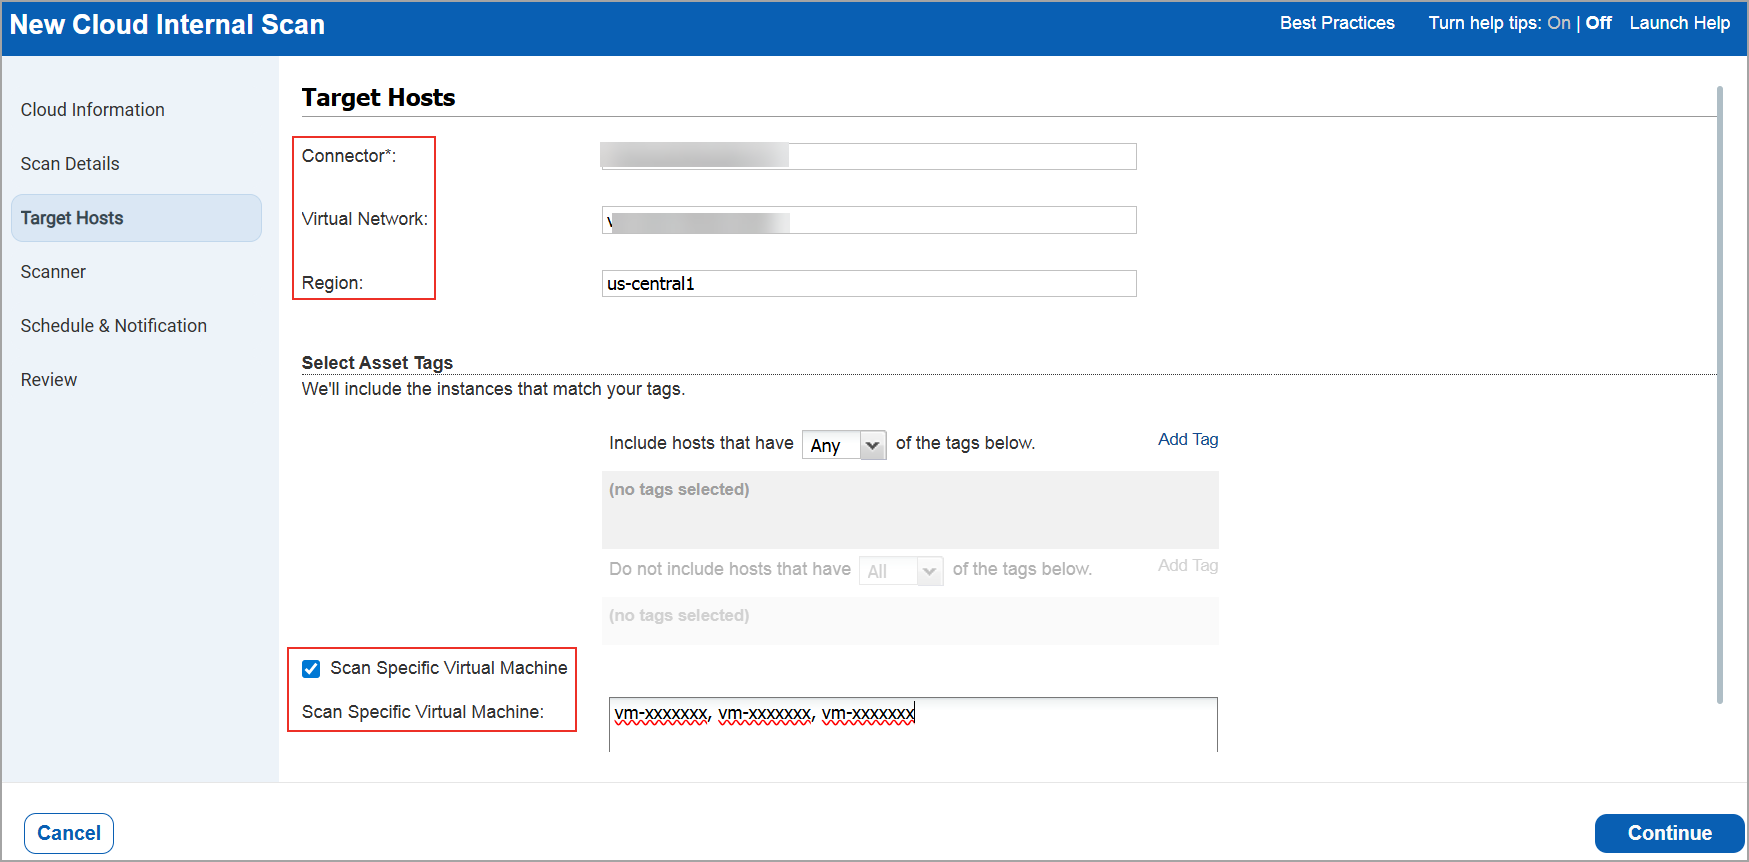
Connector - Select the connector you configured. The connector is displayed in the list as per your subscription.
Virtual Network - Choose this option to select the scanners from the list of available virtual networks.
Region - Choose this option to select scanners from the available region list. Based on your selected virtual network, you can select the region(s).
Select Asset Tags - You must add the tags to specify the hosts to be scanned. Select All to include hosts that match all the tags listed. Select Any to include hosts that match at least one of the tags listed.
Note: If you want to exclude the hosts from the scan, add the tags to the Do not include hosts section.
Scan specific Virtual machine - Enable this option to filter your target host selection (connectors, Asset Tags, VNet/Region) to scan only specific VM instances. You can enter up to 10 VM instance IDs separated by commas. VM instance IDs can be specified with or without tags.
Note: If you do not specify any asset tags, we launch the scan on the assets resolved from the connector.
Choose a scanner appliance from the list. This field displays all the scanners with respect to region and virtual networks.
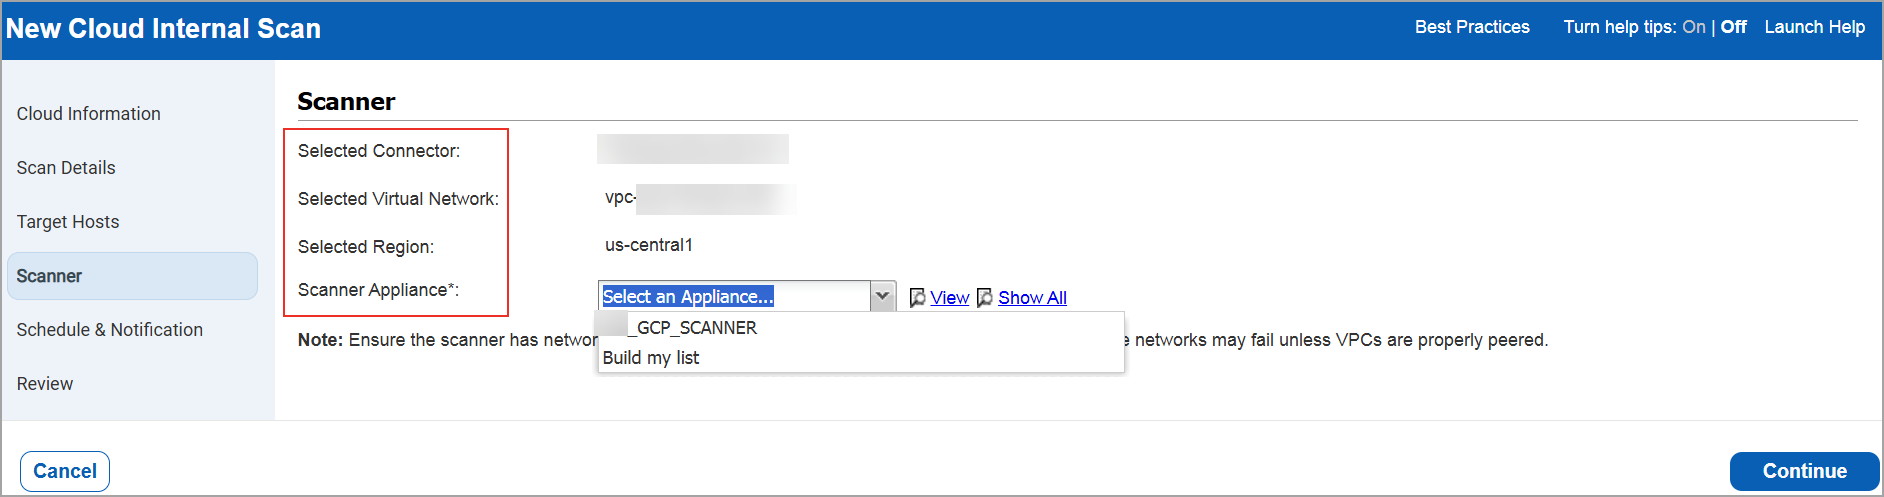
- Select the scanner appliance from the scanner list. Choose Build my list to select multiple scanners within the selected connector based on your GCP Subscription. The list displays only the scanners that are currently in Connected status.
Note: Click Show All to view all the scanner appliances if you are unable to view your configured scanner.
- You can view the following selected fields updated in the Target Hosts pane:
- Virtual Network to view all the scanners within the selected virtual network.
- Region to view all the scanners in the GCP location only.
Note: Ensure the scanner has network reachability to all selected VPCs/subnets. Jobs spanning multiple networks may fail unless VPCs are properly peered.
Schedule and NotificationSchedule and Notification
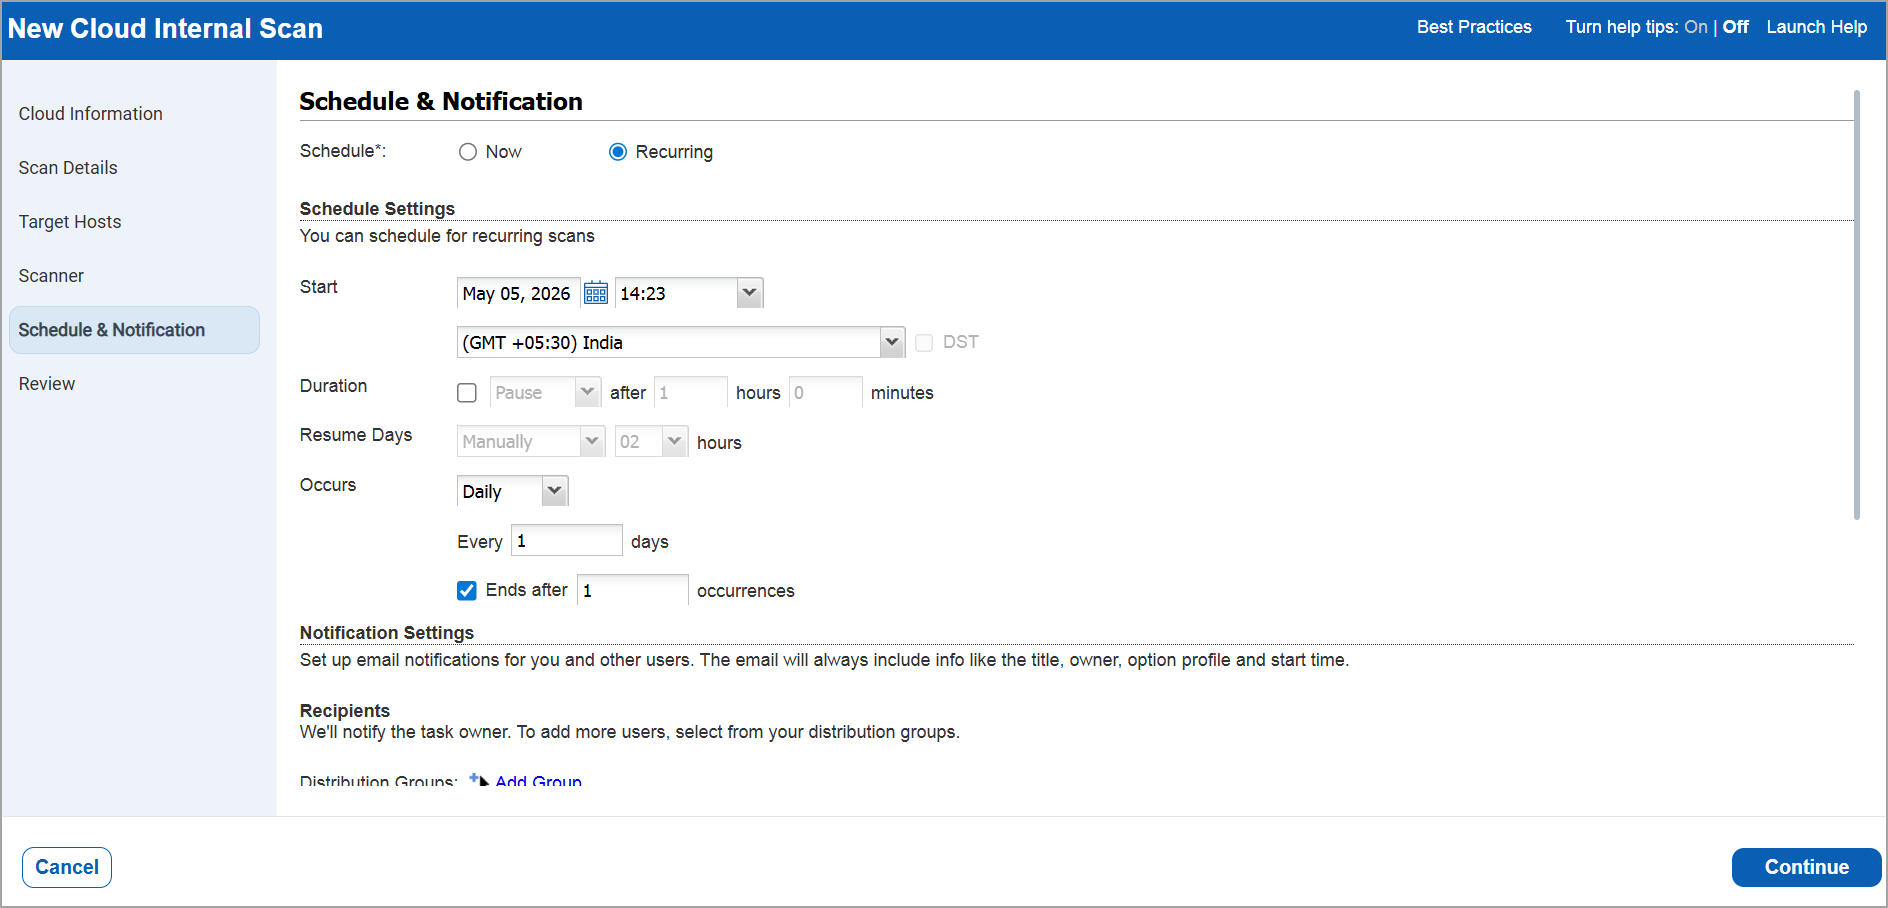
Tell us when you want the scan to run - Now or Recurring.
Note that when you choose Now, your scan may not start immediately. We check for new scan requests every few minutes. If you have not reached your concurrent scan limit, then we launch the scan. If you have reached your limit then the scan will be launched at the next opportunity.
When you choose Recurring, you must set the scheduling and notification options.
Start - Select the starting date and time for this schedule and your local time zone (GMT shift and location). If you select a time zone that observes Daylight Saving Time, the Auto adjust during Daylight Saving Time option is selected by default. The start time will be adjusted automatically during time changes, so you do not have to make any edits to your schedule.
Duration - Set a maximum run time for the scan. You can pause or cancel the scan If it runs longer than the number of hours/minutes.
Resume Days - You can choose to have the scan resumed manually or automatically after a set number of days/hours. The value you set for pause determines the minimum value you can set for resume.
Occurs - Run the scan daily, weekly, or monthly (or every 2 days, every 3 weeks, etc.). When this feature is enabled for your account, you can choose Relaunch on Finish for continuous scanning.
Ends after - Your scan runs indefinitely unless you tell us how many times to run the scan. The schedule will be deactivated when the set number of occurrences is reached.
You can identify the assets to scan based on your settings.
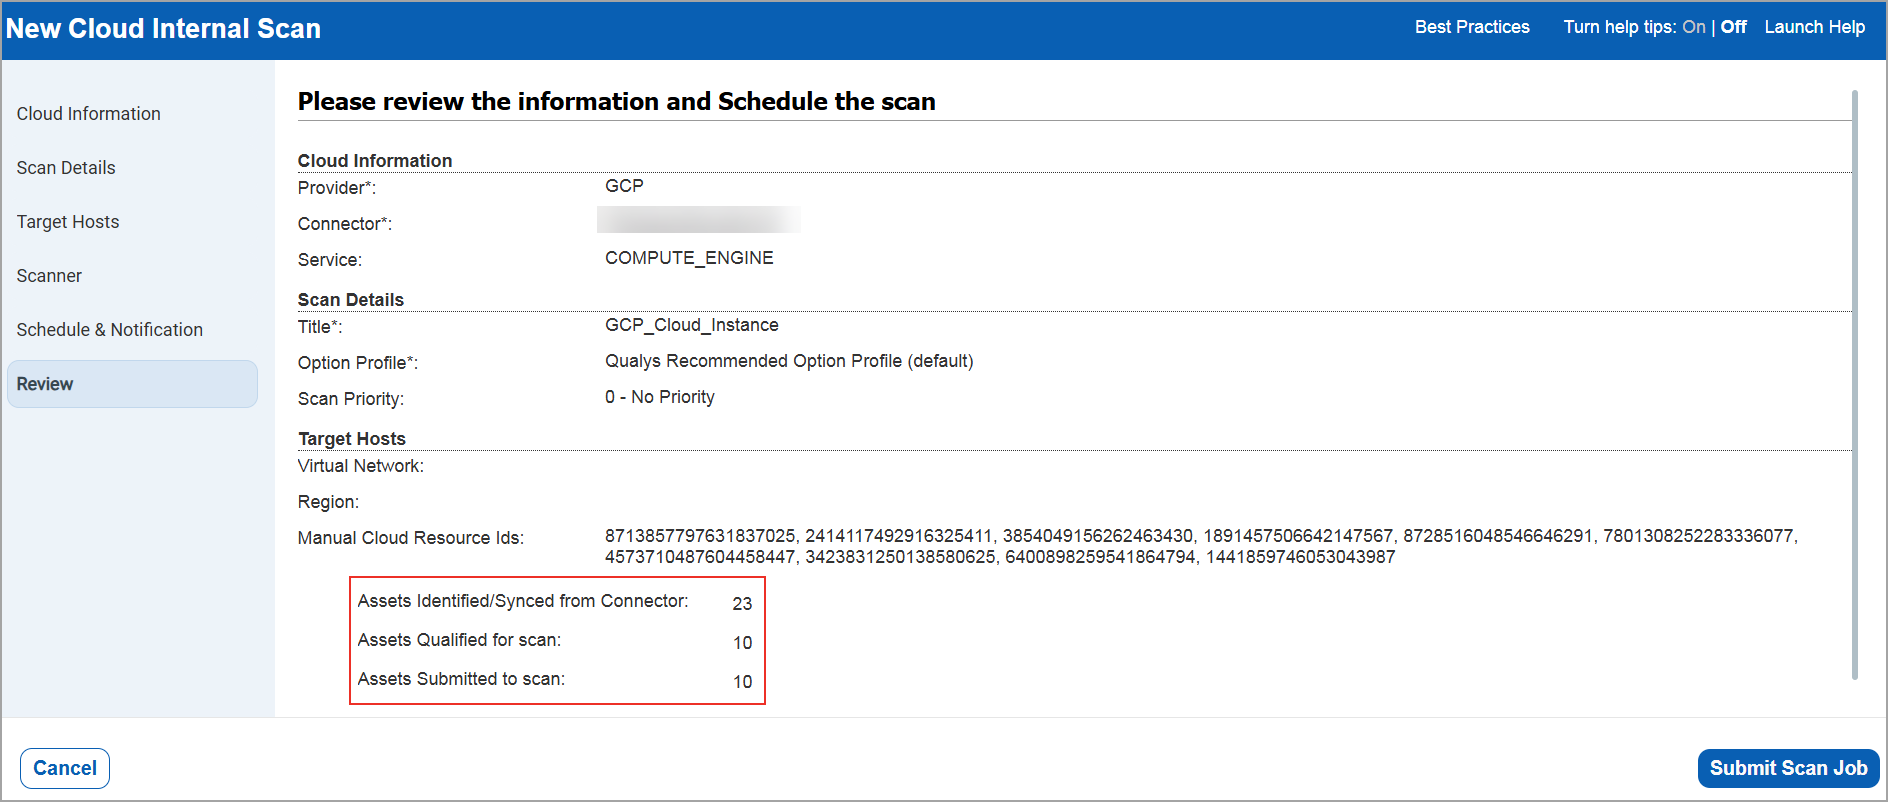
You can see the following asset counts:
Assets Identified / Synced from Connector - The number of assets discovered by the connector that you selected for this scan job.
Assets Qualified for scan - The number of assets discovered by the connector that match the selected platform, region, and asset tags.
Assets Submitted to scan - The number of assets that we submit in the scan job.
Create Scan Job
After reviewing the settings and confirming the asset count, click Create Scan Job.
When creating a scan job, a warning message that no scannable assets are found is shown if no assets are resolved from the connector and for the optional platform and asset tags selections. You can find such scan jobs under Scans > Schedules tab.
What Happens Next
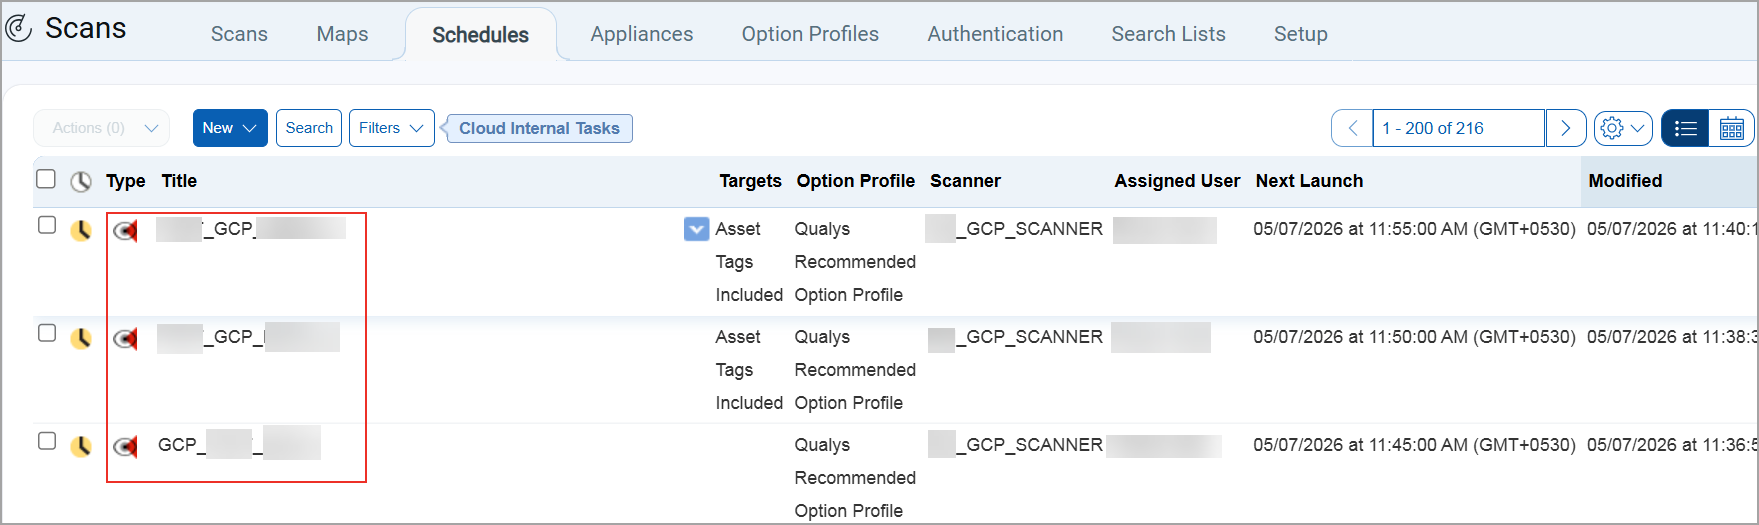
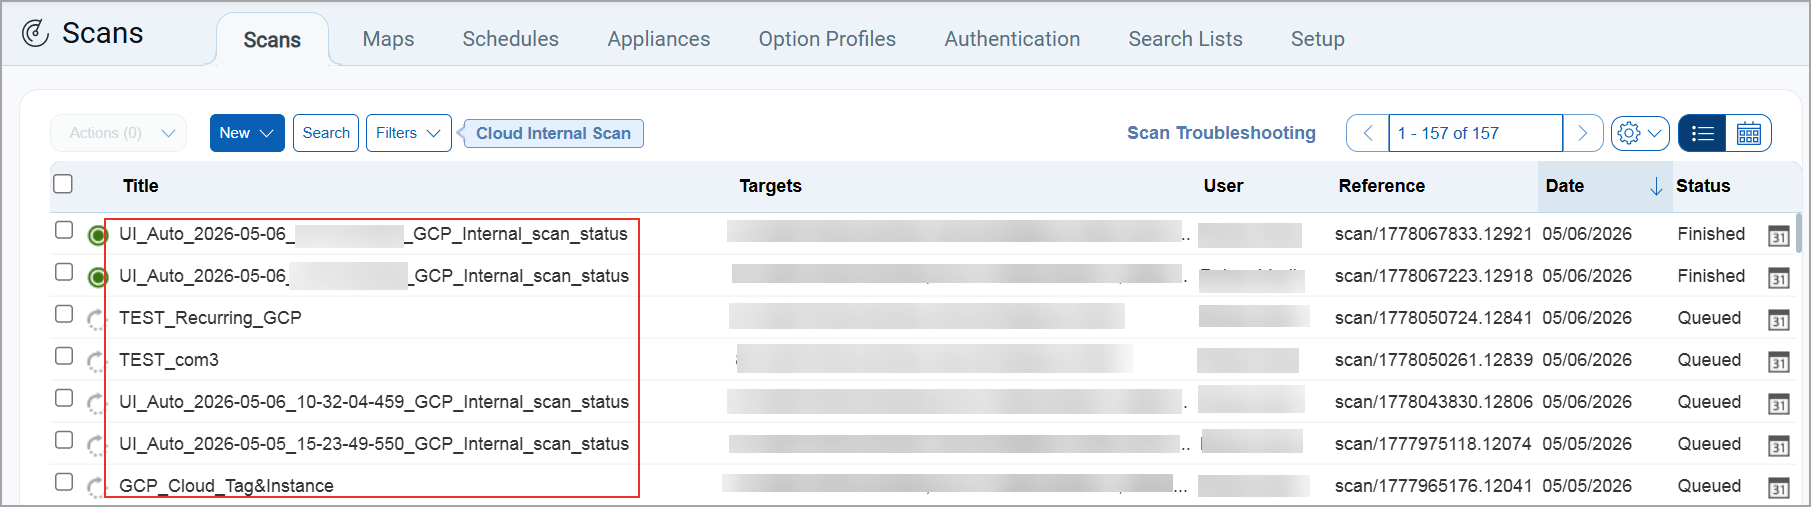
Your new scan job is displayed on the Schedules list. You can filter the scan list (Schedules > Filters > Cloud Internal Tasks), and the listing page displays all the information related to GCP Internal Tasks.
When your scan starts, it is displayed on the Scans list. You can filter the scan list (Scans > Filters > Cloud Internal Scan ). As with other scans, you can take actions such as cancel or pause the scan, view the scan status, and download the results.
Want to run the scan again? Choose New Scan Job from the Quick Actions menu. We retain certain scan settings from the original scan job and schedule the scan to run Now.