Zero-Day Vulnerability Response Journey with VMDR
Structured five-phase operational steps for responding to zero-day vulnerabilities, from asset discovery and prioritization through remediation, verification, and ongoing monitoring.
Overview
The zero-day vulnerability response journey provides a guided workflow for responding to newly disclosed zero-day vulnerabilities using Qualys VMDR. It walks you through each stage of the response process, from discovering affected assets and prioritizing critical risks to remediating vulnerabilities, validating the results, and monitoring the overall response. By following this journey, you can quickly identify exposure, reduce organizational risk, and maintain a consistent, well-documented response to critical security incidents.
The remediation workflow requires the Qualys Patch Management module to be licensed and configured. If Patch Management is unavailable, use the patch details available in the Risk Elimination panel to raise a manual remediation request with the appropriate asset owner.
Response Journey Steps
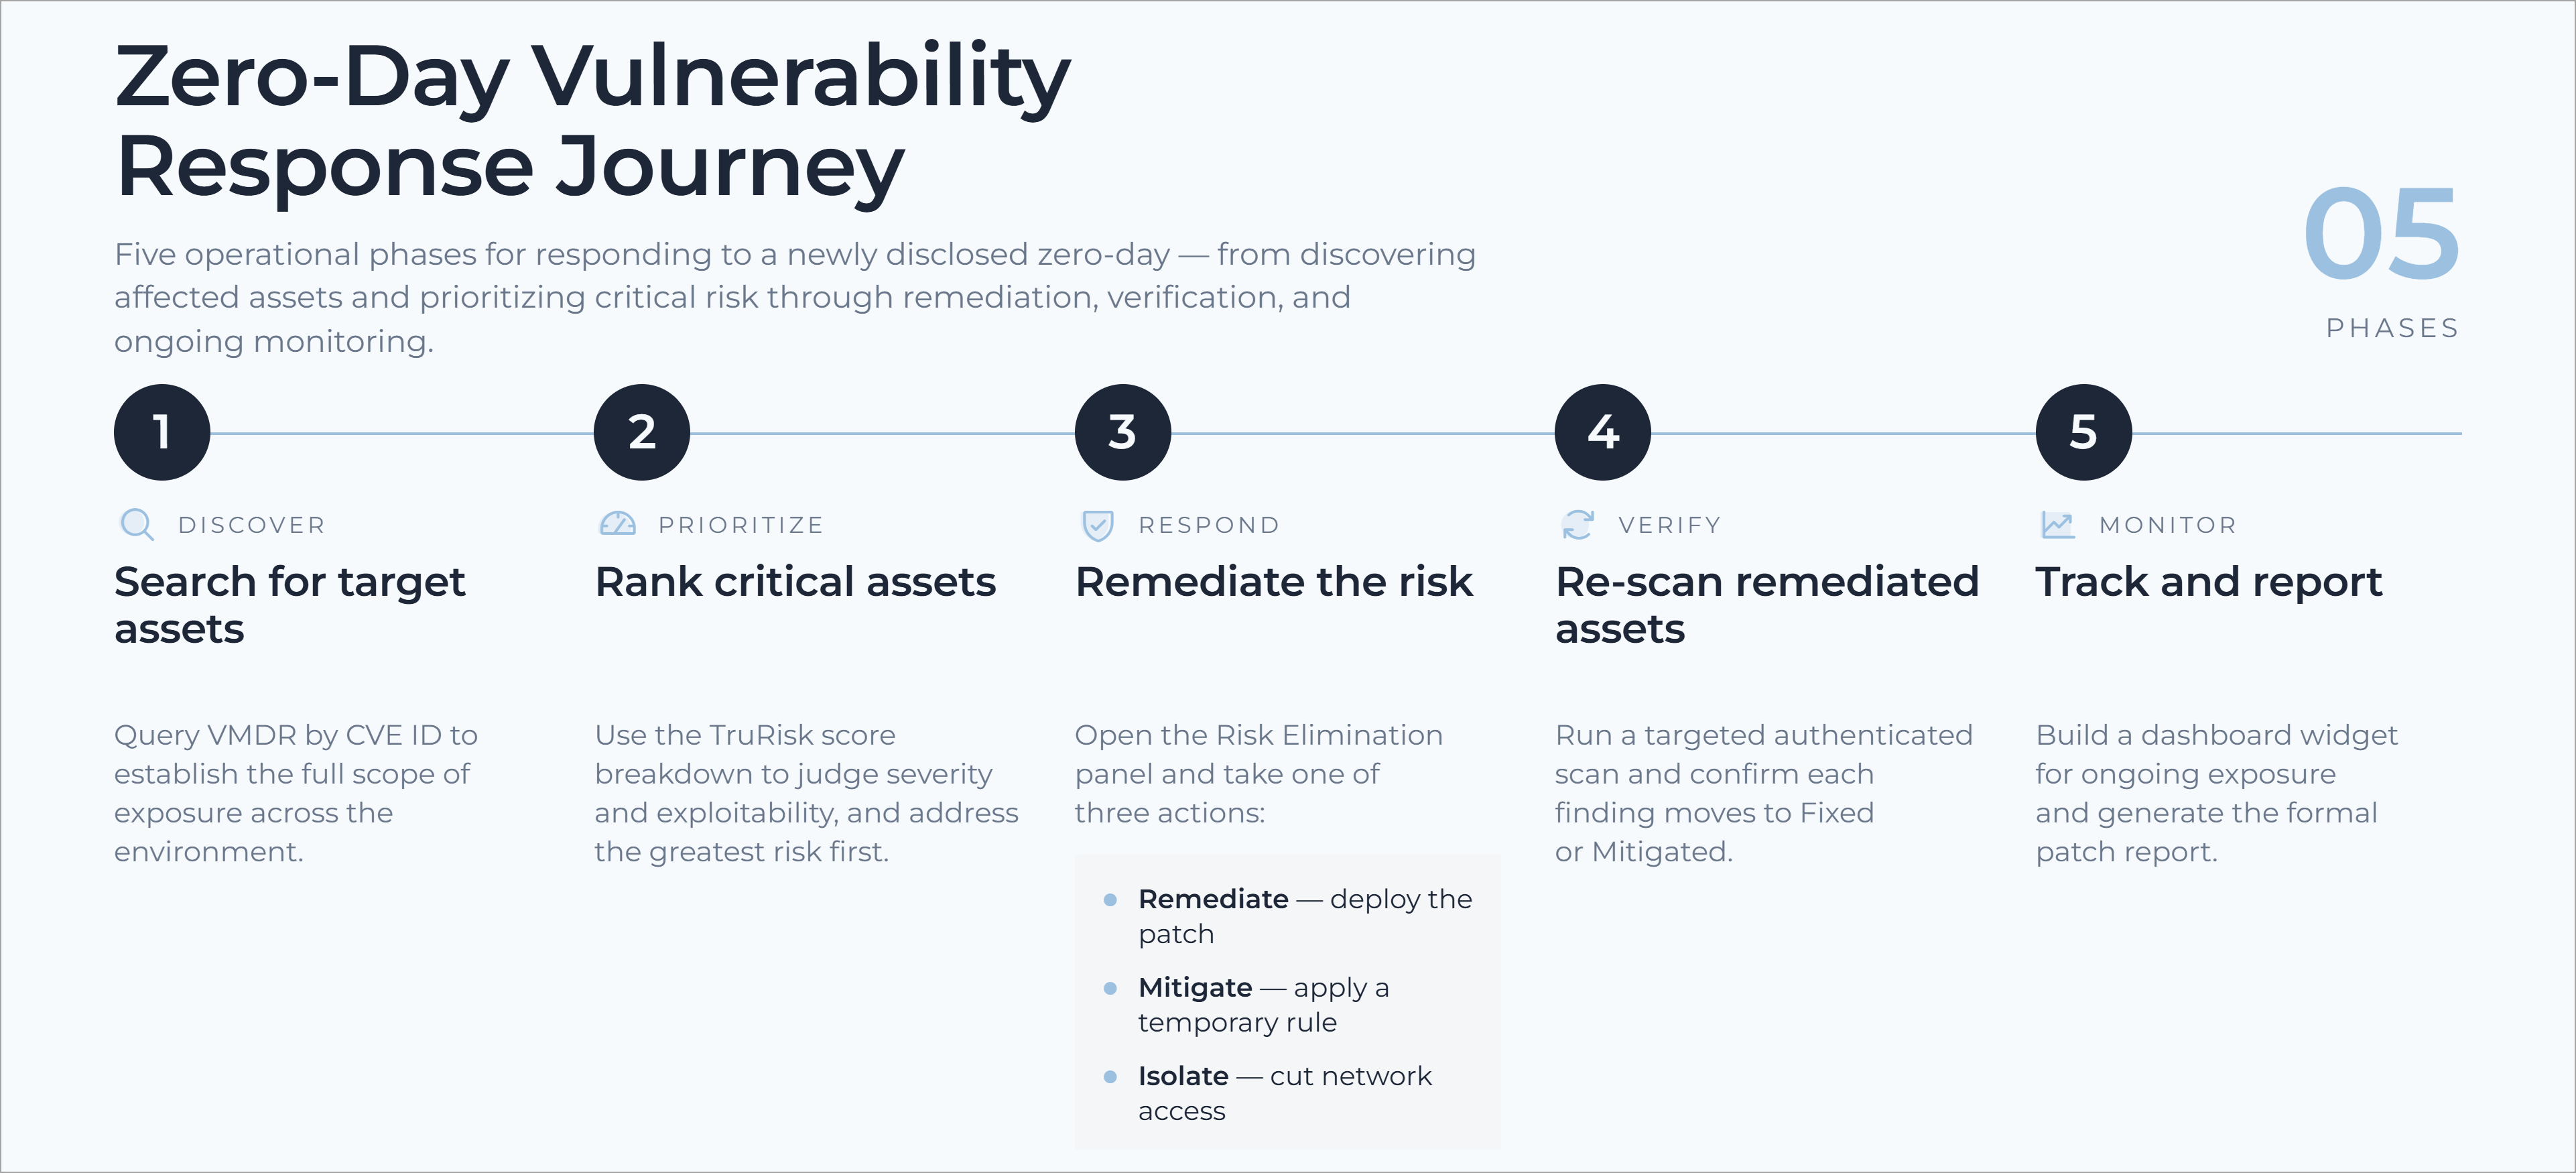
Click a step number in the graphic to jump directly to its procedure.
Step 1: Search for Target Assets in VMDR
This is the starting point of the response workflow. Before you can assess risk or begin remediation, you need a clear understanding of which assets are affected by the vulnerability.
In this step, you will identify all assets affected by the zero-day vulnerability and establish the scope of exposure across your environment. You will use a targeted VMDR search using the CVE ID to locate all affected assets and gather vulnerability details, such as the QID, severity, and affected systems.
- Log in to the Qualys platform and navigate to VMDR.
- In the Vulnerabilities tab, click Asset.
- Enter the following query in the VMDR search bar to identify all affected assets:
finding.vulnerability.cveId: "CVE-XXXX-XXXXX"If you want to search for multiple CVE IDs simultaneously, enter the following query:
finding.vulnerability.cveId: [CVE-XXXX-XXXXX, CVE-XXXX-XXXXX]
Replace CVE-XXXX-XXXXX with the actual CVE ID before executing this query.
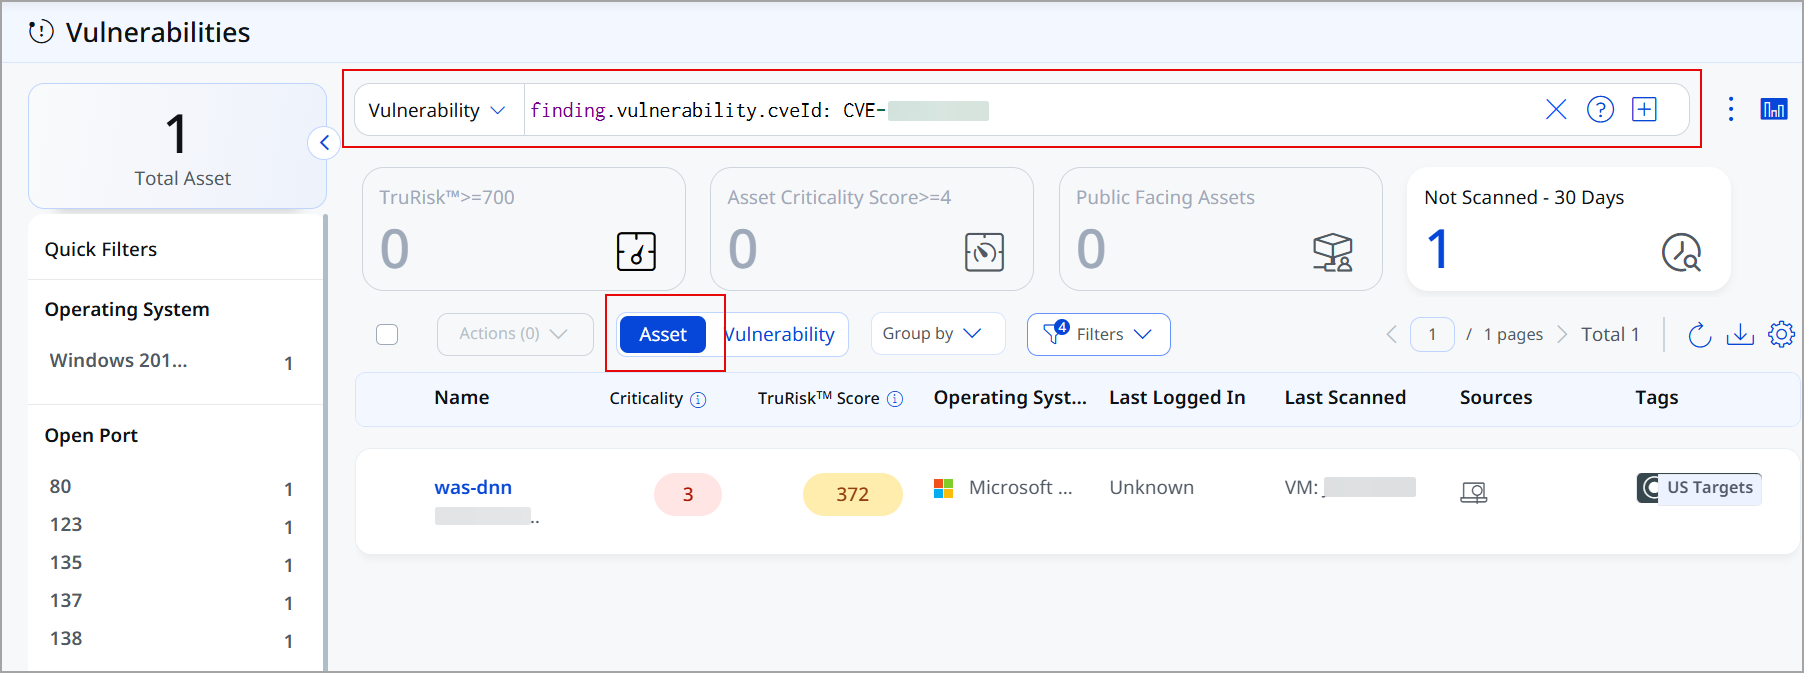
Review the Results
The system displays a list of affected assets with the following fields:
- Asset name and IP address
- TruRisk Score
- Criticality score
Step 2: Prioritize Critical Assets
Once you have identified the affected assets, the next step is to determine which of them require immediate attention. Because resources and response time are often limited, prioritizing vulnerabilities based on risk helps ensure that the most critical threats are addressed first.
In this step, you will evaluate the severity and exploitability of each finding and identify the assets that pose the greatest risk to your organization. You will review indicators to effectively prioritize remediation efforts.
Access the TruRisk Score Details
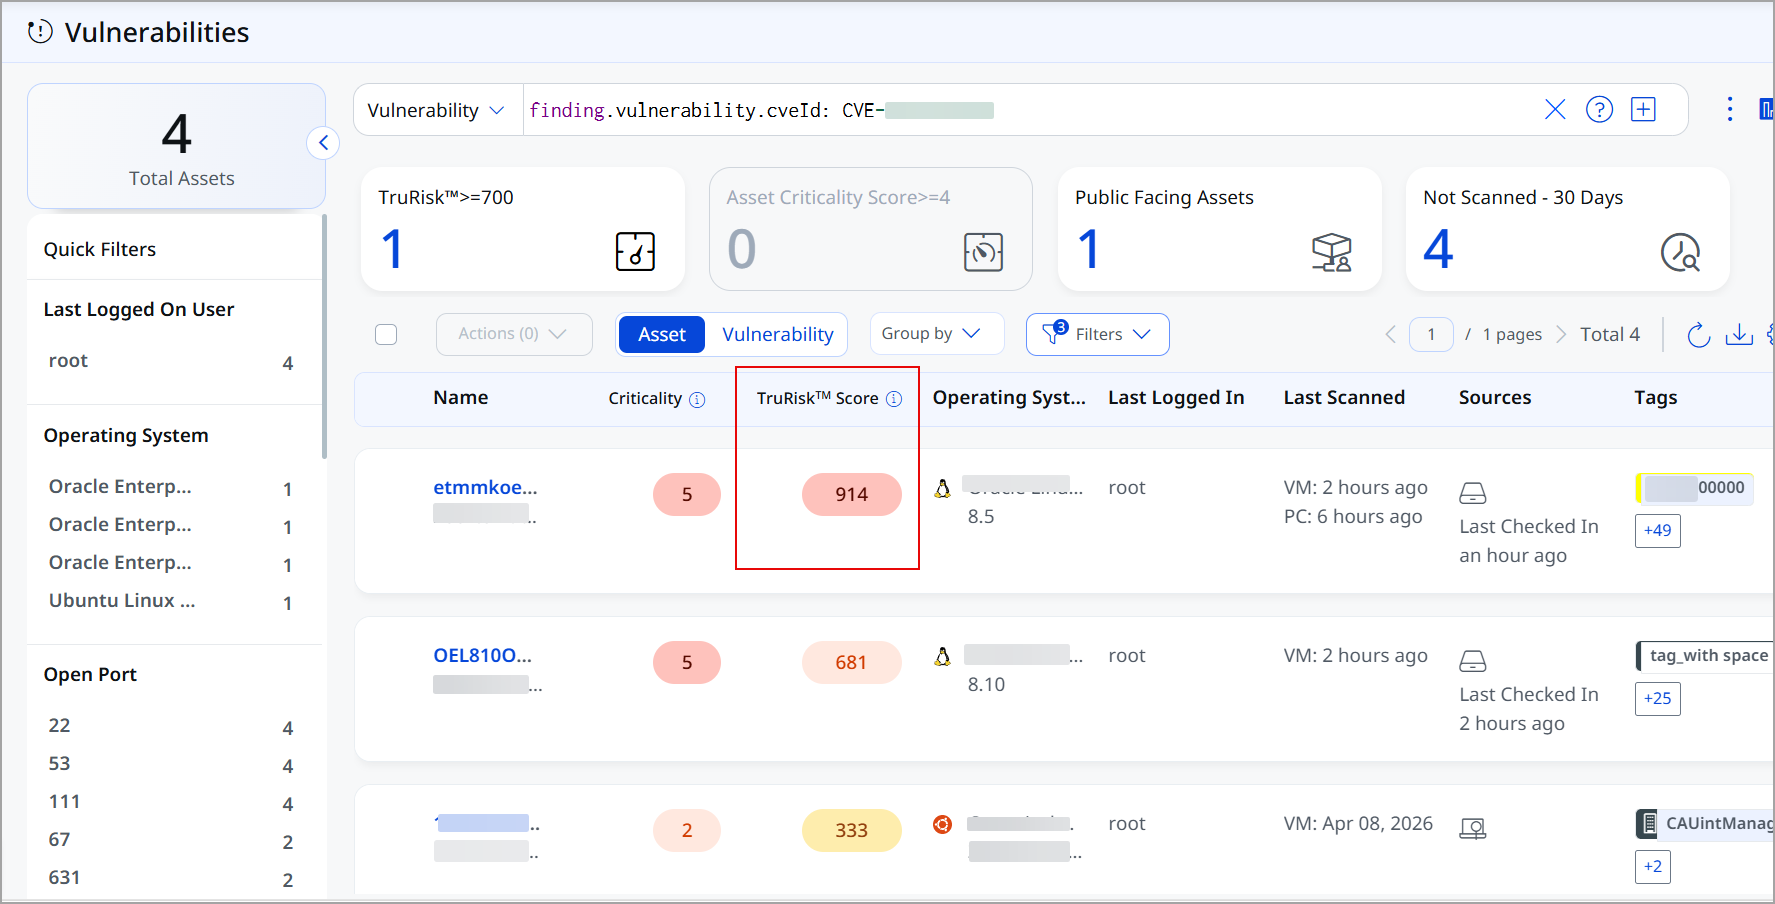
- Go to VMDR > Vulnerabilities > Asset
- In the Asset tab, for a particular asset, click the TruRisk score.
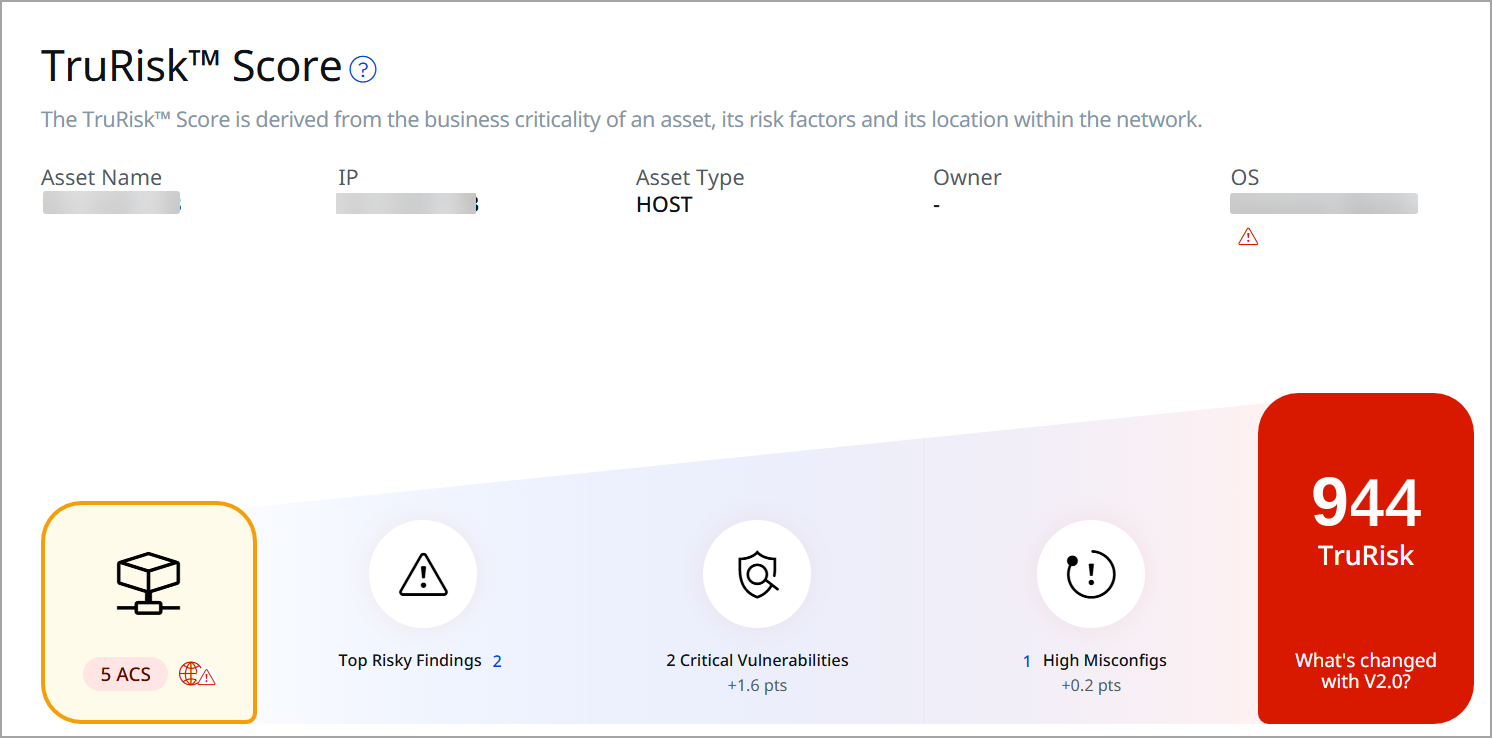
The TruRisk Details tab displays the breakdown of contributing scoring factors.
This score provides information about critical assets.
A finding is classified as critical when the following conditions are met:
- TruConfirm score: 850–1000.
- QDS: 70-89 (High) and 90-100 (Critical)
Step 3: Remediation and Response
After prioritizing the affected assets, you can take corrective action to reduce or eliminate the risk posed by the vulnerability. The appropriate response depends on the remediation options available and the level of exposure associated with each asset.
In this step, you will implement the most suitable remediation strategy to protect your environment from potential exploitation. You will either:
- Deploy an available patch, or
- Apply a mitigation control, or
- Isolate affected systems until a permanent fix becomes available.
Open the Risk Elimination Panel
- Navigate to the Vulnerabilities tab.
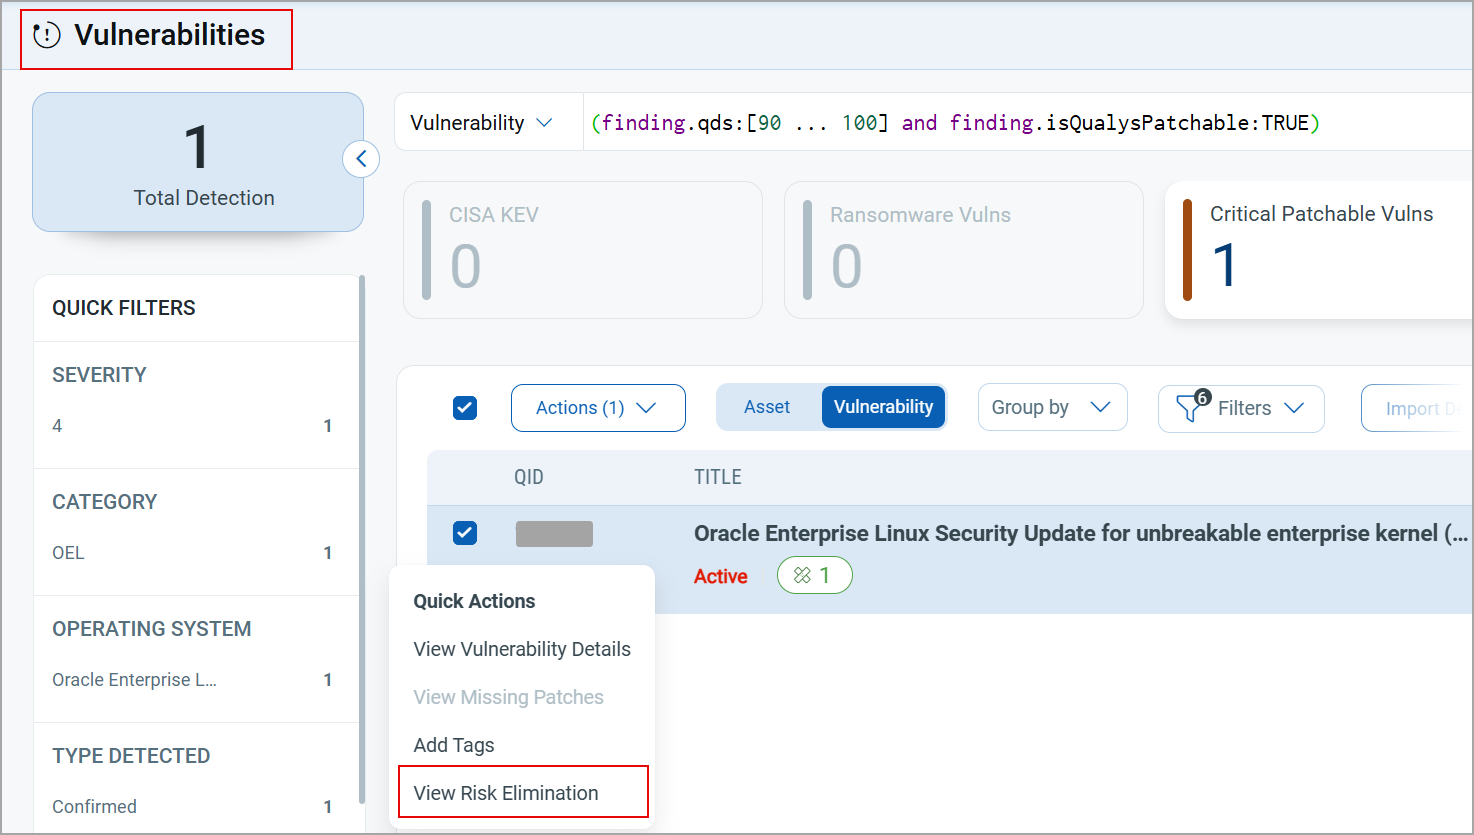
- Click the dropdown arrow beside the QID and select View Risk Elimination. The Risk Elimination panel opens, displaying available remediation options.
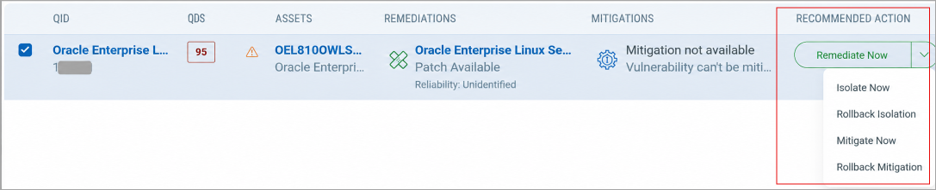
Automated patch deployment via Remediate Now requires the Qualys Patch Management module to be licensed and configured. If unavailable, raise a manual patch ticket with the asset owner using the patch details from the Risk Elimination panel.
Option A: Patch Available: Remediate Now
-
From the drop-down menu, select Remediate Now, and then click Create Job.
- In Basic Information, enter the job title and click Next.
- Select the target assets for the job and click Next.
- In Select Pre-Actions, specify a pre-remediation script if required, then click Next.
- In Select Patches, choose the patches to install on the selected assets.
- In Select Post-Actions, specify a post-remediation script if required, then click Next.
- In Schedule Job, run on demand or configure a schedule, then click Next.
- In Reboot Communication Options, configure notification and reboot settings, then click Next.
- Select co-authors who can access the job and click Next.
- In Review and Confirm, verify all job details and click Save and Enable to deploy immediately.
- Monitor patch deployment progress in the Qualys Patch Management module.
- After deployment, re-scan the asset and verify the vulnerability status changes from Active to Fixed in the VMDR dashboard.
Option B: No Patch Available: Mitigate Now
- In the Risk Elimination view, click the dropdown next to Recommended Action and select Mitigate Now.
- Qualys applies a mitigation rule to reduce exposure temporarily while awaiting a permanent vendor fix.
- Document the mitigation applied in your incident or change management system.
- Once a patch is released and applied, click Rollback Mitigation to remove the temporary rule.
Option C: No Patch or Mitigation Available: Isolate Now
- In the Risk Elimination view, click Isolate Now. This immediately cuts the asset's network connectivity to prevent exploitation.
- Notify the asset owner and security team with the asset name, IP, QID, CVE, and QDS score.
- Apply manual compensating controls:
- Disable the affected application or feature.
- Apply firewall rules or network segmentation to limit exposure.
- Enable enhanced monitoring and logging on the affected assets.
- Document the isolation action including timestamp, action taken, and approver.
- Once a patch is available, apply it and click Rollback Isolation to restore network connectivity.
Mitigation and isolation actions can significantly impact asset availability. Carefully evaluate operational impact before proceeding.
Step 4: Run a Scan on Remediated Assets
In this step, you have to run a targeted authenticated scan on the remediated asset (s) and verify that the vulnerability status changes to Fixed or Mitigated in VMDR > Vulnerabilities tab.
Create a Targeted Scan
- Navigate to VMDR > Scans > New Scan and select Scan. The Launch Vulnerability Scan tab opens.
-
Enter a clear scan name for audit traceability, such as:
ZD-Verification - CVE-2024-XXXXX - [Date] - Set the target to only the affected asset group from Step 1. Do not scan the full environment.
- Select an authenticated scan profile to ensure accurate post-patch detection. Agent-based assets update automatically within 4–6 hours of a successful patch.
Verify Scan Results
Once the scan completes, re-run the Phase 1 QQL query in VMDR > Vulnerabilities: finding.vulnerability.cveId:"CVE-2024-XXXXX" and vulnerabilities.vulnerability.status:"Active"
Replace CVE-2024-XXXXX with the actual CVE ID before executing this query.
- Confirm all affected assets show Status = Fixed or Mitigated (Isolation).
- Screenshot or export the filtered results for inclusion in the final report.
Step 5: Monitoring and Reporting
Build a widget dashboard to track ongoing exposure, generate a formal patch report.
Create a Widget Dashboard
- Navigate to the three-dots menu
 (top right) and click Create Widget from Query. The Add Widget to Dashboard (VMDR) page opens.
 - In the Widget Name field, enter a descriptive name. For example: Zero-Day Vulnerability Exposure Overview.
- Click Query Settings and enter the vulnerability query used to identify affected assets:
finding.vulnerability.cveId: [CVE-XXXX-XXXXX, CVE-XXXX-XXXXX] - Click Add to Dashboard and verify the widget displays the expected vulnerability data.
Generate the Remediation Report
- Navigate to VMDR > Reports > New and select the Patch Report template.
- Name the report using the following naming convention:
ZD-Report_CVE-2024-XXXXX_[YYYY-MM-DD] - Select PDF format for distribution and CSV format for import into your ITSM or GRC system.
- Set the Asset Scope to the same asset group used during the incident and click Run.
By completing all five phases: asset discovery, risk prioritization, remediation, and monitoring and reporting, you have systematically identified, assessed, and addressed the vulnerability across your environment.