Enterprise TruRisk™ Platform Release 10.39.1
July 2, 2026
Qualys Vulnerability Management (VM)
Added On-Host Script Execution to Option Profiles
Authenticated scans depend on successful access to target hosts. In some environments, host policies can block standard WinRM-based authentication, causing authenticated scans to fail before collecting the data needed for accurate vulnerability assessment.
With this enhancement, you can now enable on-host script execution in VM option profiles. When standard authentication fails on a host configured with a Windows NT authentication record, the scanner automatically falls back to PowerShell-based script execution. This helps authenticated scans continue successfully, improving scan reliability and maintaining vulnerability coverage across your Windows assets.
To enable On-Host Script Execution on a new or existing option profile, navigate to Scans > Option Profiles > New/Edit > Scans > On-Host Script Execution > enable the checkbox >Save.
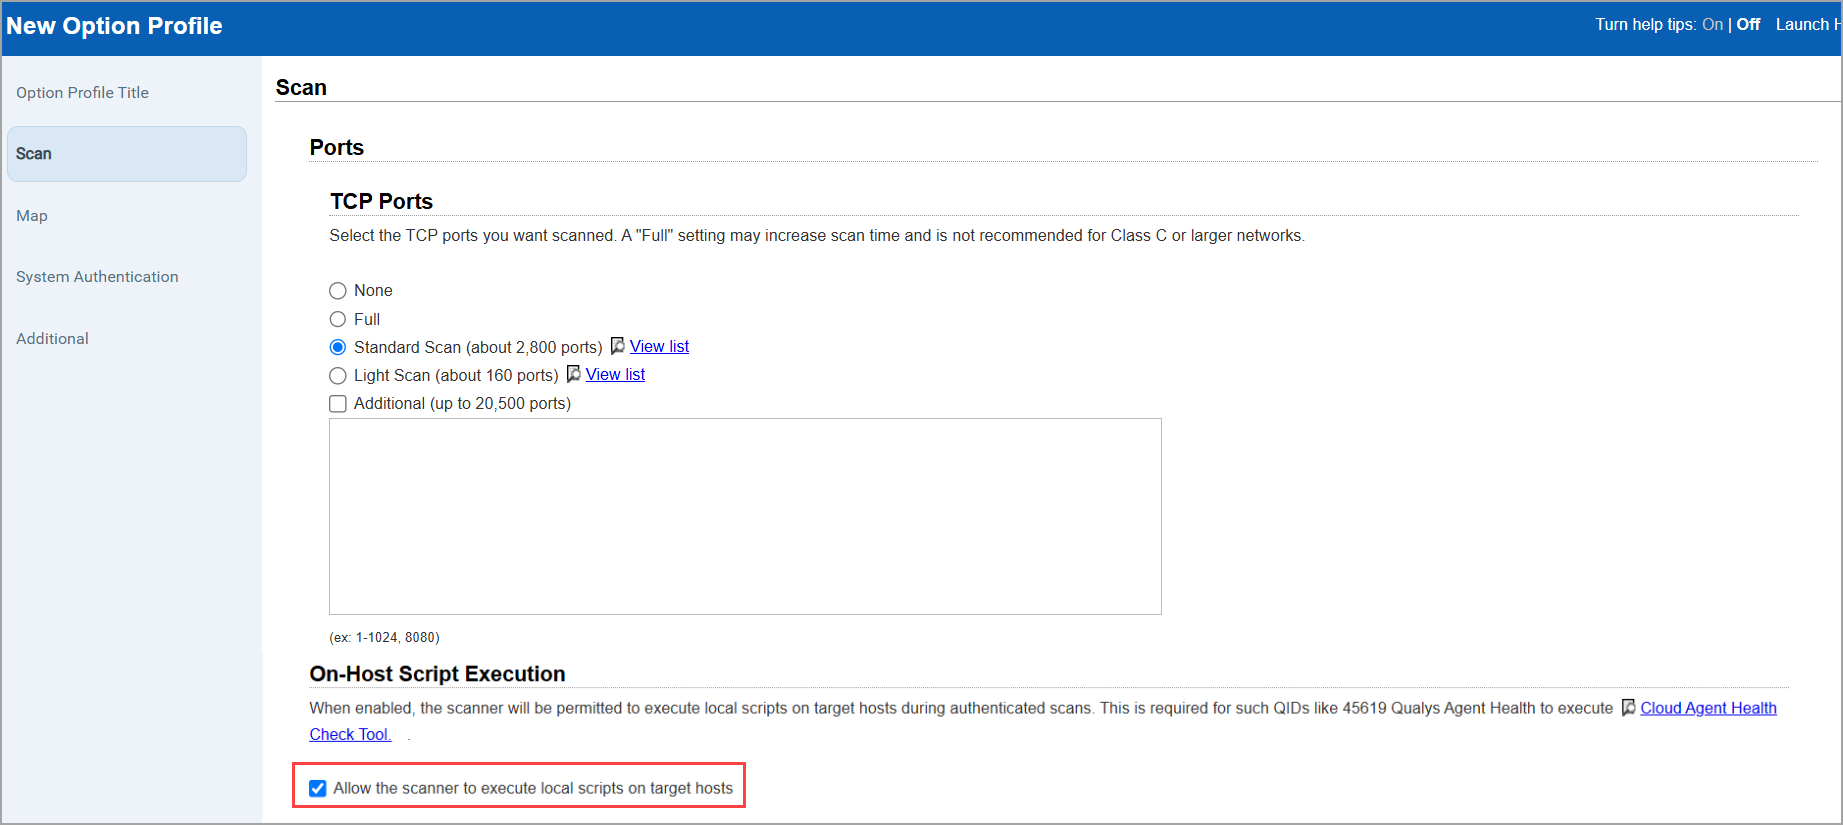
Allow the scanner to execute local scripts on target hosts checkbox is disabled by default.
Once you enable the checkbox, you can view the status (Enabled/Disabled) in the Option Profile Information page (Quick Actions menu > Info > Scan Settings)
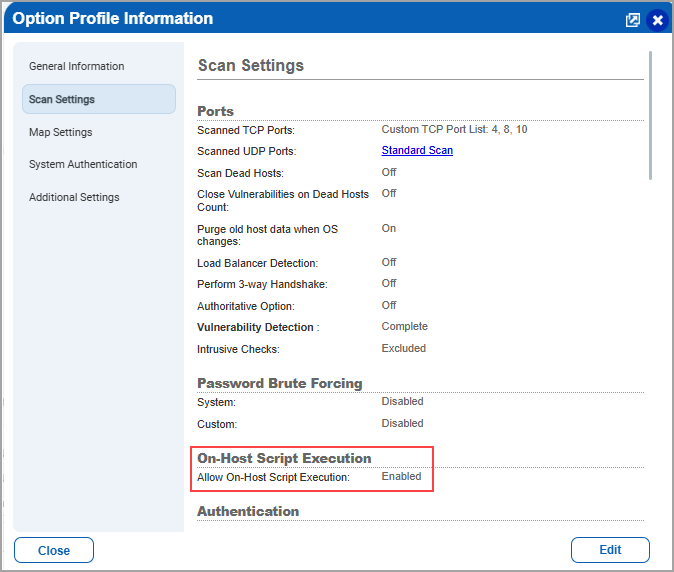
Expected Behavior
- The scanner uses PowerShell scripts only when two conditions are met: the option profile has On-Host Script Execution enabled, and the scan targets a host with a Windows NT authentication record.
- PowerShell-based execution activates only when standard authentication fails.
- Existing option profiles remain unchanged until you explicitly enable the setting.
- If disabled, scan behavior remains unchanged.
Limitations
- This capability applies to VM scans only, including regular, EC2, and EC2 CertView scans.
- PA and PCI scans are unaffected.
Qualys API Support for HashiCorp Vault AD Support Engine
For this enhancement, an updated version of the following API's are available:
VM Option Profile API: /api/5.0/fo/subscription/option_profile/vm
Option Profile API: /api/7.0/fo/subscription/option_profile/
For more information, refer to Enterprise TruRisk Platform Release 10.39.1 API.
View Detailed Login Activity in Activity Log
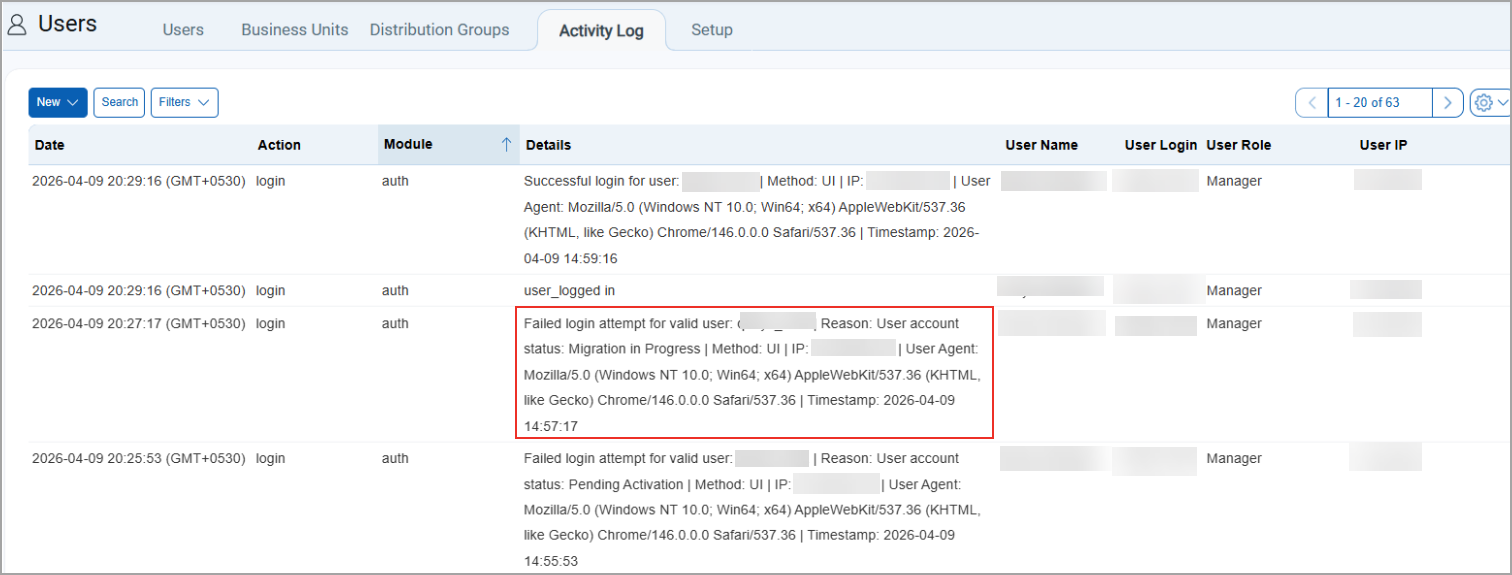
You can now view detailed login activity, including failed attempts by valid users, directly on the Activity Log listing page. Previously, login events were logged with a generic message (for example, user_logged in), and failed login attempts were not visible on the Activity Logs listing page.
With this enhancement, all login events now display descriptive messages along with additional context. Each log entry includes details such as the username, login status (success or failure), reason for failure, access method (UI), IP address, user agent, and timestamp. This helps you better understand user activity and quickly identify authentication issues. You can now monitor authentication activity more effectively from the listing page, helping you detect unauthorized access attempts and troubleshoot login issues.
Authenticate NSX using additional vault providers
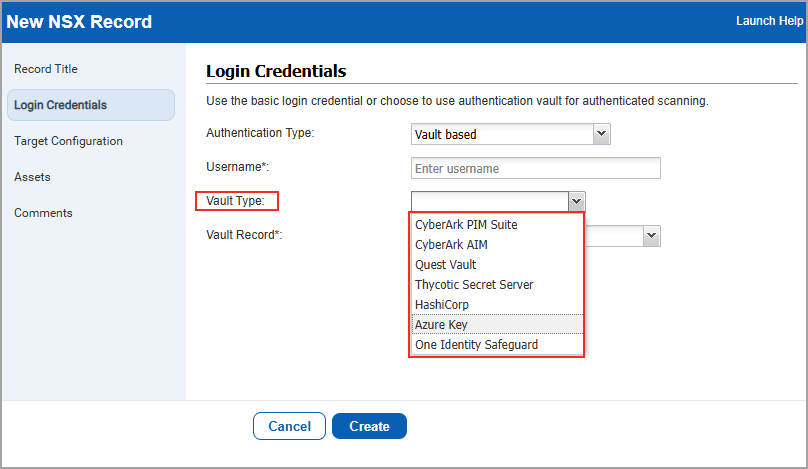
You can now use more vault providers to authenticate NSX environments. Previously, vault-based authentication for NSX supported only HashiCorp Vault. With this release, you can choose from multiple supported vault providers, giving you greater flexibility in securely managing credentials. Also, making it easier to standardize how credentials are stored and accessed across your environment.
This enhancement allows you to integrate NSX authentication with your preferred enterprise vault solution, helping you align with existing security and credential management practices.
To access the vault based authentication for NSX, navigate to Scans > Authentication > New > Hypervisors and Virtualization > NSX > Login Credentials > Authentication Type> Vault Based > under Vault Type, select from the following supported providers
- CyberArk PIM Suite
- CyberArk AIM
- Thycotic Secret Server
- HashiCorp Vault
- Azure Key Vault
- One Identity Safeguard
- Quest Vault
Filter Cloud Perimeter Scan Schedules
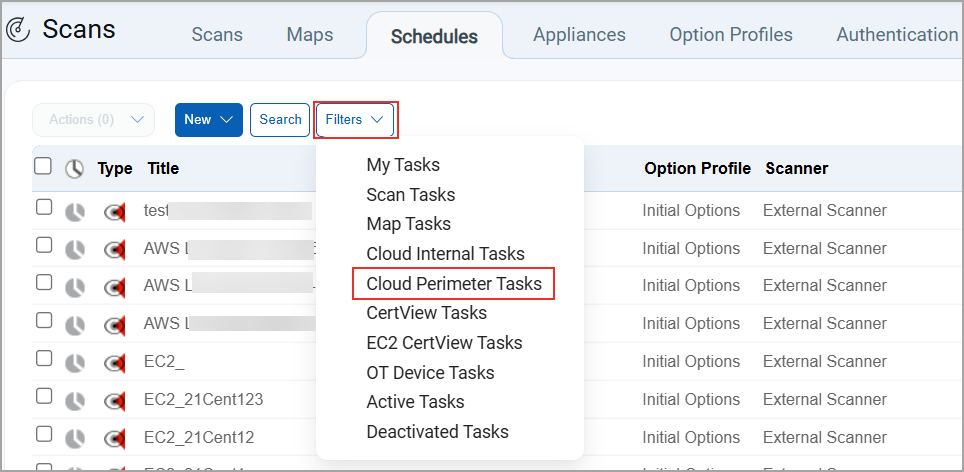
You can now filter Cloud Perimeter Scan (CPS) schedules directly from the Schedules page when you launch or schedule a scan. This enhancement helps you quickly narrow down the list of schedules and focus on relevant Cloud Perimeter tasks. To filter CPS schedules, go to Schedules > Filters > Cloud Perimeter Tasks. The filtered view displays only CPS schedules, allowing you to work more efficiently when launching new scans or managing existing ones.
Manage DNS Tracking Independently from Scan by Hostname
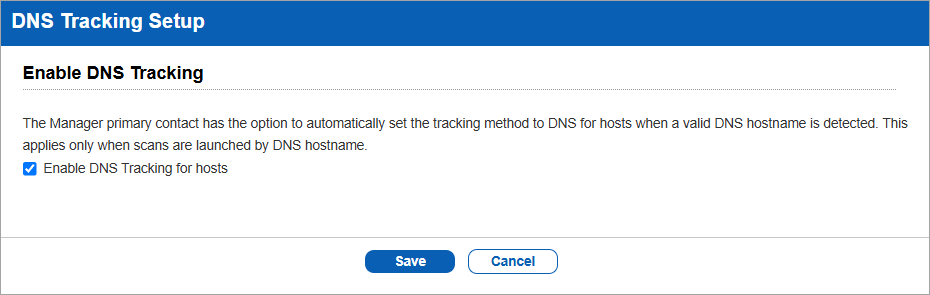
You can now enable or disable DNS Tracking more flexibly without being blocked by dependencies on the Scan by Hostname add on.
Previously, DNS Tracking behavior was tightly coupled with the Scan by Hostname add on. If the add on was enabled, DNS Tracking could be automatically re enabled even after you disabled it. In addition, administrators could not update DNS Tracking settings because the option was not editable.
You can now manage DNS Tracking settings more predictably, without unexpected system overrides. This improves configuration control, reduces unintended behavior during scans, and ensures more consistent asset tracking.
To enable DNS Tracking for hosts, navigate to Scans > Setup > DNS Tracking:
Capability Enhancement
- You can now enable or disable DNS Tracking without it being automatically overridden by the Scan by Hostname add on.
- The DNS Tracking setting is now editable from the Portal, allowing administrators to update it when needed.
- Auto enable behavior is now limited to new subscriptions only and no longer applies when modifying existing subscriptions.
- When you try to enable DNS Tracking without the required add on, the Portal provides a confirmation prompt and handles the dependency by enabling the Scan by Hostname add on.
Expected Behavior
- You can explicitly enable or disable DNS Tracking, and your selection is preserved.
- If the Scan by Hostname add on is not enabled, enabling DNS Tracking displays a confirmation prompt and enables the required add on.
- DNS Tracking is no longer automatically reenabled when subscription settings are updated.
- Administrators can now directly modify DNS Tracking settings in the Portal.
- For new subscriptions, DNS Tracking continues to follow default behavior when the Scan by Hostname add on is enabled.
View Accurate Expiration Details in Excluded Hosts History
You can now view accurate and consistent expiration details for excluded hosts in the Excluded Hosts History section.
You can clearly track when excluded hosts were set to expire and maintain a reliable audit trail. This improves visibility into historical changes and helps you confidently manage excluded host configurations over time.
To view expiration details, navigate to Scans > Setup > Excluded Hosts > History:

What’s New
- Improved UI representation for expiration values:
- Displays actual date when expiration is set
- Displays '-' when no expiration is configured
- Displays 'N/A' for remove operations where expiration does not apply
- The Info view now includes the expiration date with consistent formatting.
Expected Behavior
- When you add an IP without setting an expiration, the UI displays a '-' indicator with a tooltip.
- When an IP is removed, the expiration field shows 'N/A' since it does not apply to removal actions.
- The Info panel reflects the same expiration values for each history entry.
View User and System Changes in QID Change Log
You can now view both user‑initiated changes and system‑generated changes in the QID change log, providing a complete audit trail for vulnerability updates.
Previously, the QID change log displayed only system changes, making it difficult to track updates made by users. With this update, you can see all changes in one place, including who made them and when.
You gain improved visibility into all updates made to QIDs, helping you track changes more effectively, support audit requirements, and maintain better control over vulnerability management workflows.
Capability Enhancement
- The QID change log now displays:
- User changes (for example, updates to severity, status, threat, impact, and solution)
- System changes
- Each user change entry includes the username of the person who made the change
- All changes are merged and sorted by date, with the most recent changes shown first
- Improved formatting for better readability:
- Displays entries in the format: (User: )
- Multiple changes in a single entry are separated using a '|' delimiter
- Longer text fields (Threat, Impact, Solution) are truncated for preview
- User-generated entries are clearly distinguished from system changes
To view the updated QID Change Log with user and system changes, navigate to Vulnerabilities > Search > Select a QID > QID Info
Expected Behavior
- You can view both user and system changes together in a unified timeline.
- Changes are displayed in descending order by date.
- Each user change shows the username and change details.
- If no changes are available, the following message displays, There are no changes for this vulnerability.
- Change history reflects only data available within the defined retention period.
QID user change logs are retained for 2 years. Older entries are not available for display.
Added API External ID for user authentication mapping
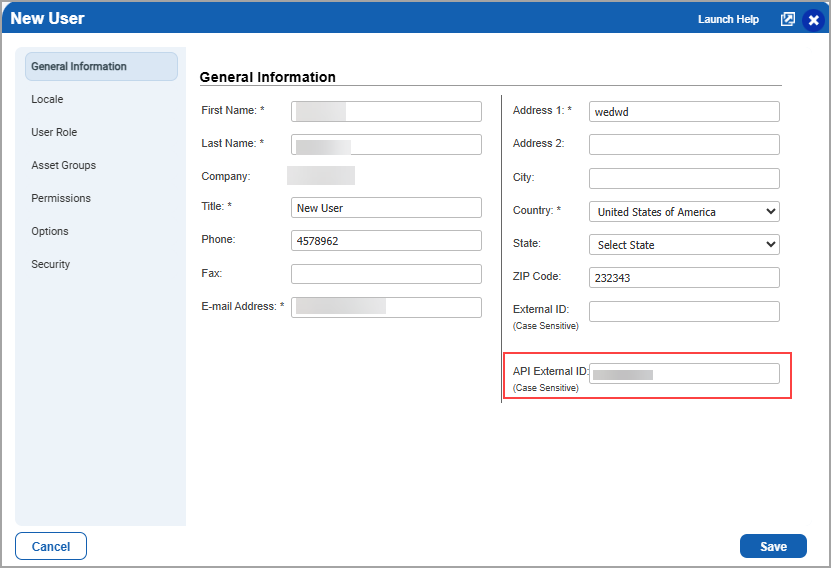
You can now specify an API External ID when you create a new user by navigating to Users > New > Users > General Information. This field allows you to assign a unique identifier to map users from external systems to user accounts in the platform.
The API External ID is an optional, case-sensitive field that ensures accurate user identification during authentication. By providing a unique value (such as an alphanumeric value, an email address, or any unique ID), you can establish a reliable mapping between external identities and platform users.
This enhancement helps ensure that users are authenticated correctly, can securely access APIs based on their mapped identity, and support passwordless API authentication workflows.
API External ID is used for OAuth/OIDC-based passwordless API authentication and helps map externally authenticated identities to Qualys user accounts for API access.
The External ID is the unique identifier assigned to a user by the organization's identity provider (IdP). It is stored in the Qualys user management system and is used to map JWT tokens to the correct user account and permissions during IdP-based authentication.
Using API External ID, you can accurately map external users to the appropriate accounts, enabling secure and seamless API authentication. This reduces authentication errors and ensures users receive the appropriate access based on their identity mapping.
Issues Addressed
The following reported and notable customer issues are fixed in this release:
| Component/Category | Description |
| VM - Knowledge Base | When users viewed QID 19273, incorrect authentication requirement information was displayed due to an issue in QID configuration or validation logic. This resulted in inaccurate vulnerability details. The issue is now resolved by correcting the authentication requirement logic, and QID 19273 now displays accurate information. |
| VM | When users viewed the scan preview panel in the scan list, status summary messages were generic, ambiguous, or inconsistent across different scan end states. As a result, the messages did not provide sufficient information to help users understand the issue or take corrective action. This issue is resolved. The scan preview panel now displays detailed, actionable messages that clearly indicate the root cause and the suggested resolution steps. |
| VM - Scan API | When users configured a scheduled VM or Compliance scan with Scanner Appliance = All Scanners in TagSet, the schedule scan list API (/api/5.0/fo/schedule/scan/?action=list) incorrectly returned <USE_IP_NT_RANGE_TAGS_INCLUDE>0</USE_IP_NT_RANGE_TAGS_INCLUDE>. This occurred even when asset tags included IP range rules and the option was enabled in the UI. This issue is resolved. The API now returns the correct value, ensuring accurate representation of the Use IP Network Range Tags for Include setting. |
| VM - Knowledge Base | When users accessed the Knowledgebase page, the UI took a long time to load. Actions such as viewing QID details or scan summaries were also delayed. This issue has been addressed by improving how the Knowledgebase page and filters are loaded. As a result, users now experience faster access and more responsive interactions when searching and viewing vulnerability details. |