Enterprise TruRisk™ Platform Release 10.40
September 7, 2026 (Updated on September 17, 2026)
Launch Organization-Wide Cloud Perimeter Scans With a Single Connector
You can now launch Cloud Perimeter Scans (CPS) using Organization-Level Connectors across AWS, Azure, and GCP. Previously, perimeter scans were created for individual cloud connectors, which often resulted in multiple scan schedules in large cloud environments.
With this enhancement, you can use a single organization-level connector to scan assets across the organization and its associated account-level connectors. As a result, multiple connector-specific scans can be consolidated into a single scan configuration, simplifying scan management and providing centralized visibility across connected cloud accounts. This reduces administrative burden overhead and helps ensure consistent perimeter coverage across cloud environments.
Organization-level connectors are supported only for Cloud Perimeter Scans. Internal cloud scans (such as EC2 and Azure internal scans) continue to support only account-level connectors.
Where to Find It
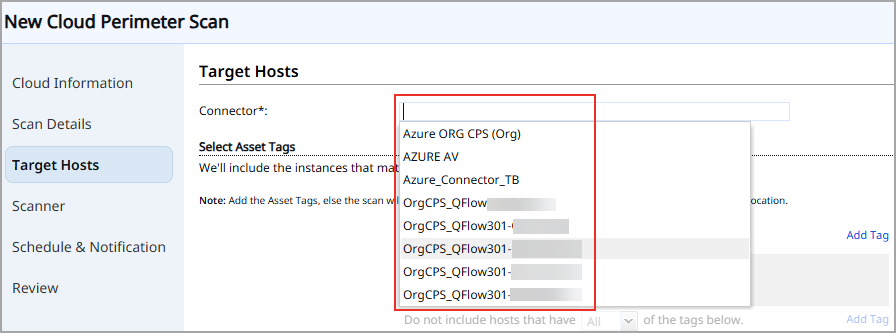
To launch a scan, navigate to Scans > New > Cloud Perimeter Scan > Target Hosts > select your Connector from the Connectors list.
Expected Behavior
- Organization-level connectors are displayed at the top of the connector list and are identified by (Org) appended to the connector's name.
- Selecting an organization-level connector includes assets identified through the organization connector and its associated account-level connectors.
- In the Review page (Scans > New > Cloud Perimeter Scan > Review) and the Scheduled Task Information page (Schedules > Select a scheduled scan > select Info from Quick Actions menu > Connector Details), the selected organization-level connector is displayed with (Org) for easy identification.
- Existing scan, relaunch, and edit workflows continue to work for both organization-level and account-level connectors.
- The scan report can be generated in PDF and XML file formats.
Track Last Scan Dates for Specific Scan Types in Asset Search Reports
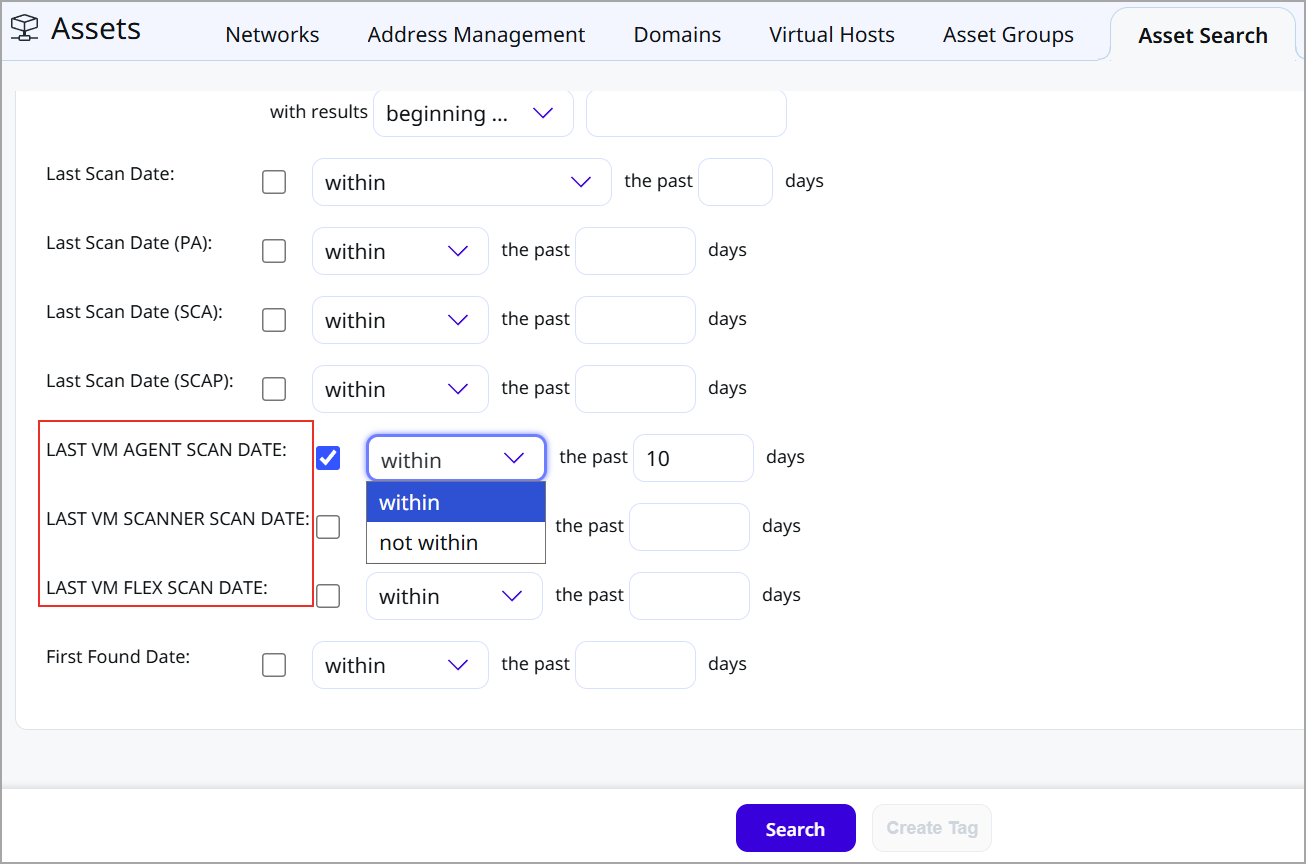
You can now view and filter assets based on their Last VM Scanner Scan Date, Last VM Agent Scan Date, and Last VM Flex Scan Date in the Asset Search Report. Previously, when asset merging was enabled, Qualys combined your Cloud Agent, scanner, and Flex Scan data into a single asset record. However, the Asset Search Report displayed only a generic last scan date for that merged asset, making it difficult to determine when an asset was last scanned by a specific scan source.
This enhancement provides greater visibility into scan activity and helps you distinguish between Scanner, Cloud Agent, and Flex scans for reporting and audit purposes.
Prerequisite: You must have an active Vulnerability Management Scan Process (VMSP) subscription enabled on your account. All scan date filters are available only with a VMSP subscription.
Where to Find It
Navigate to Assets > Asset Search. The Asset Search page now includes filters for:
- Last VM Scanner Scan Date
- Last VM Agent Scan Date
- Last VM Flex Scan Date
You can filter assets based on the last VM Scanner, VM Agent, or VM Flex scan performed within a specified time period of up to 730 days.
Expected Behavior
-
Asset Search results display separate scan dates for VM Scanner, VM Agent, and VM Flex scans
-
The new scan date fields are available in Asset Search Report downloads in CSV, XML, and PDF formats.
-
Asset Search Report results include three new columns:
-
Last Agent Scan Date
-
Last Scanner Scan Date
-
Last Flex Scan Date, along with the existing Last Scan Date.
-
To enable the VMSP, contact your Technical Account Manager (TAM) or Qualys Support.
Qualys API Support for Asset Search Report
For this enhancement, we have updated the Asset Search Report API: api/3.0/fo/report/asset/. For more information, refer to the Enterprise TruRisk Platform Release 10.40 API.
Deploy Cloud Agents Using Multiple Scanner Appliances
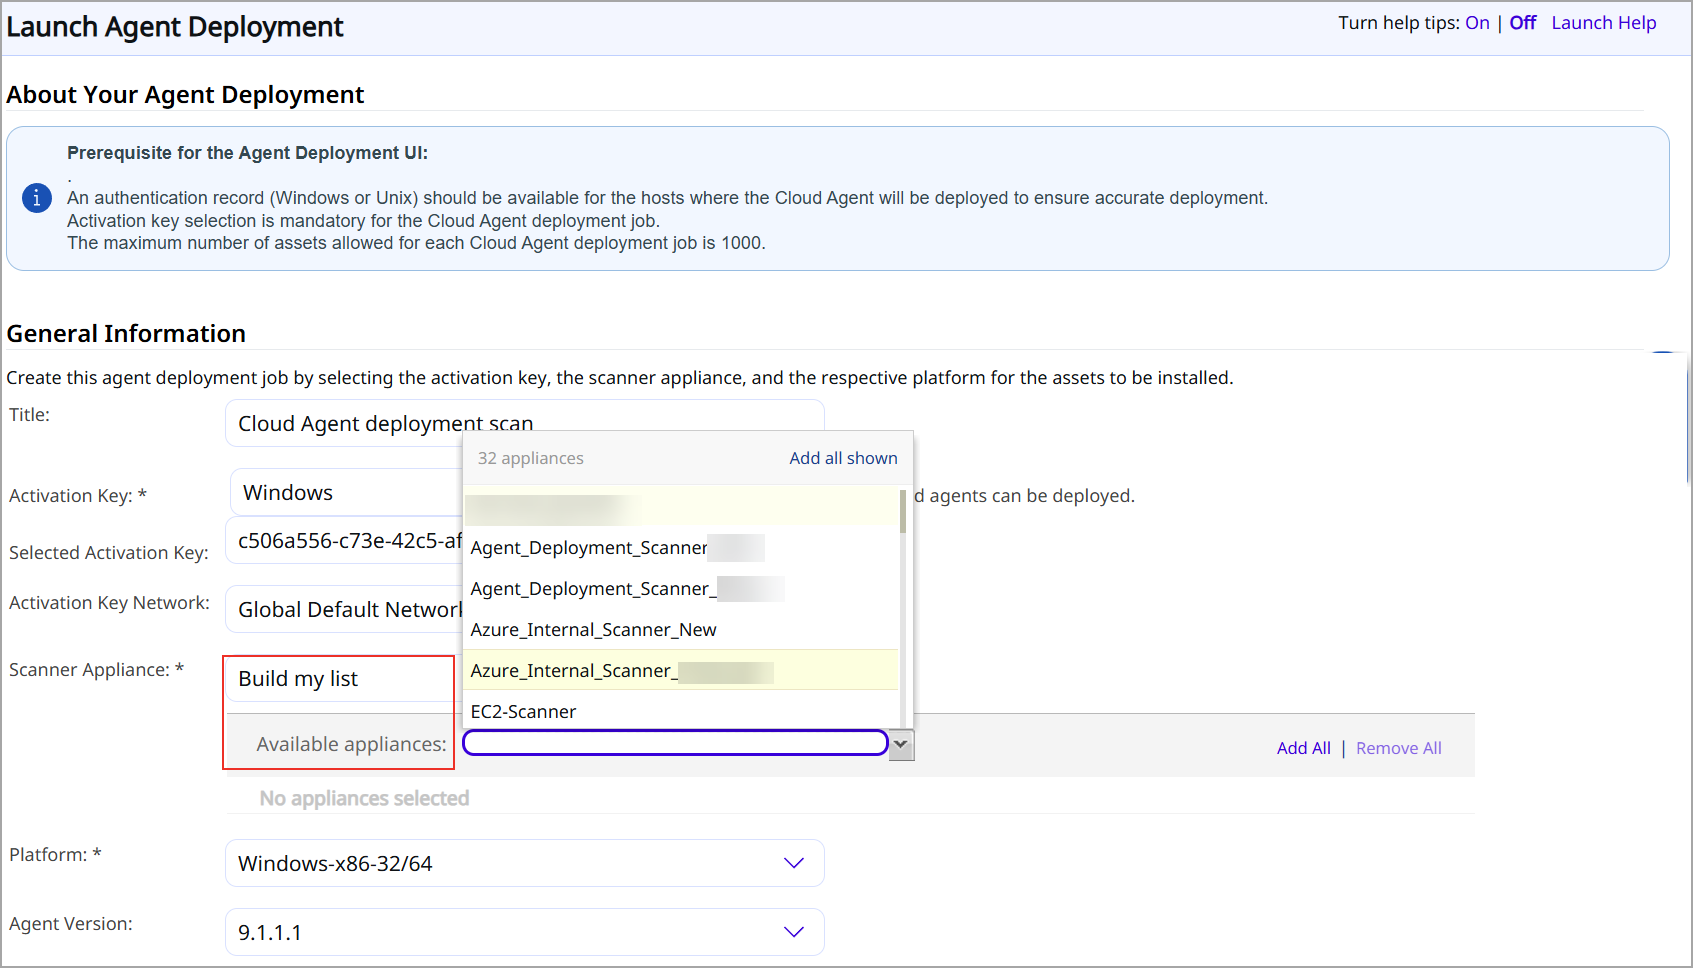
You can now select multiple scanner appliances when launching a Cloud Agent Deployment Scan. Previously, Cloud Agent Deployment Scans supported only a single scanner appliance. This enhancement adds support for selecting multiple scanners through the Build my list option, enabling agent deployment jobs to use multiple scanner appliances. You can then select the Platform, select the appropriate Cloud Agent Version, and launch the cloud deployment scan. By leveraging multiple scanner appliances, you can reduce the time required to deploy Cloud Agents across large numbers of assets and better utilize available scanner capacity.
You can select multiple scanner appliances only through the Build my list option. Multiple scanner selection is not supported through other scanner selection methods, such as asset groups or tag-based scanner selections.
What's New
You can now:
- Select multiple scanner appliances using the Build My List option.
- Use a single Cloud Agent Deployment Scan with multiple scanner appliances.
- You can add or remove scanner appliances from the selected list before launching the deployment job.
- Select and manage multiple active scanner appliances from the network associated with the selected activation key.
Where to Find It
Navigate to Scan > New > Cloud Agent Deployment. In the Scanner Appliance field, select Build my list from the list. You can select one or more scanner appliances available within the network from the Available appliances list.
Use One Password for Both the UI and API
You can now create and update passwords using a consistent set of supported characters across both the UI and APIs. Previously, passwords created through the UI could contain characters that were not supported by API authentication, resulting in authentication issues when the same credentials were used for API access. This enhancement helps you to use the same credentials consistently across the UI and APIs, reducing authentication issues caused by unsupported password characters.
When you log in for the first time to your account, you receive an email with a temporary password. After signing in with the temporary password, you must change your password before you can continue.
If your existing password contains unsupported whitespace, tabs, or special characters, you must reset your password to comply with the updated password requirements.
What's New
- Password validation is now aligned across the UI and APIs.
- When you create or change a password, unsupported whitespace characters are no longer accepted. You can view the password validation messages that clearly indicates the supported password requirements.
Where to Find It
The updated password validation applies to password creation and password change workflows, including:
- User password changes from the user account settings (Help > Account Activity)
- Password reset initiated through Forgot Password
- First-time password updates after reset (Help > Change Password)
- Password Changes initiated from the Change Password (Help > Change Password)
Expected Behavior
- Passwords must use supported characters that are accepted by both the UI and APIs.
- Passwords containing unsupported whitespace characters, such as spaces, are rejected during password creation or update.
- Validation messages provide guidance when a password does not meet the supported character requirements.
See Your Scanner's CPU, Memory, Swap, and Disk Information at a Glance
You can now view hardware resource information directly from the Scanner Appliance Information page. Previously, obtaining scanner sizing information often required access to the underlying virtualization or infrastructure platform.
This enhancement provides visibility into scanner hardware resources directly, helping you review appliance sizing and capacity without leaving the platform. This also helps improve scanner capacity planning and operational visibility using CPU, memory, swap, and disk information. This eliminates the need to access the underlying hypervisor or infrastructure platform when troubleshooting scanner performance, validating sizing, or planning scanner capacity.
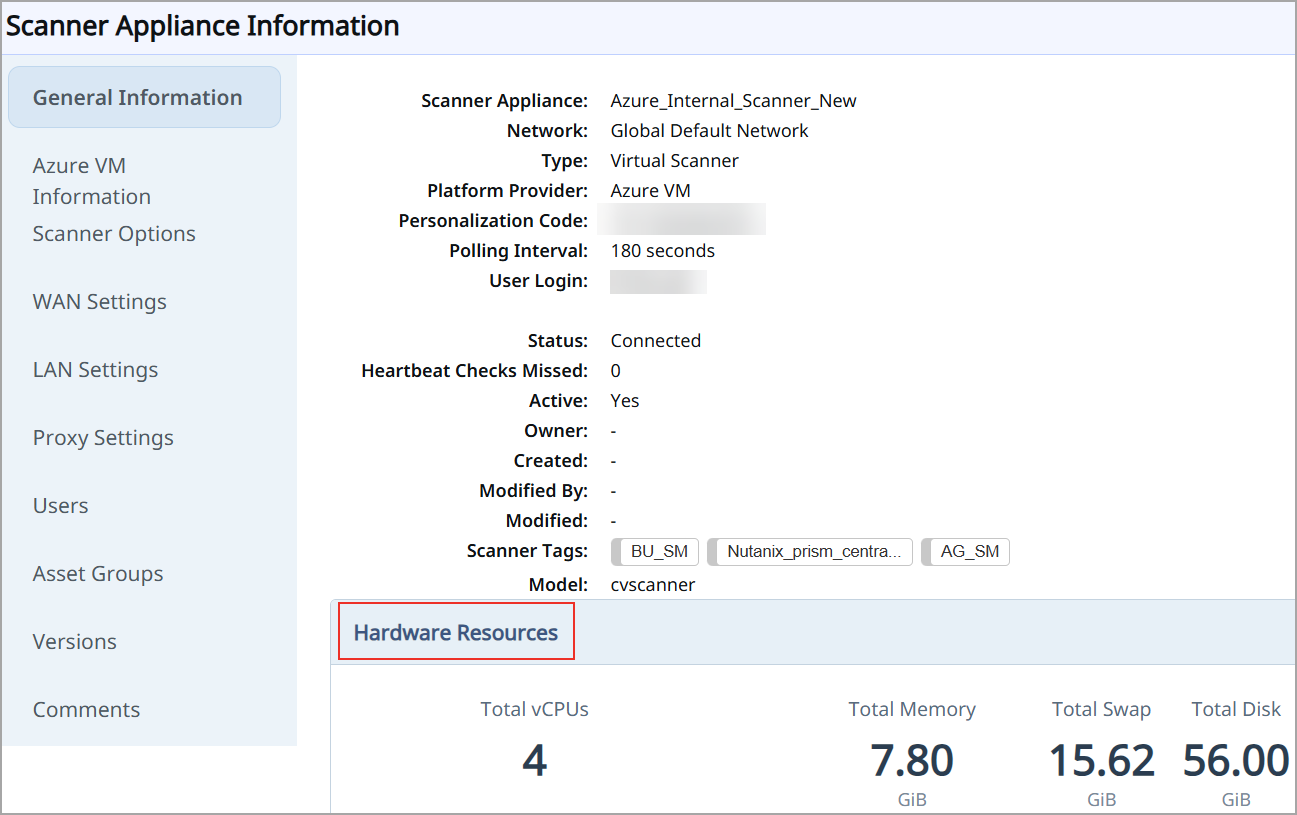
You can now view the following hardware resource details for supported scanner appliances:
- Total vCPUs
- Total Memory (GiB)
- Total Swap (GiB)
- Total Disk (GiB)
Where to Find It
Navigate to Scans > Appliances > select a scanner appliance > select Info from Quick Actions menu. You can view the Hardware Resources section under General Information tab of the Scanner Appliance Information page.
Expected Behavior
- The Hardware Resources section is always displayed on the General Information tab, regardless of whether hardware resource data is available.
- If a hardware value is not reported for a scanner appliance, the corresponding fields are displayed empty.
- Hardware values reflect the most recent resource information reported by the scanner appliance.
Qualys API Support for Scanner Appliance
For this enhancement, we have updated the Scanner Appliance API: /api/3.0/fo/appliance/. For more information, refer to the Enterprise TruRisk Platform Release 10.40 API.
Visibility into Scanner Platform Versions and End of Support Status for Scanner Appliances
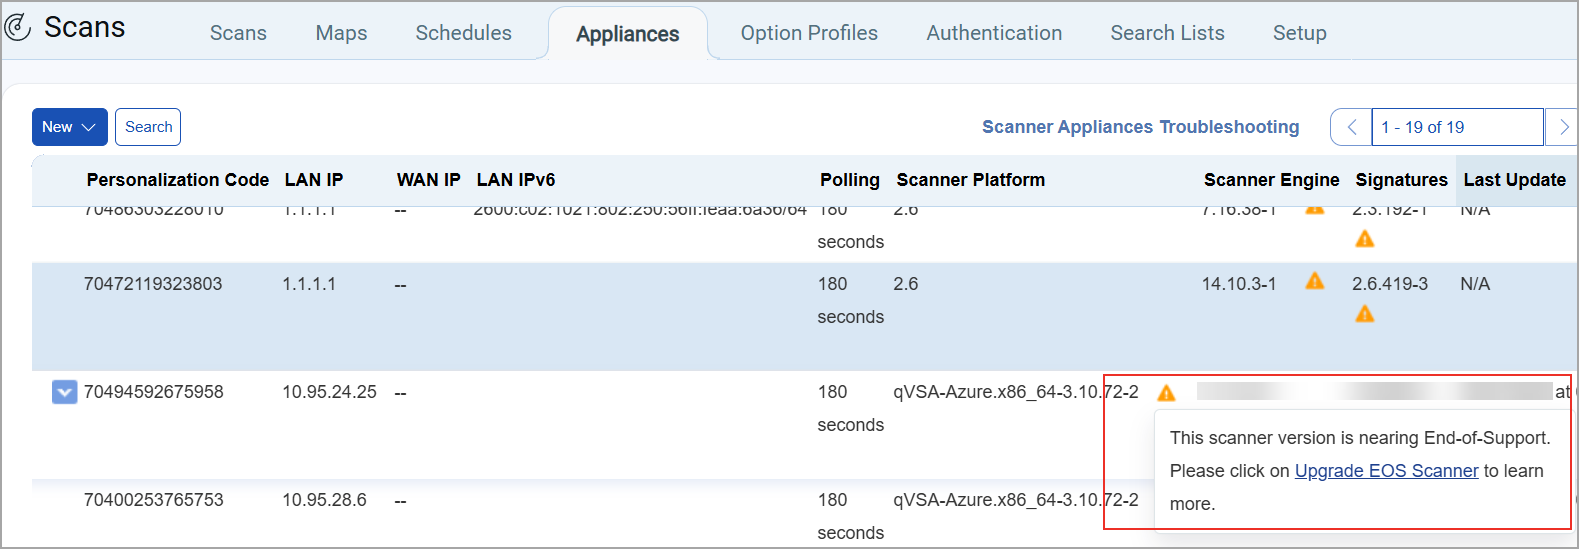
You can now view scanner platform versions directly from the Scanner Appliances listing page and quickly identify scanner appliances approaching End of Support (EOS). Previously, scanner platform version information was available only in the Versions pane of the Scanner Appliance Information page. This required additional navigation when reviewing scanner versions across multiple appliances. This enhancement helps teams proactively identify scanner appliances approaching End of Support, reducing operational risk, improving supportability, and helping ensure scanners continue to receive updates and improvements.
Where to Find It
Navigate to Appliances > Appliances listing page > select a scanner appliance that displays the icon  . You can hover over the icon to see whether the scanner platform version is nearing End of Support (EOS) and access the Upgrade EOS Scanner documentation for additional information and upgrade guidance.
What's New
- A new Scanner Platform column is available on the Scanner Appliances page and displays the scanner platform version.
- The existing Scanner column is renamed to Scanner Engine. The values displayed in the column remain unchanged.
- Scanner platforms that have reached End of Support display an icon next to the scanner platform version.
- You can hover over the icon to view additional information about the EOS status and available upgrade guidance.
- When you select a scanner appliance from the Scanner Appliances page and select Info from the Quick Actions menu, the Versions pane on the Scanner Appliance Information page displays an icon next to the Software Image Version field when the scanner platform version is approaching EOS.
Qualys API Support for Scanner Appliance
For this enhancement, we have updated the Scanner Appliance API: /api/3.0/fo/appliance/. For more information, refer to the Enterprise TruRisk Platform Release 10.40 API.
Enhanced User Interface
The enhancement is temporarily rolled back to ensure a stable user experience and will be reintroduced in an upcoming release.
With this release, we have introduced an improved user experience across all Vulnerability Management pages. You can see updates across fonts, colors, typography, and buttons, making the interface more intuitive and easier to use. This release features User Interface and design system enhancements that improve visual consistency and readability, resulting in a cleaner, more intuitive user experience.
This enhancement improves usability by creating a more consistent experience across Vulnerability Management workflows. Users can more quickly identify risk information, navigate pages, and interpret scanner and vulnerability data with less effort.
You can notice updates to fonts, colors, typography, and buttons that make the interface more intuitive and user-friendly.
Key benefits are:
- Cleaner, more consistent screens
- Easier-to-read and understandable text
- Important information stands out better, with less clutter
- Faster comprehension of risk, status, and numbers
User Interface Consistency and Clarity
Introducing the new and improved User Interface with the following key upgrades:
- Easier-to-read labels and text, with ALL CAPS replaced by sentence-style text
- Consistent text style for status and source names across the application
- Uniform text colors in tables, filters, page numbers, and tabs
- Aligned colors and text styles for tabs and page navigation throughout the application
- Clear visual indicators for buttons and options, showing active, inactive, or secondary states
- Better emphasis on important information, with subtle styling for less critical details to help users focus
Charts, Metrics, and Data Presentation
You can view the following updates:
- Updated chart color schemes for improved clarity and accessibility
- Compact, more readable numeric formats for better visibility
- Refined color gradients for risk scores and meters to enhance interpretation
Issues Addressed
The following reported and notable customer issues are fixed in this release:
| Component/Category | Description |
| VM - Scan Schedule | When users created or edited a scheduled scan job and changed the scanner appliance option to All Scanners in TagSet, the Confirm Tag Removal dialog was displayed when selected tags did not meet the required criteria. If users clicked No, the scan configuration could remain in an inconsistent state. The scanner appliance selection, Include and Exclude tag settings, and scanner selection view were not restored correctly. The issue is now resolved. Clicking No on the Confirm Tag Removal dialog correctly restores the previous scanner appliance selection, tag settings, and scanner selection view. |
| VM - User Management |
When users removed VM module access while editing a user account by going to Administration > User Management, the changes were not getting saved. An error message was displayed as "Latest Vulnerabilities – Invalid input." This error message was also displayed for Scan Summary Notification or Map Notification settings. The issue is now resolved. Saving user changes after removing VM module access now completes successfully. The Invalid input error no longer occurs for these notification settings. |
| VM - Remediation | When users opened the Remediation tickets page for large subscriptions, it took a long time to load. The Activity Log page also loaded slowly in some cases. The issue is now resolved. The Remediation tickets page and Activity Log page now load faster, even on large subscriptions. |
| VM - Host List API |
When users viewed the Host Information page, some user-defined attribute values were missing. This happened for values set through API with a different network ID than the host. The Host List API still returned these values, creating inconsistent data between the API and UI. This issue is now resolved. The Host List API and Host Information page now show consistent user-defined attribute data. Values from a network different from the host's are excluded from both. |
| VM - Scan API | When users tried to launch the Ignore Vulnerability API with the tag_set_include parameter, the API returned an error stating that "parameter tag_set_include has an invalid value", even when a valid tag was specified. This issue occurred with certain asset-tracking configurations and prevented vulnerabilities from being ignored for assets associated with the specified tags. This issue is now resolved, and the API correctly processes valid tags during ignore and restore operations. |
| VM - Knowledge Base | When users created or edited a Dynamic Search List, the page was taking a long time to load or respond, impacting the overall user experience. This issue is now resolved, and Dynamic Search List pages load more efficiently, providing faster access to search criteria and improved responsiveness when creating or editing search lists. |
| Sensor - Scanner | When users created or activated new scanner appliances, the scanners were appearing offline even when they were operational. This issue was caused by delays in processing scanner status information. This issue is now resolved, and scanner status updates are processed more efficiently, ensuring that activated scanner appliances are displayed accurately. |