Enterprise TruRisk™ Platform Release 10.41
OCTOBER 6, 2026
This release expands scan report templates with Vulnerability Tag filtering and Qualys Patchable and Mitigable details. It extends authenticated Vulnerability Management scanning to Oracle Linux Virtualization Manager (OLVM) environments. It also introduces email notifications for scan failures along with several fixes across Vulnerability Management.
Qualys Vulnerability Management (VM)
NEW FEATURE
Filter Scan Reports Using Vulnerability Tags
What's New for You
You can now use Vulnerability Tags in scan report templates to filter report results and focus on vulnerabilities that match specific vulnerability tag criteria.
This allows you to configure scan report templates to include Vulnerability Tags as a report filter. Previously, scan report templates supported only asset-based filtering.
With this enhancement, a new Vulnerability Tags filter is available in the report template configuration. You can select one or more vulnerability tags, and reports generated from the template include only vulnerabilities associated with the selected tags. This helps to focus the reports on vulnerabilities that are relevant to specific remediation and risk-management workflows.
Selected vulnerability tags are saved with the report template and are available when you edit the template later.
Existing report template functionality remains unchanged when vulnerability tags are not configured.
You can add the tags by navigating to Reports > Templates > Scan Templates > QID Based Template > Filter. You can click Add Tag to include all favorite tags and recent tags, and, from the hierarchy, select the required tags.
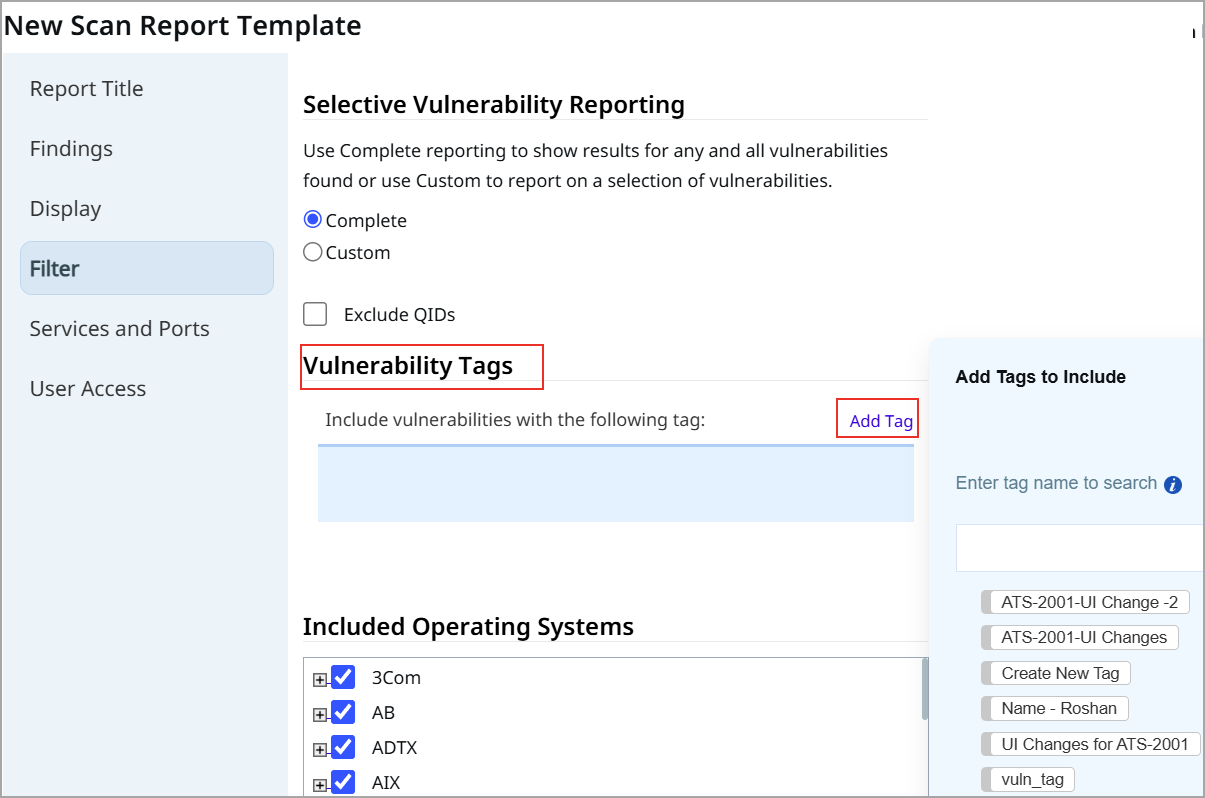
This feature is visible only if you have a Vulnerability Management Reporting Service (VMRS) enabled account. Contact your TAM or Qualys Support to enable this feature.
Qualys API Support for Scan Reports
For this enhancement, we have updated the Scan Report API: /api/8.0/fo/report/template/scan/. For more information, refer to the Enterprise TruRisk Platform Release 10.41 API
NEW FEATURE
Secure Your OLVM Environment with an Authenticated Scan
What's New for You
You can now configure and use Oracle Linux Virtualization Manager (OLVM) authentication records for Vulnerability Management (VM) scans. This extends OLVM support to Vulnerability Management, allowing you to assess OLVM assets using the same authenticated scanning workflow you already use for other supported virtualization platforms, providing deeper visibility into vulnerabilities affecting your OLVM-managed assets. This helps you achieve authenticated vulnerability scanning, detection, and reporting, along with a unified security posture view across your OLVM environments.
This allows you to:
- Create, update, list, and delete OLVM authentication records for Vulnerability Management scans.
- Configure OLVM authentication using Basic credentials (username and password) or a Vault-based credential reference.
- Launch authenticated VM scans against OLVM environments using your OLVM credentials.
- Enable OLVM authentication in a VM option profile so that any scan launched with that profile includes your OLVM authentication records.
- Scan OLVM environments using only the Standard Scan setting, covering TCP ports (about 2,800 ports) and UDP ports (about 180 ports).
- Generate a detailed vulnerability report specific to OLVM that helps you prioritize and take appropriate remediation action.
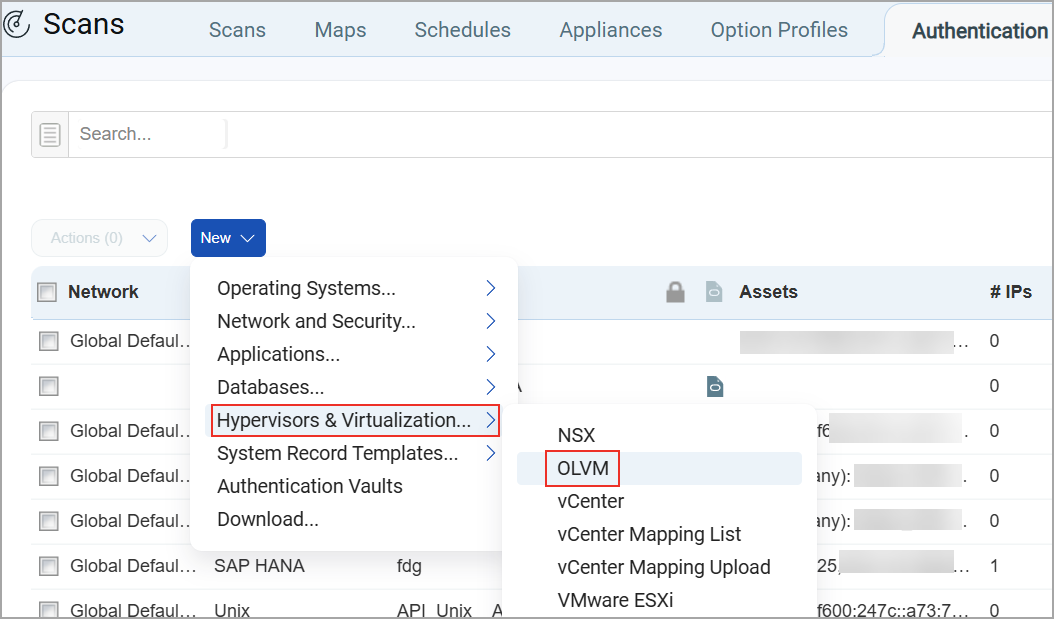
To create an OLVM authentication record navigate to Scans > Authentication > New > Hypervisors and Virtualization > OLVM.
To enable OLVM authentication in an option profile, go to Scans > Option Profiles > New/Edit Option Profile. In the Authentication section, select OLVM.
Qualys API Support for OLVM Authentication
For this enhancement, we have updated the following APIs:
- VM Option Profile API - /api/6.0/fo/subscription/option_profile/vm/
- Option Profile Import and Export API - /api/8.0/fo/subscription/option_profile/
For more information, refer to the Enterprise TruRisk Platform Release 10.41 API.
Enhancement
Generate Scan Reports with Qualys Patchable and Mitigable Details
What Changed For You
You can now include Qualys Patchable and Qualys Mitigable vulnerability details in your host-based scan reports. Two new options, Include Qualys Patchable and Include Qualys Mitigable, are available when you create or edit a scan report template.
You can now configure scan report templates to include Qualys Patchable and Qualys Mitigable information in report output. This helps to generate more actionable reports for remediation and risk management workflows and improves visibility into patchable or mitigable vulnerabilities.
Prerequisite: You must have Vulnerability Management Reporting Service (VMRS) subscription enabled for your account. Contact your TAM or Qualys Support to enable this feature.
You can enable this by navigating to Reports > Templates > Scan Templates > QID Based Template > Display. Under Include the following details result in the report section, enable Vulnerability Details, and then enable Qualys Patchable and Qualys Mitigable.
You can enable Qualys Patchable and Qualys Mitigable only when you enable Vulnerability Details.
You must select the Vulnerability Details checkbox before you select either option. When you select the option, your CSV report includes two additional columns, and your XML report includes two additional tags, so you can immediately see which vulnerabilities in your scan results can be patched or mitigated without cross-referencing separate data.
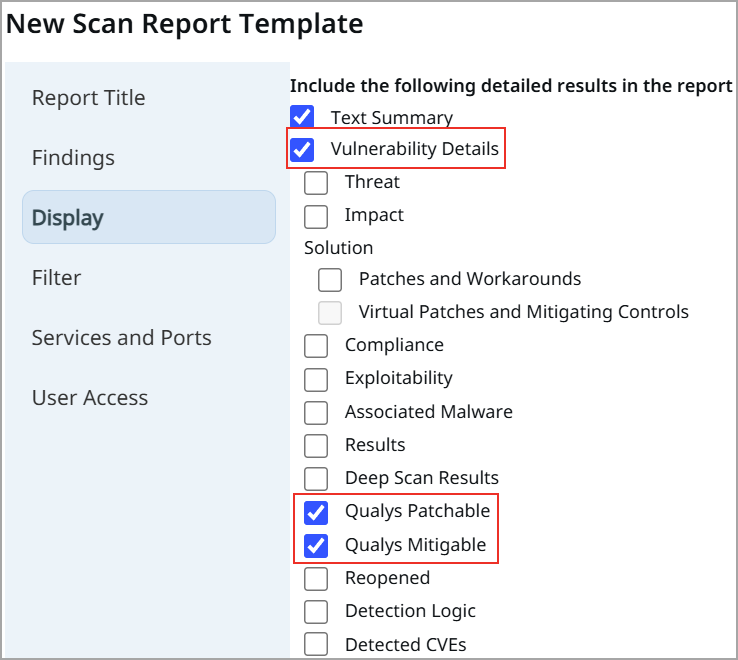
- Both options are unchecked by default. Select them to include the corresponding details in your report.
- You can update your existing host-based scan report templates to add these options. You don't need to create new templates.
Qualys API Support for Scan Reports
For this enhancement, we have updated the Scan Report API: /api/8.0/fo/report/template/scan/. For more information, refer to the Enterprise TruRisk Platform Release 10.41 API.
NEW FEATURE
Get Notified the Moment a Scan Fails
What's New for You
You can now receive email notifications when a VM scan enters the error state, helping you identify scan failures without manually checking scan status in the UI. Also, it reduces the risk of missed scans and delayed vulnerability assessments.
Configure Scan Failure Notifications to enable email notifications for failed scans, rather than identifying the error later in the UI. Previously, notifications were available for scan completion and certain pre-launch conditions, but you were not able to receive a dedicated notification when a scan failed after launch. As a result, scan failures could remain unnoticed until you manually reviewed scan results.
With this enhancement, when the scan notification is enabled, an email is sent to the scan owner and the following relevant users when a scan enters an error state.
- Managers, Auditors, and users with compliance access who are assigned to the asset groups in the scan
- Any additional recipients from distribution groups you add on the Scan Failure Notification setup page (up to 50 distribution groups)
The notification includes the following relevant scan details to help you identify and address scan failures more quickly.
- Scan title and scan reference
- Scan date and launch type (Scheduled or On demand)
- Targets in the scan
- Scan status
- Failure time and failure reason
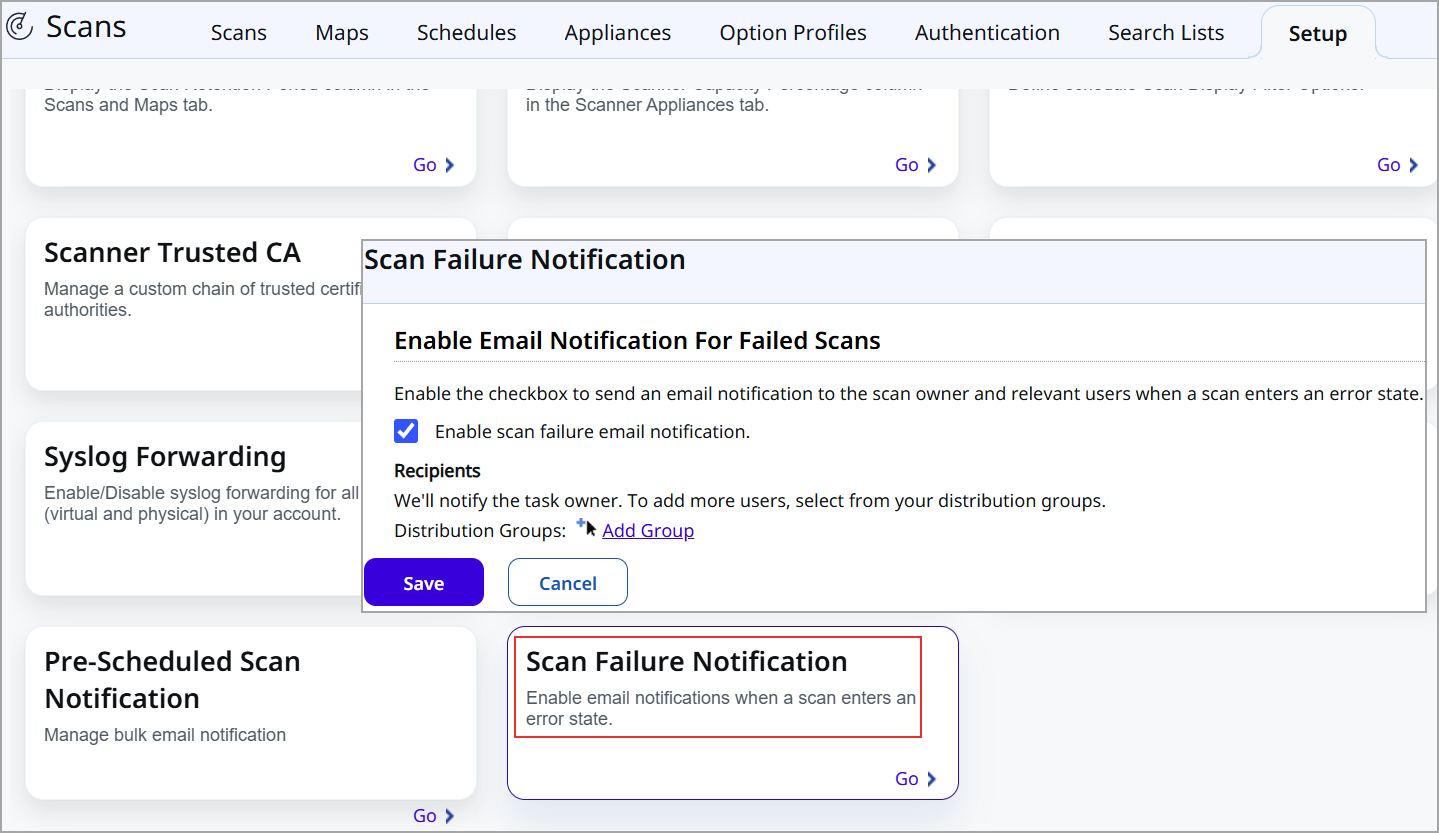
To enable the notification navigate to Scans > Setup > Scan Failure Notification. You can enable or disable scan failure email notification and configure additional recipients using Distribution Groups.
- Only users with the POC Manager role can enable or configure the settings.
- Scan Failure Notification is disabled by default and must be enabled from Scans > Setup.
- At least one Distribution Group must already exist in your subscription if you want to add additional recipients.
- Configure this setting once at the subscription level to cover all your scan schedules.
Fix
Issues Addressed
The following reported and notable customer issues are fixed in this release:
| Component/Category | Description |
|---|---|
| VM - Asset API | When Manager users add IP addresses to the Excluded Hosts list using the API with a distribution group specified in the dg_names parameter, the API rejected the request as invalid.
This occurred because the request was made by a Manager user who was not the owner of the specified distribution group. |
| VM - Scan Schedule | When users launched a VM scheduled scan and an on-demand scan with include and exclude tags that did not resolve to any scannable assets, the scan was skipped and displayed error messages that differed from those shown during an on-demand scan under the same conditions.
This inconsistency could make it difficult for users to understand why the scan did not run. This issue is now resolved, and VM scheduled, and on-demand scans consistently display the message "No scannable assets match the selected tag(s)" when the selected tags do not resolve to any scannable assets. |
| VM - Assets (Scanner) | When users configured an Amazon EC2 API Proxy for an EC2 scanner appliance, proxy hostnames that included alphanumeric domain suffixes were rejected as invalid, even though the same hostname worked successfully for the scanner proxy configuration. This prevented users from using certain internal proxy hostnames and required them to use an IP address instead.
This issue is now resolved. Users can configure Amazon EC2 API Proxy settings using supported proxy hostnames with alphanumeric domain suffixes, and the configuration is saved successfully without validation errors. |
| VM - Report API | When the sub user was trying to launch a report on Tags, and also added a few AGs/IPs to the template used to launch the report. However, the user did not have access to AGs/IPs added in the template, and an error was observed in the API response.
The issue is fixed, and the report will now be launched on the tags specified in the API call, even if the user does not have access to the AG/IP mentioned in the template. |
| VM - Azure VM Scans | When users launched a Cloud Internal Azure VM scan using a scanner appliance configured on a custom network, a scan authentication error occurred, even though a valid authentication record was configured for that network.
This occurred because the scan configuration had no option to select a network, so it always defaulted to the Global Default Network (GDN) and used the authentication record associated with GDN instead of the one set up for the custom network. This issue is now resolved, and Cloud Internal - Azure VM scans now automatically use the network associated with the selected scanner appliance. |
| VM - Reports General | When users downloaded scan results in PDF format from the Scans tab, some results failed to download, even though the same results could be downloaded successfully in CSV format.
This issue is now resolved, and scan results can be downloaded successfully as PDFs. |
| VM - Scans | When users shared VMDR PCI scans that included native IPv6 targets with PCI, some IPv6 addresses were not imported into the PCI merchant account.
This issue occurred for IPv6 targets that were part of the scan target list but were not detected as active during the scan. As a result, the PCI merchant account did not contain all the IPv6 targets included in the original scan. The issue is now resolved, and all configured native IPv6 scan targets are included when PCI scan data is shared from VMDR to PCI, ensuring complete target information is imported into the PCI merchant account. |
| VM - Scans | When users generated scan reports (HTML or PDF) for subscriptions with extensive vulnerability data, the process used excessive memory, causing reports to fail or, in some cases, affecting platform performance.
This occurred because large volumes of vulnerability data were loaded during report generation and scan result processing. This issue is now resolved, and scan results and reports are processed more efficiently by loading vulnerability data on demand. This reduces memory consumption, improves report generation performance, and enhances overall platform stability. |