VMDR Mobile Release 1.6.1
April 10, 2026
Implementation of QQL Token Standardization
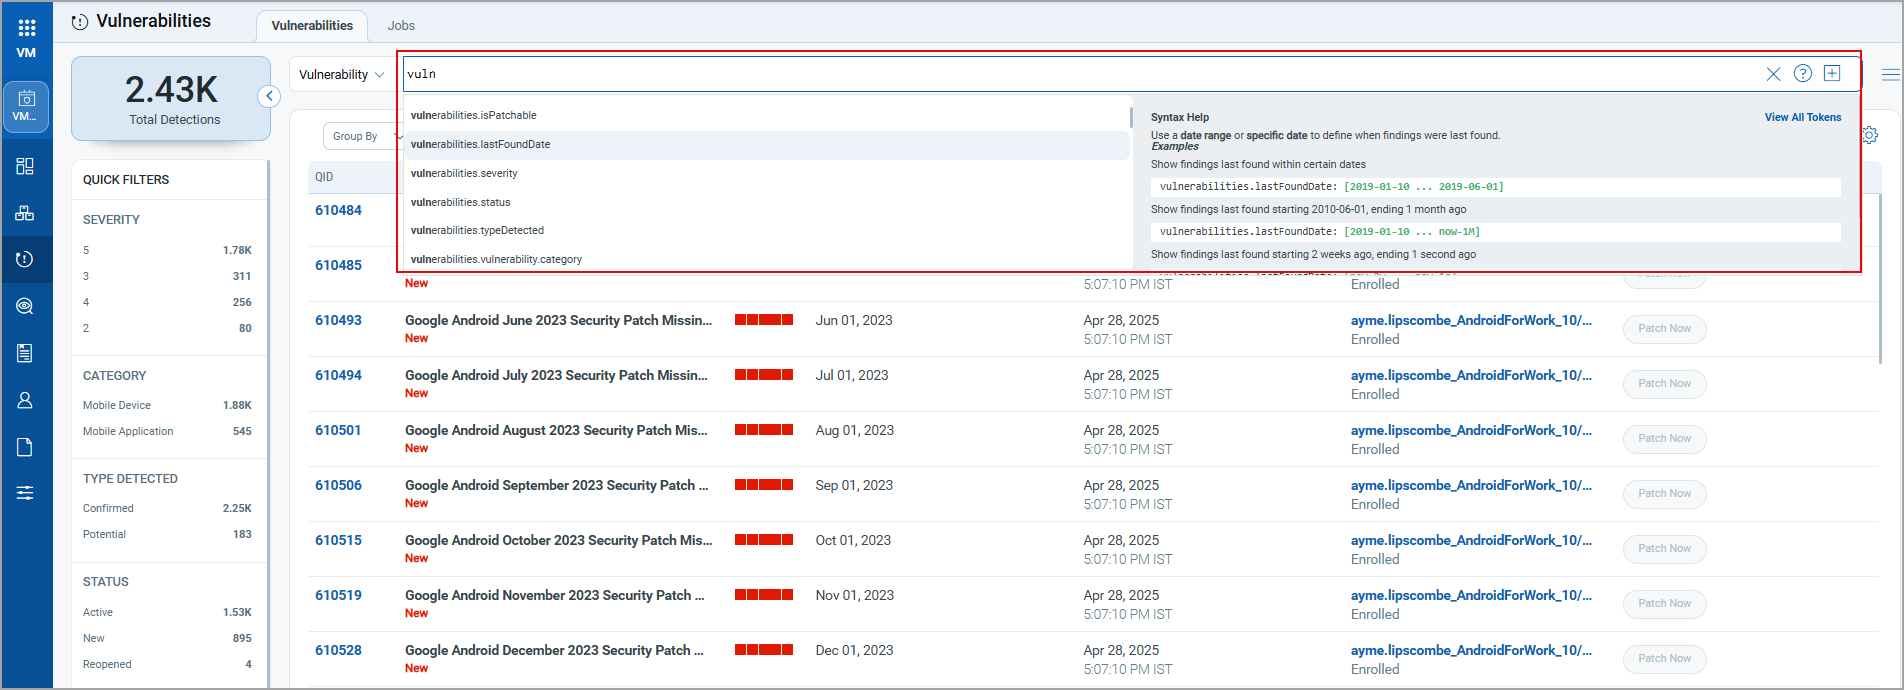
We have now implemented Qualys Query Language (QQL) token standardization across all Qualys applications. As part of this enhancement, both common and VMDR Mobile-specific tokens are updated with new token names that follow a standard, consistent nomenclature.
The new token format follows the syntax: entity.attribute
For example, in the new token, policy.createdDate, policy is the entity, and createdDate is the attribute.
Key Enhancements:
- Standardized Token Naming: The assets, EULA, APNS, Audit log, control, jobs, policy, user, and VMDR mobile tokens now follow the standardized naming convention. The tokens common to all Qualys applications have also been updated.
- Search Bar Updates: The newly renamed tokens will appear in the auto-suggestions, but the original token names that were renamed will no longer be shown. Tokens that were not renamed will continue to appear in the auto-suggestions as usual.
- Backward Compatibility: The existing Dashboard widgets and Saved Search Queries will continue to support the old tokens in edit mode.
- Improved Interoperability: The standardized tokens make it easier to copy and reuse the search query from one application to another, eliminating the need to remember multiple token names for different applications and similar searches.
For the complete list of old and new token mapping, see Old and New Token Mappings.
New Tokens
The following new Finding tokens are added to the Vulnerability tab:
| Rule Query | Tokens |
|---|---|
| Vulnerability | Finding TokensFinding Tokens
finding.isFound finding.lastFoundDate finding.severity finding.typeDetected finding.vulnerability.qid finding.vulnerability.category finding.vulnerability.title finding.firstFoundDate finding.asset.name finding.hostOperatingSystem.name finding.vulnerability.cveld finding.vulnerability.cvss3BaseScore finding.vulnerability.cvss3TemporalScore finding.vulnerability.description finding.vulnerability.publishedDate finding.vulnerability.solution finding.vulnerability.vendorRef finding.vulnerability.vendorProductName finding.vulnerability.vendorName finding.vulnerability.risk finding.vulnerability.supportBy.service finding.vulnerability.consequence finding.isPatchable finding.vulnerability.releaseDate finding.vulnerability.type finding.vulnerability.cve.severity |
| For more information, see Finding Tokens in Searching Assets. |
Support for Auth ID Client Management from UI
With this release, we have extended our support for OpenID Connect Authentication Client Management capabilities from the UI. This update enables secure authentication and authorization for API access directly from the user interface. Our API interactions are now authenticated with enhanced security measures.
ID tokens are generated and validated with utmost security. This seamless integration requires minimal changes to the existing infrastructure, allowing for to maintenance of the highest level of security for APIs.
Access Control
Manager users can create two types of clients based on access requirements:
- User Level Clients: These clients are associated directly to individual user accounts, making them ideal for scenarios where user-specific access control is required. Users can access APIs and VMDR mobile functionality provided by this client.
The token generated through the User Level client becomes invalid if the user is deactivated. - Subscription Level Clients:
These are independent of user identities and provide broader access within the subscription. This means the client is tied to the subscription rather than an individual user.
The token generated for a subscription-level client continues to function even if the user is deactivated.
Currently, the Subscription Level clients are not supported by the VMDR mobile APIs.
Non-Manager users are restricted to creating only User Level Clients, ensuring limited access control.
With the Auth ID Client Management from UI, you can:
- Manage authentication and authorization processes more intuitively to provide a smoother user experience.
- Easily handle API access permissions directly from the UI, simplifying the process of granting and revoking access when needed.
- Maintain your existing workflows with minimal changes, enabling you to continue your tasks without having to learn new processes in depth.
To access the Client Management tab, navigate to your profile icon, located at the top-right corner, and click View Profile > Auth Id Client Management tab.
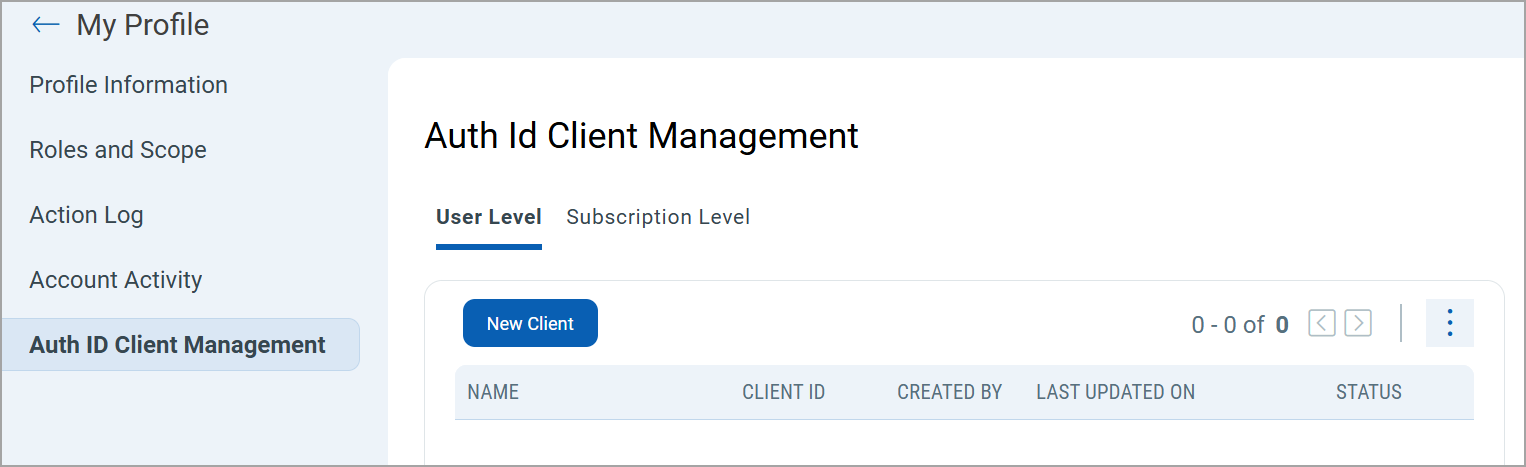
To create a client, select either User Level, and then click New Client.
Only users with manager privileges can view and access the Subscription Level tab.
While creating a client, you can select all modules at once or individual modules as required. You can also set various permissions, including global, dashboard, tagging, and API access permissions. Depending on these permissions, you can access the modules and their features assigned to the client.
Based on the permissions you select:
- If the API Access permission is not enabled under Global Permissions > Access, the API returns a response with this message:
User does not have permission to access API module - If the VMDR Mobile Access permission under VMDR mobile > VMDR mobile Permissions is not enabled, the API returns a response with this message:
User does not have permission to access the VMDR mobile module. -
Once you click Create, a Client ID and Client Secret Key are automatically generated. The Client Secret Key is displayed only once. Make sure to copy and store it securely. This key is essential for generating JWT access tokens and cannot be retrieved later.
Support for OAuth 2.0 and OpenID Connect Authentication Standards
With this release, we have enhanced API security by implementing OAuth 2.0 and OpenID Connect for Qualys API authentication and authorization. When OpenID Connect API authentication is implemented alongside OAuth 2.0, the IdP is used for user authentication and for generating JWT tokens for Qualys API access.
Key Updates
- Seamless integration of OAuth 2.0 and OpenID Connect to enhance API authentication and authorization measures.
- Compatibility with current identity providers and authentication to facilitate a seamless integration experience.
- All Qualys APIs support this authentication
- It eliminates the need for users to provide a username and password. This streamlines Qualys API access by enabling users to use JWT tokens, bypassing the hassle of usernames and passwords.
Enable OpenID Connect API Authentication
This feature is not available by default. Contact Qualys support to enable it for your subscription. You must follow the onboarding process. This feature requires IdP.
Benefits
- Enhanced API security
OpenID Connect (OIDC) uses tokens to establish a user's identity and grant access. - Standardized access control
OpenID Connect (OIDC) provides a standardized way to manage user identities and access control - Centralized Authentication
By enabling IDP-initiated SSO, users can authenticate once through your organization’s Identity Provider (IDP) and gain access to all the necessary APIs without needing to log in again. This simplifies the user experience and reduces password fatigue, making access faster and more secure. - Compliance and Security
Helps to meet compliance requirements by ensuring user authentication processes adhere to established security protocols such as SAML and OIDC.
Prerequisites
Public signing certificates for verifying the authenticity of SAML responses. Up to 3 certificates can be provided. The certificate must be in X.509 format (usually in .pem or .cer files).
- IdP Name
The Identity Provider (IdP) name is being configured. This can be a custom name or provided by the customer. - Entity ID
The unique identifier for the customer’s IdP. Typically, this is a URN or URL that serves as the IdP’s primary identifier during OIDC communications.Example: "https://example.com/idp"
- Single Sign-On (SSO) URL
The URL where authentication requests will be sent. This is the endpoint where users are redirected to authenticate with the customer’s IdP.Example: "https://example.com/login"
- Single Logout (SLO) URL (if applicable)
The URL for handling logout requests. If you support Single Logout, this endpoint manages session termination at both the IdP and in Qualys.Example: "https://example.com/logout"
- SSO Exit URL (optional)
The URL where users will be redirected after successful authentication. - Certificates
Public signing certificates for verifying the authenticity of SAML responses. Up to 3 certificates can be provided. The certificate must be in X.509 format (usually in .pem or .cer files).
Only VMDR mobile and Mitigation APIs are supported.
Onboarding Process
To start using OpenID Connect API authentication, the following onboarding process must be completed.
- Contact Qualys Support (www.qualys.com/support) to request activation of OpenID Connect API authentication for your subscription. A CRM ticket is automatically created and serves as a reference and tracking tool for all discussions concerning the activation.
- Qualys Support replies to the ticket to share and request the required technical information used to enable OIDC. See the Prerequisites for the details.
- Upon receipt of the response, Qualys enables support for OpenID Connect API authentication. This process takes approximately one week to complete.
Use OpenID Connect API Authentication
Once the onboarding process is complete and the OpenID Connect API authentication is enabled, you can begin using it. To start using it, generate a JWT token and use it to execute the Qualys APIs. The following subsections provide API request and response samples for generating a JWT token and executing APIs using this token.
You can generate the JWT access token by providing the client ID and client secret key in the following API request headers.
For more information on client ID and client secret key, refer to Support for Auth ID Client Management from UI.
Sample: Generate JWT Token using User CredentialsSample: Generate JWT Token using User Credentials
API Request
curl --location '
      https://qualys.oktapreview.com/oauth2/aus27sviwo8jbrP4T0h8/v1/token'
      --header 'Content-Type: application/x-www-form-urlencoded'
      --data-urlencode 'grant_type=password'
      --data-urlencode '[email protected]'
      --data-urlencode 'password= '
      --data-urlencode 'client_id=0oa27l586h672nMy90h8'
      --data-urlencode 'scope=openid profile'
Response
{
  "token_type": "Bearer",
  "expires_in": 3600,
  "access_token": " ",
  "scope": "openid profile",
  "id_token": " "
}
API Request
curl -X POST
'<qualys_base_url>/auth/oidc'
--header 'clientSecret: wJalrXUtnFEMI/K7MDENG+bPxRfiCYEXAMPLEKEY'
--header 'clientId: 123e4567-e89b-12d3-a456-426614174000'
Response
eyJhbGciOiJSUzI1NiIsInR5cCI6IkpXVCJ9.
eyJzdWIiOiJjbGllbnQxMjM0NTYiLCJzYwZXM
iOlsiYXBpLnJlYWQiLCJhcGkud3JpdGUiXSwi
aXNzIjoiaHR0cHM6Ly9kdW1teS1hdXRoLmNvb
SIsImV4cCI6MTcwMDAwMDAwMH0.SdXn3I6yTb-
JNk9LPjR8W9xAtH7dN3Mqf3HdJ5WnRfE
API Request
curl -X GET
'<qualys_base_url>/sem/v1/assetList?action=list&truncation_limit
=1includeFields=operatingSystem,hardware' -H 'Authorization: Bearer <ACTUAL_TOKEN>
Response
<?xml version="1.0" encoding="UTF-8"?>
<!DOCTYPE ASSET_LIST_VM_DETECTION_OUTPUT SYSTEM "https://qualysgua
rd.p04.eng.sjc01.qualys.com/sem/xapi/v1/asset/asset_list_output.dtd">
<ASSET_LIST_VM_DETECTION_OUTPUT>
<RESPONSE>
<DATETIME>2021-10-18T07:58:11.268Z</DATETIME>
<ASSET_LIST>
<ASSET>
<ID>231</ID>
<IP>192.168.1.101</IP>
<IPV6>2401:4900:52b8:8433:204a:25d7:89b0:1a51</IPV6>
<ASSET_FRIENDLY_NAME>abhi123abhi123_iOS_Apple_5</A
SSET_FRIENDLY_NAME>
<OS>iOS</OS>
<OS_VERSION>14.5</OS_VERSION>
<ASSET_STATUS>Enrolled</ASSET_STATUS>
<LAST_SEEN>2021-04-28 12:01:06</LAST_SEEN>
<OWNERSHIP>Corporate - Owned</OWNERSHIP>
<MODEL_NAME>iPad (5th generation)</MODEL_NAME>
<MANUFACTURER>Apple, Inc.</MANUFACTURER>
<USERNAME>abhi123abhi123</USERNAME>
<DETECTION_LIST>
<DETECTION>
<QID>610100</QID>
<TYPE>Information</TYPE>
<SEVERITY>1</SEVERITY><RESULTS>
<![CDATA[iOS Device Details :
iOS : 14.5
Model : iPad (5th generation)]]>
</RESULTS>
<STATUS>Active</STATUS>
<FIRST_FOUND_DATETIME>2021-04-28 05:01:36</FIRST_FOUND_DATETIME>
<LAST_FOUND_DATETIME>2021-04-28 12:01:07</LAST_FOUND_DATETIME>
<TIMES_FOUND>21</TIMES_FOUND>
<LAST_UPDATE_DATETIME>2021-04-28 12:01:07</LAST_UPDATE_DATETIME>
</DETECTION>
</DETECTION_LIST>
</ASSET>
</ASSET_LIST>
<WARNING>
<CODE>1980</CODE>
<TEXT>1 record limit exceeded. Use URL to get next batch of results.</TEXT>
<URL>
<![CDATA[https://gateway.p04.eng.sjc01.qualys.com/
sem/v1/assetList?id_min=643&action=list&truncation_limit=1]]>
</URL>
</WARNING>
</RESPONSE>
</ASSET_LIST_VM_DETECTION_OUTPUT>
<!--
CONFIDENTIAL AND PROPRIETARY INFORMATION. Qualys provides the Qual
ysGuard Service "As Is," without any warranty of any kind. Qualys
makes no warranty that the information contained in this report is
complete or error-free. Copyright 2021, Qualys, Inc.-->
Issues Addressed
The following reported and notable customer issues are fixed in this release.
| Component/Category | Description |
|---|---|
| VMDR-Mobile- Inventory Window | Customers reported that the downloaded CSV report did not include the IP address of the enrolled assets. We have fixed this issue, and the IP addresses now appear correctly in the report. |
| VMDR-Mobile-User Window | Customers faced an issue while uploading the user bulk upload CSV file. We have resolved this issue, and they can now upload the CSV file and create bulk users. |