Create a Minimum-privilege Scan Account on ArubaOS‑CX
This topic covers how to create a dedicated scan account on ArubaOS-CX with the minimum privileges needed for read-only discovery and configuration checks. The account can run only the operational commands necessary for scanning.
1. Create a User Group for Scan Access
You create a custom user group that defines the specific Command-Line Interface (CLI) commands the scan account can run. The following script creates a custom group called qscangroup.
# configure terminal

  user-group qscangroup

    permit cli command "no page"

    permit cli command "show system"

    permit cli command "show version"

    permit cli command "show running-config all"

    permit cli command "show session-timeout"

    permit cli command "show password-complexity"

    permit cli command "show service export-password"

    permit cli command "show ipv6 source-binding"

    permit cli command "show ntp status"

    permit cli command "show dhcpv4-snooping"

    permit cli command "show tls"

    permit cli command "show running-config interface"

    permit cli command "show usb"

    permit cli command "show ssh server"

    permit cli command "show dhcpv6-snooping"

    permit cli command "show ssh authentication-method"

    permit cli command "show domain-name"

    permit cli command "show bluetooth"

    permit cli command "show crypto pki certificate"

    permit cli command "show nd-snooping"

    permit cli command "show aaa authentication"

    permit cli command "show user-list"

    permit cli command "show user-group"

    permit cli command "show ipv4 source-binding"

    permit cli command "show crypto pki application"

    permit cli command "show running-config"

  exit
Purpose of Each Permission
| Command | Purpose |
no page |
Ensures output is not paginated, allowing scanners to capture full command results. |
show system |
Provides system summary. |
show running-config all |
Allows the scanner to retrieve the full device configuration. |
show version |
Provides software version and platform details. |
show session-timeout |
Retrieves session timeout settings. |
show password-complexity |
Displays configured password complexity rules for local user accounts. |
show service export-password |
Shows whether the password export service is enabled and its settings. |
show ipv6 source-binding |
Displays IPv6 source binding entries used for device tracking and security features. |
show ntp status |
Shows the operational status and synchronization state of the NTP service. |
show dhcpv4-snooping |
Displays DHCPv4 snooping configuration and the learned DHCP binding table. |
show tls |
Shows TLS configuration and status used for secure management services. |
show running-config interface |
Displays the currently active configuration applied to switch interfaces. |
show usb |
Displays information and status of USB devices connected to the switch. |
show ssh server |
Shows SSH server configuration and operational status. |
show dhcpv6-snooping |
Displays DHCPv6 snooping configuration and learned IPv6 DHCP bindings. |
show domain-name |
Shows the configured system domain name. |
show bluetooth |
Displays the status and configuration of the Bluetooth interface. |
show crypto pki certificate |
Shows installed PKI certificates used for authentication and encryption. |
show nd-snooping |
Displays IPv6 Neighbor Discovery snooping configuration and learned entries. |
show ssh authentication-method |
Displays the SSH authentication methods allowed for user login. |
show aaa authentication |
Shows configured AAA authentication methods used for login access. |
show user-list |
Lists all local users configured on the switch. |
show user-group |
Shows configured user groups and their associated privilege levels. |
show ipv4 source-binding |
Displays IPv4 source binding entries used by IP source guard. |
|
Shows applications that are using PKI services. |
|
Displays the complete set of configuration settings currently applied to the device. |
2. Create a Scan User and Assign the User Group
After creating a custom group, add a scan user and assign it to the group. The following script creates a scan user called qscan and assigns it to the custom group qscangroup. Provide a password that meets your organization's security requirements before you run the command.
# configure terminal

  user qscan group qscangroup password plaintext <your-password>

  or

  user qscan group qscangroup password ciphertext <your-ciphertext-password>

exit
3. Verify Privileges on the Scan User Account
Use the following two commands to verify that the scan user exists and that the user group has the required privileges.
- Verify the Scan User and its associated group.
# show user-list | include qscan

qscan qscangroup - Verify the custom group's rules.
# show user-group qscangroup

	User Group Summary

	==================

	Name            : qscangroup

	Type            : configuration

	Included Group  : --

	Number of Rules : 26
User Group Rules
================
SEQUENCE NUM ACTION COMMAND COMMENT
------------- ---------- -------------------------------- --------------------------------
10 permit no page
20 permit show system
30 permit show version
40 permit show running-config all
50 permit show session-timeout
60 permit show password-complexity
70 permit show service export-password
80 permit show ipv6 source-binding
90 permit show ntp status
100 permit show dhcpv4-snooping
110 permit show tls
120 permit show running-config interface
130 permit show usb
140 permit show ssh server
150 permit show dhcpv6-snooping
160 permit show ssh authentication-method
170 permit show domain-name
180 permit show bluetooth
190 permit show crypto pki certificate
200 permit show nd-snooping
210 permit show aaa authentication
220 permit show user-list
230 permit show user-group
240 permit show ipv4 source-binding
250 permit show crypto pki application
260 permit show running-config============================================
A custom group provides the minimal required privileges for a read-only user. It allows execution of permitted commands without granting any configuration modification rights.
Create an Authentication Record in Policy Audit
To create a Unix authentication record for the ArubaOS-Switch-CX (VM, PC) target type:
- Navigate to Scans > Authentication.
- Select New > Operating Systems > Unix.
The New Unix Record dialog box opens. - In the left pane, click Login Credentials.
- In the Target Type, click ArubaOS-Switch-CX (VM, PC).
- Enter the other required details, and then click Create.
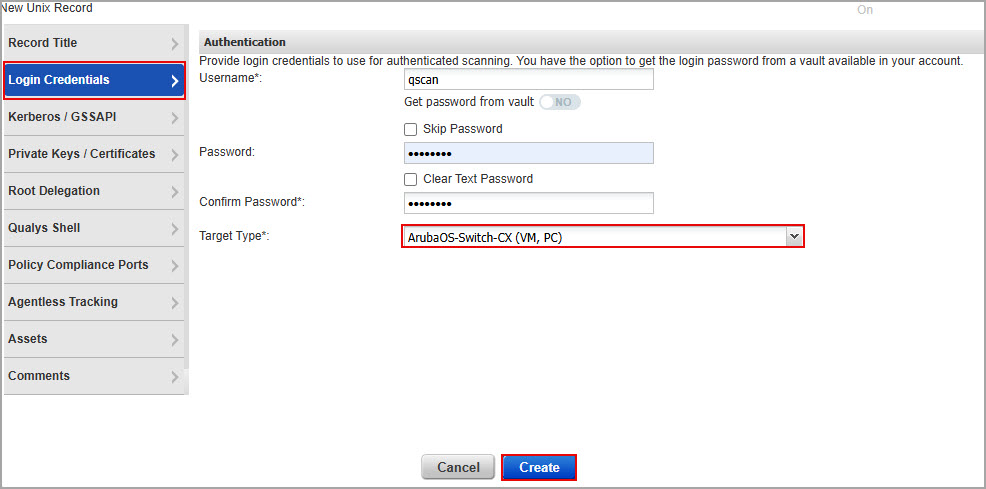
A new Unix authentication record for the target type ArubaOS-Switch-CX (VM, PC) is created.