Configure Qualys Cloud Agent on GCP Marketplace
Before configuring Qualys Cloud Agent in GCP Marketplace, ensure that you meet all the requirements mentioned in the Prerequisites section.
Perform the following steps to configure Qualys Cloud Agent in the GCP Marketplace.
- In the Google Cloud Platform user interface, open the Marketplace from the left pane.
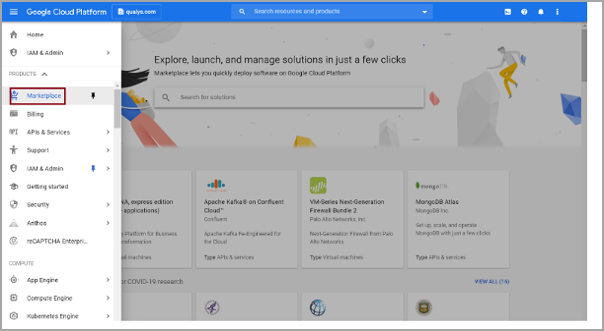
- In the marketplace search bar, search for Qualys and select Qualys Cloud Agent. The Qualys Cloud Agent Sign up page opens.
- Click VISIT QUALYS, INC. SITE TO SIGN UP. The Cloud OS Config API library page opens.
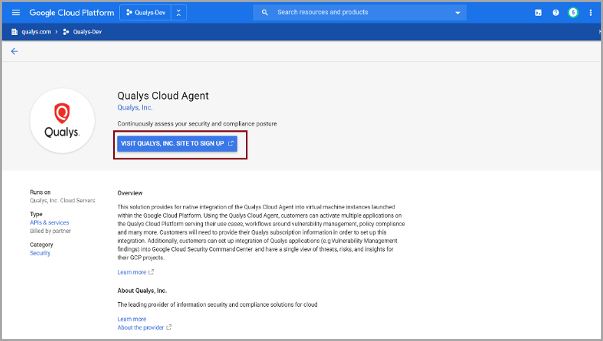
- To enable OS Config API, click ENABLE.

If you already have enabled Cloud OS Config API, the main configuration page opens.
- In the Qualys Cloud Agent Configuration page, enter the following information:
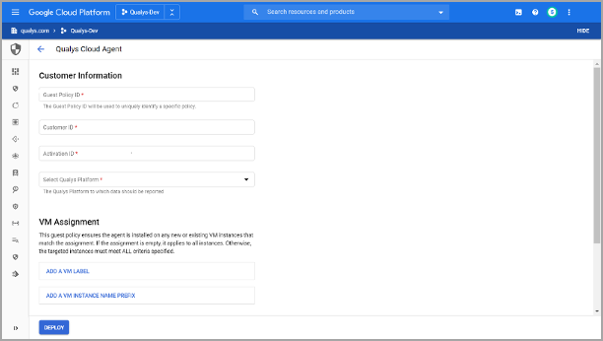
- Guest Policy ID: Enter appropriate name for Cloud Agent policy. The Guest Policy ID is used for identification purpose. The guest policies are automatically created.
Only the lowercase letters, numbers, and hyphen/dash (-) are allowed as input characters for Guest Policy ID.
- Customer ID: Enter the Qualys Customer ID for your subscription.
- Activation ID: Enter the Activation ID for your Cloud Agent.
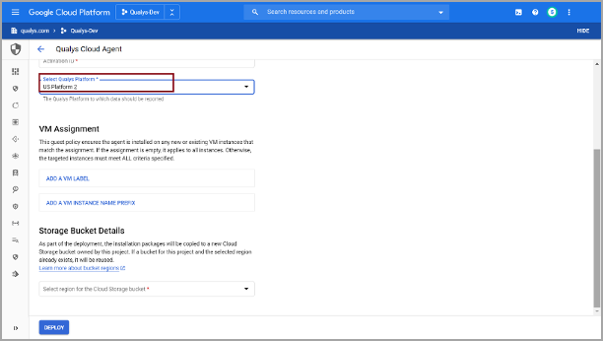
To learn about generating Customer ID and Activation ID, refer to Retrieve Qualys Customer ID and Activation ID. - Select Qualys Platform: Select the Qualys Cloud Platform applicable for your subscription.
Refer to Identify your Qualys Platform to know your platform.
- Guest Policy ID: Enter appropriate name for Cloud Agent policy. The Guest Policy ID is used for identification purpose. The guest policies are automatically created.
- Select the VM Assignment. This updates the guest policy and ensures that agent is installed on any new or existing VM instances matching the specified assignments.
If no assignments are added, the VM Assignment is applied to all the instances.
- You can also add labels to VM instances or VM instance name prefix. To add a VM instance label, click ADD A VM LABEL. Similarly to add a VM instance name prefix, click ADD A VM INSTANCE NAME PREFIX.
- After you configure the assignment, guest policy installs Cloud Agent on all the instances matching configured labels and name prefix.
- In the Storage Bucket Details section, select the region for Cloud storage bucket.
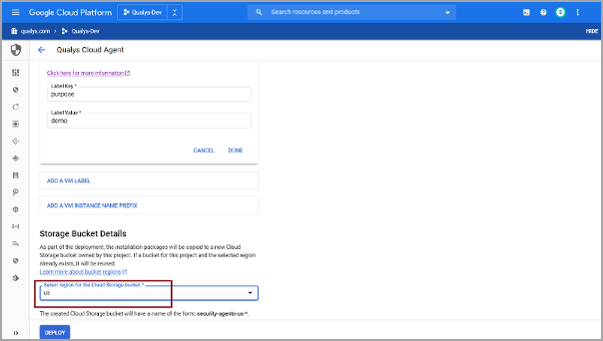
- Click DEPLOY. The Cloud Agent is deployed on all the instances as configured in VM assignment.
- A cloud storage bucket is created in your project. This storage bucket reduces the load on original installer source by copying installers from original bucket. This new storage bucket is in sync with original bucket and ensures that installers are available for VM instances.
- You can create only one storage bucket in the specified region. You can use the same storage bucket for your subsequent deployment.
The regional parameter is a legel requirement to meet the data localization regulations.