Create AWS Organization Connector
AWS Organizations (Org) is an account management service that allows you to consolidate multiple AWS accounts into an organization that you create and centrally manage. As an administrator of an organization, you can create accounts in your organization and invite existing accounts to join the organization. Qualys lets you set up an organization connector and attach it to member connectors in minutes.
Create AWS Organization Connectors
In the Connectors tab, click Amazon Web Services Connectors, click organization and then click Create Connector, and our wizard will walk you through the steps.
Step 1: Basic DetailsBasic Details
Provide a name and description for the connector. We recommend you provide a unique name for the connector.
Select applications that are applicable for the connector.
Select Enable Remediation to enable remediation on the connector. You need to configure additional permissions before you enable remediation for AWS connectors.
Note: Ensure that the member connector has write access to the AWS account for which you enable remediation.
Step 2: Organization Details
- Account TypeAccount Type
Select an account type for your organization connector: Global, or US GovCloud. You can choose only one account type per connector.
- Polling FrequencyPolling Frequency
Select a frequency at which the org connector should poll the cloud provider and fetch data. The designated interval for the org connector determines when it automatically run scans for new or deleted accounts. Choose any period under 24 hours as the interval to auto-run the scan.
By default, the connector polling frequency is configured for every 4 hours. As a result, the connector will connect with the cloud provider every 4 hours to fetch the data.
- Cross-account ARNCross-account ARN
This lets you grant Qualys access to your AWS resources without sharing your AWS security credentials. Qualys will access your AWS resources by assuming the IAM role that you create in your AWS account. Learn more.
AWS requires that vendors provide a unique external ID value amongst all their customers when providing a vendor account for a trust relationship. However, we no longer require customers to adhere to any fixed format for external ID. Learn more
In the Role ARN Information, paste Role ARN, and click Add.
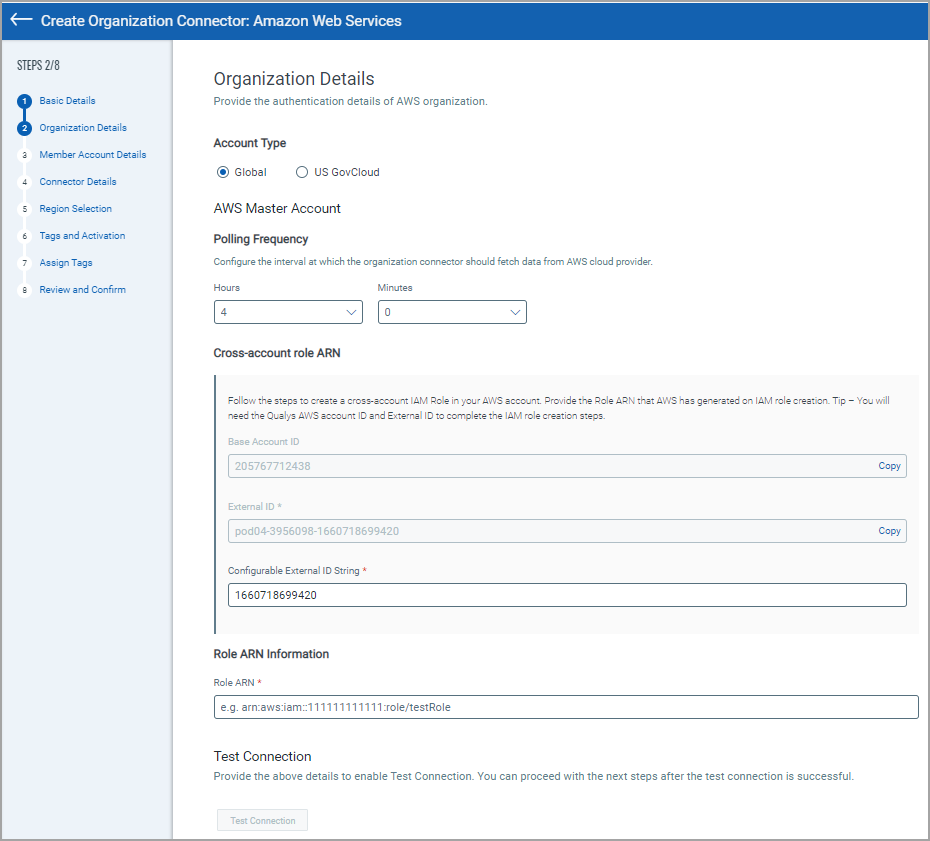
- Test ConnectionTest Connection
Click Test Connection to verify if the organization connector can successfully authenticate using the provided role ARN information. If the test connection is successful, proceed with the connector creation process. If the test connection fails, you may need to check and update the authentication details.
Step 3: Member Account Details
- Polling FrequencyPolling Frequency
Select a frequency at which the member account connector should poll the cloud provider and fetch data. The designated interval for the member connector determine when the connectors will be automatically run. Choose any period under 24 hours as the interval to auto-run the scan.
By default, the connector polling frequency is configured for every 4 hours. As a result, the connector will connect with the cloud provider every 4 hours to fetch the data.
- Connector Name PatternConnector Name Pattern
Enter the prefix that will be added to the member account connector. This prefix will show which organization the member account connector is connected to.
- Cross-account ARNCross-account ARN
This lets you grant Qualys access to your AWS resources without sharing your AWS security credentials. Qualys will access your AWS resources by assuming the IAM role that you create in your AWS account. Learn more.
To adhere to the AWS vendor requirement best practices, we have modified the format of the external ID. AWS requires that vendors provide a unique external ID value amongst all their customers when providing a vendor account for a trust relationship. Learn more
In the Application list, select the Application (CloudView/AssetView), provide the Role Name, and click Add.
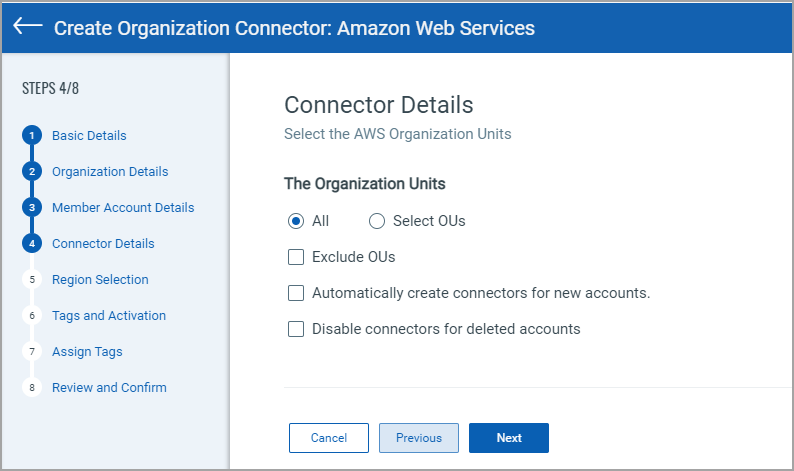
Step 4: Connector DetailsConnector Details
Configure the organization connector. Here, you can select the Organization Units where member connectors are created for the accounts present under it. Select all OUs, select specific OUs or exclude OUs.
All- Member connectors will be created for all the accounts under all the OUs.
Select OUs- Member connectors will be created for all the accounts under the selected OUs.
Exclude OUs- Member connectors will not be created for the accounts present under the excluded OUs.
The connector details for AWS organization connectors also allow you to:
1) Automatically create member connectors for new accounts by selecting the 'Automatically create connectors for new accounts' checkbox.
2) Automatically disable member connectors for the accounts you delete by selecting 'Disable connectors for deleted accounts' checkbox.
The connector will automatically scan for these changes during the polling frequency interval.
Step 5: Region SelectionRegion Selection
Select regions to discover the asset/resource and fetch the data from the member connectors of all the selected regions.
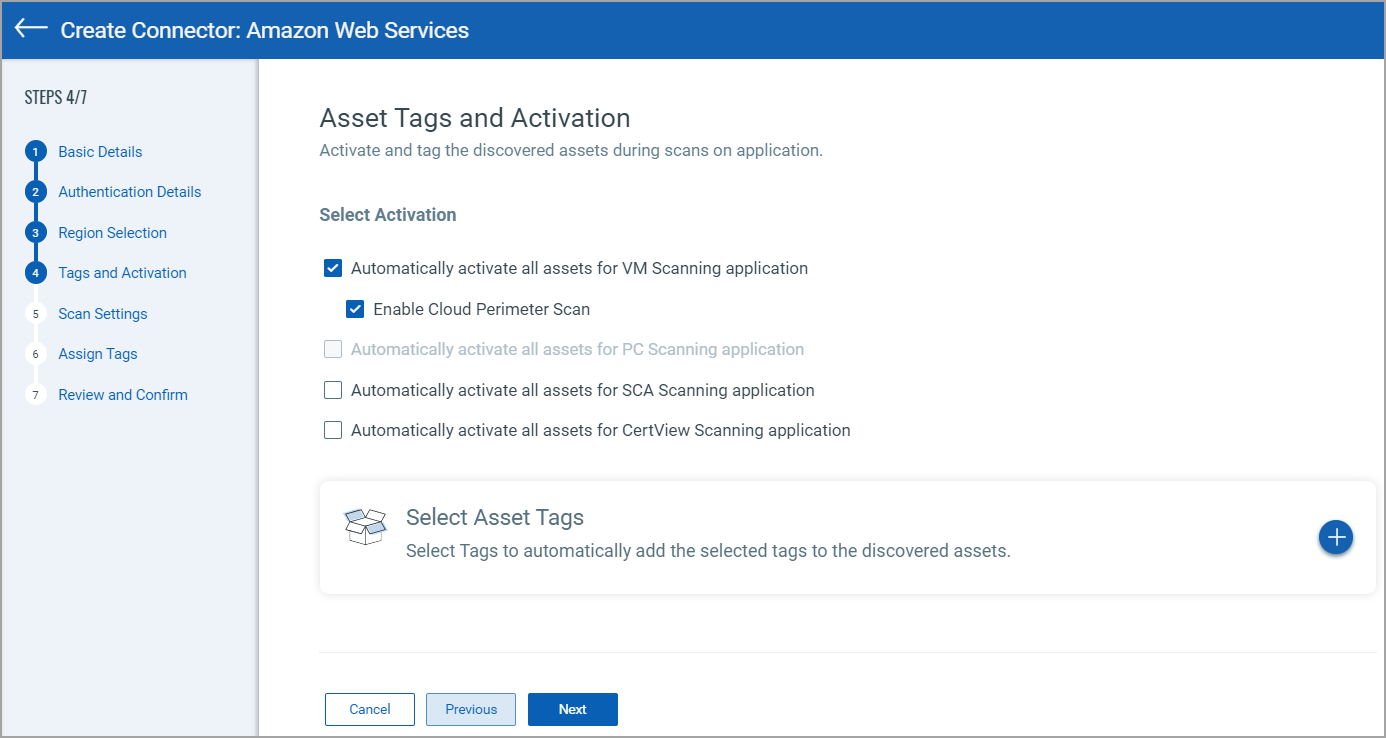
Step 6: Tags and ActivationTags and Activation
We can activate AWS assets for scanning automatically so you do not have to take this extra step. Select the required check box to enable activation for the required app. We automatically activate the assets as they are discovered and even assign them tags if you want.
Enabling Cloud Perimeter Scan
When you select the Automatically activate all assets for VM Scanning application check box, you can see a check box to enable cloud perimeter scan. Show meShow me
Select the Enable Cloud Perimeter Scan if you want to enable launching perimeter scans on all the member AWS connectors associated with the AWS organization connector. The settings you configure for AWS organization connector are applied to all the member connectors for the cloud perimeter scan.
Perimeter scan jobs are run automatically based on the settings defined in the Scan Settings step or in the Cloud Perimeter Scan - Global Scan Configuration.
Select Asset Tags
We recommend you create at least one generic asset tag (for example, EC2) and have the connector automatically apply that tag to all imported assets. You can add more tags to your EC2 assets based upon discovered EC2 metadata.
Step 7: Assign TagsAssign Tags
Assign tags to the connector that you are creating. You can also create a new tag. For details on creating new tags, see Configure Tags in Qualys CyberSecurity Asset Management documentation.
Step 8: ConfirmationConfirmation
Review the connector settings you configured and then click Create Connector.
That’s it! The organization connector is created and so are its member connectors. The member connectors will establish a connection with Amazon Web Services to start discovering resources from the configured region.
Note: Any changes made to the AWS account will only reflect on the connectors after manually running it or waiting for the auto-run to sync the changes.
The Amazon Web Services page displays the list of AWS organization and member connectors. The Status column indicates the status of the connector created, that is, Completed successfully, Completed with errors, Queued, Synchronizing, and Disabled.
Related Topics
Edit AWS Organization connector
Disable AWS Organization connector