Ordr Connector
The Ordr connector retrieves IoT asset and vulnerability data from the Ordr platform into Qualys CSAM. It operates as a unidirectional, REST API-based integration that pulls host asset records and associated vulnerability findings on a scheduled basis.
The connector addresses the fragmentation problem where security findings exist in separate systems, preventing teams from establishing comprehensive risk visibility. This integration enables security practitioners to automatically transfer asset inventory and vulnerability findings through scheduled API calls, eliminating delays in threat prioritization and response.
Connector Details
The following table provides a comprehensive overview of what the Ordr Connector supports.
| Vendor | Ordr |
| Product Name | Ordr |
| Category | Asset & Attack Surface Management |
| Findings Support | Assets and Vulnerabilities (Findings) |
| Supported Assets | Host Assets |
| Version | 1.0.0 |
| Integration Type | API Integration (REST) |
| Direction | Unidirectional |
| Delta Support | Not Supported |
| Supported Version & Type | SaaS (Latest) |
| Import of Installed Software | Not Supported |
| Import of Source Tags | Not Supported |
| Filters/Filter Query | Not Supported |
Configure the Connector
The connector wizard consists of three steps: Profile & Connectivity, Scope & Schedule, and Review & Confirm. A successful connection test is required before you can proceed.
Before You Begin - AuthenticationBefore You Begin - Authentication
Complete the following steps before configuring the connector in Qualys ETM.
Obtaining Your Ordr Credentials
- Contact your Technical Account Manager (TAM) or Qualys Support to activate the Ordr connector for your subscription.
- Obtain your Ordr Tenant URL in the format
https://<tenantURL>.naw.saas.ordr.net/. - Create API credentials (username and password) in the Ordr platform under the Platform API integration:
- Log into your Ordr instance using the custom URL provided by Ordr.
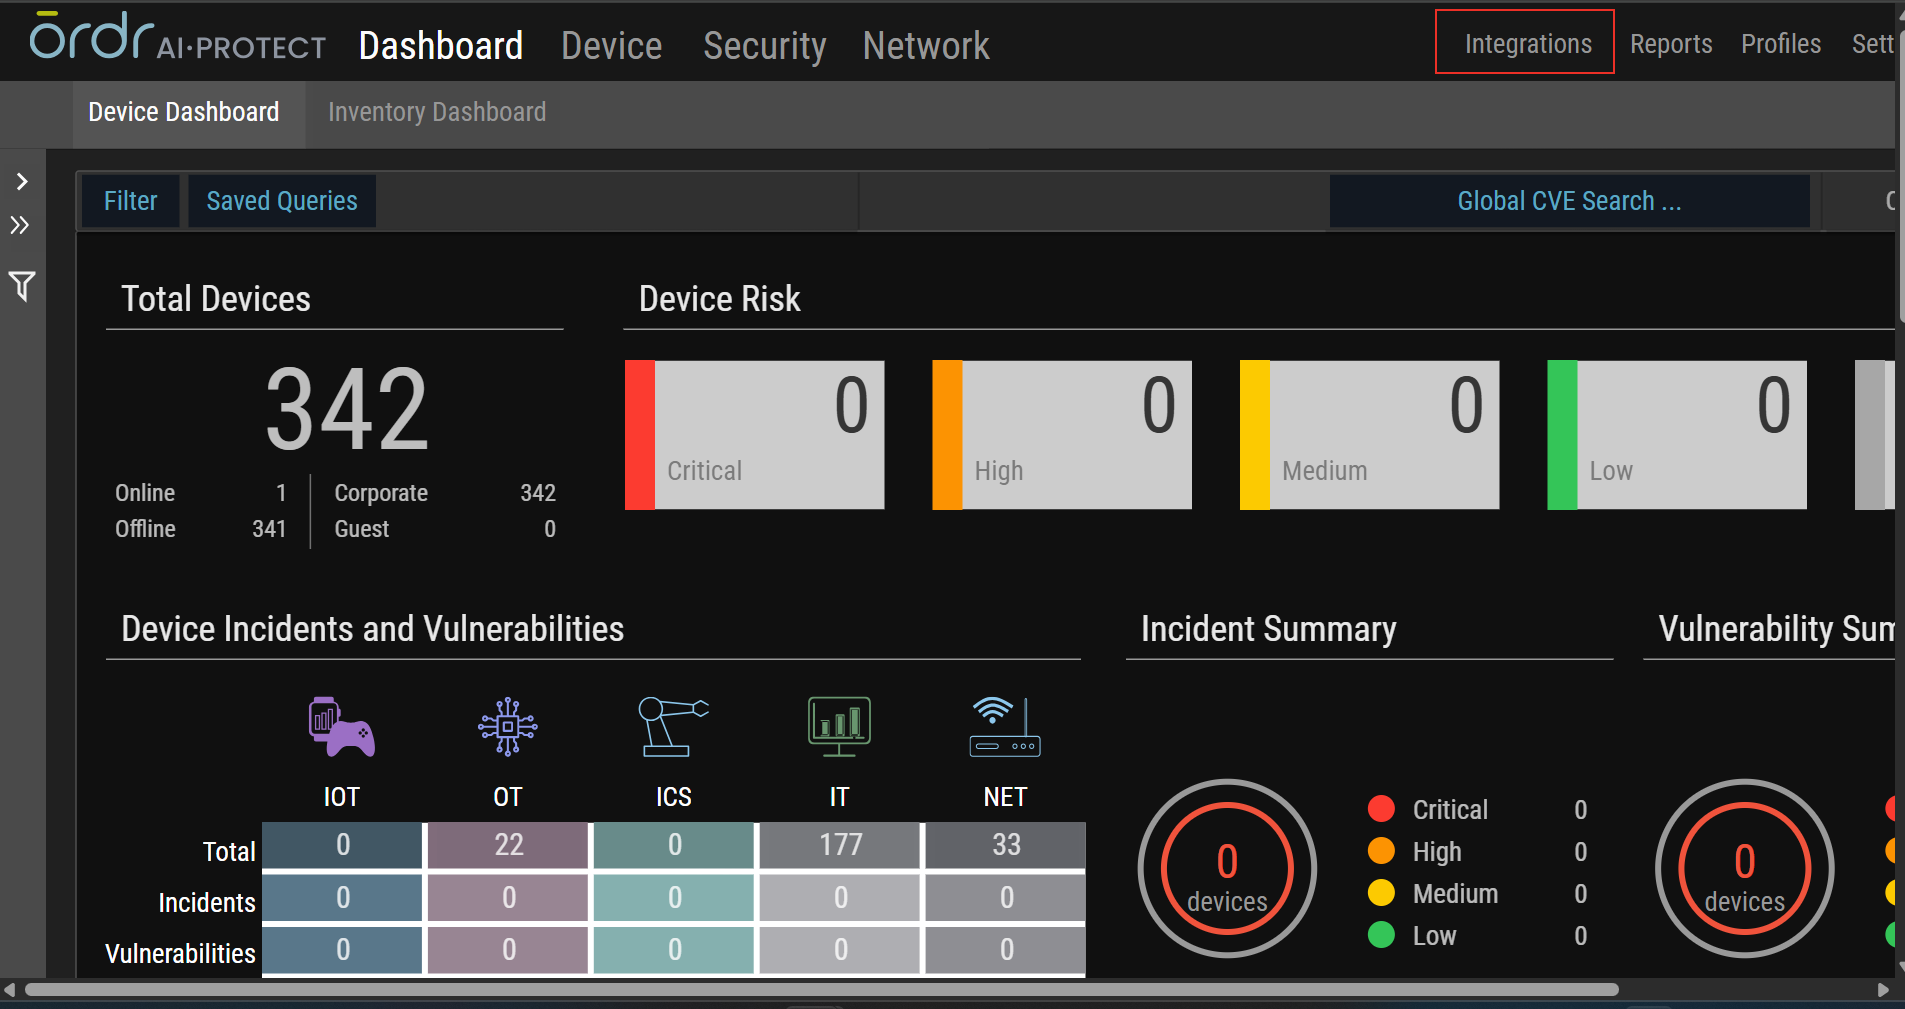
- Navigate to Integrations in the top-right corner of the interface.
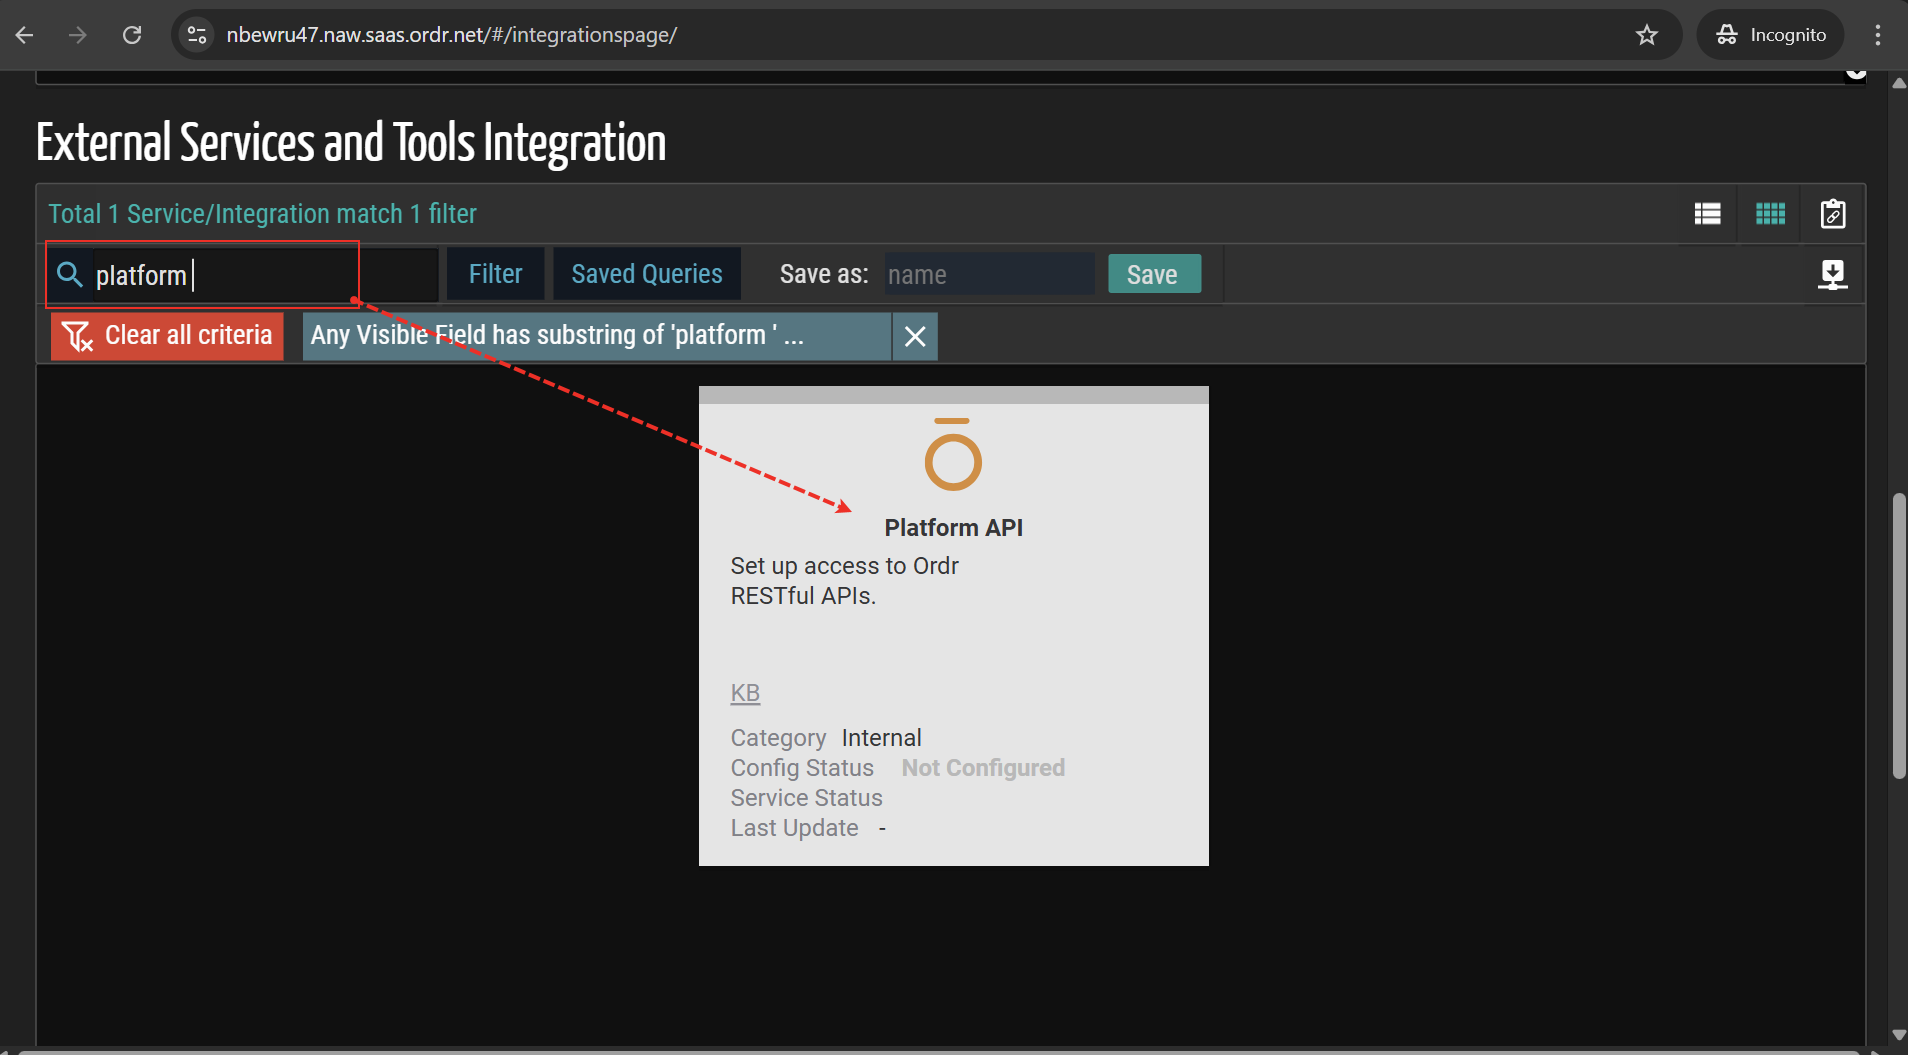
- Search for Platform API and select it.
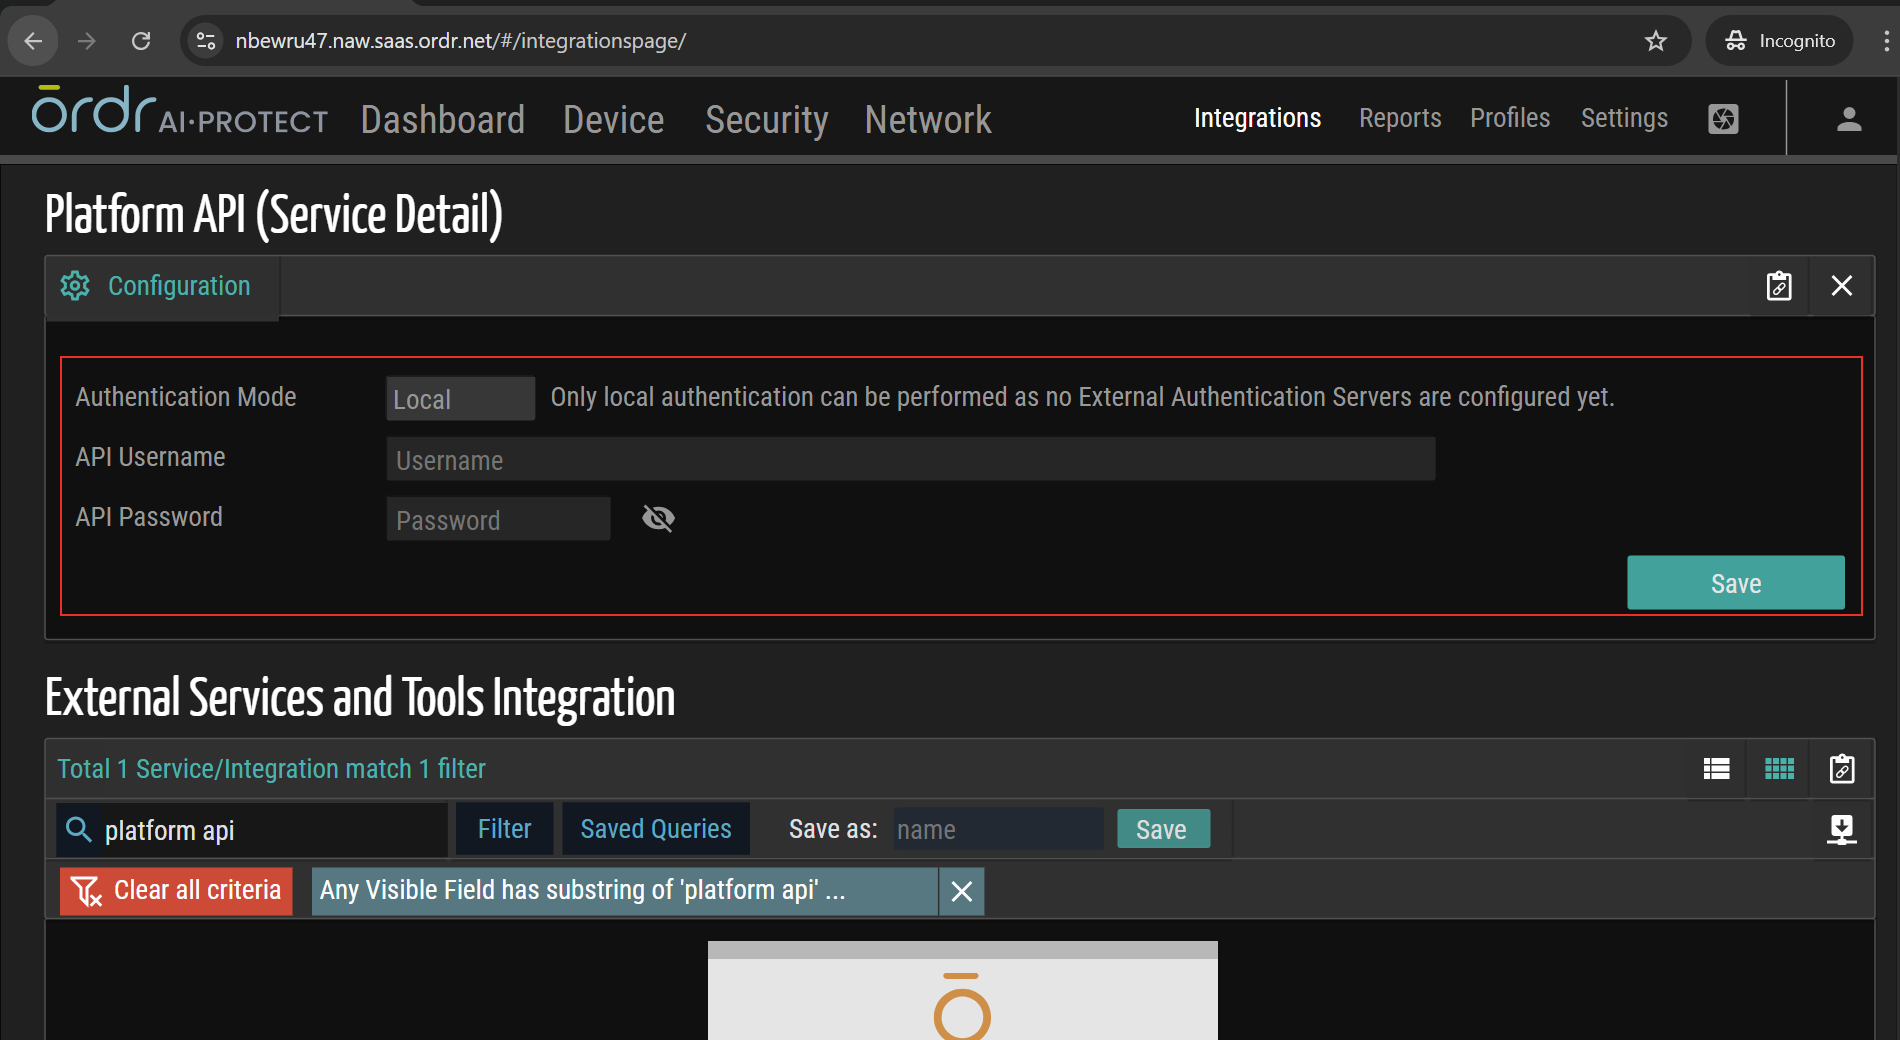
- Enter your desired API Username and Password, then click Save. Record these values for use in the Qualys connector configuration.
- Confirm that the Ordr SaaS instance is running the latest supported version.
Permissions Required
The API credentials configured in Ordr must have access to the Platform API integration. The account needs read access to both the Devices endpoint and the Vulnerabilities endpoint.
Scope and Data Access
The connector retrieves all devices and vulnerabilities accessible through the authenticated API credentials. It queries the following endpoints:
/Rest/Devices– retrieves host asset records/Rest/Vulnerabilities– retrieves associated vulnerability findings
Scoring configuration maps Ordr severity ratings (across five levels) to Qualys Detection Scores on a 0–100 scale. A default severity value handles any findings that do not match the configured severity mappings.
Key Rotation
When rotating API credentials, create the new credentials in the Ordr platform under the Platform API integration before disabling the old ones. Update the Qualys connector configuration with the new username and password. Verify connectivity by monitoring the next scheduled execution for a successful Processed state.
Create a Profile & ConnectionCreate a Profile & Connection
Configure the connector's identity and authenticate with the Ordr source system.
Connector Details
| Field | Type | Description |
|---|---|---|
| Name | String | A unique display name for this connector instance. Example: Ordr2605050541 |
| Description | String | An optional free-text description of this connector's purpose or environment. |
Authentication Details
| Field | Type | Description |
|---|---|---|
| Tenant URL | String | The base URL of your Ordr SaaS instance. Example: https://<tenantURL>.naw.saas.ordr.net |
| Username | String | The API username created under the Platform API integration in Ordr. |
| Password | Encrypted String | The API password associated with the Platform API username. The value is masked after entry. |
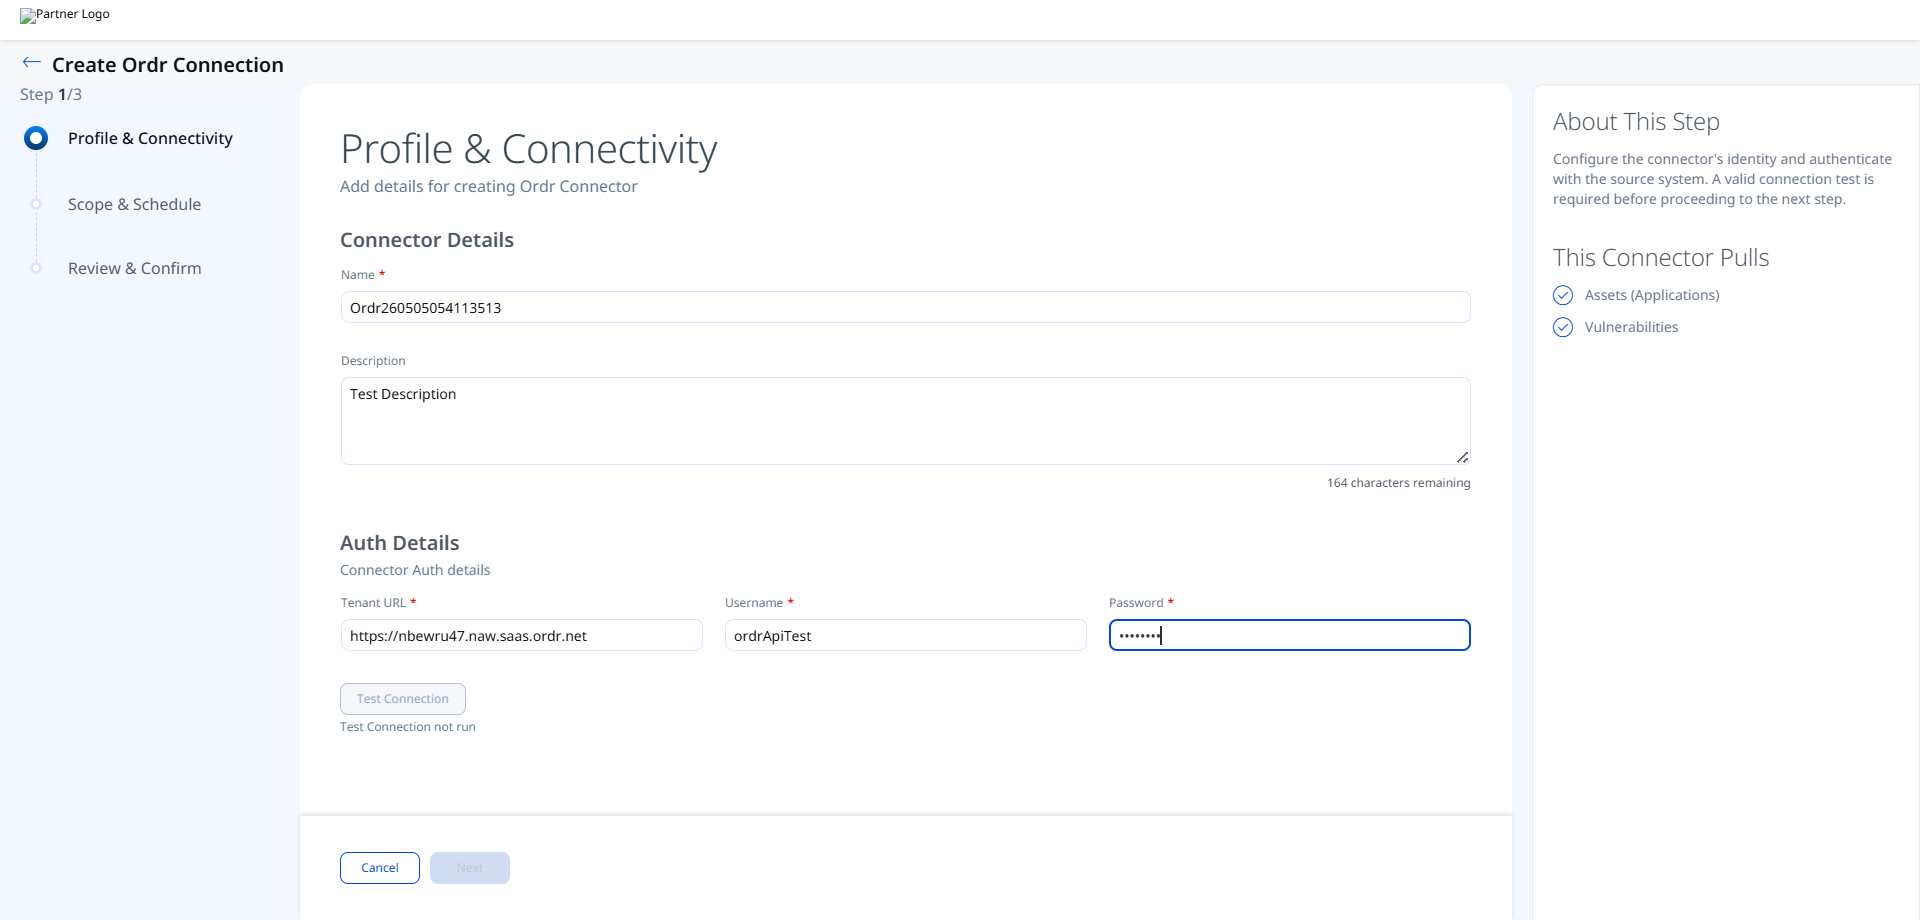
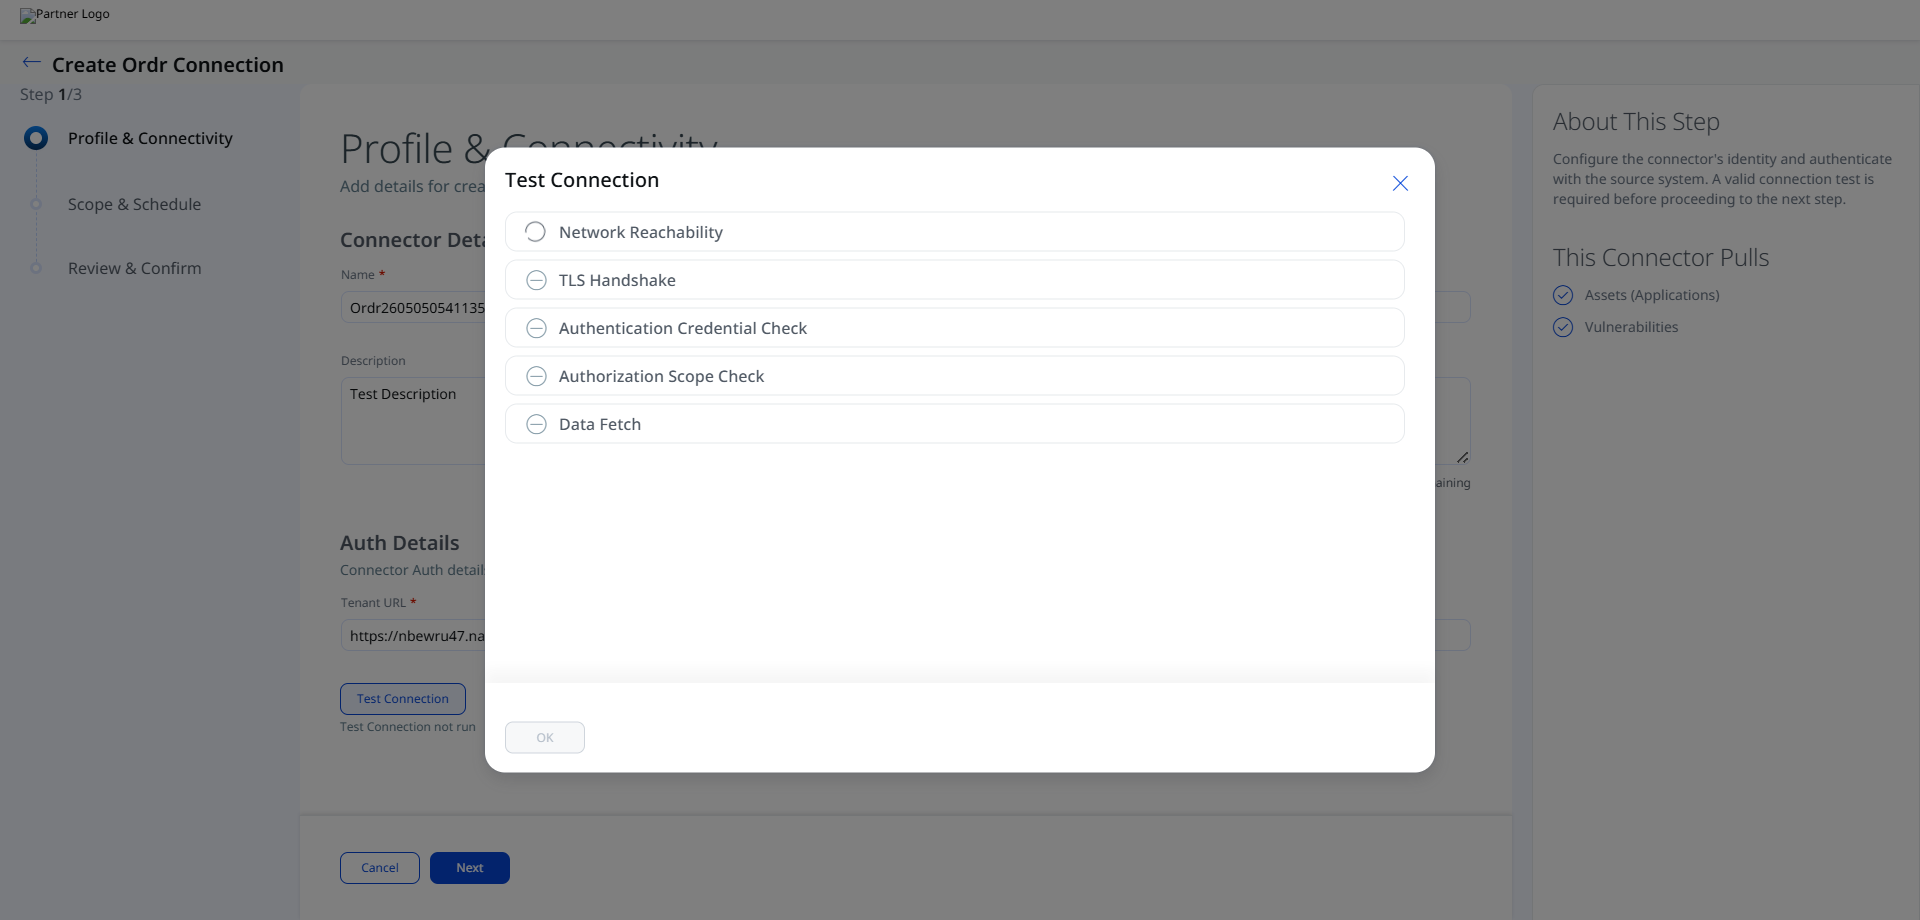
After entering all three authentication fields, click Test Connection to validate the credentials before proceeding. The following checks are performed:
- Network Reachability — Verifies the API endpoint is reachable.
- TLS Handshake — Confirms a secure connection can be established.
- Authentication Credential Check — Validates the Client ID, Client Secret, and Token URL.
- Authorization Scope Check — Confirms the service account has the required permissions.
- Data Fetch — Verifies that data can be retrieved from the Ordr API.
All checks must pass before you can advance to the next step. If any check fails, refer to the Troubleshooting section for resolution guidance.
Set the Scope & ScheduleSet the Scope & Schedule
Define what data the connector imports and how frequently it runs. The connector imports Assets (Applications) and Vulnerabilities from Ordr. Configure the execution schedule to control when the connector pulls data from Ordr.
Note: Delta (incremental) sync is not supported. Each scheduled execution performs a full data pull from Ordr.
Advanced Settings
Note: After making changes in any Advanced Settings tab, click Save to apply the configuration before navigating away.
Filters Tab
The Ordr connector does not currently support filter queries. The Filters field is present in the connector configuration but filter expressions are not processed. All devices and vulnerabilities accessible through the authenticated API credentials are retrieved on each execution.
Transform Map Tab
The Ordr connector provides an out-of-box transform map that you can use without additional configuration. View the map to understand the data transformation, or clone it to create a customized version.
To learn more about the field-level mappings, refer to the Transformation Maps section.
Ordr Vulnerability Transformation MapOrdr Vulnerability Transformation Map
| Source Attribute (Ordr) | Target Attribute (Qualys ETM) |
|---|---|
MacAddress |
externalAssetId (Required) |
dhcpHostname |
hostName (Required) |
vulns[].vulnId |
externalFindingId (Required) |
vulns[].severityLevel |
findingSeverity (Required) |
MacAddress |
macAddress |
deviceName |
assetName |
vulns[].firstSeen |
findingFirstFoundOn |
LongMfgName |
productVendor |
OsType |
operatingSystemName |
vulns[].vulnSummary |
findingDescription |
vulns[].category |
findingType |
vulns[].categoryType |
findingSubType |
vulns[].vulnId |
cveId |
accessType |
fqdn |
OsType |
operatingSystemVersion |
How the Connection Works
The Ordr connector retrieves IoT asset and vulnerability data from the Ordr platform and imports them into Qualys CSAM. It operates as a unidirectional, REST API-based integration that pulls host asset records and associated vulnerability findings on a scheduled basis.
Each execution performs a full data pull, as delta sync is not supported. Installed software import and source tag import are not available. Full asset and finding ingestion may take up to two hours to complete.
Connector States
After the connector is created, it progresses through the following states:
| State | Description |
|---|---|
| Registered | The connector has been saved and is awaiting its first scheduled execution. |
| Scheduled | The connector is queued for execution according to the configured schedule. |
| Processing | The connector is actively pulling data from Ordr and ingesting it into Qualys CSAM. |
| Processed | The execution completed successfully and the data is available in ETM. |
| Errored | The execution encountered an error. Review the connector logs and refer to Troubleshooting for resolution steps. |
Note: The first full data ingestion from Ordr may take up to two hours to complete, depending on the volume of assets and vulnerabilities. Monitor the connector state progression from Registered through Scheduled and Processing before expecting the Processed state. Even after the connector reaches the Processed state, findings may continue to be indexed in ETM for a short period.
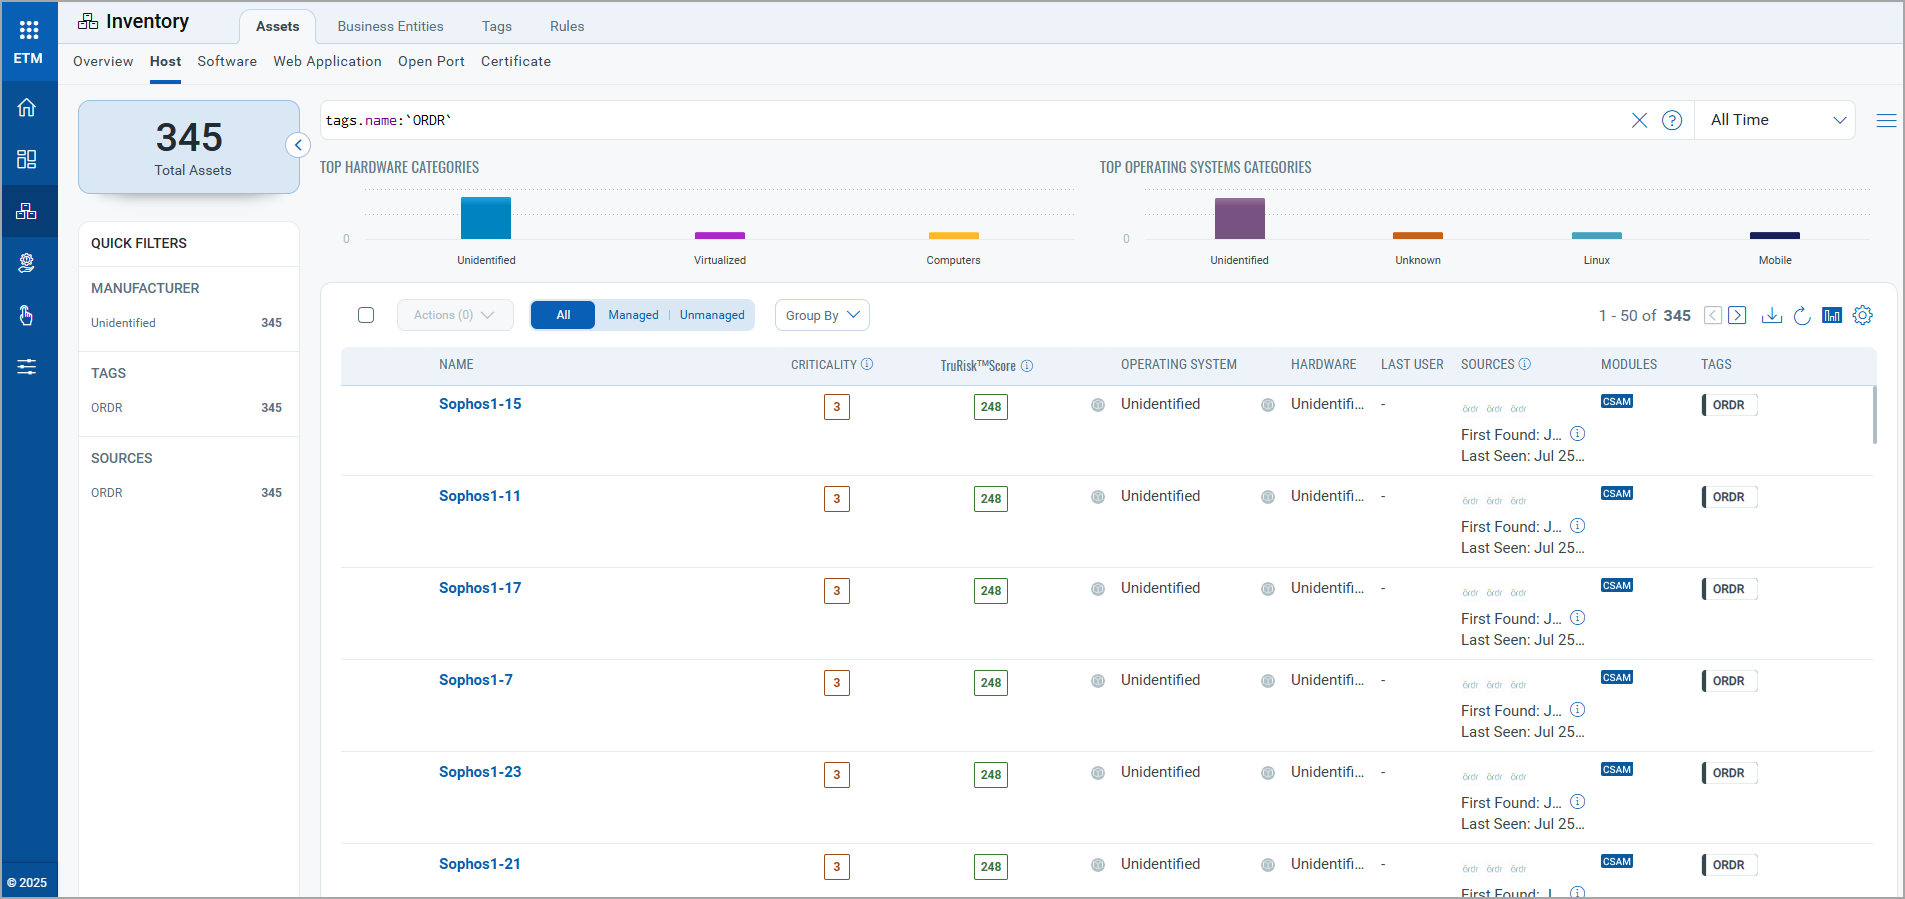
Viewing Assets and Findings in ETM
Navigate to Enterprise TruRisk Management (ETM) to analyze the imported data from Ordr.
To view imported assets, go to Assets > Host in the Inventory tab of ETM. Use the following filter token to display all assets sourced from Ordr:
inventory:(source:"Ordr")
To view vulnerability findings, navigate to Risk Management and go to Findings > Vulnerability. Use the following filter token to display all Ordr vulnerability findings:
findings.vendorProductname:"Ordr"
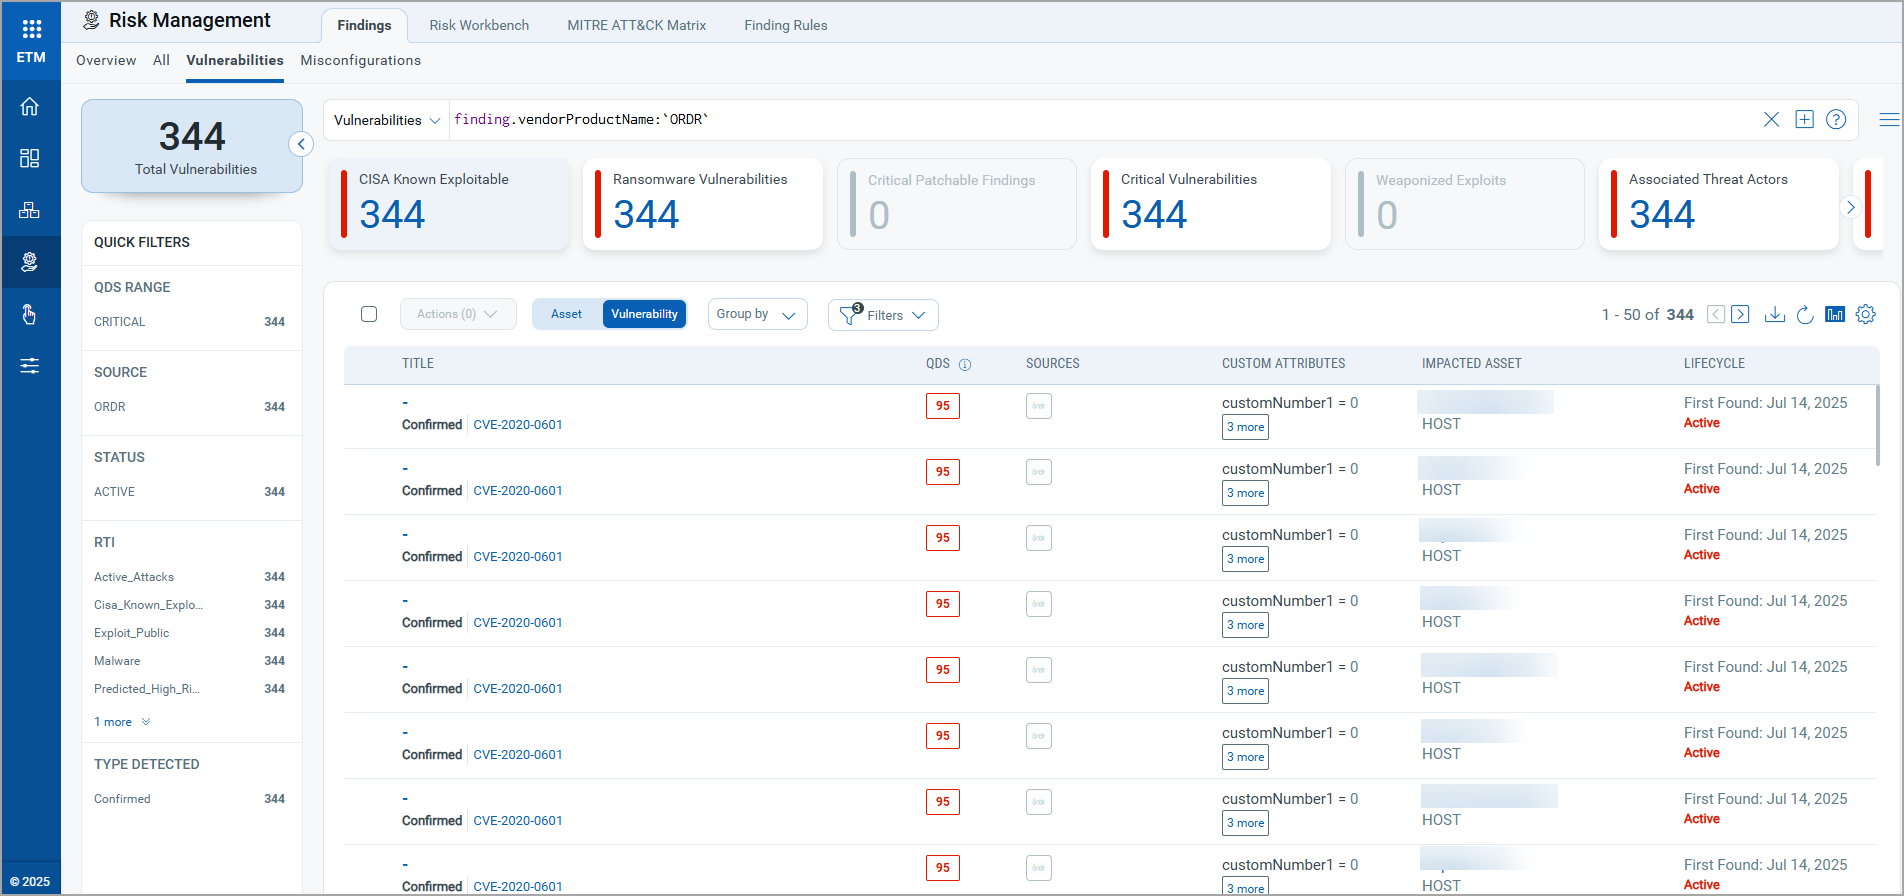
For more information on working with connector data in ETM, refer to the Qualys ETM Documentation.
Troubleshooting
| Issue | Resolution |
|---|---|
| Connection test fails | Verify that the Tenant URL follows the correct format: https://<tenantURL>.naw.saas.ordr.net/. Confirm that the API Username and Password are entered correctly. Check that the Qualys platform has outbound network access to the Ordr SaaS endpoint. |
| Processing takes longer than expected | Full data ingestion from Ordr can take up to two hours depending on the volume of assets and vulnerabilities. Monitor the connector state progression from Registered through Scheduled, Processing, and finally Processed. If the connector remains in Processing beyond two hours, check the connector logs for errors. |
| Assets not appearing with correct identification | Ensure that at least one Identification Rule is active in the connector configuration. The Qualys CSAM precedence rules determine how incoming Ordr assets match existing records. Review the identification rules to confirm they align with the asset attributes provided by Ordr. |
Additional Information
API Reference
The following table lists the REST API endpoints queried by the Ordr connector during each execution.
| Operation | Endpoint | Default Params |
|---|---|---|
| Authentication | Not Required (credentials passed per-request) | – |
| Fetch Asset List | https://{tenantURL}.naw.saas.ordr.net/Rest/Devices |
limit=20 |
| Fetch Vulnerabilities | https://{tenantURL}.naw.saas.ordr.net/Rest/Vulnerabilities |
limit=20 |