VMware ESXi Connector
The VMware ESXi Connector automatically discovers and inventories virtual machines and ESXi hosts from vCenter environments into Qualys' asset management system, enabling security teams to maintain an accurate, real-time view of their virtualized infrastructure. By establishing this continuous synchronization, organizations can identify all VMs and hosts across versions 5.0 to 8.0, eliminating blind spots in their asset inventory that could hide vulnerable systems from assessments.
The connector supports filtering capabilities to focus on relevant assets and offers flexible scheduling options, allowing teams to align data collection with their operational rhythms. Security practitioners gain the ability to enrich their vulnerability management and compliance programs with comprehensive VMware infrastructure data, creating a foundation for more effective risk prioritization and remediation.
Create a VMware ESXi Connector
To create a VMware Esxi Connector, you must begin by navigating to the Connectors application.
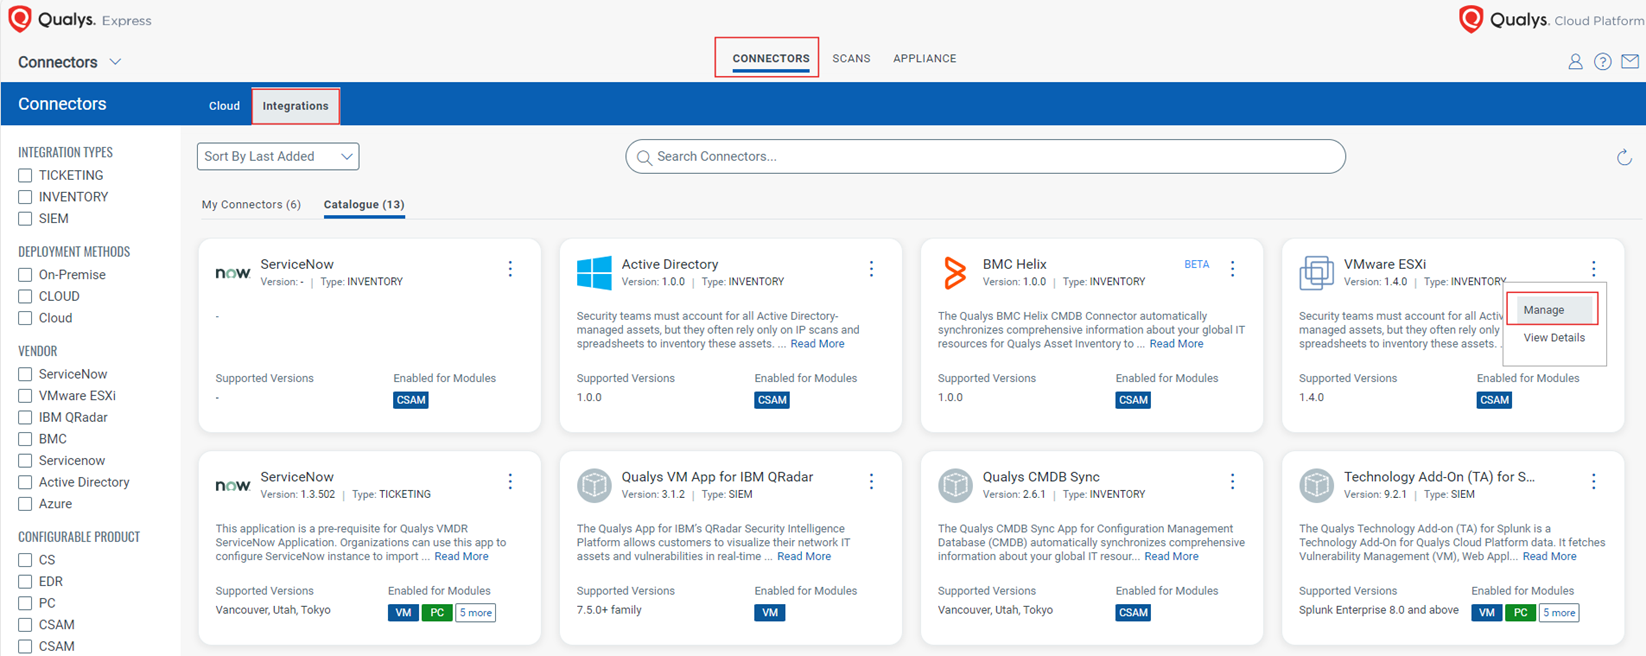
1. Navigate to Integrations.
2. Click the three dots and click Manage on the VMware ESXi section.
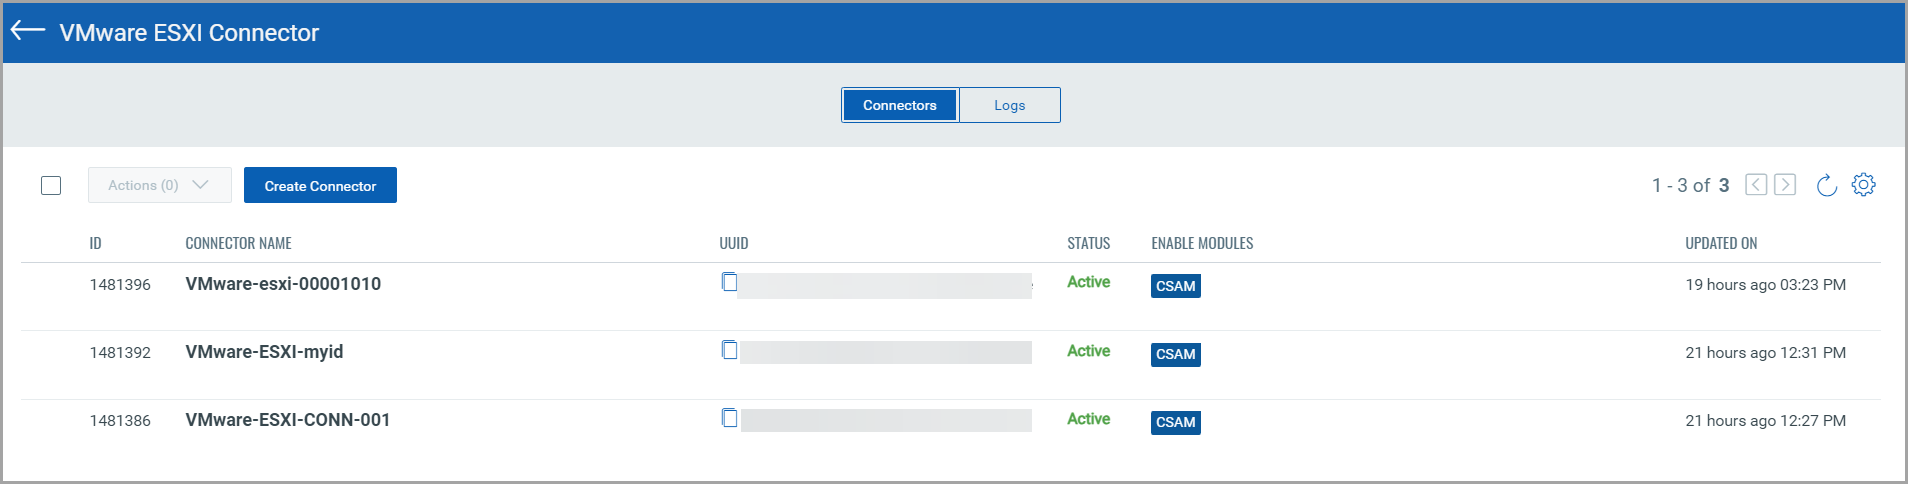
The Manage Connectors screen lists all the available connectors you created in the Connectors Application. You can view their status and perform actions on them.
3. Let’s begin creating our first connector. Click Create Connector.
A connector creation wizard appears. Provide the necessary information to authenticate your VMware ESXi account.
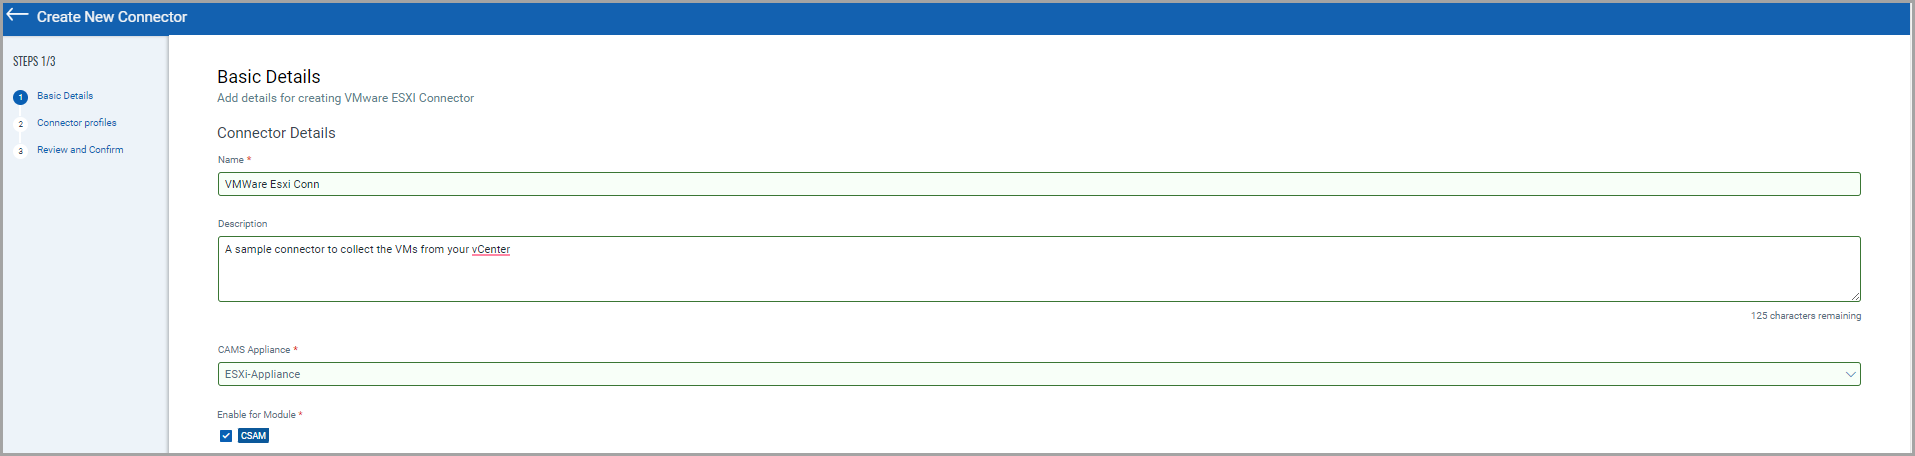
4. In the Basic Details screen, provide the required details:
Connector Name - Name of the connector.
Description – Description of the connector.
CAMS appliance – Select the appliance you have created on the Appliance tab, which queries the VM data. To learn more about creating an appliance, refer to Configure Appliances.
The appliance must be in an Active state to be visible in the CAMS appliance dropdown.
Modules to Enable - Select the Qualys service the connector will have access to. Select CSAM to pass the Connector information to the CSAM application.
Certificate – Upload a Root or Private Key certificate for added security.
VCenter IP/Host or vSphere Host/IP – Provide the URL of the VMware ESXi instance to authenticate.
When providing the vSphere Host/IP or VCenter IP/Host URL, ensure not to add any protocols to the input. For example, vcnxx.xxxx.com or 10.xx.xx.xx.
Username and Password – Authenticate the VMware ESXi account with your username and password. The ESXi user account used here can be Administrator or Non-administrator.
For a Non-administrator user account, you must at least have a ‘Read-only’ Role or Privileges or Access to fetch the VMs and ESXi host data from the VMware ESXi platform.
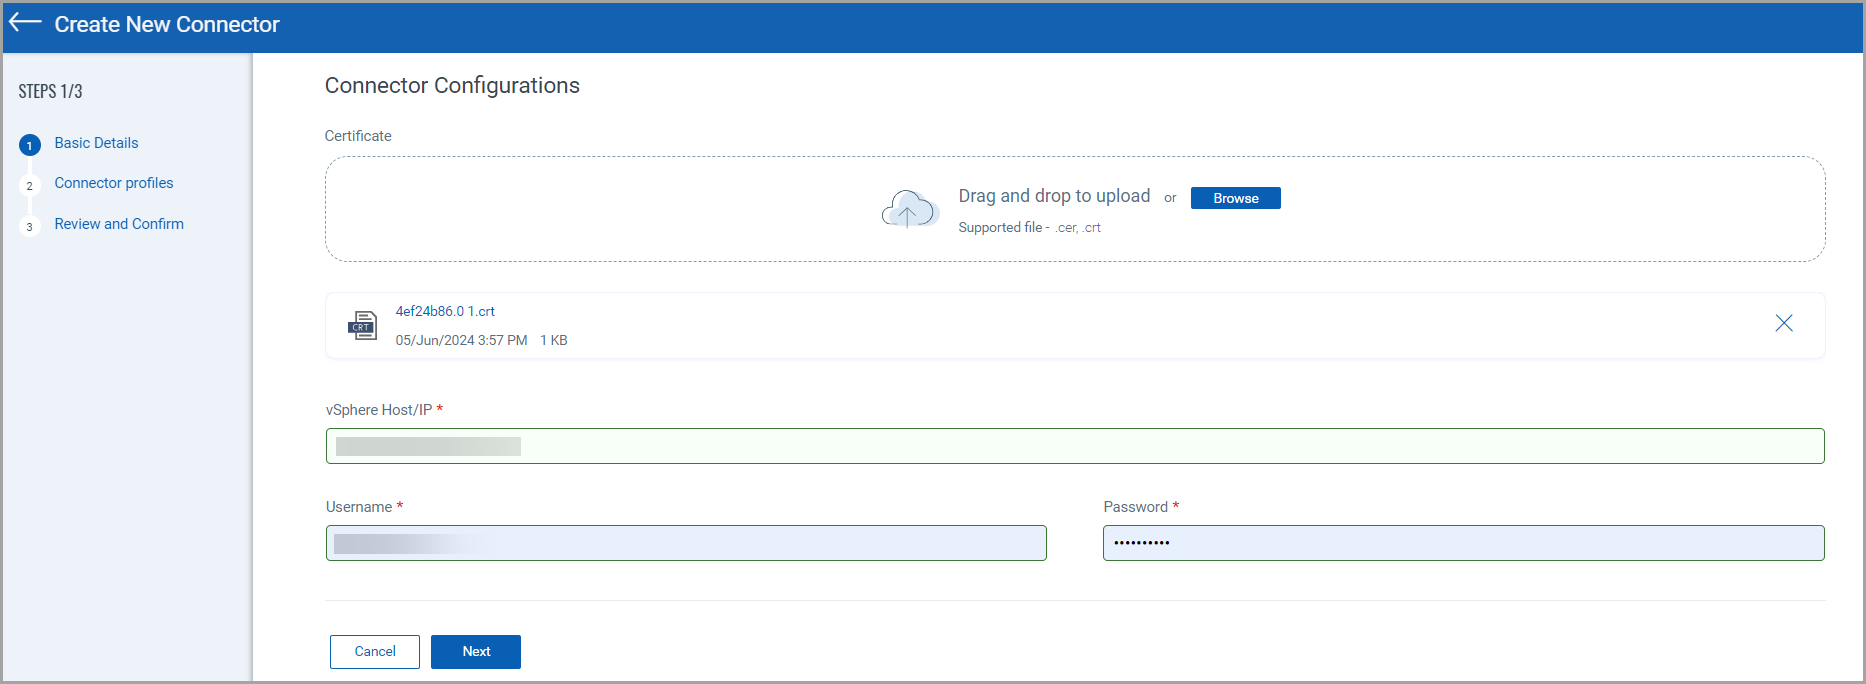
5. Click Next to proceed to the next step.
Create Profiles
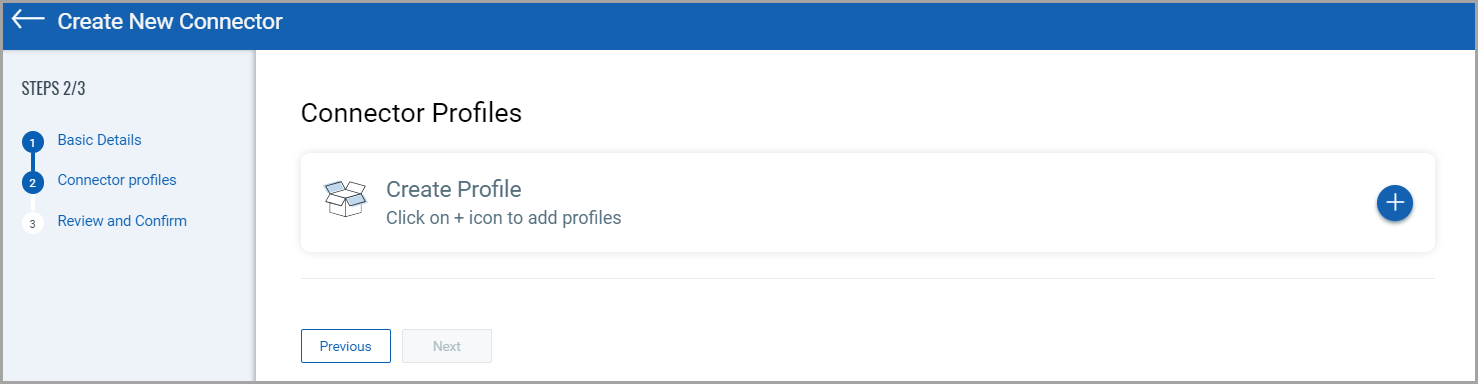
The wizard is navigated to the Connector Profile screen, where you can create profiles to filter out fetched data. Specify a filter on what assets from the vCenter should be retrieved. Profiles can be switched to active or inactive depending on the type of data you need.
1. In the Connector Profile screen, click on the + icon to provide the required details:
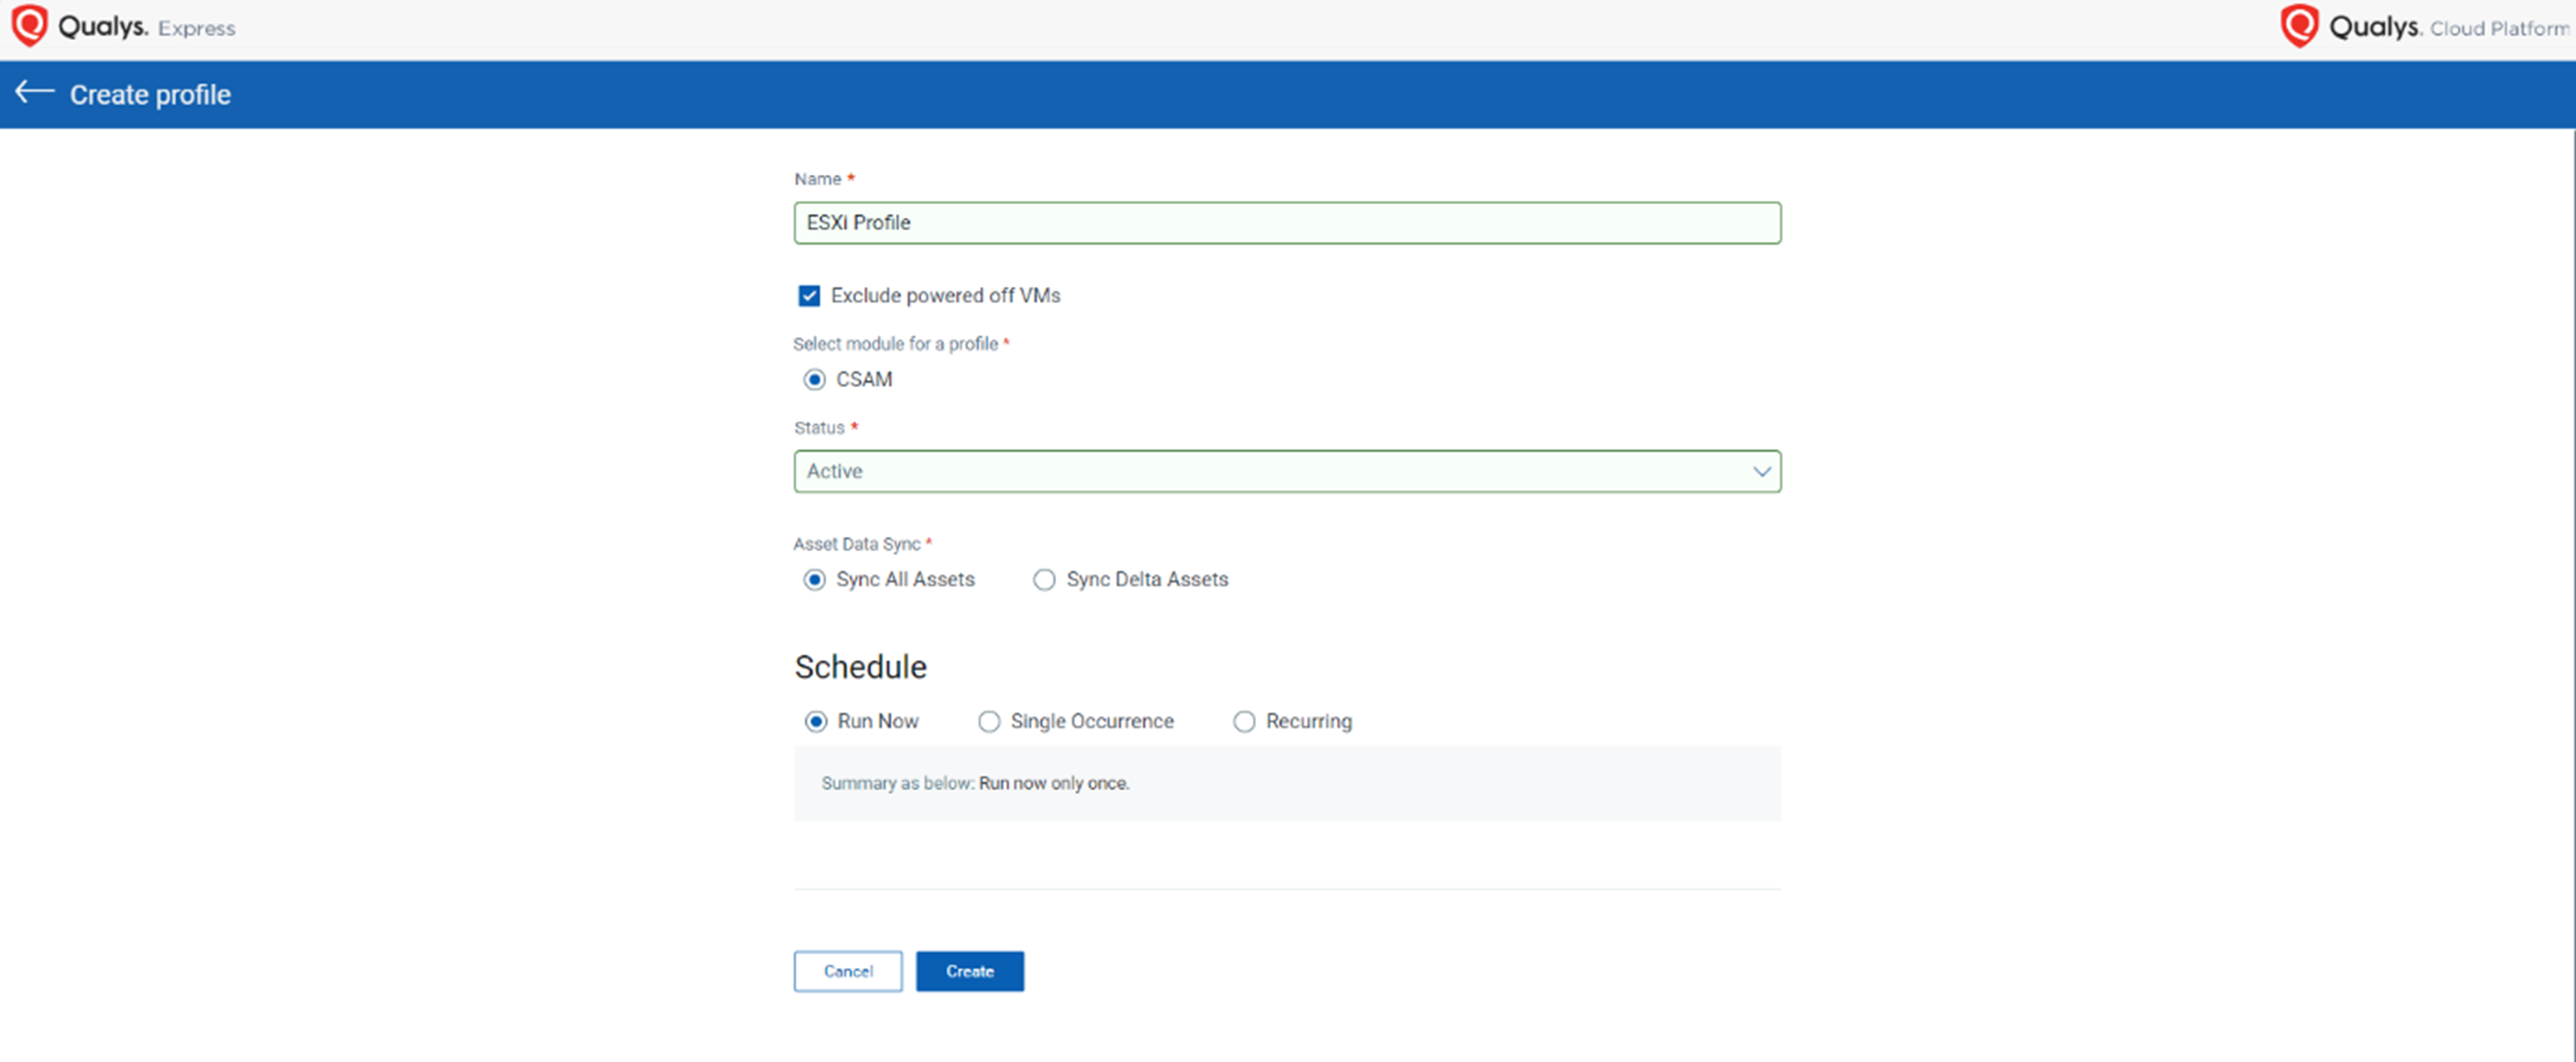
Profile Name - Name of the profile.
Exclude powered off VMs - Select this checkbox to filter out shutdown instances.
Select module - Select the Qualys service the connector will have access to. Select CSAM to pass the profile information to the CSAM application.
Status – Select the status (Active/Inactive) of the profile upon creation. You can toggle this later to start or stop fetching the data.
Asset Data Sync – Decides how the connector should sync VMs and ESXi host information from vCenter to Qualys.
- Sync All Assets - When this option is configured in the profile, the connector with this profile will sync all candidate VMs and ESXi hosts data from vCenter to Qualys on each occurrence/execution of the connector.
- Sync Delta Assets - When this option is configured in the profile, the connector with this profile will sync all candidate VMs and ESXi hosts from vCenter to Qualys for the first time. If the profile is configured as Recurring, then in subsequent execution, the connector will only sync such VMs with a changeVersion date greater than the last execution date and time. The delta sync will not be applicable for ESXi Hosts information.
Schedule – Select if the profile should be updated once or on a schedule.
- Run Now - After configuring the profile, the connector fetches asset data from vCenter and publishes it to CSAM (within 10 mins).
- Single Occurrence – Provide a date and time for the connector to run automatically, fetch the assets data from vCenter, and publish to CSAM. The connector runs once as per the configured schedule.
- Recurring – Select the ‘Recurring’ checkbox to run the connectors as per the configured frequency. The connector will run multiple times (daily, weekly, or monthly) and stop only on the provided End date/time.
2. Click Next.
3. Review your configurations and click Submit.
7. Click Create to create your profile.
Once you have created the profile, click Next.
Review and confirm your changes and click Create.
Your connector is ready. You can change the state of your connector or edit their configurations by selecting them and clicking Actions.
VMware ESXi Attribute Mapping
The following tables detail how the VM and ESXi host field names are mapped to CSAM after a successful connector run.
Attribute Mapping with VMsAttribute Mapping with VMs
| CSAM Fields | SDK field name for Virtual Machine |
|---|---|
| identityAttributes | |
| identityAttributes/sourceNativeKey | config.uuid |
| identityAttributes/instanceUuid | config.instanceUuid |
| identityAttributes/hostName | config.name |
| identityAttributes/fqdn | guest.ipStack.dnsConfig.hostname |
| identityAttributes/macAddress | guest.net.macAddress |
| identityAttributes/ipAddress | guest.net.ipAddress |
| identityAttributes/hardwareUuid | config.uuid |
| coreAttributes | |
| coreAttributes/operatingSystem |
summary.config.guestFullName |
| coreAttributes/hostName |
summary.config.name |
| coreAttributes/netBiosName |
guest.ipStack.dnsConfig.hostname |
|
coreAttributes/fqdn |
dns_values.hostName |
|
coreAttributes/domain |
guest.ipStack.dnsConfig.domain |
|
coreAttributes/osVersion |
summary.config.guestId |
| coreAttributes -biosInfo | |
|
coreAttributes/biosInfo/lastBoot |
runtime.bootTime |
|
coreAttributes/biosInfo/totalMemory |
summary.config.memorySizeMB |
|
coreAttributes/biosInfo/model |
"VMware virtual platform" +config.version |
|
coreAttributes/biosInfo/hardwareUuid |
config.uuid |
| coreAttributes -networkInterfaces | |
|
coreAttributes/networkInterfaces/interfaceName |
config.hardware.device.deviceInfo.label |
|
coreAttributes/networkInterfaces/macAddress |
config.hardware.device.macAddress |
|
coreAttributes/networkInterfaces/dnsAddress |
guest.net.dnsConfig.ipAddress |
|
coreAttributes/networkInterfaces/hostName |
guest.net.dnsConfig.hostname |
|
coreAttributes/networkInterfaces/ipv4Address |
guest.net.ipAddress_prefixlength24 |
|
coreAttributes/networkInterfaces/ipv6Address |
guest.net.ipAddress_prefixlength64 |
| coreAttributes -volumes | |
|
coreAttributes/volumes/name |
config.hardware.device.deviceInfo.label |
|
coreAttributes/volumes/size |
(virtualDisk.)capacityInBytes
|
Attribute Mapping with ESXi HostAttribute Mapping with ESXi Host
| CSAM Fields | SDK field name for ESXi Host |
|---|---|
| identityAttributes | |
|
identityAttributes/sourceNativeKey |
summary.hardware.uuid |
|
identityAttributes/hostName |
summary.config.name |
|
identityAttributes/fqdn |
config.network.dnsConfig.hostName |
|
identityAttributes/macAddress |
config.network.vnic.device.spec.mac |
|
identityAttributes/ipAddress |
config.network.vnic.device.spec.ip.ipAddress |
|
identityAttributes/serialNumber |
hardware.systemInfo.serialNumber |
|
identityAttributes/hardwareUuid |
summary.hardware.uuid |
| coreAttributes | |
|
coreAttributes/operatingSystem |
summary.config.product.fullName |
|
coreAttributes/hostName |
summary.config.name |
|
coreAttributes/fqdn |
config.network.dnsConfig.hostName |
|
coreAttributes/domain |
config.network.dnsConfig.domainName |
|
coreAttributes/osArchitecture |
summary.config.product.osType |
| coreAttributes -biosInfo | |
|
coreAttributes/biosInfo/biosDescription |
hardware.biosInfo.biosVersion |
|
coreAttributes/biosInfo/lastBoot |
summary.runtime.bootTime |
|
coreAttributes/biosInfo/manufacturer |
hardware.biosInfo.vendor |
|
coreAttributes/biosInfo/totalMemory |
hardware.memorySize |
|
coreAttributes/biosInfo/timeZone |
config.dateTimeInfo.timeZone |
|
coreAttributes/biosInfo/model |
hardware.systemInfo.model |
|
coreAttributes/biosInfo/serialNumber |
hardware.systemInfo.serialNumber |
|
coreAttributes/biosInfo/hardwareUuid |
hardware.systemInfo.uuid |
| coreAttributes -processor | |
|
coreAttributes/processor/description |
summary.hardware.cpuModel |
|
coreAttributes/processor/speed |
summary.hardware.cpuMhz |
|
coreAttributes/processor/numberOfCpu |
summary.hardware.numCpuThreads |
| coreAttributes -networkInterfaces | |
|
coreAttributes/networkInterfaces/interfaceName |
config.network.vnic. |
|
coreAttributes/networkInterfaces/macAddress |
config.network.vnic.spec.mac |
|
coreAttributes/networkInterfaces/gatewayAddress |
config.network.vnic.spec.ipRouteSpec.ipRouteConfig.defaultGateway |
|
coreAttributes/networkInterfaces/dnsAddress |
config.network.netStackInstance.dnsConfig.address(based on config.network.vnic.hostVirtualNic)netStackInstanceKey |
|
coreAttributes/networkInterfaces/ipv4Address |
config.network.vnic.spec.ip.ipAddress |
|
coreAttributes/networkInterfaces/ipv6Address |
config.network.vnic.spec.ip.ipV6Config.ipV6Address[] |
| coreAttributes -services | |
|
coreAttributes/services/name |
config.service.service.key |
|
coreAttributes/services/description |
config.service.service.label |
|
coreAttributes/services/status |
config.service.service.running |
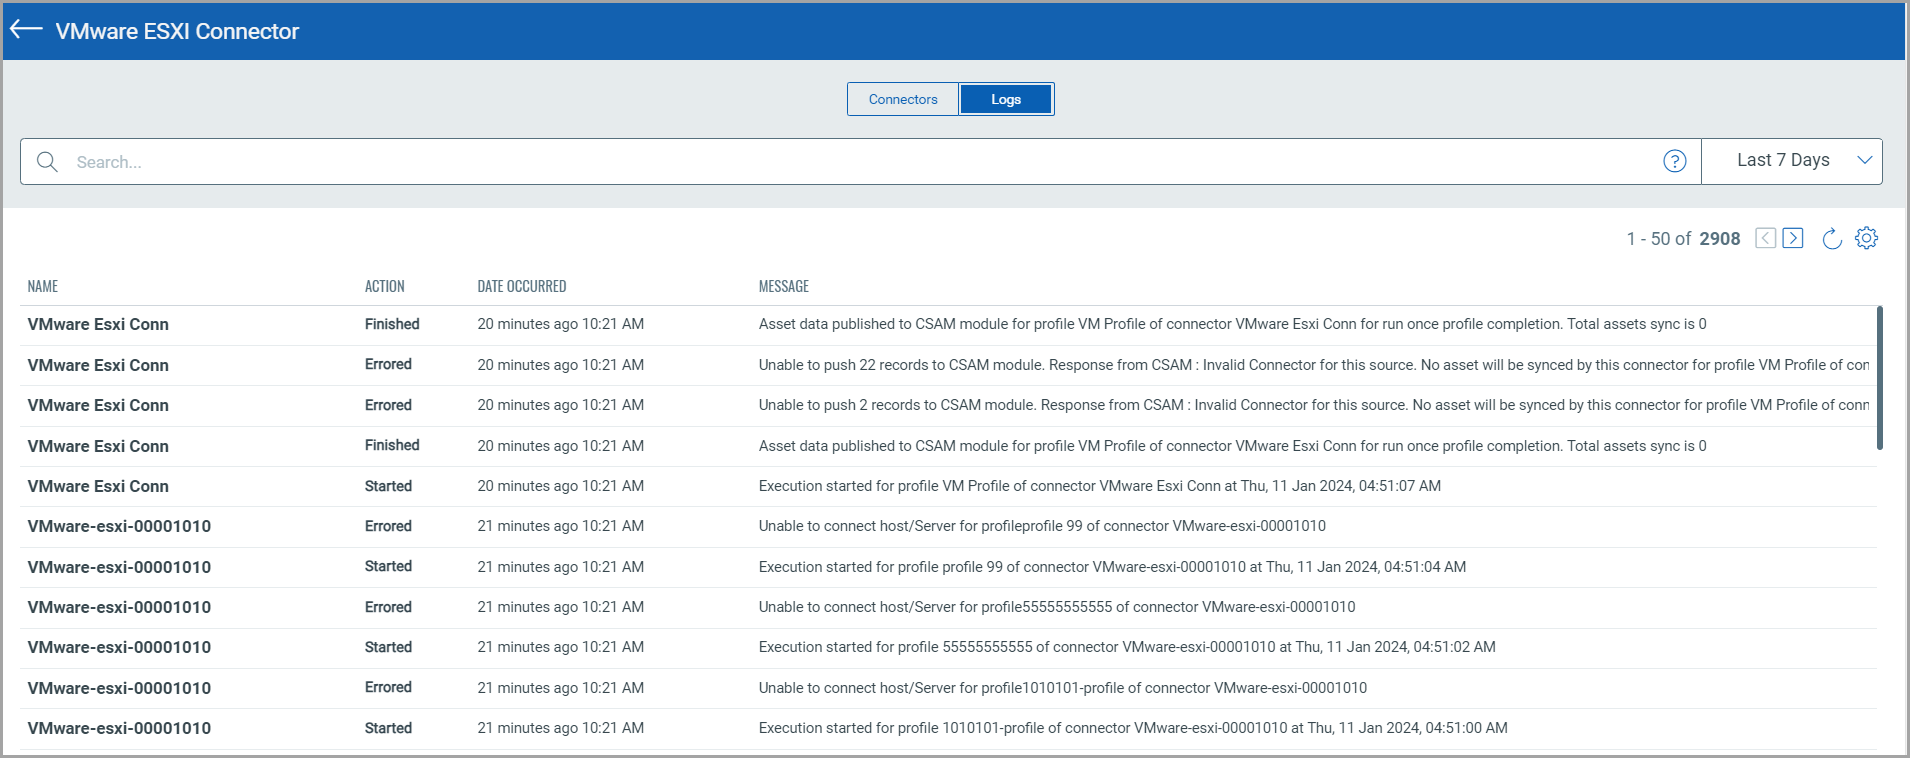
View Logs of Connector Runs
You can view the history of past executions with information on their statuses by navigating to the Logs tab. It tells when the connector was run and whether its data was reconciled.
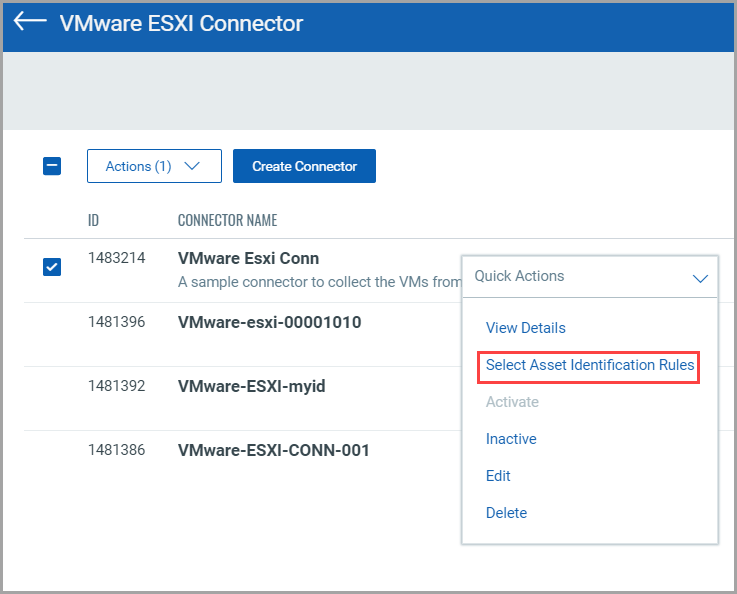
Asset Identification Rules
Once you have created a connector, you must specify the Asset Identification rules to determine which attributes must be fetched and in which order. Select a connector and click Actions. Click Select Asset Identification Rules to open the Identification rule wizard.
You can merge duplicate hostnames or assets or select rules for the VMware Esxi inventory. Select the rules by toggling the ‘Required’ button.
To create rules in the CSAM application, follow the steps documented in CSAM Online Help.
If you do not have any assets, create an unmanaged asset by selecting the ‘Create unmanaged asset’ checkbox.
Select the Apply default rule when faced with multiple matches under the final rule selected. The asset selected will be based on its most recent update and the source's trustworthiness.
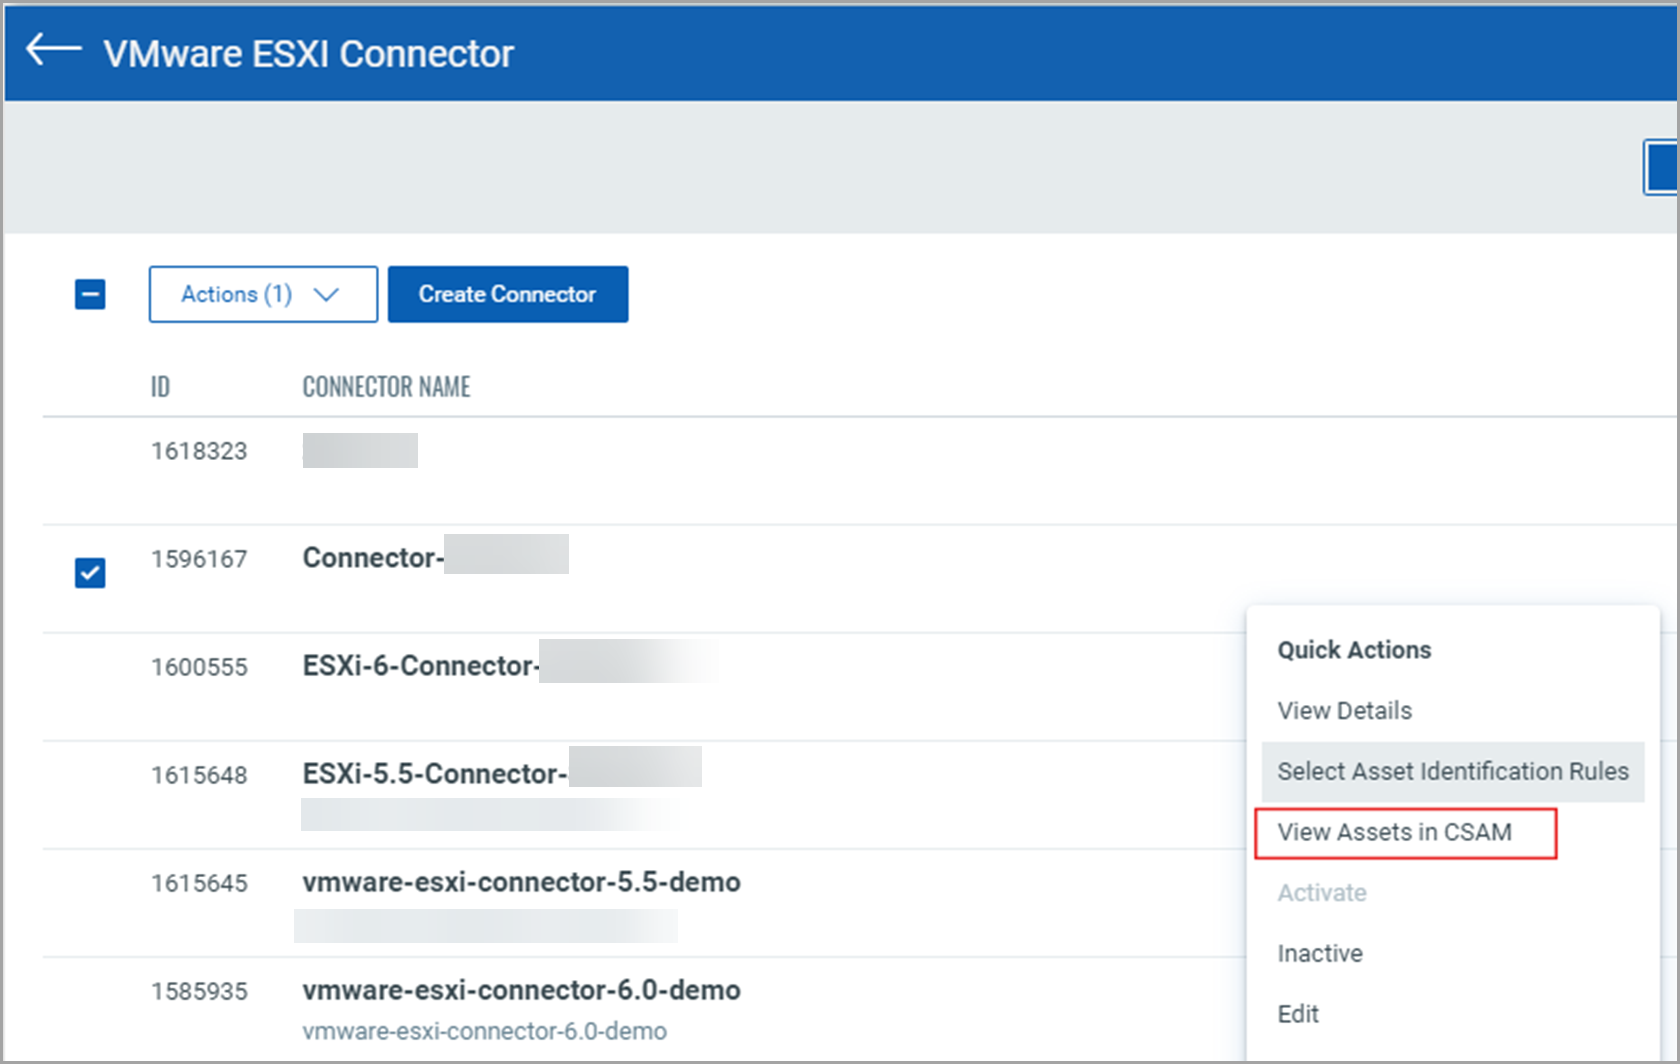
View Assets in CSAM
Your connector is created successfully and has Asset Identification rules provided. Now, it should start fetching from VMware ESXi. To view the Asset information, you must navigate to the CSAM application.
Select any of your connectors, click Actions, and click View Assets in CSAM.
This will take you to the CSAM application, where you can view your assets fetched according to your profile and rules.