Getting Started with Admission Controller
This topic provides an overview of Qualys Admission Controller. Qualys offers a unified helm chart 'qualys-tc' to install:
- Qualys Cluster Sensor (cluster-sensor)
- Qualys Admission Controller (admission-controller)
- Qualys Container Security Sensor (qcs-sensor)
The unified helm chart is hosted on ArtifactHub - https://artifacthub.io/packages/helm/qualys-helm-chart/qualys-tc
Qualys Admission Controller
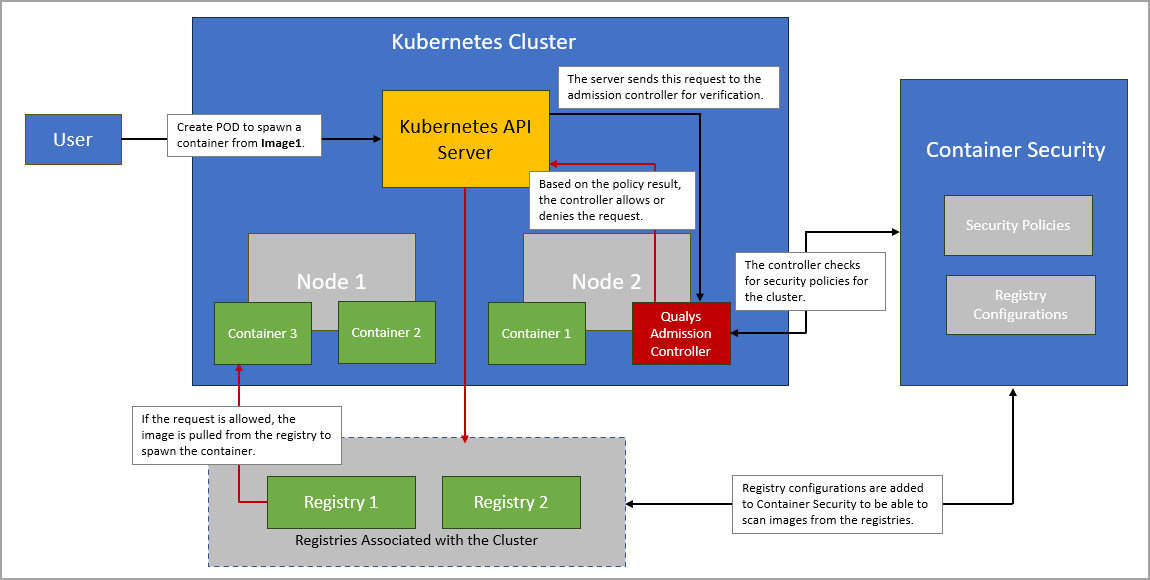
You can use Qualys admission controller to verify and authenticate CREATE and UPDATE requests made to the Kubernetes API server. You can create security policies and enforce them on the admission controller to ensure that only valid requests are authorized to the Kubernetes cluster API server.
Here are a few benefits offered by the Qualys admission controller:
- Allows images to deploy only from a trusted registry.
- Allows or denies images with vulnerabilities depending on the vulnerability management policies.
- Adds an extra layer of security and validation for the Kubernetes cluster.
The following image illustrates the working of the admission controller:
Supported Architecture
Qualys Admission Controller supports the following CPU architectures.
- x86_64
- aarch64
Admission Controller Workflow
The steps given below show the workflow of Admission Controller.
- Pre-requisites
- Getting Admission Controller Image
- Installing Admission Controller
- Admission Controller Output
Pre-requisites
The following points ensure the working of the Admission Controller.
- You need to have access to Qualys Enterprise TruRisk™ Platform along with the Container Security module enabled.
- Qualys Admission Controller uses gateway URLs to communicate with Qualys Enterprise TruRisk™ Platform. If you are using proxy configuration, you must whitelist Qualys gateway URLs for the Admission Controller to communicate with Qualys Enterprise TruRisk™ Platform.
Refer to the Qualys gateway URLs - https://www.qualys.com/platform-identification/