Understand TruConfirm
The following section walks you through the various subtabs available in TruConfirm.
Overview tab in TruConfirm: Key Information and Insights
The Overview tab serves as a centralized hub for monitoring and prioritizing vulnerabilities in your environment. It provides a high-level summary of critical metrics, trending vulnerabilities, and risk distribution, enabling you to make informed decisions and take targeted actions. It consolidates key metrics, trends, and prioritization insights to help you focus on actionable risks and streamline your remediation efforts.
How the Overview Tab Helps You
-
Streamlines decision-making: Displays key metrics and trends to quickly identify areas requiring attention.
-
Prioritizes risks: Highlights exploitable vulnerabilities and critical assets to focus on remediation efforts.
-
Improves workflow efficiency: Offers direct navigation to detailed views and actionable insights.
Components of the Overview Tab
The Overview tab is organized into several key sections, each offering unique insights and actionable data. Below is a detailed walkthrough of its interface elements and data visualizations:
Top Summary Metrics
At the top of the Overview tab, you can find tiles that display the following information:
-
Total CVEs: The total number of Common Vulnerabilities and Exposures (CVEs) identified in your environment during the TruConfirm scans.
-
Unique CVEs: The count of distinct CVEs affecting your assets.
-
Total External Assets: The number of external-facing assets identified during the TruConfirm scan.
-
Critical Assets: The count of assets classified as critical based on their business impact and vulnerability status.
-
Ruled-out Exposures: The number of vulnerabilities determined to be non-exploitable after validation.
Data for external assets, critical assets, and ruled-out exposures is generated post-TruConfirm scan.
Trending CVEs
This dynamic section lists the most impactful CVEs currently affecting your environment. Key features include:
-
Trending CVEs: A curated list of vulnerabilities, dynamically updated to reflect the latest threats.
-
‘Actively exploited/Exploited’ indicator: Highlights CVEs with active exploitation/exploitation in the wild. If you hover the cursor on this tag you can see a tooltip that displays the last exploited date, helping you quickly assess the relevance of active threats.
-
Navigation:
-
Click a CVE card to open the detailed information about the vulnerability
-
Select View All to go to the Knowledge Base of a comprehensive list of CVEs.
-
CVE Risk Prioritization
This section visualizes the prioritization of vulnerabilities in your environment using a hierarchical triangle chart:
-
Total Findings: The total number of vulnerabilities identified.
-
Critical Findings: A subset of the critical findings classified as critical.
-
Validation Available: From the critical findings, the findings with TruConfirm validation available.
Validation Status by Asset Criticality & Business Entity Distribution
Asset Criticality Chart (Left)
-
X-axis: Asset Criticality levels (1 to 5).
-
Y-axis: Vulnerability Count.
-
Color-coded bars:
-
Blue: Validation Available.
-
Red: Exploit Validated.
-
Green: Exploit Ruled Out.
-
-
Interaction: Clicking a bar navigates to the page for detailed asset information.
Business Entities (Right)
-
X-axis: Business Entities.
-
Left Y-axis: Business Value ($).
-
Right Y-axis: TruRisk™ Score.
-
Color-Coded Bars:
-
Blue: Validation Available.
-
Orange Circle: TruRisk™ Score.
-
At the bottom, you can find a section provides an overview of the TruConfirm service and its functionality:
-
Description: Explains how TruConfirm validates vulnerabilities to focus on real threats and reduce TruRisk™.
-
Supporting Video: Includes a video player with a brief introduction to the service.
TruConfirm Scan Tab Explained
The Scan tab in ETM TruConfirm provides a unified view of your security assessments. You can review vulnerability data, filter results, and initiate targeted scans directly from this interface to streamline your threat response.
The central table on this tab organizes information into specific columns to help you identify and prioritize threats.
-
Title: Displays the unique identifier for each detected security flaw.
-
Exploitation Validated: Provides a detailed, status-based breakdown of TruConfirm findings, enhancing visibility into scan results. You can see the scan results in the following format:
- Inconclusive – 1
- Ruled Out – 1
- Validated – 0
-
Scope: Defines the assets (such as IP addresses or domains) included in the scan.
-
Created By: Shows the user who initiated or created the scan.
-
Created On: Displays the date and time when the scan was created.
-
Status: Shows the current state of the scan.
-
Exploit Validation Source: This shows the validation source as either Cloud Agent or Scanner Appliance.
The drop-down menu for each scan provides scan management options.
- You can use the Relaunch option to rerun an existing on-demand scan with its current configuration, eliminating the need to recreate the scan and ensuring consistency across configurations.
- The same menu also allows you to Pause, Resume, or Delete scans, either individually or in bulk, making it easier to manage scan operations efficiently.
You can launch TruConfirm scans from this tab. For step-by-step details on how to launch the TruConfirm scan from this tab, refer to the Launch TruConfirm Scan from the Scan Tab section.
TruConfirm Knowledge Base Tab: Vulnerability Insights and Details
The Knowledge Base tab within the TruConfirm tab interface serves as a centralized repository for managing and analyzing Common Vulnerabilities and Exposures (CVEs). This section provides a detailed overview of the Knowledge Base tab to help you navigate and use it effectively.
The Knowledge Base tab is designed to provide you with a comprehensive view of CVEs, specifically within the context of TruConfirm. It consolidates critical vulnerability data, allowing users to assess, prioritize, and address security risks efficiently. The tab integrates filtering, search capabilities, and detailed metrics to support informed decision-making.
Search and Metrics
QQL Search Functionality
At the top of the interface, a Qualys Query Language (QQL) search bar is available. This feature allows users to perform precise searches across the CVE database using structured queries. The search bar includes a magnifying glass icon for initiating searches, a placeholder text ("Search...") to guide input, and additional icons for accessing help and visualizing search results.
Top-Level Metrics
Below the search bar, the interface displays key metrics in the form of dashboard cards. These metrics provide a high-level summary of the CVE landscape:
-
CISA Known Exploits: The number of CVEs identified as known exploits by the Cybersecurity and Infrastructure Security Agency (CISA).
-
Ransomware Vulnerabilities: The count of vulnerabilities associated with ransomware threats.
-
Malware: The total number of CVEs linked to malware.
-
Actively Exploited: The number of vulnerabilities currently being exploited in the wild.
-
Patch Available: The count of CVEs for which patches are available.
Each metric is presented with a corresponding icon and numerical value, offering a quick overview of the security posture.
CVE Listings
The Knowledge Base tab features a detailed table that lists individual CVEs. The table is organized into the following columns:
Basic Information
-
CVE ID: The unique identifier for each vulnerability (e.g., CVE-2026-1281).
-
Title: A brief description of the vulnerability, summarizing its status, its nature, and affected components.
TruConfirm Specifics
-
Status: Indicates the severity of the CVE, using color-coded badges (for example, Critical, High, Medium).
-
Exploitability: Specifies whether the vulnerability has a Proof of Concept (POC) or is Weaponized.
-
TruConfirm Validation: Displays the validation status of the CVE within the TruConfirm framework.
Risk Assessment
-
Risk Factor: Highlights associated risk factors, such as exploit availability or ease of exploitation. It also shows the Threat Actor icon.
-
Impact: Represents the potential impact of vulnerability on systems or networks.
-
Impacted Filter: Displays only the vulnerabilities that are currently affecting assets in your environment, helping you quickly focus on relevant and actionable CVEs.
-
Qualys Patchable: Indicates whether the CVE is patchable using Qualys solutions, with a numerical count of affected assets.
-
Exploited Vulnerabilities summary card: This card displays the total number of exploited vulnerabilities, enabling users to quickly identify and prioritize risks associated with known exploits.
-
Window of Weaponization (WoW): Indicates the time between public CVE disclosure and the first known exploitation in the wild. Helps quickly identify how rapidly a vulnerability is weaponized. It helps assess how quickly vulnerabilities are weaponized
- Negative values indicate pre-disclosure exploitation (zero-day) (for example, -7 days).
- Positive values indicate post-disclosure exploitation (for example, 5 days).
- Unavailable indicates that no exploit intelligence is currently available.
The table includes pagination controls to navigate through large datasets, as well as interactive elements for refreshing or customizing the view.
Navigation: Quick Filters
The quick filter in the left-hand side Filters panel, allows users to refine the data displayed in the table. Filters are organized into collapsible sections for ease of use:
-
QVSS Base: Filter CVEs by severity levels (for example, Low, Medium, High, Critical).
-
RTI (Risk Threat Intelligence): Narrow results based on exploit availability, ease of exploitation, and other risk factors.
-
Exploit Availability: Focus on vulnerabilities with POC or Weaponized exploits.
-
Patch Status: View CVEs with patches that are either available or unavailable.
Each filter category displays the number of CVEs matching the criteria, enabling users to quickly identify and prioritize vulnerabilities.
Schedules tab:
The Schedules tab provides a centralized view and management interface for all configured TruConfirm scan schedules. It enables you to create, monitor, and maintain both recurring and single-occurrence scans.
This interface supports:
- Visibility into schedule status and execution timing
- Assignment and ownership tracking
- Bulk and individual schedule actions
- Filtering and navigation across large datasets
Accessing the Schedules Tab
- Navigate to the TruConfirm tab in the ETM
- Select the Schedules tab from the top navigation menu.
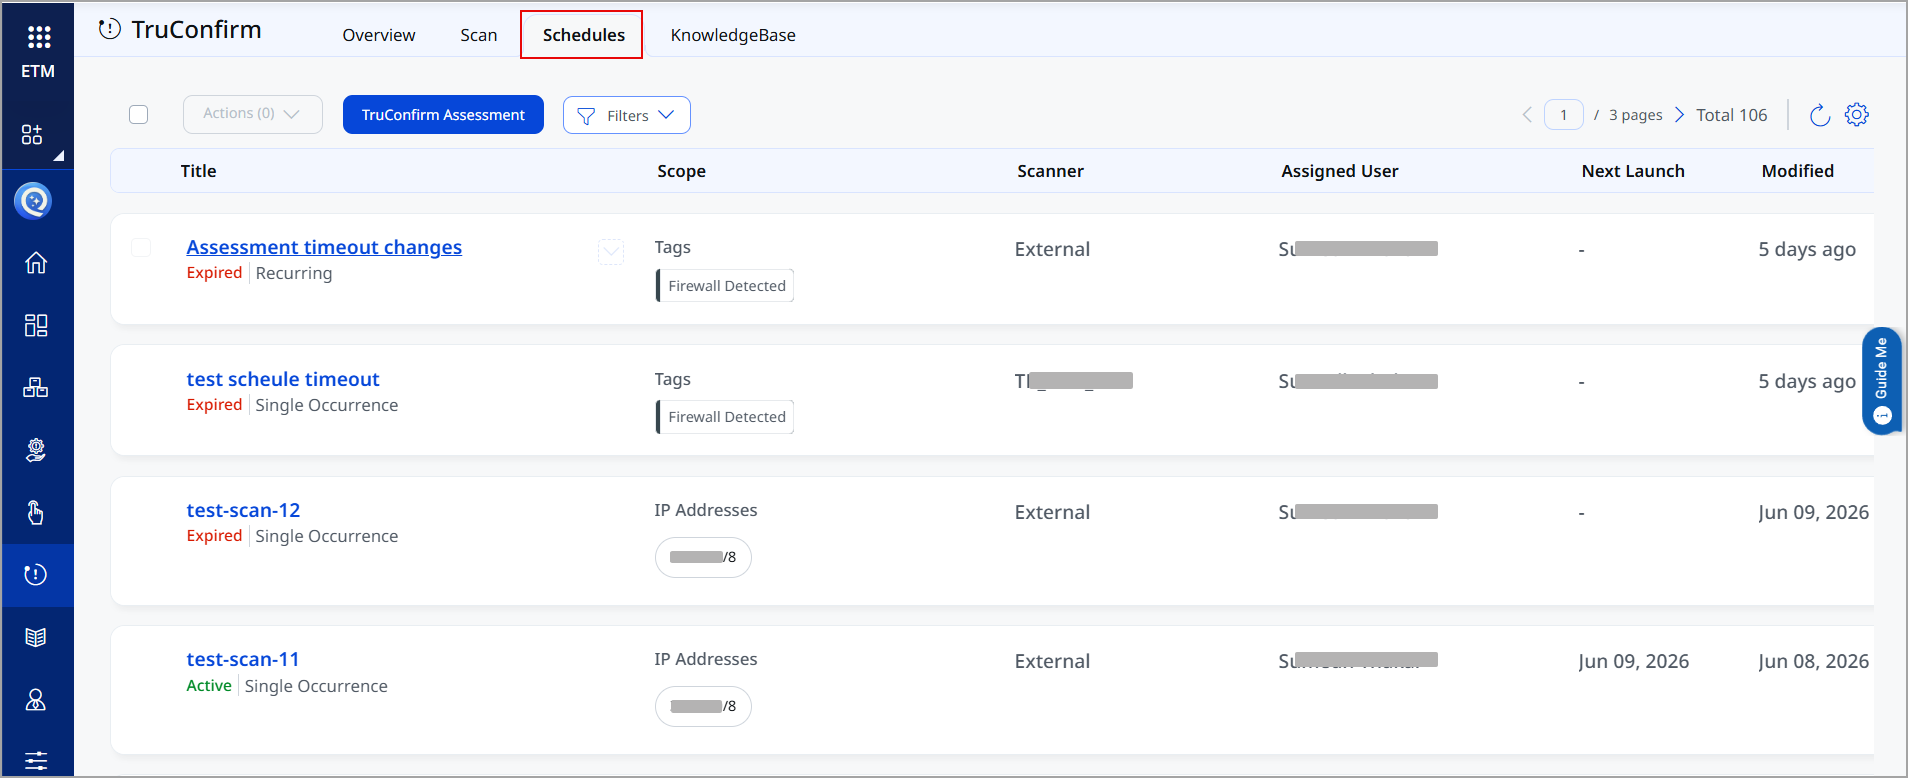
Understanding the Schedules Tab Layout
- Toolbar
The toolbar at the top of the Schedules page provides key controls:
- Actions: enables bulk operations on selected schedules. Disabled when no schedules are selected.
- TruConfirm Assessment: initiates creation of a new assessment schedule.
- Filters: opens filter criteria to refine the schedule list (for example, status, scanner, user).
- Pagination Controls: navigates across pages of schedules (for example, 1 / 1 pages).
- Total Count: displays the total number of schedules (for example, Total 36).
- Refresh icon: Reloads the data in the current view.
- Settings: Provides table or display configuration options (for example, column visibility).

- Schedule List Table
The main table displays all schedules with the following columns:
- Title: Name of the schedule. Click to view or edit details.
- Scope: Displays associated tags defining the scan scope.
- Scanner: Scanner or scanning engine assigned to execute the schedule.
- Assigned User: User responsible for the schedule.
- Next Launch: Indicates next scheduled execution time. ModifiedTime since the last update to the schedule.

- Schedule Attributes
Each scan schedule entry displays additional metadata:
- Status Indicators:
- Active (green): Schedule is enabled and will execute as planned.
- Expired (red): Schedule is no longer active and will not run.
- Schedule Type
- Recurring: Executes repeatedly based on a defined interval (e.g., daily, weekly).
- Single Occurrence: Executes only once at a specified time.
- Status Indicators:
- Performing Actions
- Select Schedules: Use the checkbox next to each schedule to select. You can click the header checkbox to select all schedule entries on the page.
- Bulk Actions: Select one or more schedules.
Creating a New Schedule
- Click TruConfirm Assessment. The platform navigates to the configure scan workflow.
- Configure the required parameters and save the schedule.
Filtering Schedules
Use the Filters control to refine the dataset. Typical filters include:
- Status (Active, Expired)
- Schedule type (Recurring, Single)
- Scanner
- Assigned user
- Tags
Interpreting Key Fields
- Next Launch: Displays relative timing (e.g., “in a day”). A hyphen (-) indicates no upcoming execution (e.g., expired or completed one-time schedules).
- Modified: Shows elapsed time since last update (e.g., “11 hours ago”). Useful for auditing recent changes.
- Tags (Scope): Represent logical grouping or targeting. Multiple tags may be present (+3 indicates additional tags not fully displayed).