ETM Release 1.14
October 14, 2026
This release adds Chat Now to Agent Sara, the AI agent in ETM. Chat Now is a guided workflow. It turns your prioritized findings into a remediation plan in a few clicks. Agent Sara groups the work into waves based on operational impact. It then creates the plans your IT Operations team needs. A new InstaScan tab in Risk Management shows the newest InstaScan findings right away. Two new dashboard widgets track CISA BOD 26-04 deadlines and SLA compliance. With Mitigate Now, you can view mitigation options and start a mitigation job from ETM. Risk Workbench now shows how many assets and findings each template covers. TruConfirm scan results now show the evidence behind each result. TruConfirm scans also show which findings and assets were skipped, and why. New tokens let you search findings by mitigation details, patch details, and Patch Tuesday release.
ETM finds and prioritizes your findings. TruRisk Eliminate runs the remediation and mitigation actions.
New Feature
Build Remediation Plans with Agent Sara Chat Now
What's New for You
You can now build a remediation plan step by step with Chat Now in Agent Sara. You do not type anything; you choose from options at each step. Pick a template and a business entity. Review the work in remediation waves. Then create the plans for your remediation owner in one action.
Prerequisite
This feature is available on request and requires TruRisk Eliminate subscription. To turn it on, contact Qualys Support or your Technical Account Manager (TAM).
Agent Sara now includes a Chat Now option next to Assign Task. Chat Now walks you through a predefined workflow. You do not type questions or queries. At each step, Agent Sara shows options to choose from.
Knowing which findings to fix first is only half the job. The other half is working out how to roll out the fixes without disrupting the business. Chat Now closes that gap. It starts from your prioritized findings. It shows you how to fix them in small batches, and you choose who does the work.
You can start a Chat Now workflow in these ways:
- Chat Now: Click Chat Now next to Assign Task.
- Agent Details: Click Explore with Sara on the Agent Details page.
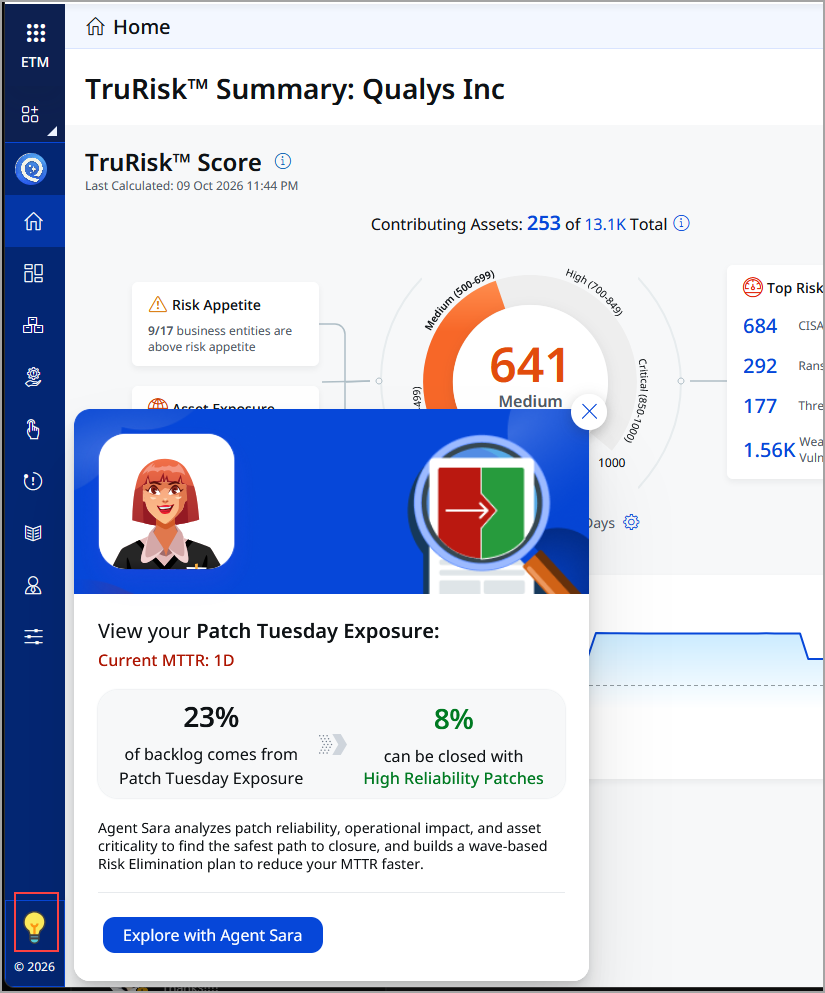
- Home page: Click Explore with Agent Sara in the Patch Tuesday pop-up. See Start from the Patch Tuesday Pop-Up.
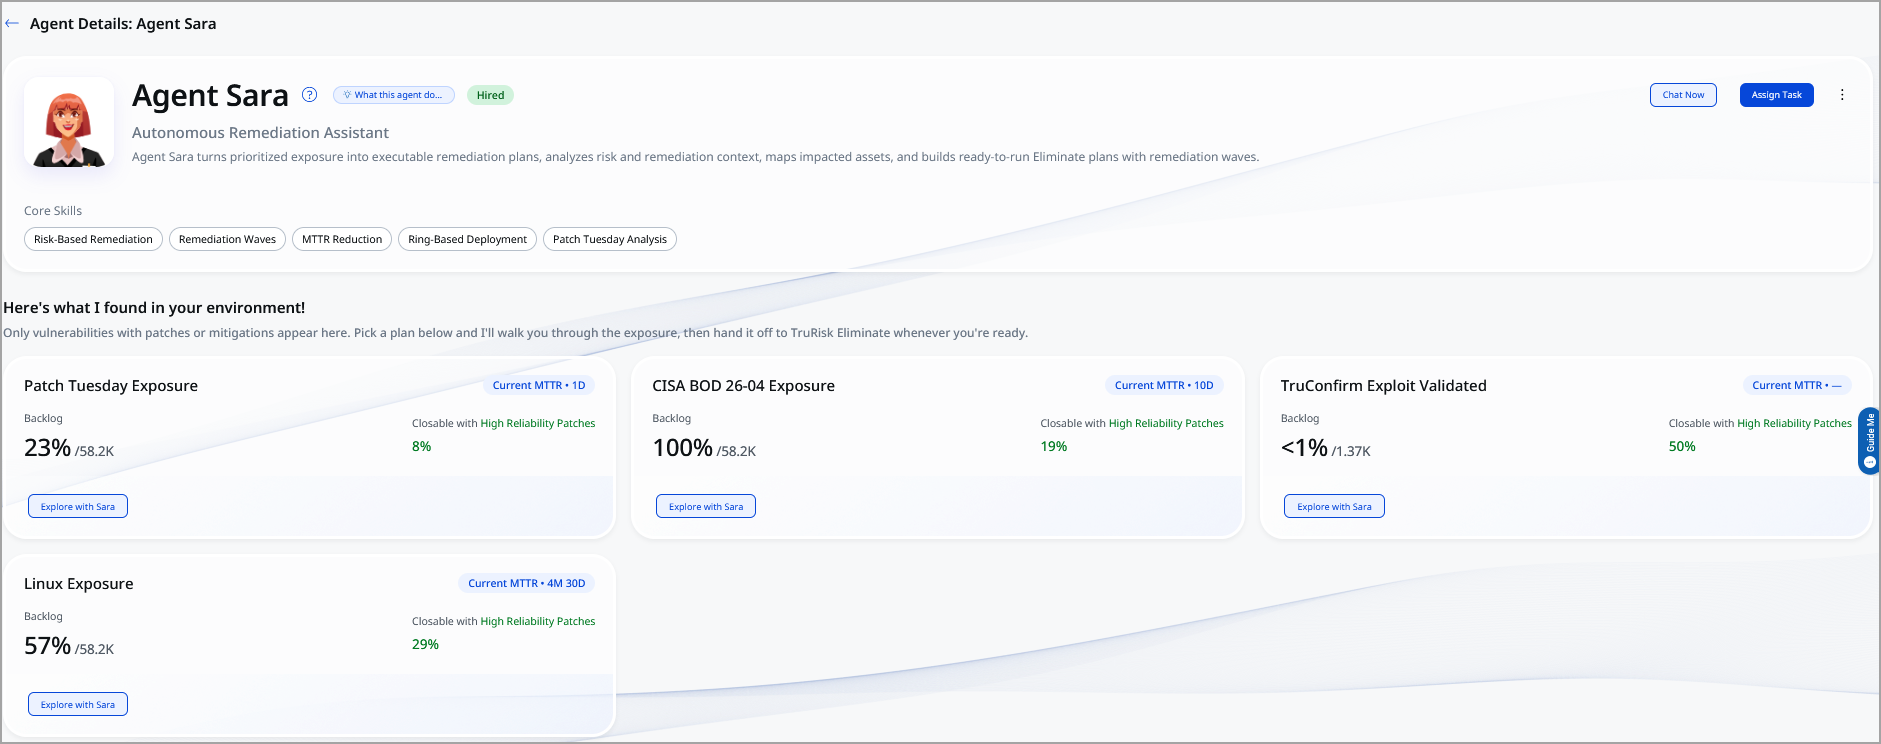
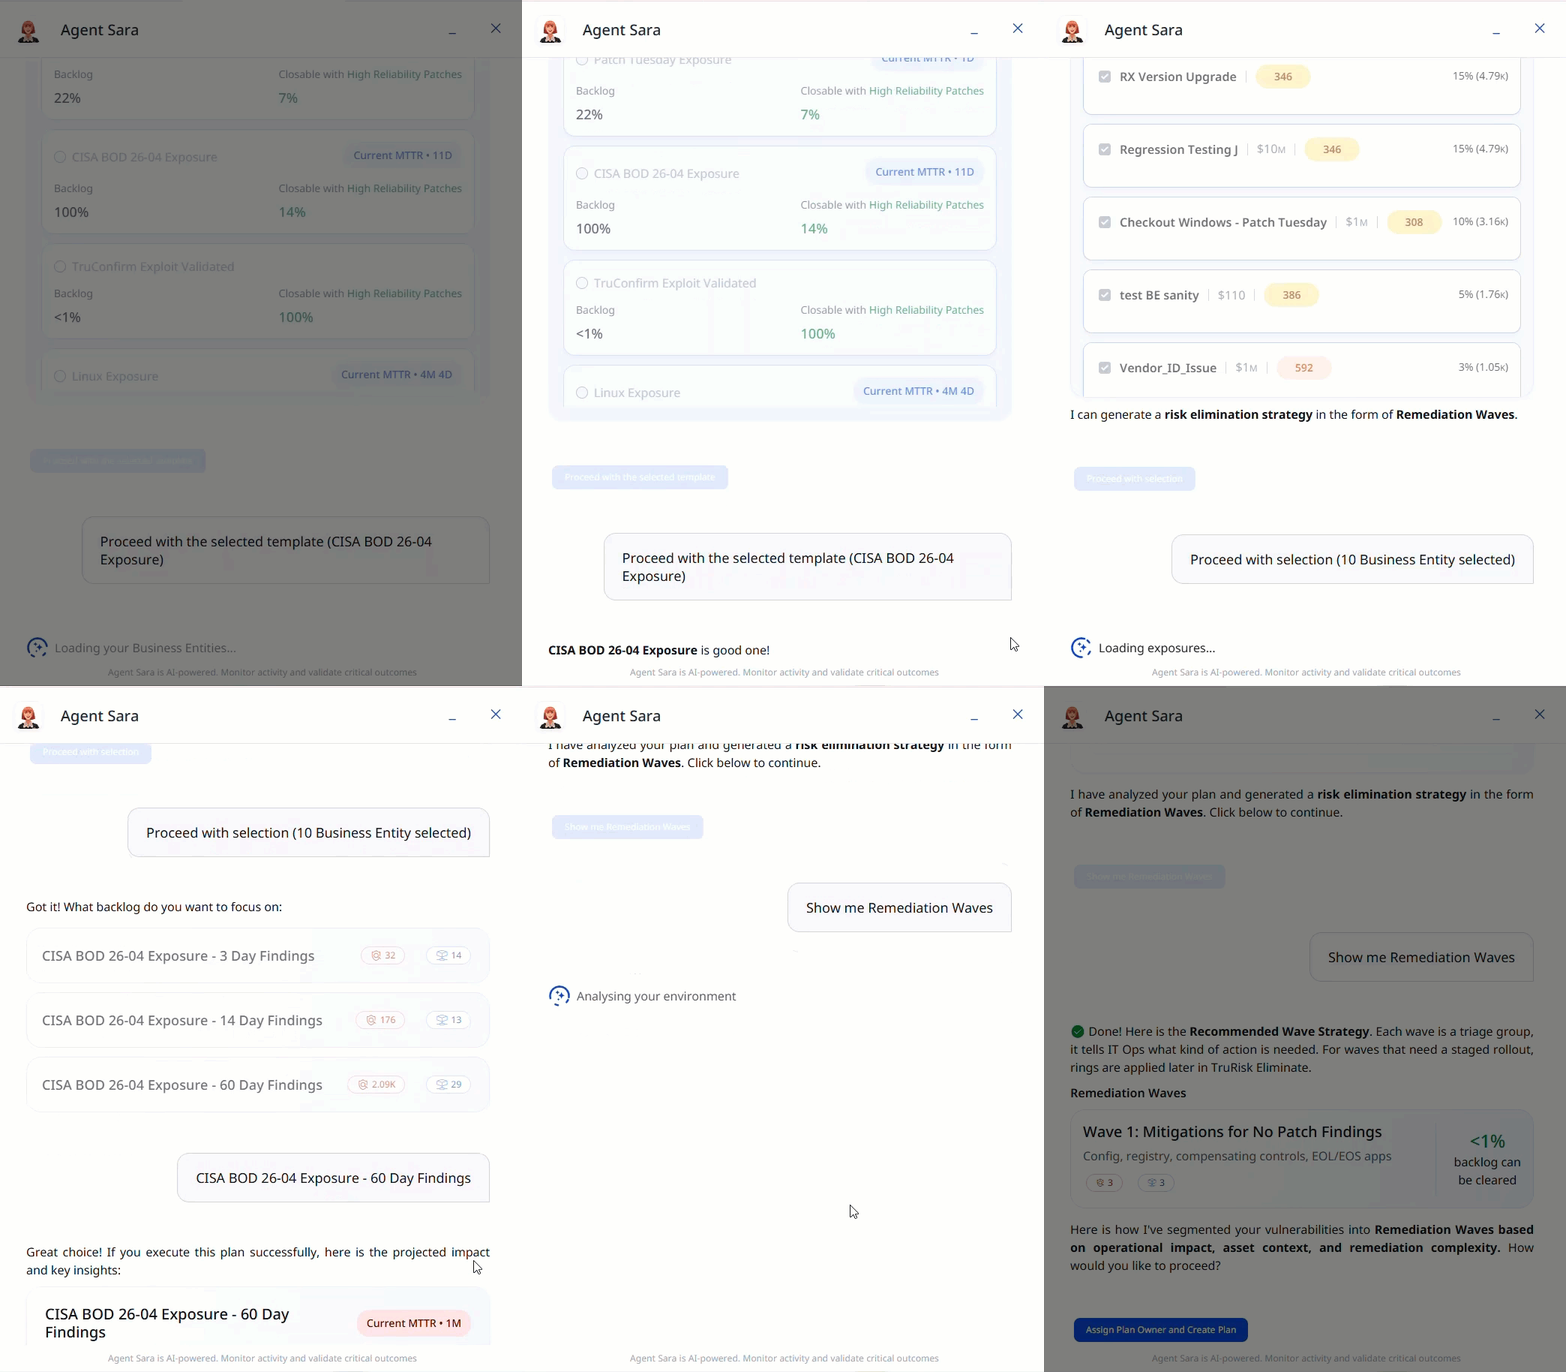
Here is how the Chat Now workflow works:
- Select a template: Choose one of the predefined templates. Each template defines the set of findings Agent Sara works with, such as this month's Patch Tuesday vulnerabilities. Template availability depends on the data available in your account, so you might not see every template. The same templates are also available in Risk Workbench, so you can create a prioritization plan from them without starting a chat.
- Select the scope: Choose a business entity. Agent Sara lists your top 10 business entities by number of impacted findings. Start with the entity that has the most exposure.
- Review the remediation waves: Agent Sara breaks the findings into remediation waves based on operational impact and patch availability. Open a wave to see its sub-waves.
- Create the plans: Select the remediation owner, and then create the plans with one click. Agent Sara creates a prioritization plan in Risk Workbench. It also creates a risk elimination plan in TruRisk Eliminate.
The finding counts that Agent Sara shows, for example, 58K, include only vulnerabilities that have an available patch or mitigation. They are not the total number of vulnerabilities in your account. The same applies to the percentages in the Home page pop-up.
Your remediation owner is usually someone in IT Operations. This person uses the plan in TruRisk Eliminate to create patch or mitigation jobs. ETM finds and prioritizes the findings. TruRisk Eliminate runs the patch and mitigation jobs.
The Assign Task workflow is not changing. You can still create and schedule Agent Sara tasks manually. Chat Now is an additional, guided way to work with Agent Sara.
Start from the Patch Tuesday Pop-Up
When your account has Patch Tuesday vulnerabilities, Agent Sara shows a pop-up on the ETM Home page. The pop-up shows how much of your backlog comes from Patch Tuesday vulnerabilities, and how much of it you can close with highly reliable patches. It also shows your current mean time to remediate (MTTR).
Click Explore with Agent Sara to start the Chat Now workflow with the Patch Tuesday template already selected.
Plan Remediation in Waves
Agent Sara now groups your findings into remediation waves. Each wave is a stage of the rollout. Start with the changes least likely to disrupt the business. Agent Sara uses patch reliability, operational impact, and asset criticality to group the fixes into waves. Waves 1 and 2 group fixes that have a patch, by operational impact. Wave 3 groups findings that have no patch available.
Think of a wave as a deployment stage. It tells you what to deploy, in which stage, and what business impact to expect. For example, if a template matches 1,000 findings, Agent Sara might put 300 in Wave 1, 500 in Wave 2, and the other 200 in Wave 3. Your teams can then plan the work in stages.
- Wave 1 – Low operational impact: Fixes that you can roll out with little risk of disrupting your operations.
- Wave 2 – High operational impact: Fixes that need more planning, such as a change window, because they can affect business operations.
- Wave 3 – Mitigation: Findings that have no patch available. These need a mitigation, such as a compensating control, instead of a patch.
Each wave is split into sub-waves, such as 1.1, 1.2, and 1.3. Sub-waves group the findings by asset type, operating system, and application category. The finding counts of the sub-waves add up to the count of the wave.
Chat Now is best for Vulnerability Management and Security Operations teams. These teams turn prioritized findings into remediation plans. It also helps IT Operations teams, who carry out the plans.
For more information, refer to ETM Online Help.
New Feature
View InstaScan Findings in Risk Management
What's New for You
Use the new InstaScan tab in Risk Management > Findings to see the newest InstaScan findings. Findings appear here as soon as they arrive, so you can act on new exposures before processing is complete. Later, they move to the Vulnerabilities tab.
Prerequisite
This feature is available on request. To turn it on, contact Qualys Support or your Technical Account Manager (TAM).
This feature is supported for accounts with Unified Asset Inventory (UAI) subscriptions. The InstaScan tab appears only when InstaScan is enabled for your account.
Risk Management > Findings now includes an InstaScan tab next to the Vulnerabilities tab. The tab lists the findings that InstaScan has detected on your assets, with the newest findings shown first.
InstaScan findings stay on this tab for about 24 hours. They then move to the Vulnerabilities tab automatically. There, you work with them like any other finding. A banner with the InstaScan icon at the top of the tab reminds you of this.
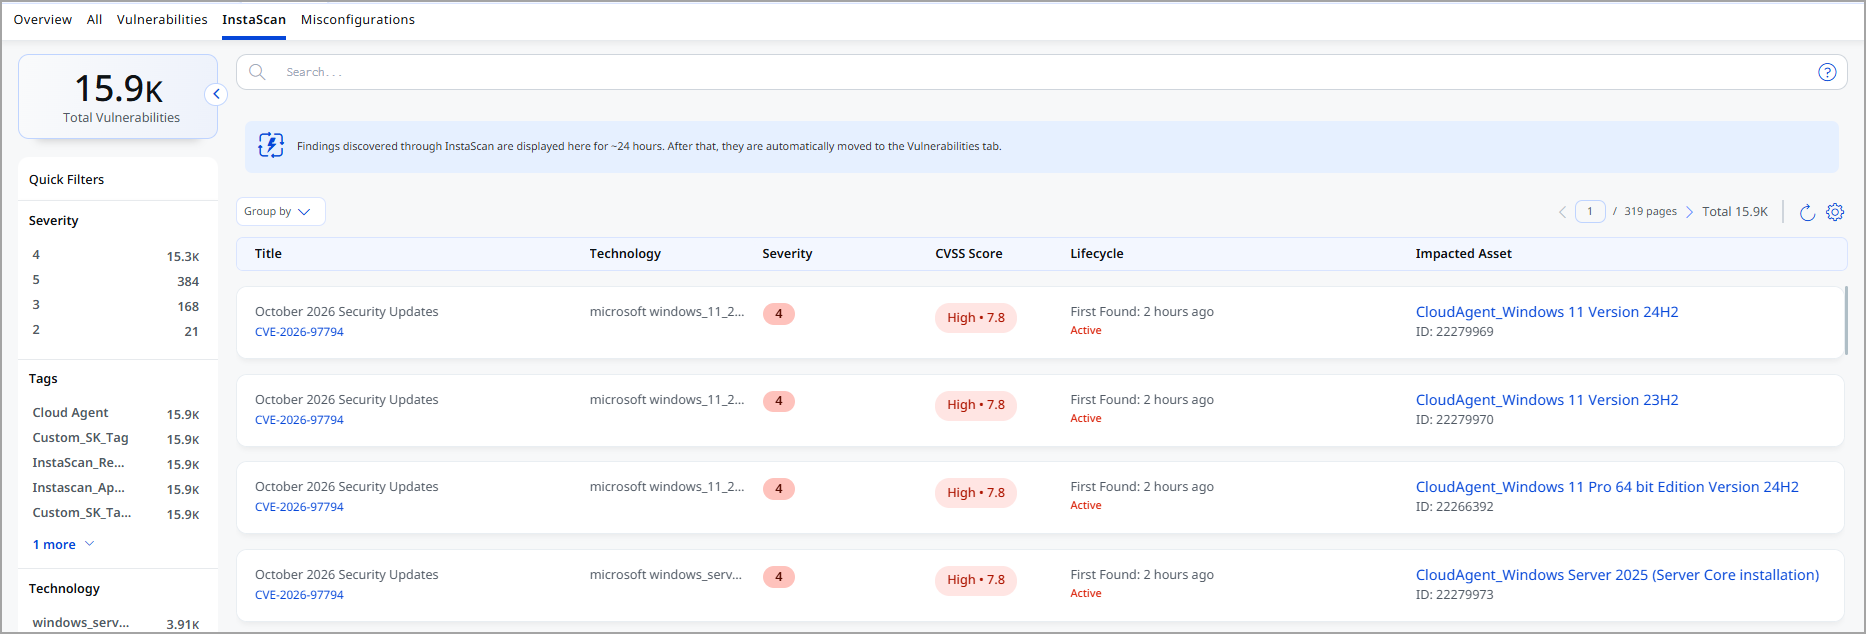
The InstaScan tab has these options:
- Search: Use a single search bar to search with both finding and asset tokens, such as the asset tag name.
- Group By: Group the findings by vendor name or severity, and click a count to see the matching findings.
- Quick Filters : Narrow the list by Technology, Tags, and Severity.
- Severity: The Qualys severity level of the vulnerability: 1 (Minimal), 2 (Medium), 3 (Serious), 4 (Critical), or 5 (Urgent).
- Total Vulnerabilities: The number of findings on the tab, shown at the top of the quick filters.
- Columns: See the CVE ID, the technology (vendor, name, and version), CVSS, the lifecycle date, and the affected asset.
- Details: Click an asset to open the asset details. Finding titles are not clickable on this tab.
New Feature
Track CISA BOD 26-04 Remediation with New Dashboard Widgets
What's New for You
You can now add two widgets to your dashboard: BOD 26-04 Remediation Timeline and BOD Remediation SLA. They show which findings fall under CISA BOD 26-04. They also show fix deadlines and whether you meet them.
Prerequisite
This feature is available on request. To turn it on, contact Qualys Support or your Technical Account Manager (TAM).
CISA Binding Operational Directive (BOD) 26-04 sets remediation deadlines based on the risk a vulnerability poses. ETM checks four risk factors for each finding:
- Asset Exposure: Whether the vulnerable asset is publicly exposed.
- CISA KEV: Whether the CVE is listed in the CISA Known Exploited Vulnerabilities (KEV) Catalog.
- Automatable: Whether an attacker can automate the steps needed to exploit the vulnerability, for example with a script. An automatable finding poses a higher risk.
- Technical Impact: How much control an attacker can gain after a successful exploit. The value is Total, Partial, or Unknown.
Based on these factors, ETM assigns each finding a remediation timeline and tracks its SLA status. Both widgets use the same supported CISA BOD 26-04 search tokens. To know more about tokens, refer to CISA BOD 26-04 Tokens. Use them to find affected assets and prioritize high-risk findings. You can also measure your progress.
To add the widgets, go to Dashboard and open the widget template library. Filter the templates by Enterprise TruRisk Management. Click Add to Dashboard, or click Customize Widget to change the settings first.
See the Remediation Timeline for Findings in Scope
The BOD 26-04 Remediation Timeline widget shows a tree view of the findings in the scope of BOD 26-04. The tree starts with your total active findings and assets, and splits them by one risk factor at a time, in this order: Asset Exposure, CISA KEV, Automatable, and Technical Impact. Each branch ends in the remediation timeline that applies, with its finding and asset counts.
- 3 Days and Forensic Triage: Fix within 3 days and investigate whether the vulnerability was already exploited.
- 3 Days, 14 Days, or 60 Days: Fix within the number of days shown.
- Fix on System Upgrade: No fixed deadline; fix the vulnerability during your next system upgrade.
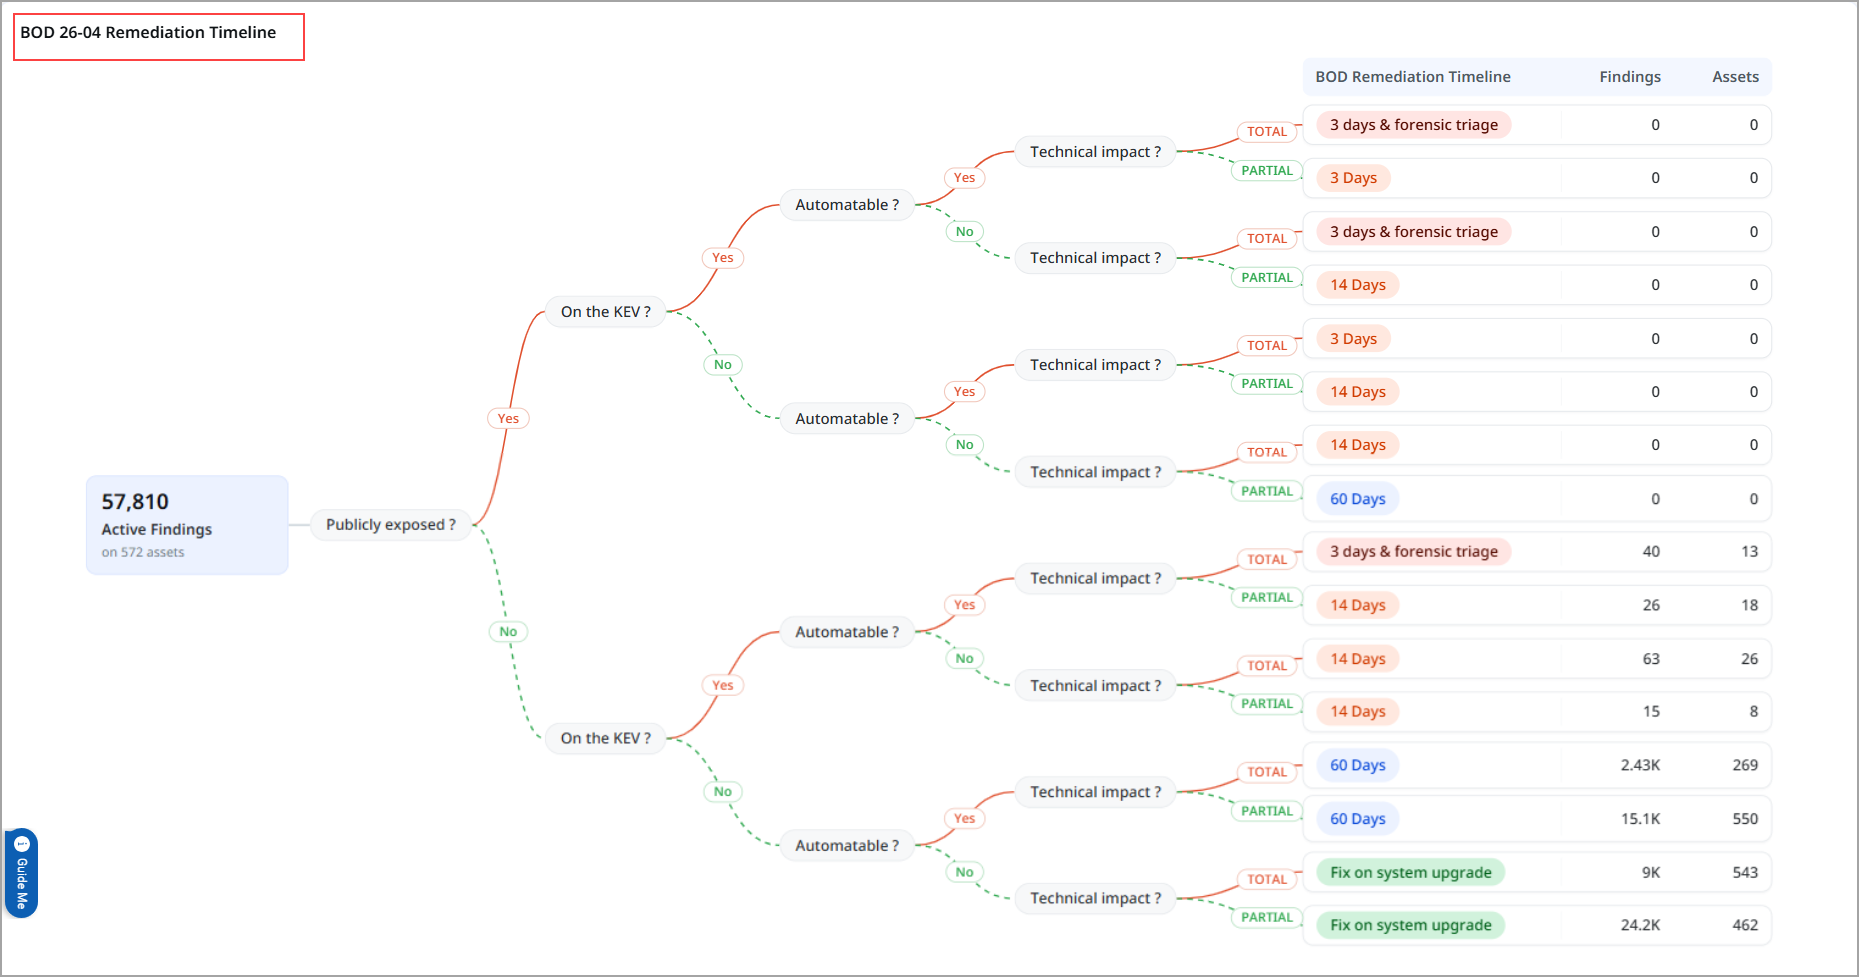
Red solid lines show the higher-risk answer: Yes or Total. Green dashed lines show the lower-risk answer: No or Partial. Hover over a branch to see its finding and asset counts. Click a count to open the matching findings in Risk Management.
The dashboard shows part of the tree. To see the whole tree, view the widget in full screen.
Track SLA Compliance for Each Timeline
The BOD Remediation SLA widget shows SLA compliance in a table. Each row is one timeline: 3 Days, 14 Days, 60 Days, and Fix on System Upgrade.

For each timeline, you see:
- SLA Status of Findings: A bar that shows the SLA status of findings: Out of SLA (red), Nearing SLA (yellow), and Within SLA (green). The bar also shows Ignored findings.
- Findings and Assets: The number of findings and affected assets. Click a count to open the matching findings.
- TruConfirm Exploitable: The number of findings that TruConfirm has confirmed as exploitable.
Use this widget together with the Remediation Timeline widget. The timeline widget shows which deadline applies; this widget shows whether you are meeting it.
New Feature
Mitigate Vulnerabilities Directly from ETM
What's New for You
You can now view mitigation options for a vulnerability in ETM. Start a mitigation job with Mitigate Now. This helps you reduce risk when a patch is not available or cannot be applied yet.
Prerequisite
This feature requires a TruRisk Eliminate subscription. This feature is available on request. To turn it on, contact Qualys Support or your Technical Account Manager (TAM).
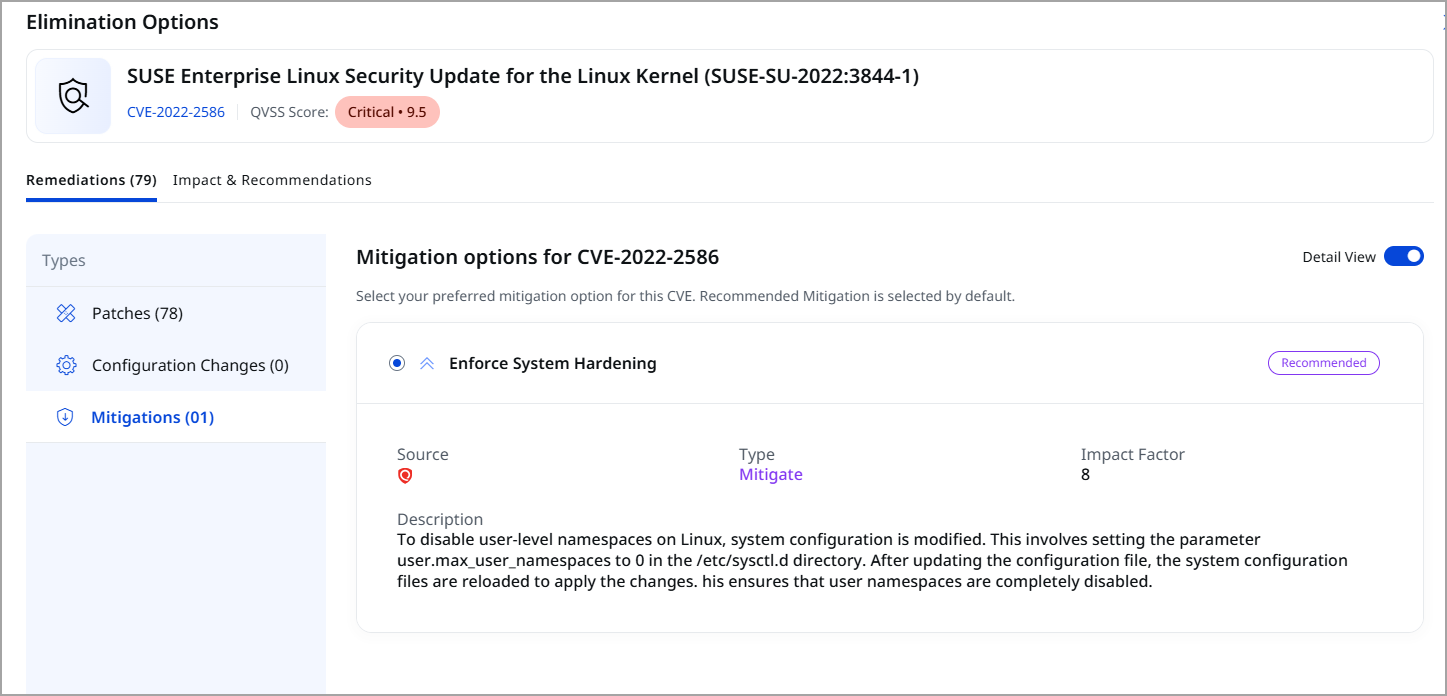
Mitigation lowers the chance that attackers exploit a vulnerability. It does not change the vulnerable software. Examples include updating a registry setting or hardening the system. Until now, you could see and apply patches from ETM. Now you can also see and apply mitigations from the same place. ETM shows the mitigation options. TruRisk Eliminate runs the mitigation job.
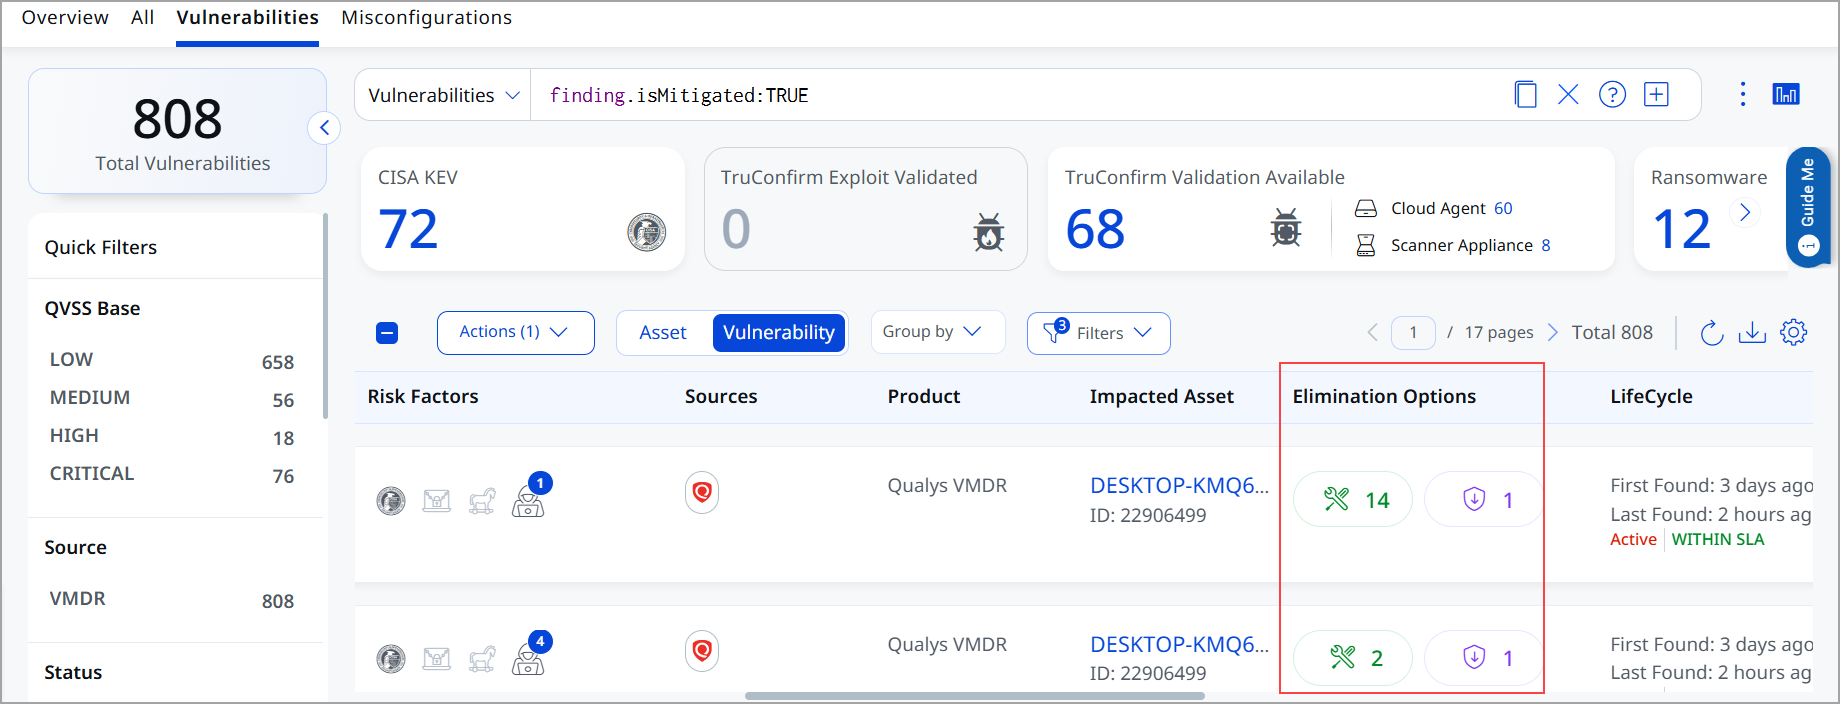
The Elimination Options column on the findings list shows two counts for each vulnerability. One is the number of patches. The other is the number of mitigations. Click a count to open the Elimination Options window.
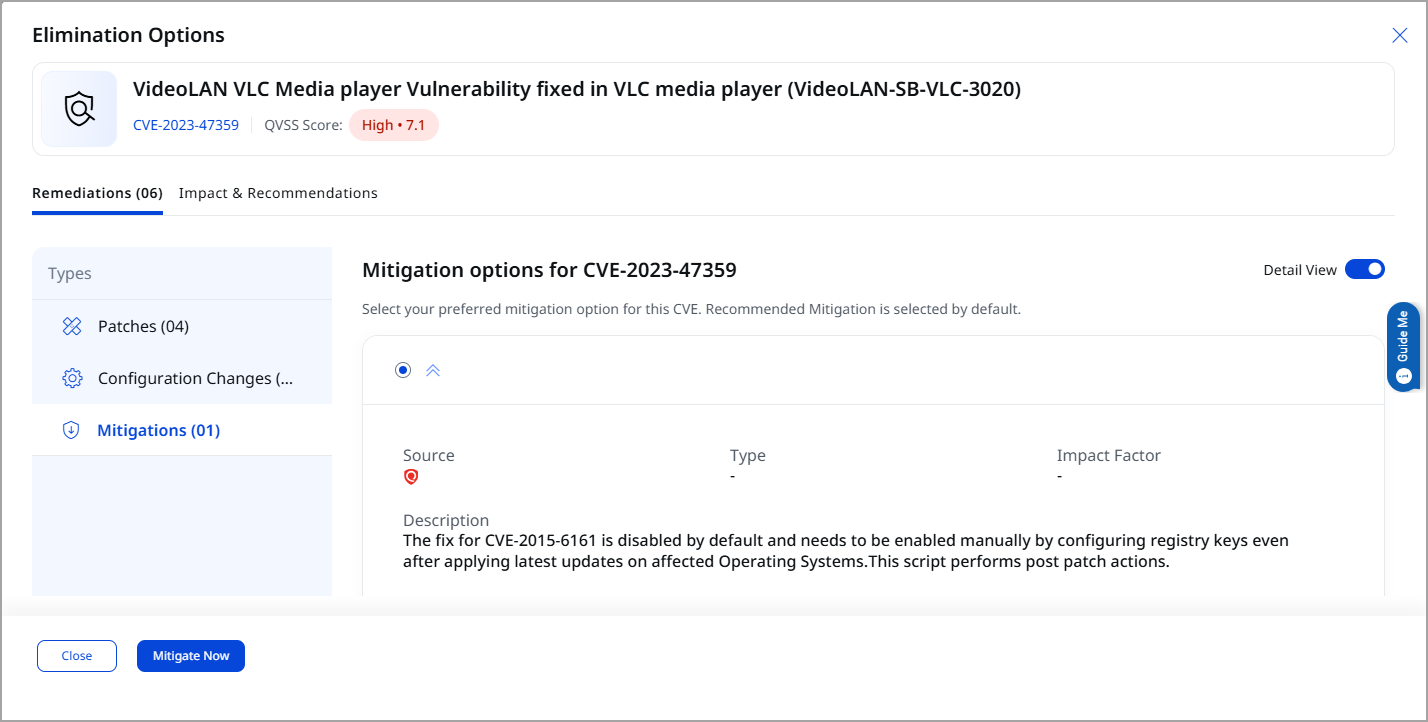
The Remediations tab of the Elimination Options window groups the fixes by type: Patches, Configuration Changes, and Mitigations. Configuration Changes are changes to system settings that fix the vulnerability. Click Mitigations to see the mitigation options for the CVE, such as Registry Update or Enforce System Hardening. The recommended mitigation is selected by default, and you can select another option. Turn on Detail View to see more about each option.
You can open the Elimination Options window from these places:
- Risk Management > Findings: From the Elimination Options column of vulnerability findings.
- Risk Management > Risk Workbench: From the Elimination Options column of the findings in a prioritization plan.
- Finding Details: From the Remediation & Actions section, which now shows the mitigation count next to the remediation count.
Create a Mitigation Job with Mitigate Now
Select a mitigation option and click Mitigate Now. ETM opens the mitigation job wizard in TruRisk Eliminate, with the asset and the selected mitigation already filled in. The job title is filled in for you, and you can change it.
The Mitigate Now button is not available when the asset does not have a TruRisk Eliminate subscription or when a mitigation is already applied to the finding. Hover over the button to see why.
Track Mitigated Findings
After the mitigation job runs on the asset, ETM shows the mitigation status for the finding:
- Status: The finding details show Mitigated next to the finding status. The finding stays active because mitigation reduces the risk but does not remove the vulnerability.
- Remediation & Actions: Shows Mitigated with the date and time the mitigation was applied.
- Vulnerability Lifecycle: Adds the Mitigated Date to the timeline.
- Elimination Options: Shows Mitigation Applied next to the mitigation that was applied.
The following are the key aspects of mitigation in ETM:
| Patches and Mitigations in One Place | See the patch count and the mitigation count for each vulnerability in the Elimination Options column. |
| Recommended Mitigation | Start with the recommended mitigation, selected by default, or pick another option. |
| Mitigate Now | Open a mitigation job with the asset and mitigation already filled in. |
| Mitigation Status | Track mitigated findings with the Mitigated status and the Mitigated Date in the lifecycle. |
Enhancement
Create Alerts and Exceptions Using Mitigation and Patch Details
What Changed For You
You can now create alert rules and exception rules based on mitigation and patch details. For example, get an alert when Qualys can mitigate a finding, or skip findings that already have a Qualys mitigation applied.
Prerequisite
This feature requires a TruRisk Eliminate subscription. This feature is available on request. To turn it on, contact Qualys Support or your Technical Account Manager (TAM).
You can use the five new mitigation and patch tokens when you create alert rules and exception rules. For the list of tokens and examples, see New Tokens for Mitigation and Patch Details.
- Set an alert for findings that you can mitigate through Qualys.
- Create an exception for findings that already have a Qualys mitigation applied.
Token
New Tokens for Mitigation and Patch Details
Use the new tokens to search for findings by mitigation and patch details. You can also use all of these tokens when you create alert rules and exception rules.
You need a Qualys TruRisk Eliminate subscription to use these tokens.
Mitigation Tokens
You can use the following tokens to search for findings based on mitigation details:
| Token | Sub Tab | Description |
|---|---|---|
|
finding.isQualysMitigable |
Risk Management > Findings > All Risk Management > Findings > Vulnerabilities Risk Management > Risk Workbench |
Select TRUE or FALSE to search findings based on whether you can mitigate them through Qualys. Example Show findings that you can mitigate through Qualys
|
|
finding.qualysMitigableType |
Risk Management > Findings > All Risk Management > Findings > Vulnerabilities Risk Management > Risk Workbench |
Select Fix or Mitigate to search findings by the type of action available for them. Fix means a patch is available. Mitigate means a mitigation is available. Example Show findings that you can fix with a patch
|
|
finding.qualysMitigationAppliedDate |
Risk Management > Findings > All Risk Management > Findings > Vulnerabilities Risk Management > Risk Workbench |
Use a date or a date range to search findings by the date when a Qualys mitigation was applied. Example Show findings that had a Qualys mitigation applied on October 1, 2026
|
Patch Tokens
You can use the following tokens to search for findings based on patch details:
| Token | Sub Tab | Description |
|---|---|---|
|
finding.patches.reliability |
Risk Management > Findings > All Risk Management > Findings > Vulnerabilities Risk Management > Risk Workbench |
Select High, Medium, or Low to search findings by the reliability rating of the patch. Reliability shows how likely the patch is to install and work without problems. Example Show findings with highly reliable patches
|
|
finding.hidePatchSuperseded |
Risk Management > Findings > All Risk Management > Findings > Vulnerabilities Risk Management > Risk Workbench |
Select TRUE or FALSE to hide or show findings whose patches were replaced by newer patches. Example Hide findings whose patches were replaced by newer patches
|
Enhancement
See Template Coverage and Mitigation Counts in Risk Workbench Plans
What Changed For You
When you create a prioritization plan in Risk Management > Risk Workbench, each template now shows its coverage. You see how many assets and findings it covers before you pick it. Plans also show how many findings you can mitigate. Plan progress now shows Findings Addressed instead of Fixed Findings.
Choose a Template Based on What It Covers
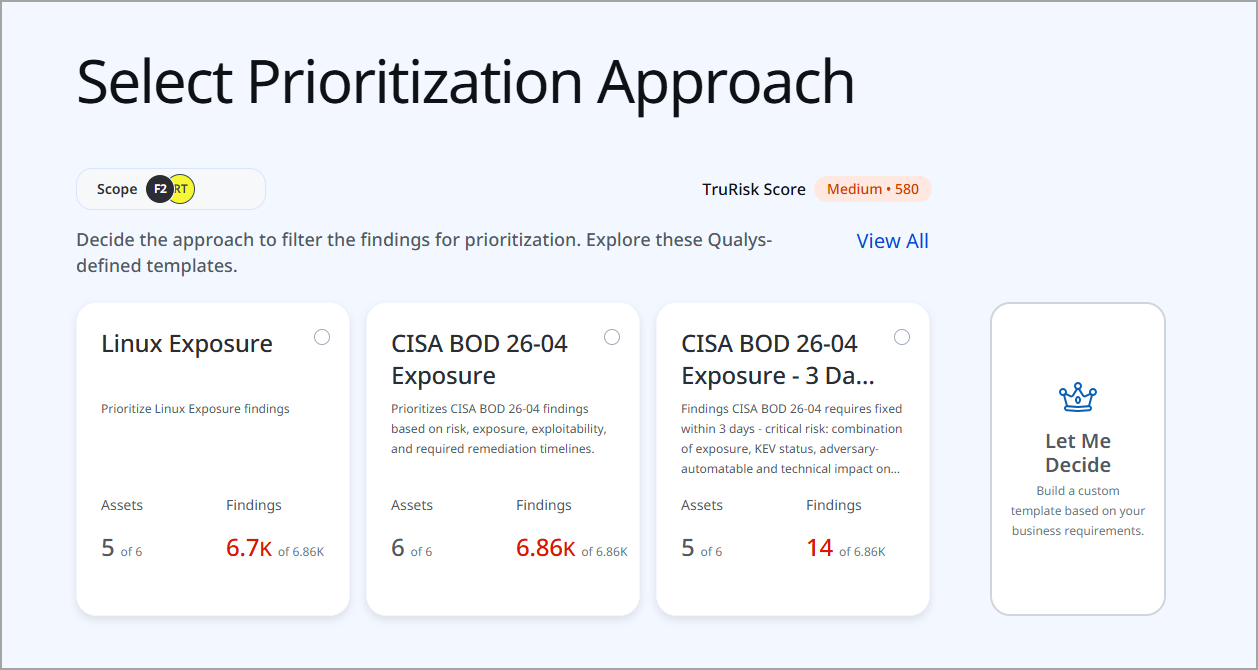
On the Select Prioritization Approach page, each template card now shows:
- A short description of the template.
- Assets: How many assets in your scope match the template, for example, 14 of 29.
- Findings: How many findings in your scope match the template, for example, 869 of 1.49K.
The page also shows the scope you selected and its current TruRisk score at the top. This helps you compare templates side by side and pick the one that fits your goal. Earlier, each card showed only a TruRisk score. These templates include the templates that Agent Sara Chat Now uses.
Click View All to see all templates in a table. The Risk Reduction column in this table is renamed to TruRisk Score.
View Findings You Can Mitigate
The Impact section of the plan preview and the plan details now include a Permanent Fixes card. It shows fixable findings and available mitigations, for example, 7 of 19 Mitigations Available. This sits next to the existing cards for critical assets, critical findings, and highly reliable patches.
The other cards now also show totals, so you can see what the plan covers at a glance. For example, 1 Critical Asset of 29 Prioritized, or 52 Highly Reliable Patches of 683 Available.
Track Score and Progress More Clearly
Plans show score and progress in these updated ways:
- Potential TruRisk Reduction: Shows the date of the current score, for example, Score as of October 5, 2026. While ETM calculates the projected score, you see Computation in progress. Scores do not appear in preview mode. Save the plan to see them.
- Plan Performance: Shows Findings Addressed instead of Fixed Findings.
- Plan Progress column: On the Risk Workbench list, progress is shown as a percentage Addressed instead of Fixed.
The following are the key aspects of these changes:
| Template Coverage | See the matching assets and findings for each template before you pick one. |
| Permanent Fixes | See how many findings in the plan can be fixed or mitigated. |
| Dated Scores | Know when the current score was calculated and when the projected score is still being calculated. |
| Findings Addressed | Track plan progress by the number of findings addressed. |
For more information, refer to ETM Online Help.
Enhancement
Evidence Section in TruConfirm Scan Results
What Changed For You
You can now see why TruConfirm marked a vulnerability as Exploit Validated or Exploit Ruled Out. The evidence behind the result appears in the result details side panel, so you can review the basis of each result instead of only its outcome.
TruConfirm scan results now include an evidence section that explains the scan result. For both Exploit Validated and Exploit Ruled Out results, the evidence is displayed along with the scan result in the TruConfirm Assessment result details side panel. You can view it in the following places:
- Findings tab: Select an exploit validated finding and click the finding title. The Finding Details page opens on the right hand side. Under the TruConfirm section, click the View Evidence option. The evidence view opens and displays the scan evidence along with the scan result.
- TruConfirm scan results: From the TruConfirm scan listing page, open the scan results page and click a listed result. The result details side panel displays the scan evidence along with the scan result.
The result details side panel displays the following:
- Result: The TruConfirm result, Exploit Validated or Exploit Ruled Out.
- Port: The port associated with the result.
- Result Details: The evidence for the result.
Enhancement
Error Handling for Skipped Findings and Assets in TruConfirm Scans
What Changed For You
You can now see which findings and assets were not sent for validation in a TruConfirm scan, and why, so you can understand how complete your scan results are.
TruConfirm now identifies findings and assets that were not sent for validation and marks them as skipped. The following changes apply to the Scan tab and the scan details:
- New Skipped scan status: A scan in which nothing could be sent for validation now ends with the status Skipped. This status is displayed in a neutral style rather than as an error. You can also filter the scan list by the Skipped status.
- Skipped counts in the scan list: The Exploit Validated column shows the number of skipped findings and assets on a second line, formatted as Skipped Findings: N | Assets: N.
- Summary cards: The scan details now include Skipped Findings and Skipped Assets cards.
- Skipped section: The scan details include a Skipped section with a switch between Findings and Assets. You can view the skipped findings or assets for the scan, and drill down to the skipped findings for a specific asset.
- Skip reason: The skipped findings and assets list displays the reason each item was skipped.
- Scan banners: For scans with the Skipped or Errored status, the scan details display a banner with the message returned for the scan. For scans that finish with skipped items, the banner shows a summary of them.
Token
New Tokens for Patch Tuesday
Use these tokens to find the vulnerabilities from a specific Microsoft Patch Tuesday release, so you can track and fix them each month. You can use the following tokens to search for findings related to Patch Tuesday releases:
| Token | Sub Tab | Description |
|---|---|---|
|
finding.patchTuesdayDate |
Risk Management > Findings > All Risk Management > Findings > Vulnerabilities |
Use a date or date range to search findings by Patch Tuesday release date. Example Show findings from the September 2026 Patch Tuesday release
Show findings from Patch Tuesday releases between July and September 2026
|
|
finding.isPatchTuesdayApplicable |
Risk Management > Findings > All Risk Management > Findings > Vulnerabilities |
Select TRUE or FALSE to search findings based on whether they are part of a Patch Tuesday release. Example Show findings that are part of a Patch Tuesday release
|
Fix
Fixes
The following reported and notable customer issues are fixed in this release:
| Component/Category | Description |
|---|---|
| ETM - Reports |
Finding reports no longer include the statusUpdatedAt and statusUpdatedBy fields. These fields showed empty (null) values for fixed findings. Use the lastFixedOn field to see when a finding was fixed. If you have scripts or tools that read these fields from finding reports, update them before you upgrade. |
| ETM - Reports |
Only the user who created a report can now download or delete it. The Super User keeps full access to all reports. If your team shares reports, the user who created a report must download it and share it with others. This change also fixes an issue where a user with limited access could download another user's report through the reporting API, even when the report included assets outside the user's scope. |
| ETM - Custom Attributes | We fixed an issue where custom attributes accepted non-numeric values in the When, Then, and Else conditions. Custom attributes now accept only numbers. If you enter a value that is not a number, a validation message appears. |
| ETM - API | We fixed an issue where an API query failed with the error "Unsupported QQL token(s) in query" when it filtered by a tag name that contains a colon (:). Queries now return correct results for tag names with a colon (:) or semicolon (;), in both the API and the UI. The AND and OR operators also work as expected with these tag names. |
| ETM - Business Entities | We fixed an issue where users could not save a business entity after adding a tag to it, and the message "Failed to edit Business Entity" appeared. You can now add tags to an existing business entity and save your changes. |