Creating Reports on FIM Events
Creating reports on FIM events that occur as a result of any kind of action in your file system is important as the reports enable you to visualize the collected data. You can better analyze trends in events detected, generate graphical reports, and create executive reports that provide an in-depth insight into your network's file integrity.
With FIM, you can create on-demand reports or schedule your report generation at a future date and time. Specify your reporting criteria by leveraging QQL tokens and have access to the most accurate and up-to-date event and incident data in PDF, CSV, or HTML formats.
The event record limit for CSV reports is 1 million, and for HTML and PDF reports, the limit is 100,000. Records beyond this limit is truncated.
You can also create rules to create reports by defining specific criteria for events and incidents. This helps you access exact event data according to your business requirements.
The FIM reports are retained on the Qualys platform for seven days. It is recommended that you download your reports within seven days of generation for future reference and analysis.
You can search for reports by the report title in the Reports sub-tab. You can also email reports to specified users by using the Notification option that's available while creating a report.
Create Reports on FIM Events
Reports that are not marked as 'Completed' can be run again. This functionality applies to all types of data sources, including event-based, asset-based, and incident-based reports.
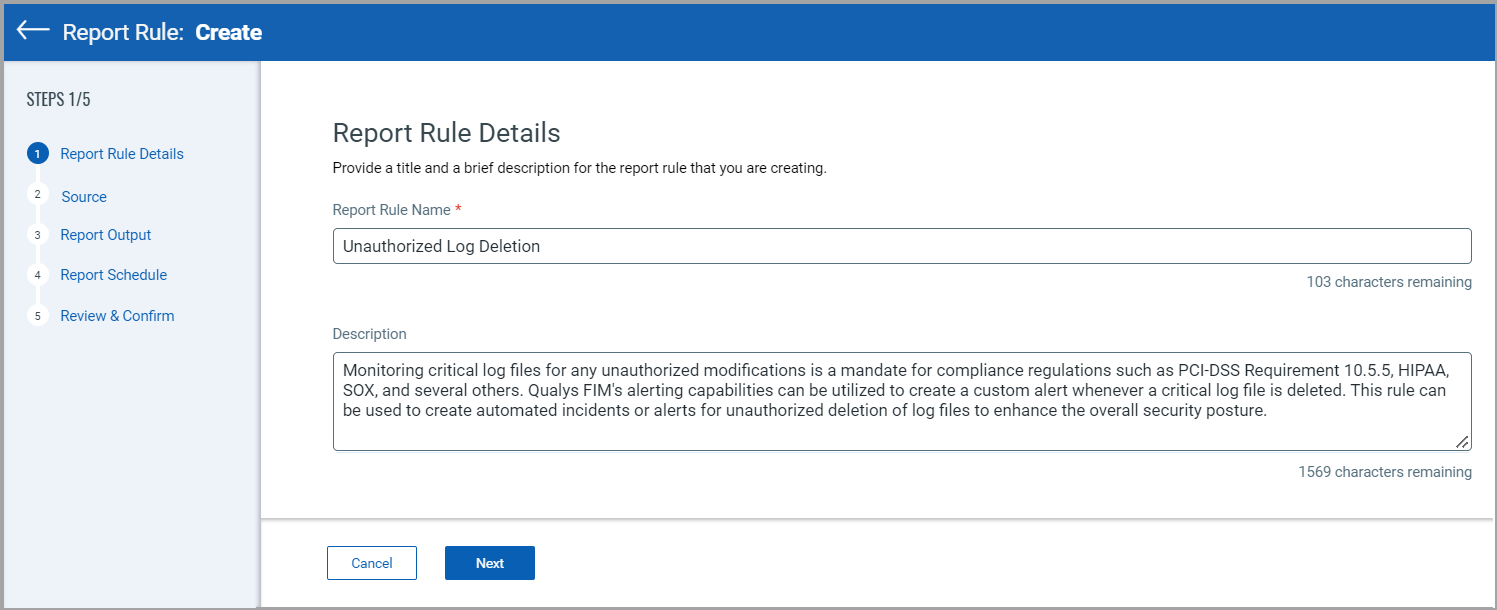
- Navigate to the Reports > Report Rules tab.
- Click Create Report Rule to view the Report Rule Details page.
- Enter the Report Rule Name and Description.
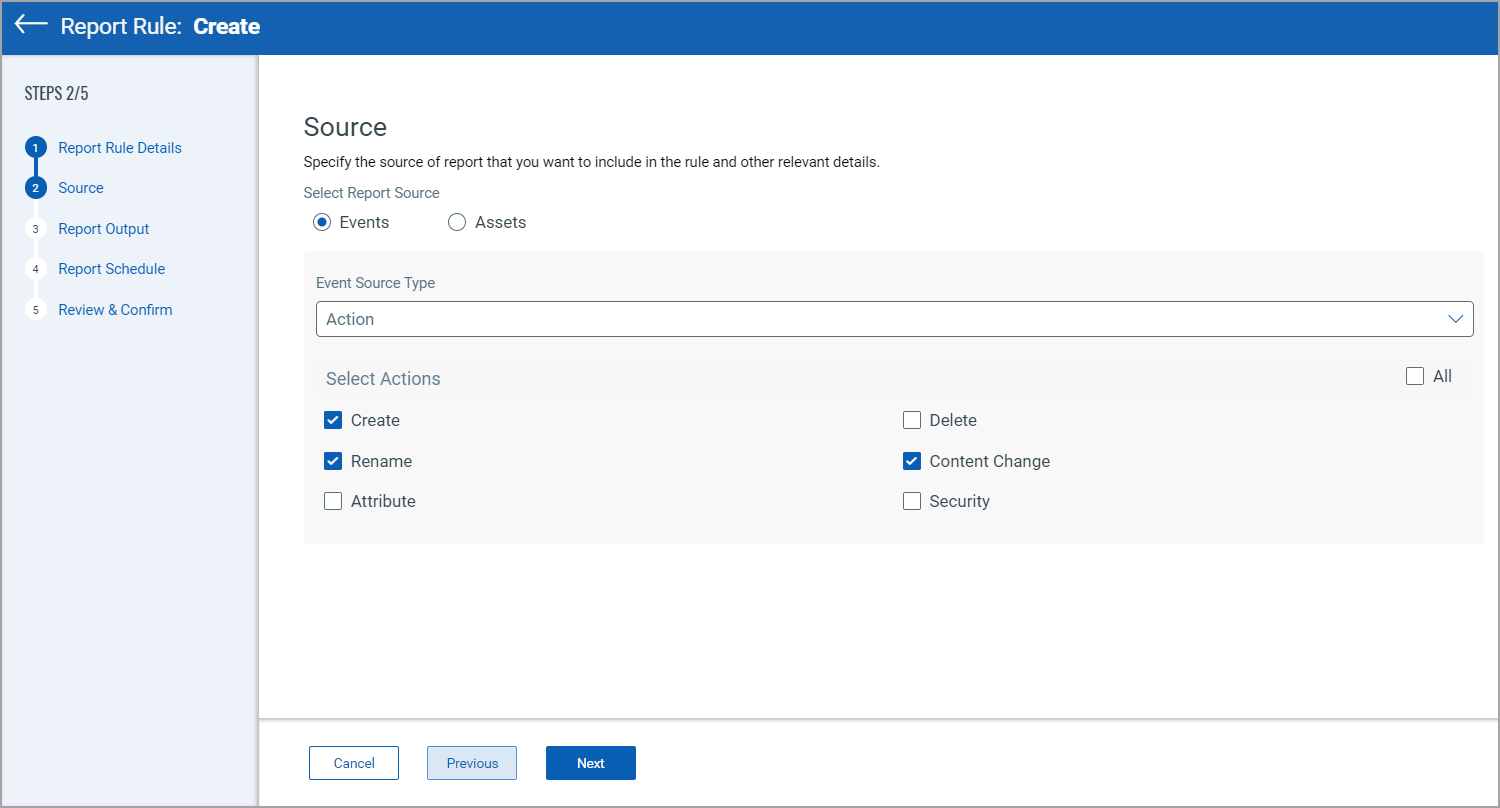
- Click Next to view the Source page.
- Select Report Source as Events that you want to include in the rule.
- Select a Event Source Type from the list that you want to capture in your report.
- Select/enter the relevant inputs for options and fields displayed depending on your selected event source.
When updating a report rule, Qualys recommends using the same Report Source that was selected during report creation. You can update the Source Type, but changing the Report Source is not supported and may lead to inconsistencies in the report data.
- If you want to define the scope of assets in the report rule, follow these steps:
-
Select Asset Tag from the Event Source Type list.
-
In the Include Assets section, click
 to select the assets from the Select Assets page and click Apply.
 -
In the Include hosts for the tags section, click
to select asset tags from the Select Tags page and click Add Tag.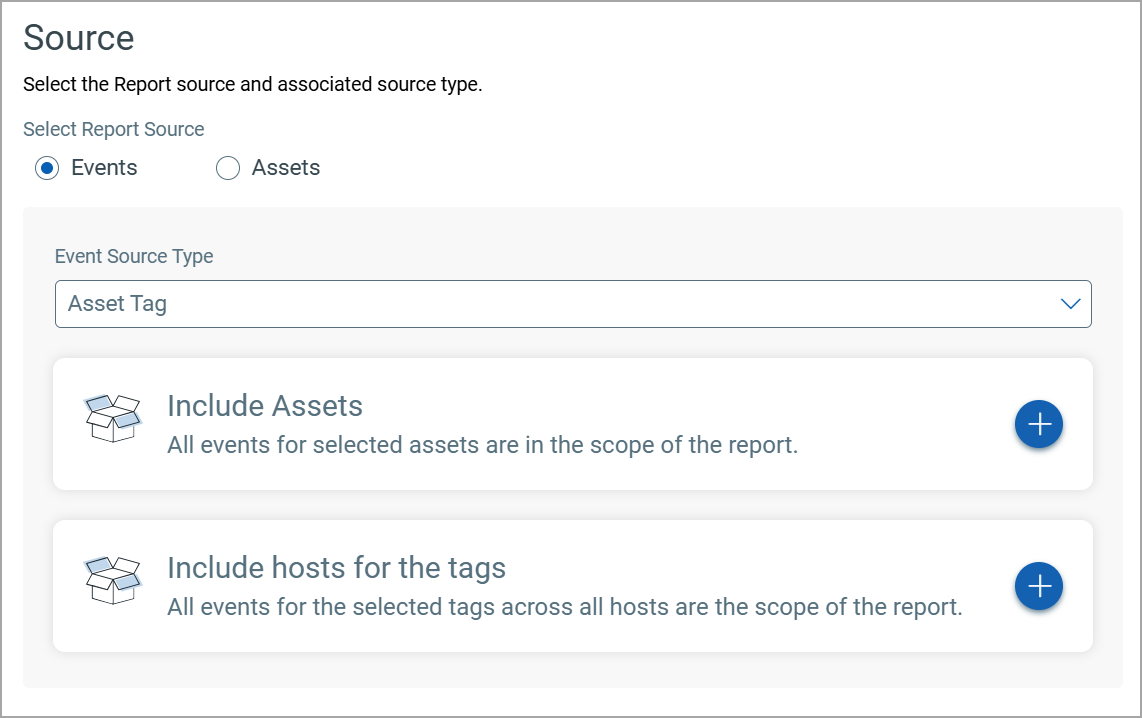
-
- (Optional) To include the incident details of events in the report, select the Include Incident Name and Incident Status in report checkbox.
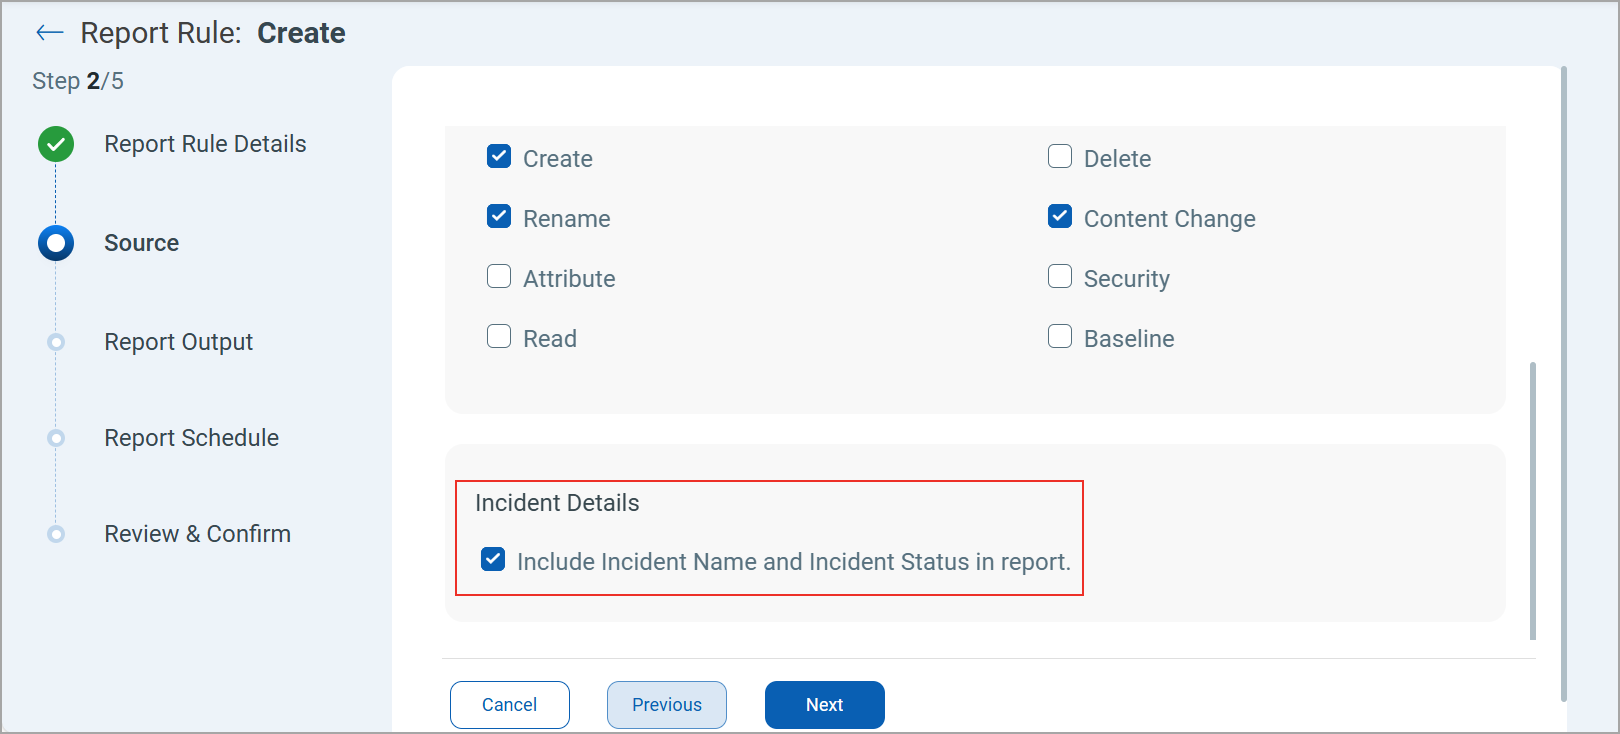
Selecting this checkbox adds the following two columns to the report:
- Incident Name: Provides the incident name associated with the event.
- Incident Status: Provides the status of the incident: OPEN or CLOSED.
If the Incident Status still appears OPEN in the report after you have closed the incident, it may take some time for the update to reflect. Wait an hour and re-generate the report to capture the updated information.
- Click Next to view the Report Output and Notification page.
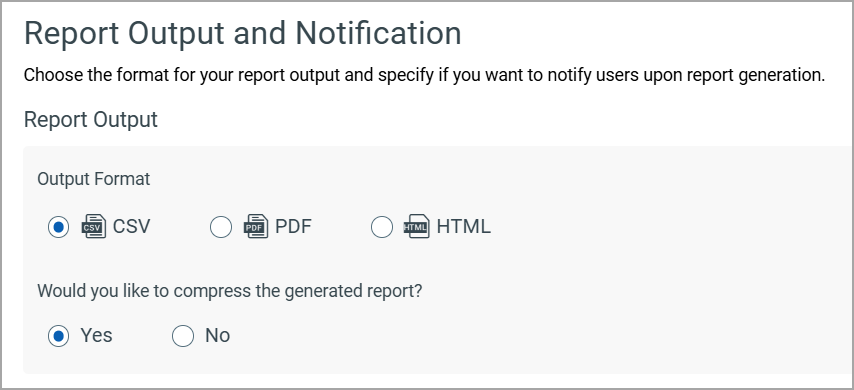
- In the Report Output and Notification page, perform the following steps:
- Select the desired report Output Format, (CSV, PDF, or HTML) for your report.
- Select Yes if you want the report to be compressed. Otherwise, click No.
-
If you want to send a notification to stakeholders when a report is generated, select the Notification checkbox.
-
Enter a Notification Subject.
-
Enter the email IDs of the stakeholders you want to notify in the To text box.
You can enter up to 10 recipients, whether or not they have access to the Qualys Enterprise TruRisk™ Platform. -
Optionally, in the Message Body text box, enter the email message to be sent along with the report.
The notification email includes the link to download the report from the Qualys Enterprise TruRisk™ Platform.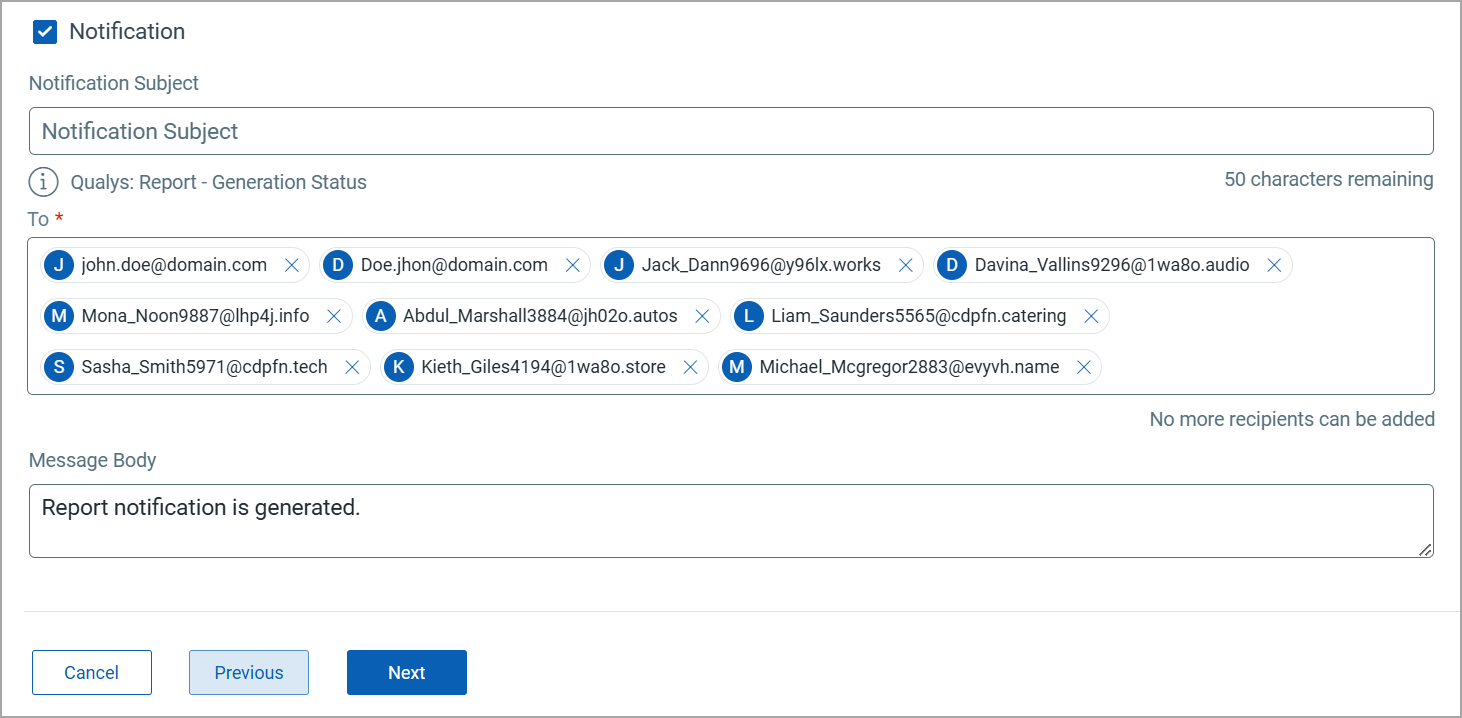
If the report size is less than or equal to 5 MB, the report is attached to the email itself. If it is more than 5 MB, the email includes a link to download the report. For more information on downloading the report from email, referf to .
The Qualys user ID and password are required to download the report, which is valid for seven days. Ensure the report is downloaded before the link expires.
- Click Next to view the Report Schedule page.
In the Report Schedule page, if you want to schedule the report generation, you can have a one-time schedule or a recurring schedule. For more information, refer to Schedule the Report Execution.
Schedule the Report Execution
On the Report Schedule page, you can choose one of the following options to generate reports:
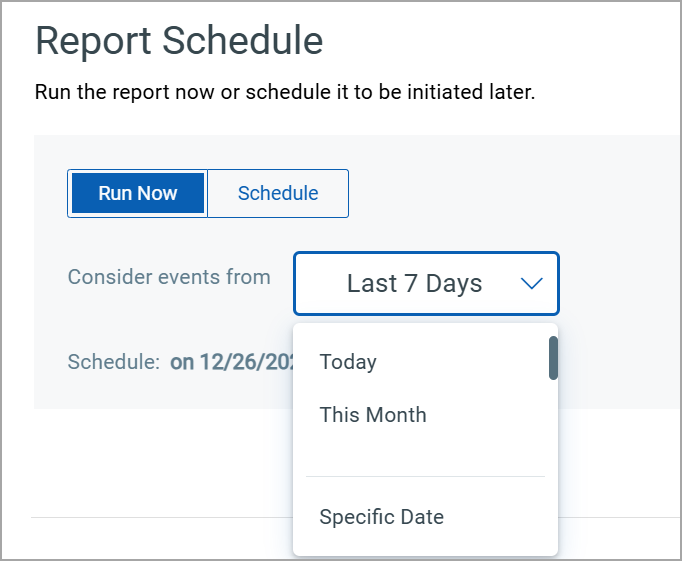
- Run Now: Generate the report immediately after creating the report rule.
- Schedule: Set up a recurring schedule to run the report automatically at specified intervals.
To schedule the report, follow these steps:
- To generate the report without a schedule, follow these steps:
- Click the Run Now tab.
- In the Consider events from list, select a specific time frame, such as Today, Yesterday, Last 7 Days, or Last 30 Days, for events to include in the report. Selecting a Specific Date allows you to choose a custom date range. By default, the value selected is Today.
- To set up a schedule, follow these steps:
-
Click the Schedule tab.
-
To generate the report for a specific duration, such as Today, Yesterday, Last 7 Days, or Last 30 Days, select a duration from the Consider events from list.
Selecting Specific Date allows you to choose a custom date range. By default, the value selected is Today.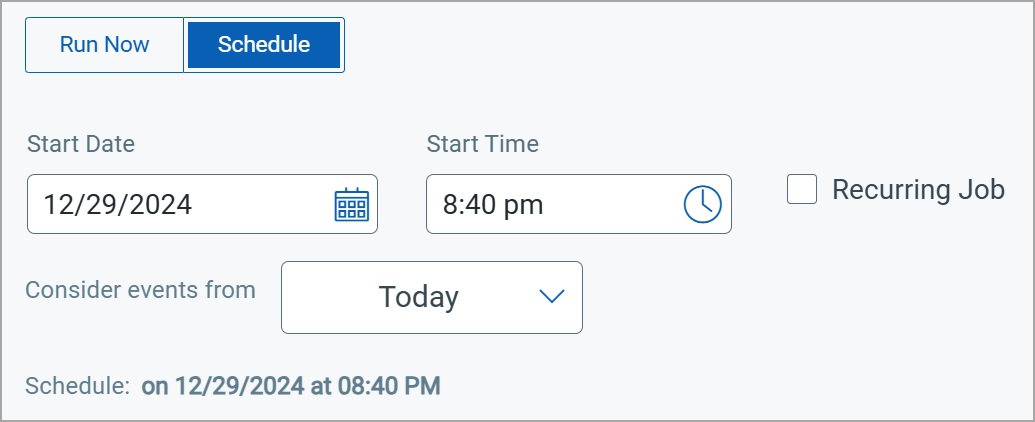
-
To schedule the report generation, select the Recurring Job checkbox.
-
From the Repeats drop-down list, select a schedule for the report execution.
The default value selected is Daily.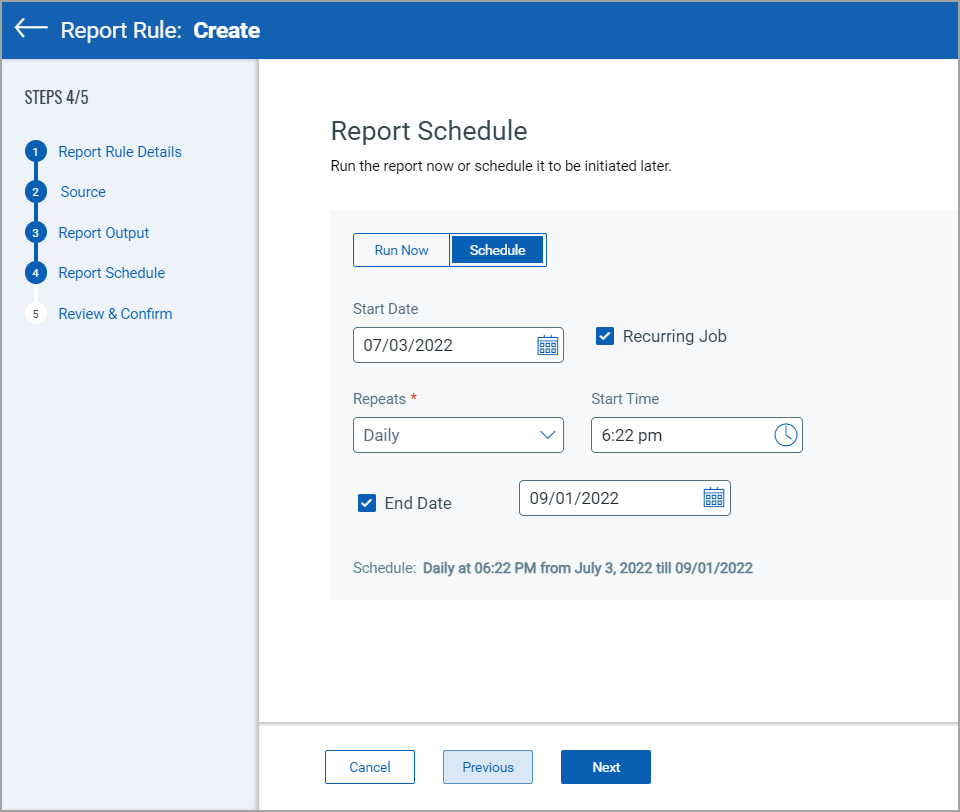
-
Select/enter the relevant inputs for options and fields that are displayed depending on the schedule you select from the Repeats drop-down list.
Schedule Description Daily 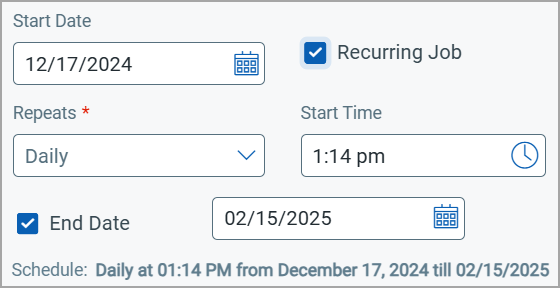
Select this option to schedule the report to run daily on the selected Start Date and Start Time.
Example:
You schedule the report to run daily at 7:00 AM, starting on 06/15/2025.
On June 15, the report runs at 7:00 AM.
Report Data: The report includes data from June 14, 7:00 AM to June 15, 7:00 AM. This means the report includes the last 24 hours of data.
Weekly
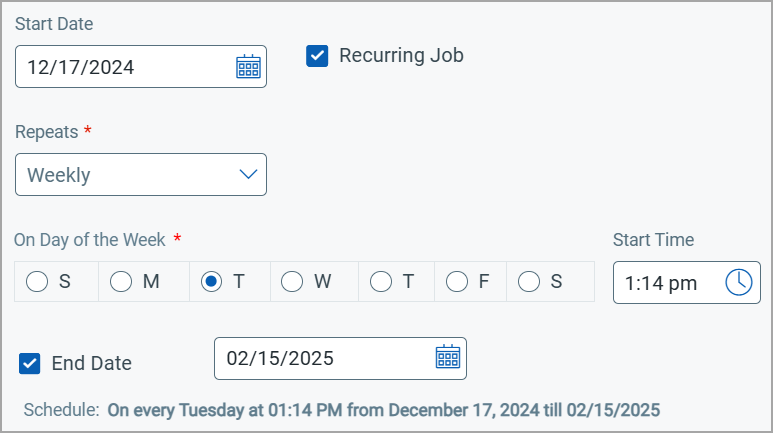
Select this option to schedule the report to run every week on the selected day.
The Start Date and Start Time indicate when the schedule begins.Example:
You schedule the report to run every Monday at 7:00 AM, starting on 06/15/2025.
On Monday, June 16, the report runs at 7:00 AM.
Report Data: The report includes data from June 09, 7:00 AM to June 16, 7:00 AM. This means the report includes the last 7 days of data.
Monthly

Select this option to schedule the report to run every month on the selected date. The Recurrence Date denotes the date the report is generated.
The Start Date and Start Time indicate when the schedule begins.
Example:
You schedule the report to run on the 15th of each month at 7:00 AM, starting on 06/15/2025.
On June 15, the report runs at 7:00 AM.
Report Data: The report includes data from May 15, 7:00 AM to June 15, 7:00 AM. This means the report includes the last 1 month of data.
Quarterly
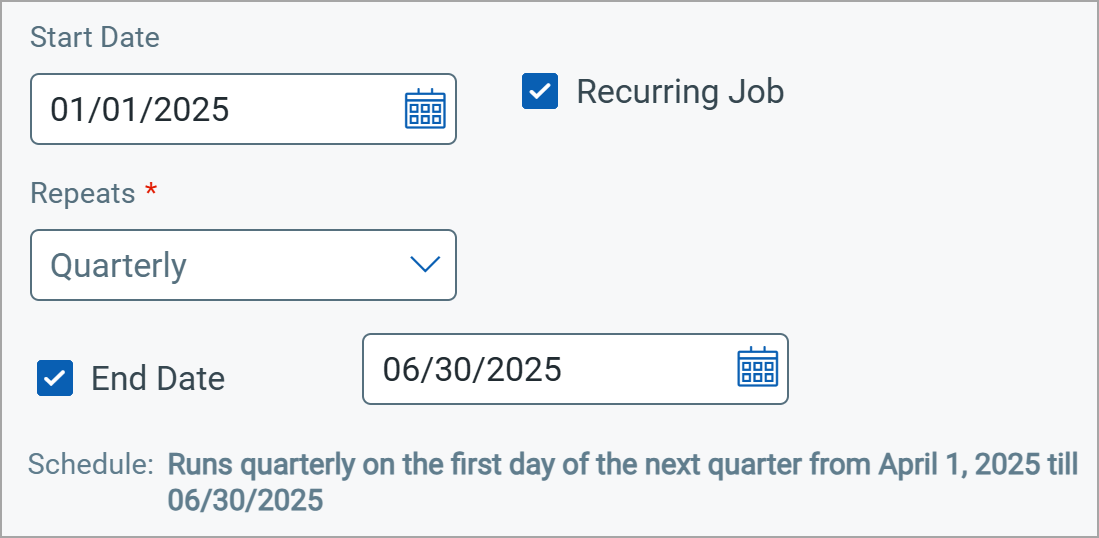
Select this option to schedule the report to run on the first day of every quarter.
The Start Date and Start Time indicate when the schedule begins.
Example:
You schedule the report to run on the first day of every quarter, starting on 06/15/2025.
The report runs on July 1st.
Report Data: The report includes data from April 1st to June 30th. This means the report includes the last 3 months of data.
Yearly
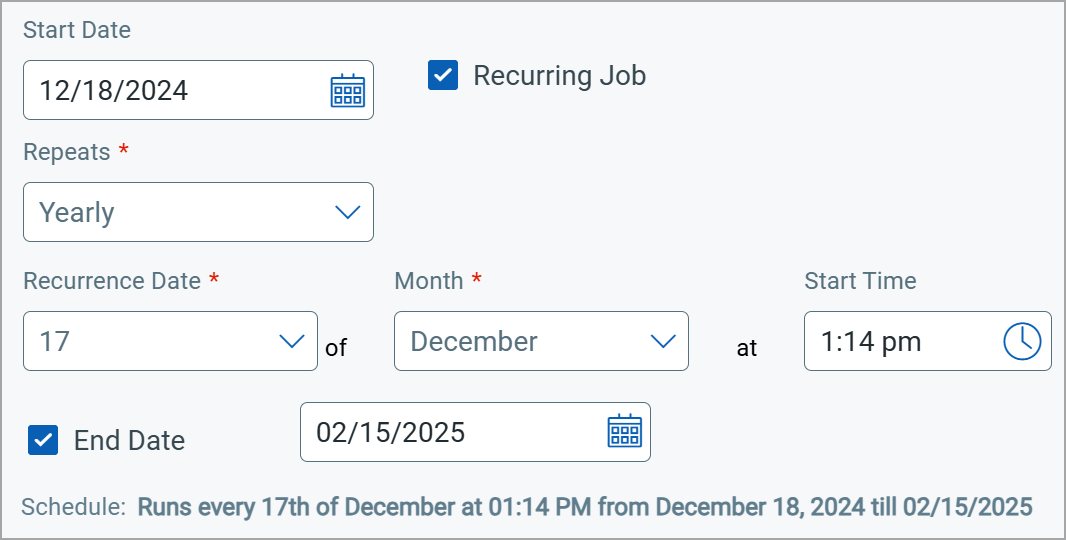
Select this option to schedule the report to run yearly on a specific day of a selected month.
The Recurrence Date and Month specify when the report is generated.The Start Date and Start Time indicate when the schedule begins.
Example:
You schedule the report to run on the 15th of June every year at 7:00 AM, starting on 06/15/2025.
On June 15, 2025, the report runs at 7:00 AM.
Report Data: The report includes data from June 14, 2024 to June 15, 2025. This means the report includes the last 1 year of data.
The default value of the Start Time is the current time +20 minutes. You can manually change the time if required.
- Select the End Date check box and specify the end date for the recurring schedule of the report.
The default value is the 10th day from the current date.
-
- Click Next to view the Review & Confirm page.
- Click
 to make changes in the respective pages if required.
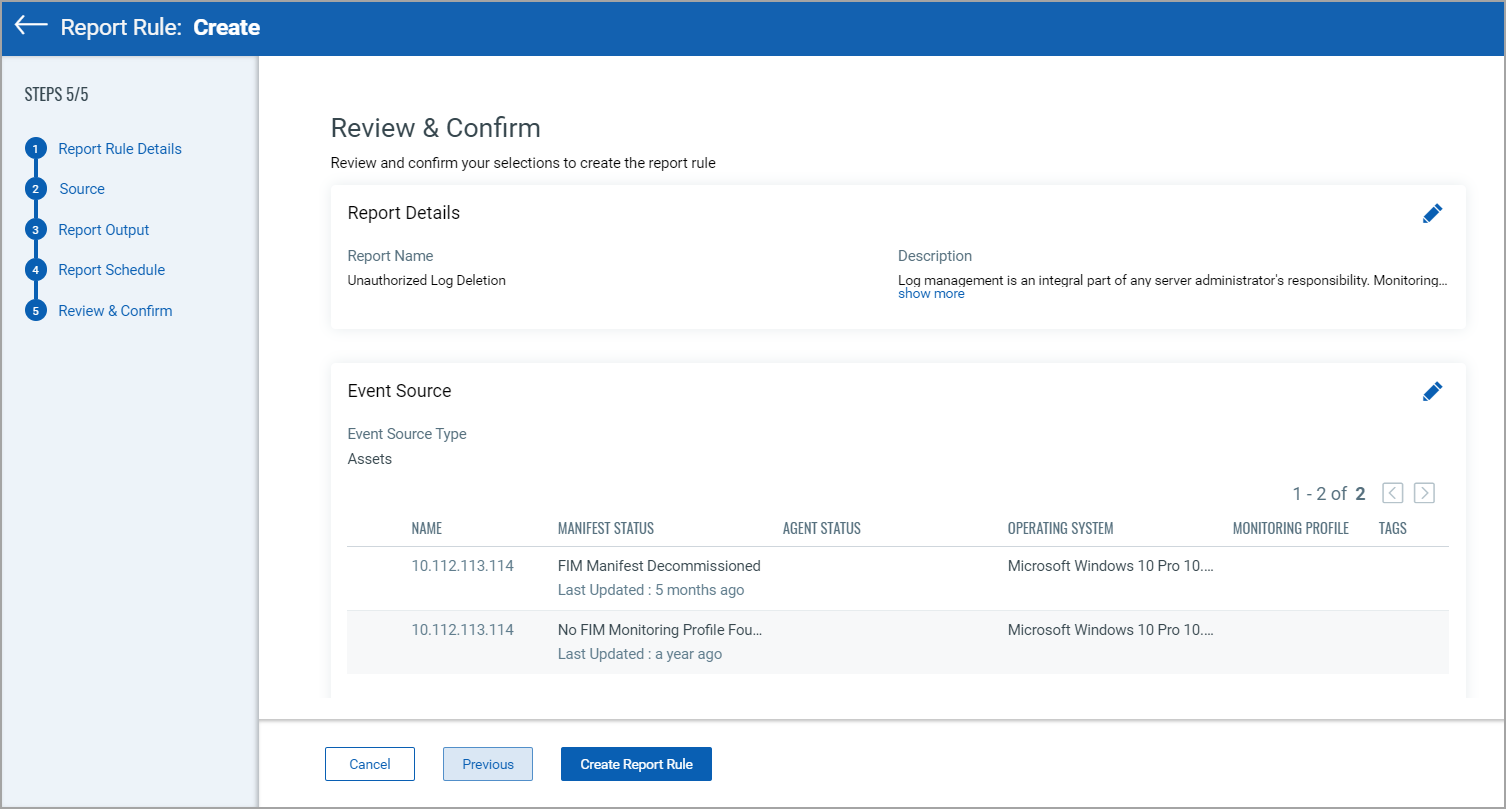
- Click Create Report Rule.
After the report rule is created, it is listed in the Report Rules tab.
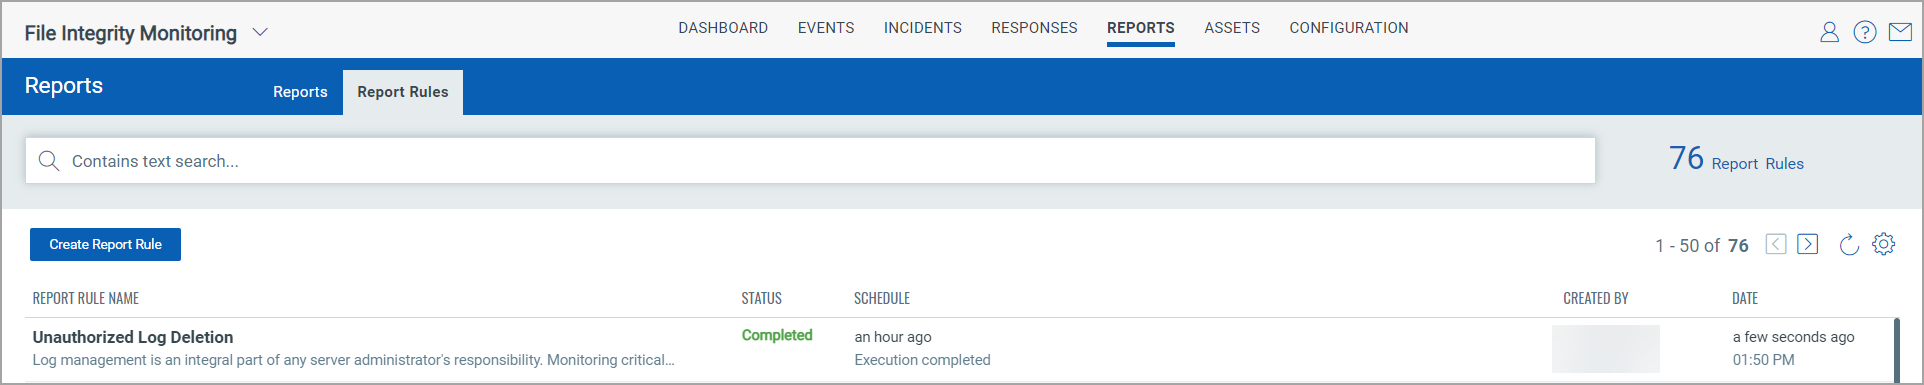
Generated reports are displayed with the Completed status in the Reports tab. You can download the report from the Quick Actions menu.
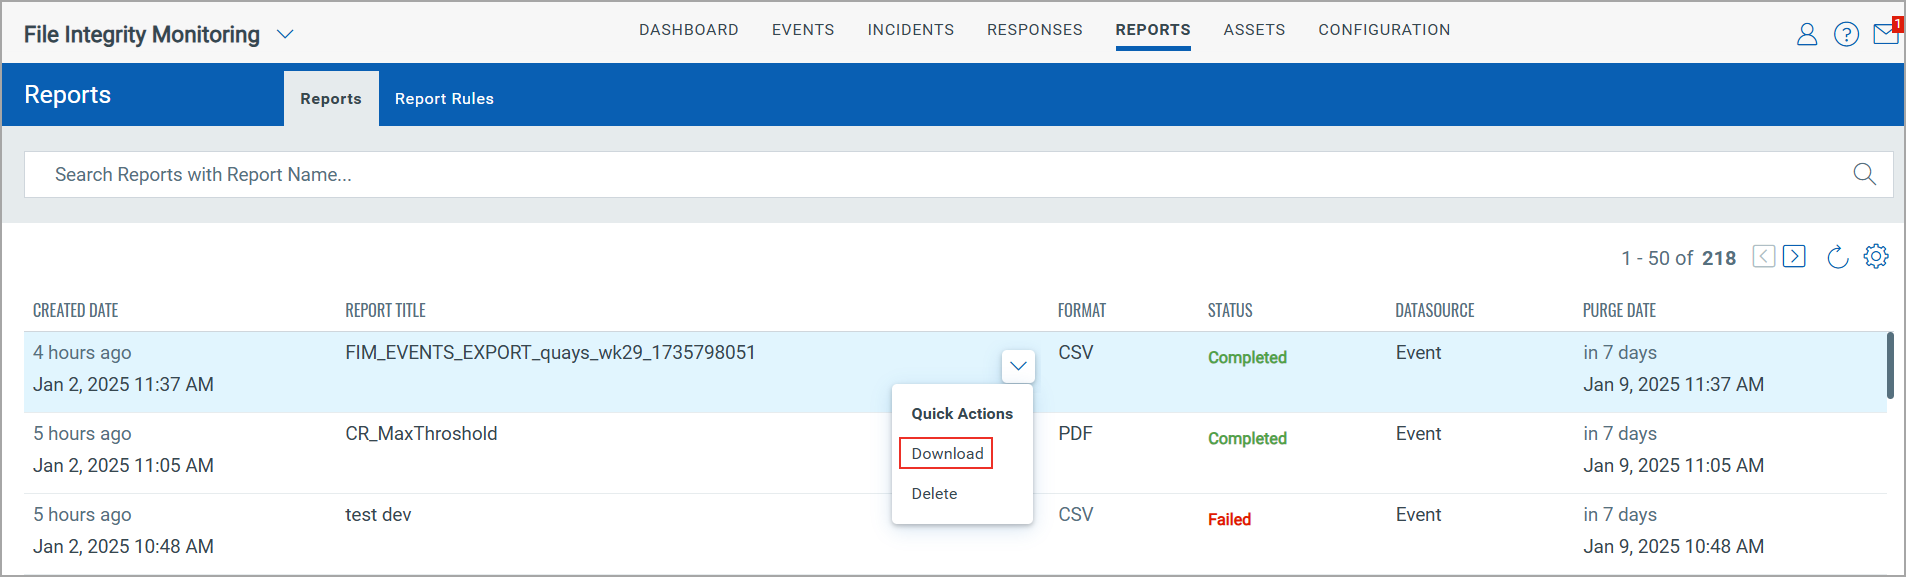
Reports with status other than Completed can be rerun. This functionality applies to all types of data sources, including event-based, asset-based, and incident-based reports.