File Integrity Monitoring Release 4.6
May 05, 2025 (Updated on May 29, 2025)
Retrieve Network Assets using Tags
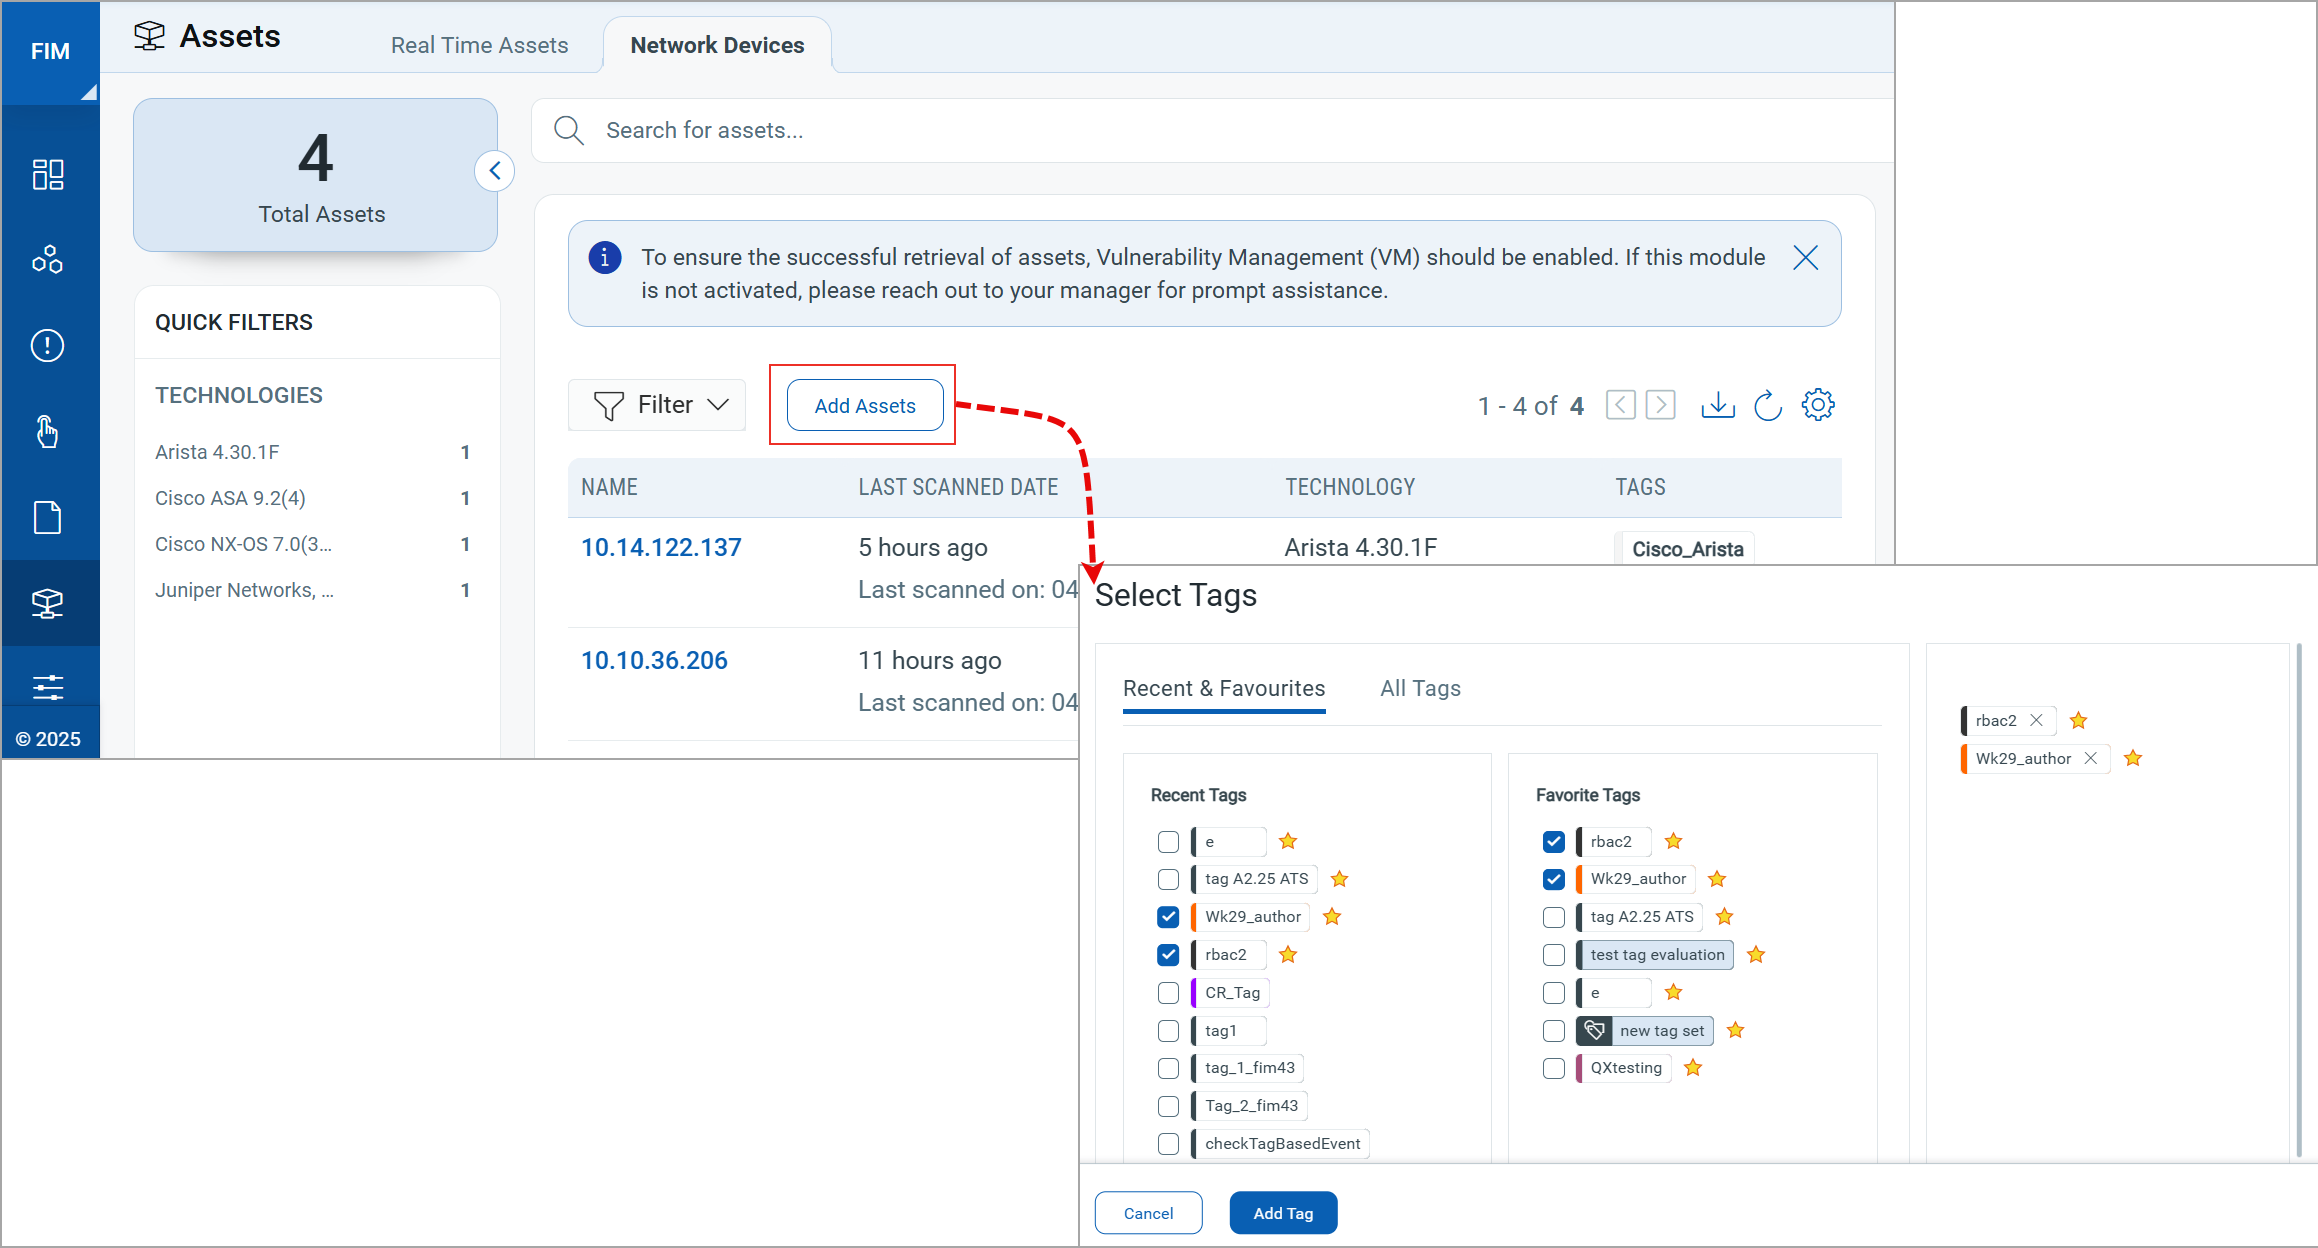
You can now retrieve your network assets using tags into your File Integrity Monitoring (FIM) asset inventory. Previously, retrieving assets required manually entering a QQL query. This improvement simplifies your workflow by eliminating the need to define a query for asset retrieval.
As part of this improvement, the Scan Based Assets tab is now renamed to Network Devices to better reflect its purpose.
To retrieve network assets, navigate to the Assets > Network Devices tab and click Add Assets to select your desired tags. You can add all tags that are in your scope.
For more information on network assets, refer to File Integrity Monitoring Online Help.
New Cards to Easily Visualize FIM Non-compliant Assets
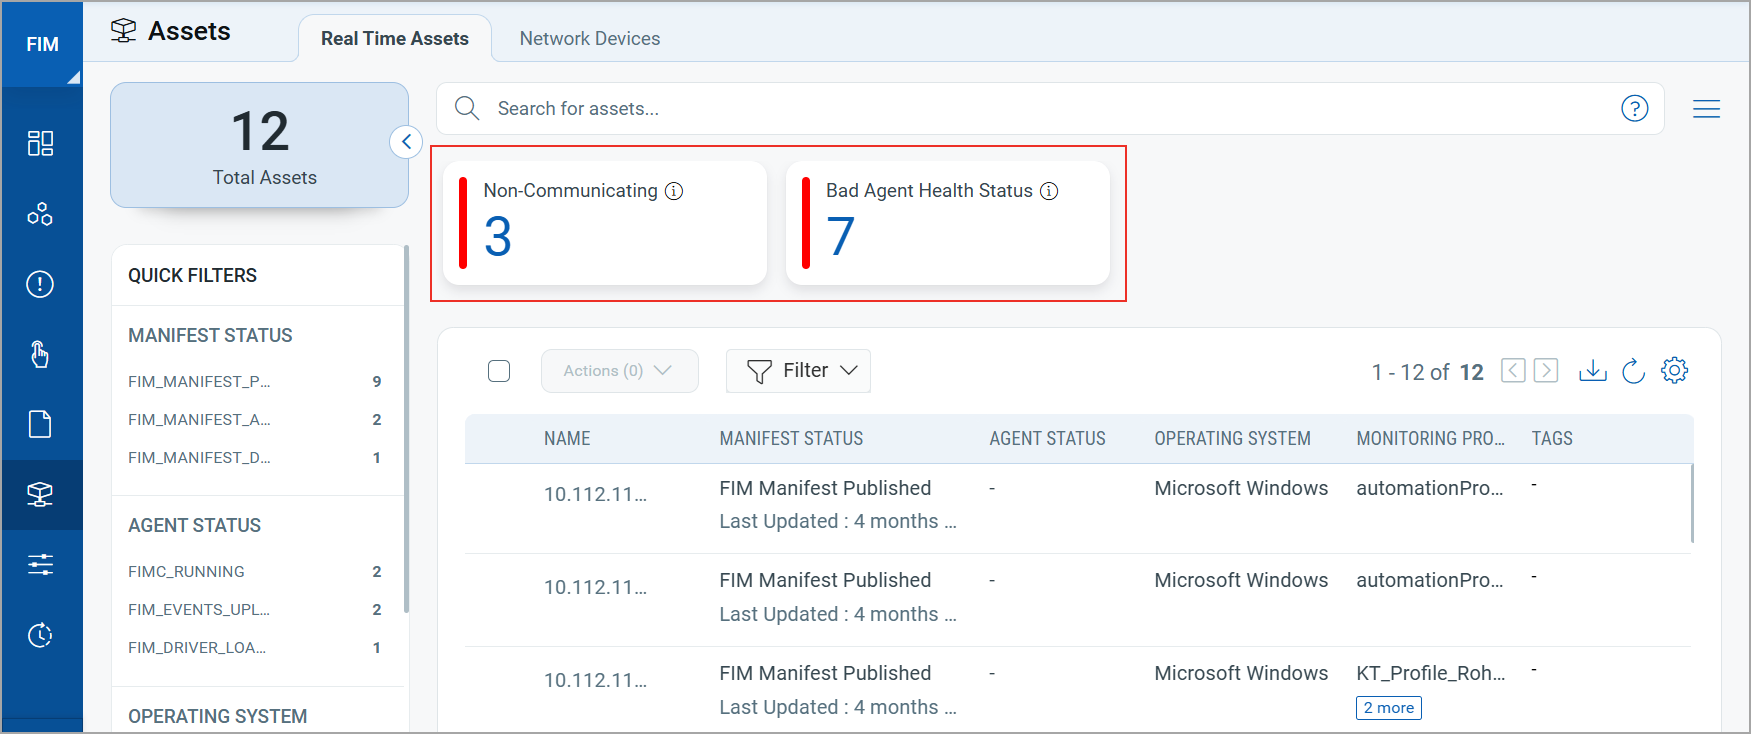
We have now introduced two summary count cards under the Assets > Real Time Assets tab. These cards give you a quick insight into assets that are non-compliant without manually filtering or searching through the list.
Non-compliant assets refer to those assets that are non-communicating and have a bad agent health status.
You can click each card to view a detailed list of the affected assets.
- Non-Communicating: Displays the number of assets that have not communicated with the Qualys Qualys Enterprise TruRisk™ Platform in the last seven days.
- Bad Agent Health Status: Displays the number of assets that are FIM activated but currently not functioning as expected.
Enhanced FIM Profile and Queries Library
We have updated the File Integrity Monitoring Profiles and Queries in the library to include the following enhancements and updates:
Improved Profile NamingImproved Profile Naming
The following profile names in the library are now renamed to help you identify the associated compliance:
| Older Profile Name | New Profile Name |
|---|---|
| Lightweight Monitoring Profile for Linux | Linux Monitoring Profile for HIPAA |
| Lightweight Monitoring Profile for Windows | Windows Monitoring Profile for HIPAA |
| Linux Monitoring Profile for PCI DSS | Linux Monitoring Profile for PCI DSS 4.0 |
| Windows Monitoring Profile for PCI DSS | Windows Monitoring Profile for PCI DSS 4.0 |
| AIX Monitoring Profile for PCI DSS | AIX Monitoring Profile for PCI DSS 4.0 |
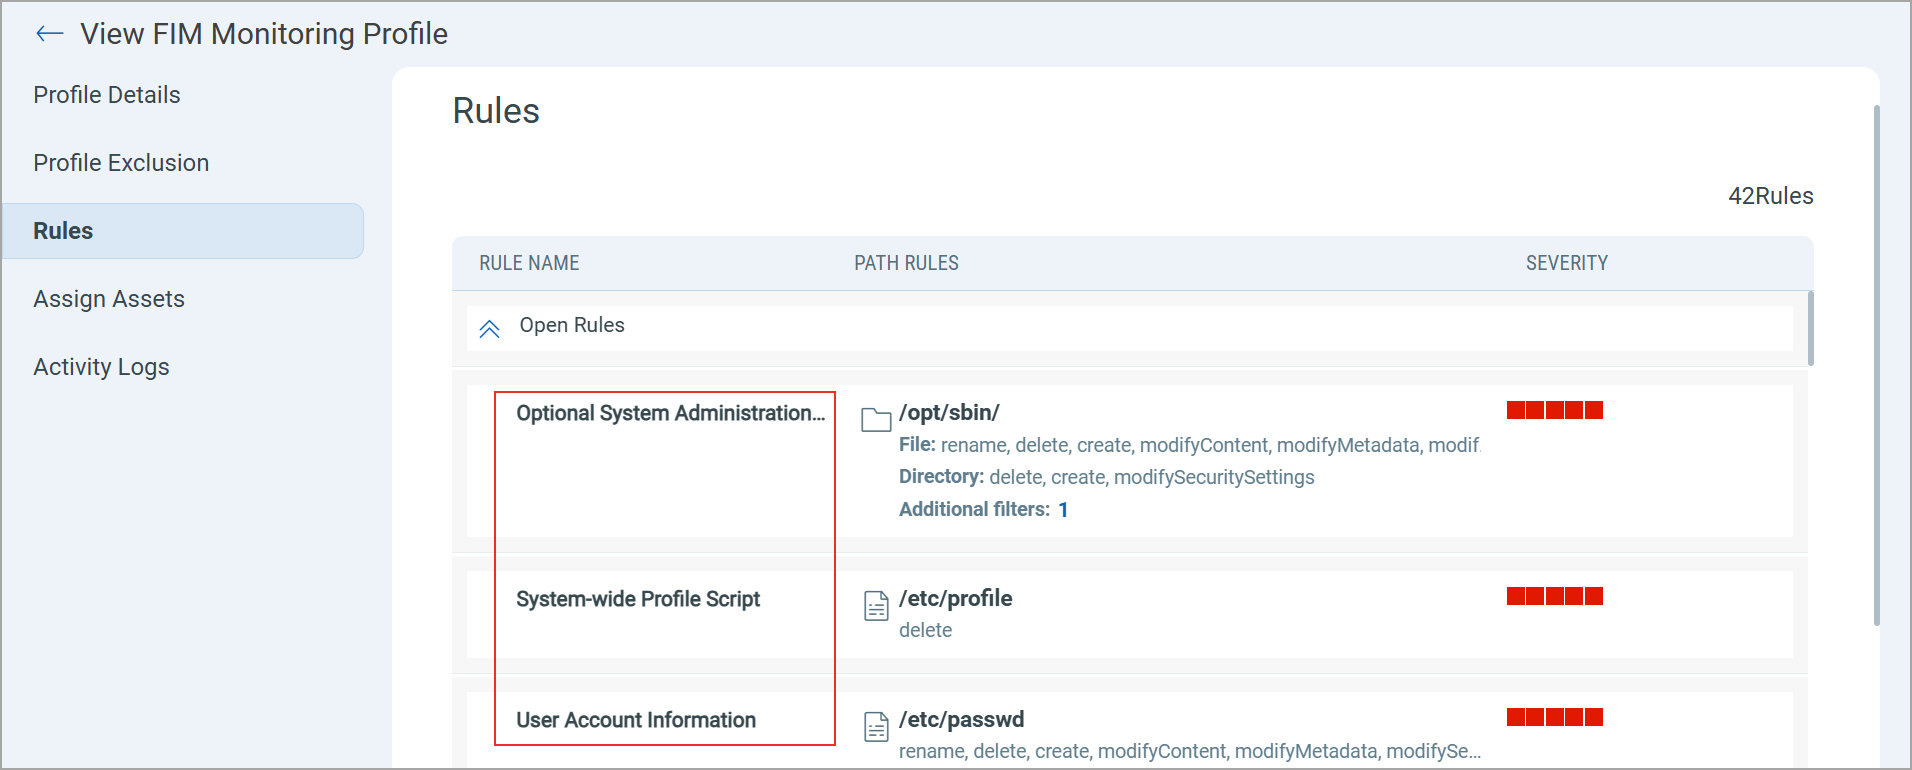
Improved Rule NamingImproved Rule Naming
Imported profiles now include an appropriate name for the associated rules to better reflect their intended purpose.
This applies to the new imported profiles only.
See the following image, which shows the rule names.
New Rules added to OOTB Monitoring ProfilesNew Rules added to OOTB Monitoring Profiles
We have added new rules to the below monitoring profiles, which help FIM detect any modifications to time synchronization files, such as NTP and Chrony, and ensure compliance with the PCI DSS 4.0 requirement 10.6.3:
- Linux Monitoring Profile for PCI DSS 4.0
- AIX Monitoring Profile for PCI DSS 4.0
See the following table for more details on new rules:
| Profile | Rule (File Path) | Rule Description |
|---|---|---|
| Linux Monitoring Profile for PCI DSS 4.0 | /etc/ntp.conf | This is the primary configuration file for the NTP service. Any change to this file may indicate a modification to the time synchronization settings. |
| /etc/chrony/chrony.conf | This is the configuration file for Chrony, which is used for time synchronization. | |
| /etc/adjtime | This file stores the system's time drift and is used by NTP/Chrony to keep the system clock in sync. | |
| /etc/localtime | This symlink points to the system's time zone file. Any change here may affect the system's time settings. | |
| AIX Monitoring Profile for PCI DSS 4.0 | /etc/ntp.conf | This is the primary configuration file for the NTP service. Any change to this file may indicate a modification to the time synchronization settings. |
| /etc/localtime | This symlink points to the system's time zone file. Any change here may affect the system's time settings. |
Queries RevampedQueries Revamped
The queries are updated with new names, descriptions, and QQL to better meet your organization's needs for compliance and monitoring. You can view the new queries under Configuration > Library > Queries.
To view the list of new queries, refer to the FIM Online Help.

Deleted List of Queries from Library
We have deleted the following queries that are no longer relevant from the Queries library:
Linux Patching ActivityLinux Patching Activity
Linux patches and hotfixes are released periodically to address bugs and vulnerabilities. To strengthen overall security and compliance, such activities can be monitored with Qualys FIM alerting and correlation feature to detect changes to systems outside of authorized change control windows.
Query: "actor.process:'python' or actor.process:'dpkg' or actor.process:'update-alternatives'"
Sunburst Suspicious Child ProcessesSunburst Suspicious Child Processes
This rule identifies suspicious child processes of SolarWinds.Orion.Core.BusinessLayer.dll that may be evidence of the SUNBURST backdoor.
Query: "actor.process:'SolarWinds.Credentials.Orion.WebApi.exe` or actor.process:'SolarWinds.Orion.Topology.Calculator.exe' or actor.process:'Solarwinds-Orion-NPM.exe' or actor.process:'WerFault.exe' or actor.process:'Database-Maint.exe' or actor.process:'APMServiceControl.exe' or actor.process:'Solarwinds-Orion-NPM.exe' or actor.process:'ExportToPDFCmd.Exe'"
Sunburst Suspicious DLLsSunburst Suspicious DLLs
Compromised DLLs can lead to massive attacks. The compromised file in the SolarWinds supply chain attack was SolarWinds.Orion.Core.BusinessLayer.dll. The SolarWinds DLL file is a backdoor which then installs a Windows service to execute malicious code.
Query: "file.name:`netsetupsvc.dll` or file.name:`SolarWinds.Orion.Core.BusinessLayer.dll` or file.name:`app_web_logoimagehandler.ashx.b6031896.dll`"
New Software InstallationsNew Software Installations
The commands used to install, update, remove or search software packages on various Linux distributions and the Microsoft Windows installer process that performs software installations can be monitored with the help of alerting & correlation feature of Qualys FIM.
Query: "(platform:'Linux' and (actor.process:'dpkg' or actor.process:'python' or actor.process:'prelink' or actor.process:'update-alternatives')) or (platform: Windows and actor.process:'msiexec.exe')"
Files containing user accounts information, groups and password hashes are critical and should be monitored for any unauthorized modification. You can configure an alert in such a way that, in case of a user action wherein a critical authentication file is modified by an unauthorized user, Qualys FIM sends an immediate alert, so that necessary action can be taken.
Query: "(platform:'Linux' and (file.name:`passwd` or file.name:`shadow` or file.name:`password-auth` or file.name:`system-auth` and (action:Delete or action:Security or action:Content)) and not actor.userName:`root`)"
Unauthorized Modification of Initialization FilesUnauthorized Modification of Initialization Files
When the operating system or an application program is first loaded into memory, a part of the program performs initialization. With the help of Qualys FIM, a correlation rule can be created to monitor the modifications in any of the critical initialization files, which must be notified and acted upon immediately.
Query: "(platform:'Windows' and (file.name:`boot.ini` or file.name:`system.ini`) and not actor.userName:'NT AUTHORITY\\SYSTEM') or (platform:'Linux' and (file.name:`lilo.conf` or file.name:`grub` or file.name:`grub.conf` or file.name:`grub.cfg`) and not actor.userName:`root`)"
Antivirus Scan ActivityAntivirus Scan Activity
All program files (executable) that enter a system go through the antivirus scan.Trend Micro OfficeScan is a security suite that protects enterprise networks from malicious software. The services run by OfficeScan client could be monitored with Qualys FIM to detect any unauthorized modifications.
Query: "actor.process:TmListen.exe or actor.process:NTRtScan.exe or actor.process:TmProxy.exe or actor.process: TmPfw.exe or actor.process: TMBMSRV.exe or actor.process: DSAgent.exe"
Detect Suspicious Web Shells on Exchange ServerDetect Suspicious Web Shells on Exchange Server
Creation of abnormal content by UMWorkerProcess.exe in Exchange is an IOC (Indicator of Compromise). We should continuously monitor for Microsoft Exchange Server’s Unified Messaging service creating non-standard content on disk, suggesting exploitation of CVE-2021-26858 vulnerability.
Query: "file.fullPath:\"aspx\" and (actor.process:UMWorkerProcess.exe or actor.process:w3wp.exe)"
Trusted Executables Dropped on the hostTrusted Executables Dropped on the host
With Trusted Source Status, user can easily identify the good changes due to patches and security updates, and whitelist them.
Query: "reputationStatus:KNOWN and trustStatus:TRUSTED"
Sunburst Suspicious FilewritesSunburst Suspicious Filewrites
This rule helps to detect creation of executable files by the SolarWinds client.
Query: "actor.process:'solarwinds.businesslayerhost.exe' and (file.name:`netsetupsvc.dll` or file.name:`SolarWinds.Orion.Core.BusinessLayer.dll` or file.name:`app_web_logoimagehandler.ashx.b6031896.dll` or file.name:`gracious_truth.jpg` or file.name:`SolarWinds-Core-v2019.4.5220-Hotfix5.msp` or file.name:'SolarWinds.Credentials.Orion.WebApi.exe' or file.name:'SolarWinds.Orion.Topology.Calculator.exe' or file.name:'Solarwinds-Orion-NPM.exe' or file.name:'WerFault.exe' or file.name:'Database-Maint.exe' or file.name:'APMServiceControl.exe' or file.name:'Solarwinds-Orion-NPM.exe' or file.name:'ExportToPDFCmd.Exe')"
Authorized deletion activity on the hostAuthorized deletion activity on the host
This query will capture all the deletions performed by privileged users.
Query: "action:Delete and (actor.userName:`root` or actor.userName:'System' or actor.userName:'Administrator')"
Configuration files contain information required to control the operation of a program. Qualys FIM helps you create alerts for any unauthorized modifications in configuration files that are of utmost importance for system startup and are also read by various applications to customize the environment.
Query: "(platform:'Linux' and (file.name:`login.defs` or file.name:`resolv.conf` or file.name:`audit.rules` and (action:Delete or action:Security or action:Content)) and not actor.userName:`root`)"
Sunburst Suspicious Parent ProcessSunburst Suspicious Parent Process
The SolarWinds DLL file is a backdoor which then installs a Windows service to execute malicious code. Evidence of this can be detected by looking for the SolarWinds.BusinessLayerHost.exe process being ran.
Query: "actor.process:`SolarWinds.BusinessLayerHost.exe` or actor.process:`SolarWinds.BusinessLayerHostx64.exe`"
Unauthorized Windows Update ActivityUnauthorized Windows Update Activity
Windows Update is often whitelisted or ignored as it generates a lot of events that may be expected as well as valid. Attackers usually take advantage of this fact and introduce malware masked as a valid-looking process such as windowsupdate.exe. This might look like another Windows Update executable similar to various other valid ones such as TiWorker, Windows-KB, wuauclt.exe, sihclient and so on. However, in reality, WindowsUpdate.exe is a malicious program that has been designed to steal sensitive information from a computer.
Query: "platform: Windows and actor.process: WindowsUpdate.exe and not (actor.process: TiWorker or actor.process:wuauclt.exe or actor.process:cleanmgr or actor.process:sihclient or actor.process:'wuauserv.exe')"
Windows Update ActivityWindows Update Activity
Microsoft issues periodic updates to fix known flaws in Microsoft products and operating systems which help improve performance, reliability, and security. To strengthen overall security and streamline compliance, the patch management process should be monitored to detect changes to systems outside of authorized change control windows. You can leverage the Qualys FIM's event correlation and alerting feature to keep a check on such events.
Query: "actor.process: TiWorker or actor.process:wuauclt.exe or actor.process:cleanmgr or actor.process:sihclient or actor.process:'wuauserv.exe'"
Detect Tampering of Exchange Server LogsDetect Tampering of Exchange Server Logs
Exchange log files might contain the potential IOCs (Indicator of Compromise) for the exploit. Monitoring critical log files for any unauthorized modifications is a mandate for compliance regulations such as PCI DSS, HIPAA, SOX and others. Qualys FIM's alerting capabilities can be utilized to create a custom alert whenever a critical log file is deleted.
Query: "(file.fullPath:\"Exchange Server\" and file.fullPath:\"logging\") and (action: delete or action:Security)"
Configuration files contain information required to control the operation of a program. Qualys FIM helps you create alerts for any unauthorized modifications in configuration files that are of utmost importance for system startup and are also read by various applications to customize the environment.
Query: "(platform: Windows and (file.name: explorer.exe or file.name: bootstat.dat or file.name: config.sys or file.name: autoexec.bat and (action:Delete or action: Security or action: Content)))"
Deletion of Log FilesDeletion of Log Files
Monitoring critical log files for any unauthorized modifications is a mandate for compliance regulations such as PCI DSS Requirement 10.5.5, HIPAA, SOX and others. Qualys FIM's alerting capabilities can be utilized to create a custom alert whenever a critical log file is deleted. This rule can be used to create automated incidents or alerts for unauthorized deletion of log files to enhance the overall security posture.
Query: "file.name:'*.log' and action:Delete"
Unauthorized deletion activity on the hostUnauthorized deletion activity on the host
Adversaries may destroy data and files on specific systems or in large numbers on a network to interrupt availability to systems, services, and network resources. Deletions in large quantities can be alarming.
Query: "action:Delete and not (actor.userName:`root` or actor.userName:`NT AUTHORITY\\SYSTEM` or actor.userName:'Administrator')"
SeriousSAM aka HiveNightMare detectionSeriousSAM aka HiveNightMare detection
An elevation of privilege vulnerability exists because of overly permissive Access Control Lists on multiple system files, including the Security Accounts Manager database. An attacker who successfully exploited this vulnerability could run arbitrary code with SYSTEM privileges. An attacker could then install programs; view, change, or delete data; or create new accounts with full user rights.
Query: "file.name:SAM and (action:Security or action:Content or action:Attributes)"
Google products use a process called Google Update to periodically check for updates. Google Update Setup runs in the background of Windows and automatically starts up when your PC boots. It checks for software updates and automatically downloads and installs them if found. As the update process happens in the background and doesn't require any action on end user's part, you can monitor such events unauthorized changes with Qualys FIM.
Query: "actor.process: GoogleUpdate.exe"
Solarwinds Supply Chain AttackSolarwinds Supply Chain Attack
A highly skilled manual supply chain attack on the SolarWinds Orion IT network monitoring product allowed hackers to compromise the networks of public and private organizations.
Query: "(file.name:`netsetupsvc.dll` or file.name:`SolarWinds.Orion.Core.BusinessLayer.dll` or file.name:`app_web_logoimagehandler.ashx.b6031896.dll` or file.name:`SolarWinds-Core-v2019.4.5220-Hotfix5.msp` or file.name:`OrionImprovementBusinessLayer.2.cs` or file.name:`gracious_truth.jpg`) or (actor.process:`SolarWinds.BusinessLayerHost.exe` or actor.process:`SolarWinds.BusinessLayerHostx64.exe` or actor.process:`Solarwinds-Orion-NPM.exe`)"
With File Reputation Status, user can identify if the change on the system is malicious or suspicious, and take necessary action to restrain the attack.
Query: "(reputationStatus:MALICIOUS or reputationStatus:SUSPICIOUS) and trustStatus:UNAVAILABLE"
Integrity violations of Windows Registry ObjectsIntegrity violations of Windows Registry Objects
With Windows registries storing a large number of programs and OS security settings and a large amount of raw data, threat actors have begun to use those registries as a data store for their malicious activity. It is therefore imperative for organizations to monitor changes in Windows registries as part of their file integrity monitoring program.
Query: "platform:Windows and (type:Key or type:Value) and (action:`Content` or action:`Security`) and not actor.process:`svchost.exe`"
Support for Auth ID Client Management from UI
We have extended our support for OpenID Connect Authentication Client Management capabilities from the UI. This update allows for secure authentication and authorization of API access directly from the user interface. Our API interactions are now authenticated with enhanced security measures.
ID tokens are generated and validated with utmost security. This seamless integration requires minimal changes to the existing infrastructure, allowing for the maintenance of the highest level of security for APIs.
Access Control
Manager users can create two types of clients based on access requirements:
- User Level Clients: These are associated directly to individual user accounts, making them ideal for scenarios where user-specific access tracking and control are required. The token generated by user level client becomes invalid if the user is deactivated.
- Subscription Level Clients: These are independent of user identities and offer broader access within the subscription. The token generated by a subscription level client continues to function even if the user is deactivated.
Currently, the tokens generated through subscription level clients are not supported by File Integrity Monitoring APIs.
Non-manager users can create only User Level Clients, ensuring limited access control.
With the Auth ID Client Management from UI, you can:
- Manage authentication and authorization processes more intuitively, providing a smoother user experience.
- Easily handle API access permissions directly from the UI, simplifying the process of granting and revoking access when needed.
- Maintain your existing workflows with minimal changes, enabling you to continue your tasks without the need to learn new processes extensively.
To access the client management tab, navigate to your profile icon, located at the top-right corner, and click View Profile > Auth Id Client Management tab.
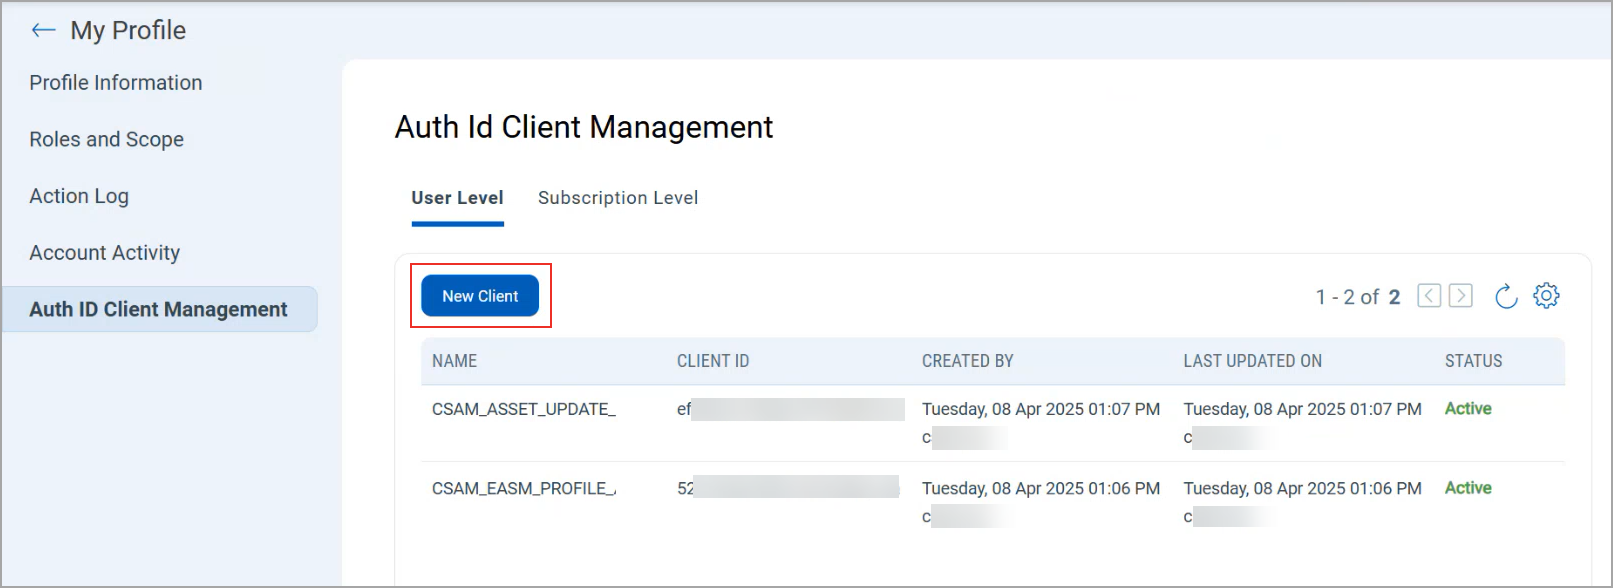
For client creation, select either User Level or Subscription Level from the available options, and then click New Client.
Only users with manager privileges can view and access the Subscription Level tab.
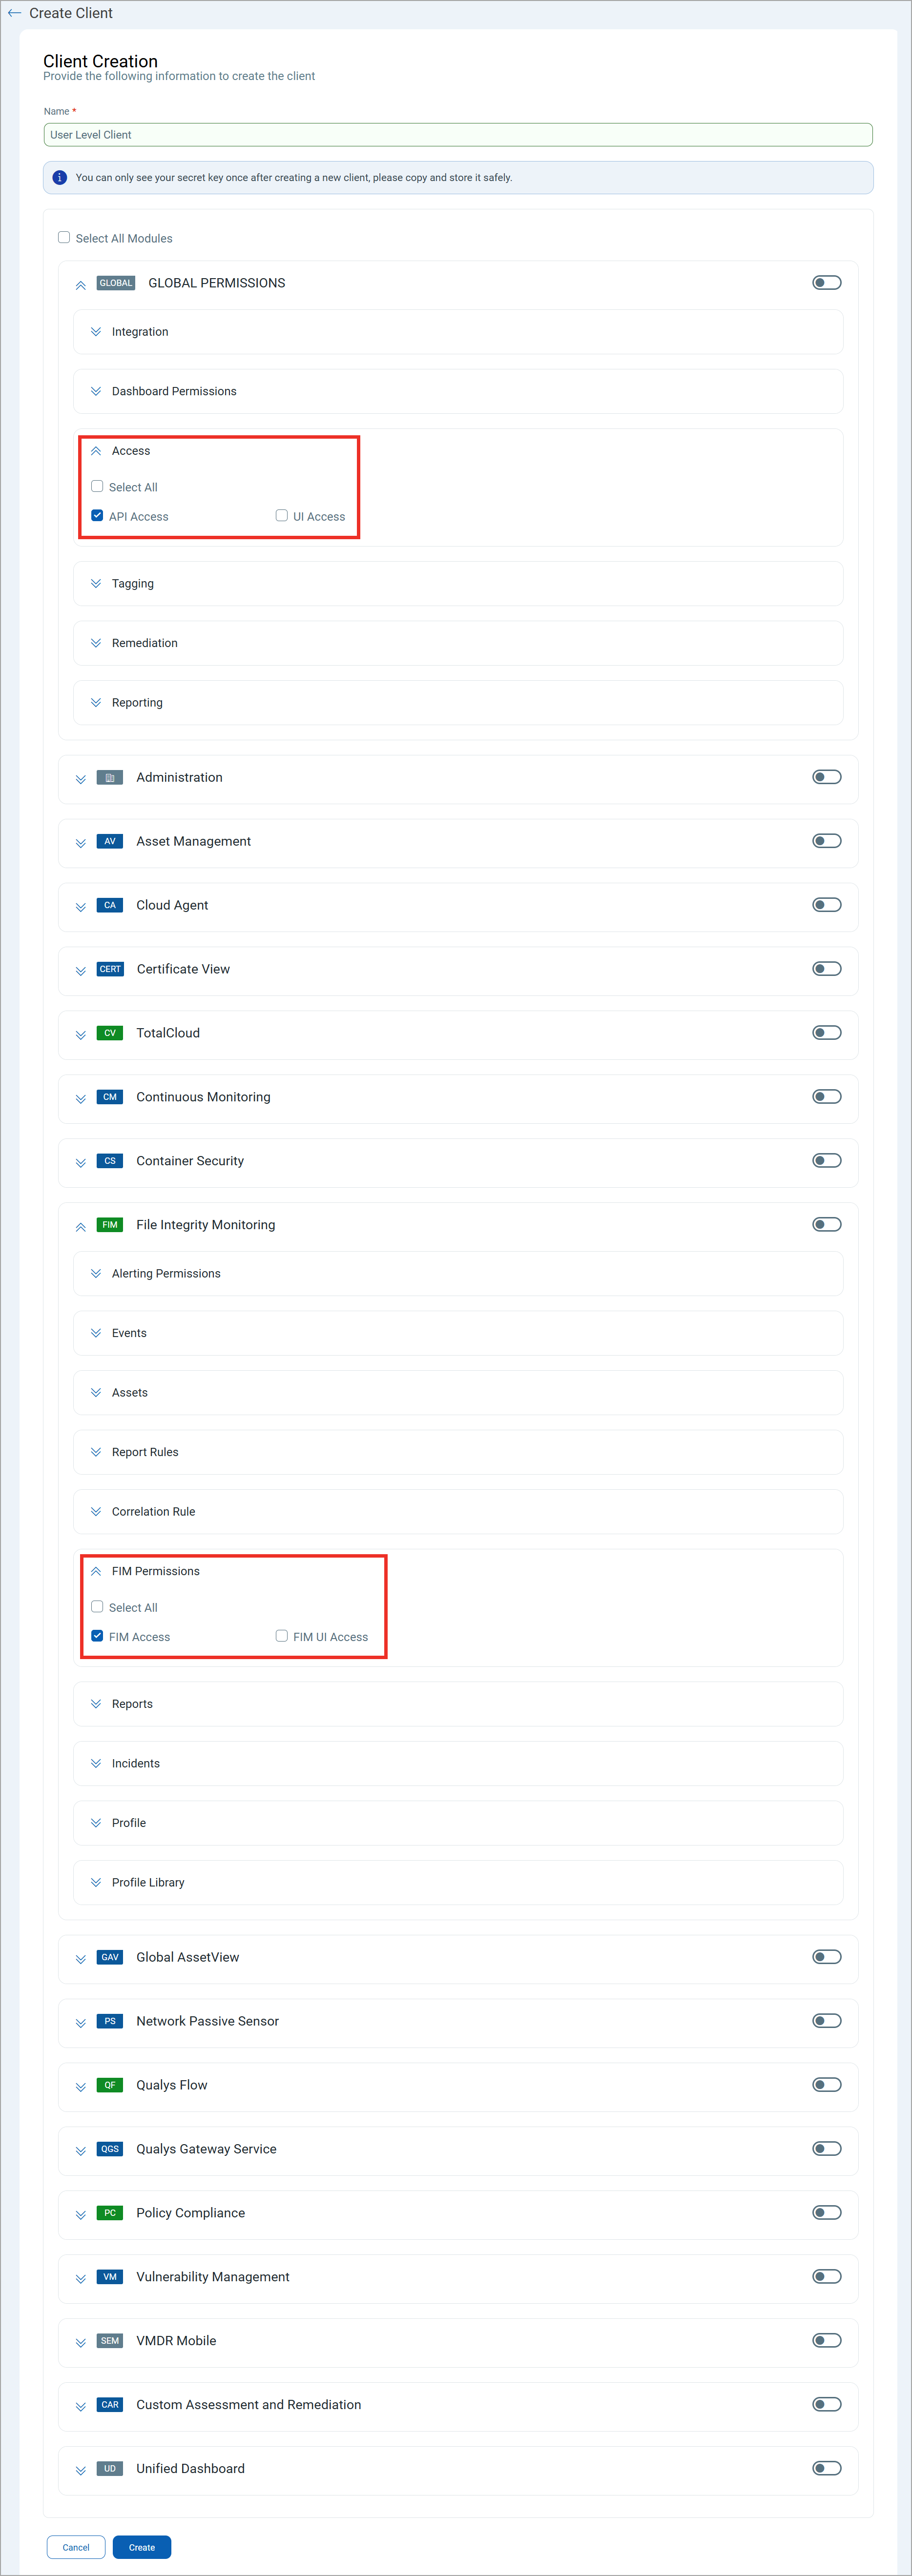
While creating a client, you can select all modules at once or individual modules as required. You can also set various permissions including global permissions, dashboard permissions, tagging permissions, as well as API access. Depending upon these permissions a user can access the File Integrity Monitoring module and its features that are assigned to the client.
Based on the permissions you select:
- If the API Access permission is not enabled under Global Permissions > Access, the API returns a response with this message:
User does not have permission to access API module - If the FIM Access permission under File Integrity Monitoring > FIM Permissions is not enabled, the API returns a response with this message:
User does not have permission to access FIM module
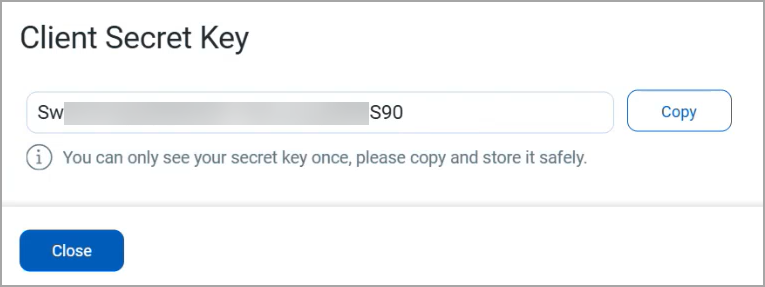
Once you click Create, a Client ID and Client Secret Key are automatically generated. The Client Secret Key is displayed only once. Make sure to copy and store it securely. This key is essential for generating JWT access tokens and cannot be retrieved later. For more information, refer to JWT Token Generation.
Issues Addressed
The following reported and notable issues are fixed in this release.
| Category/Component | Issue |
|---|---|
| FIM Reporting | We fixed an issue where the event details associated with assets were not displayed in the downloaded report for a unit manager. Now, the report includes all relevant event details. |
| Correlation Rule | We fixed the issue where selecting a Rule Query from Saved Searches caused an error during Correlation rule creation. Now, the error is no longer displayed. |
| FIM Reporting | We fixed an issue where downloading a CSV report from the Assets > Real Time Assets tab using QQL filters resulted in a blank file. The report now correctly includes the expected data based on the applied filters. |
| FIM Incident | We fixed the issue where incidents created through correlation rules did not capture all events linked to a specific profile. Now, all relevant events are correctly captured. |
| FIM Reporting | We fixed an issue where downloading a report with a large number of events showed a Gateway Time-out error. Now, the report downloads successfully, even when it contains many events. |