Configure Plugin for Build Pipelines Projects
You can use this Qualys TAS Scanning Connector extension as a pre-deployment task in your project pipeline.
After installing the Qualys TAS Scanning Connector, you can see this plugin as a task in your pipeline.
You can choose to run VULNERABILITY scan, DISCOVERY scan or COMPLIANCE Scan:
-
VULNERABILITY: This scan type is for Web Applications and API type Applications.
-
DISCOVERY: This Scan type is for Web Applications.
-
COMPLIANCE: This Scan type is for API type Applications.
Add Plugin
Perform the following steps to add a plugin:
- Click
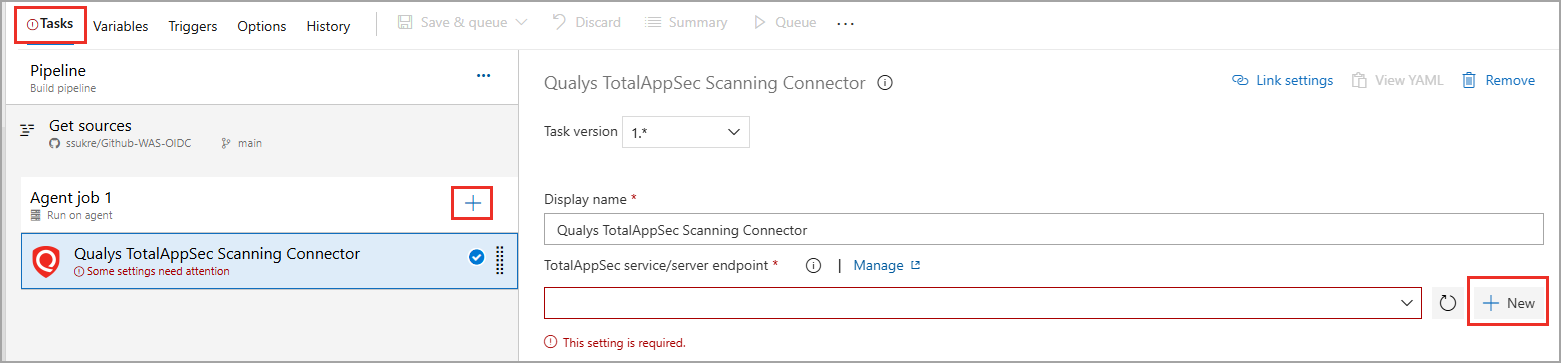
 Add under your agent job in the Tasks tab, and search for Scan Web Application with Qualys TAS.
 - Click Add to add the plugin as a task in the build pipeline.

You can see the task under the agent job. -
Click the task to configure the plugin.
-
Entering the Display name. Then, configure the WAS service endpoint.
Connect TAS APIs
You need to configure the service endpoint with a Qualys account and proxy (if required) on your Azure DevOps instance for the Organization in which the Qualys TotalAppSec Scanning Connector is installed.
- Go to TAS service/server endpoint field and click New.
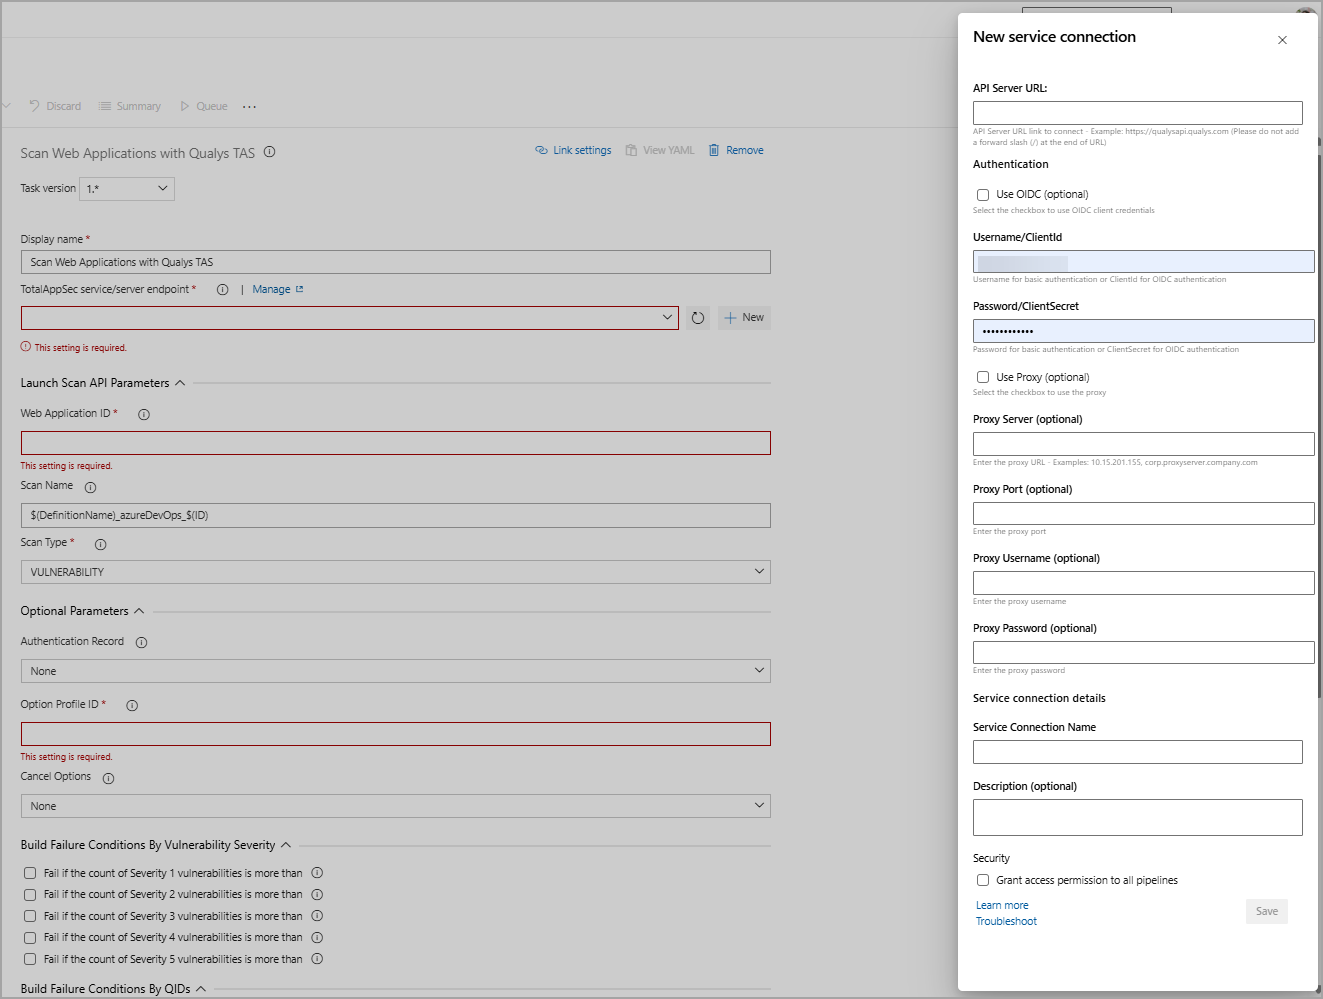
- In the New service connection page, enter the Qualys API server URL where your Qualys TAS account resides.
To identify your platform, see Identify your Qualys platform page.
-
The Qualys application supports two authentication methods for connecting to your Qualys account:
You can choose either method based on your organization’s security policies and access setup.
- Basic Authentication.
- OIDC (OpenID Connect)
Basic Authentication
Use this method if your Qualys setup uses a standard Username and Password.
Provide details in the following required fields:
- Username
Enter Qualys username used for API access. - Password
Enter password for the above username.
OIDC Authentication
Use this method if your Qualys environment is configured for OpenID Connect with Client ID and Client Secret.
For OIDC configuration, you need to create a user-level client. For more details, refer to Set up Qualys Managed Authentication.
Select Use OIDC checkbox and provide the details in the following required fields:
- Client ID
Enter the Client ID received from your Qualys OIDC configuration. - Client Secret
Enter the corresponding Client Secret.
- Provide a Service connection name to the new connection.
- Click Save.
Once added, the TAS service endpoint is listed in the TAS service/server endpoint drop-down field.
What you select here depends on the Qualys platform your organization is using. We expect the user to provide 'qualysapi' specific URL for their respective platform as input for the 'API Server URL.'
If your Azure DevOps instance does not have direct Internet access and requires a proxy, click Use Proxy Settings check box, and enter the proxy server information.
If your Qualys account resides on a private cloud platform, specify the API server URL of your Private Cloud Platform as your 'API Server URL' and your account credentials to access the API.
Launch Scan API Parameters
Next, assuming you have selected the correct platform for your subscription and have valid credentials. You need to enter the Application ID that you want to scan.
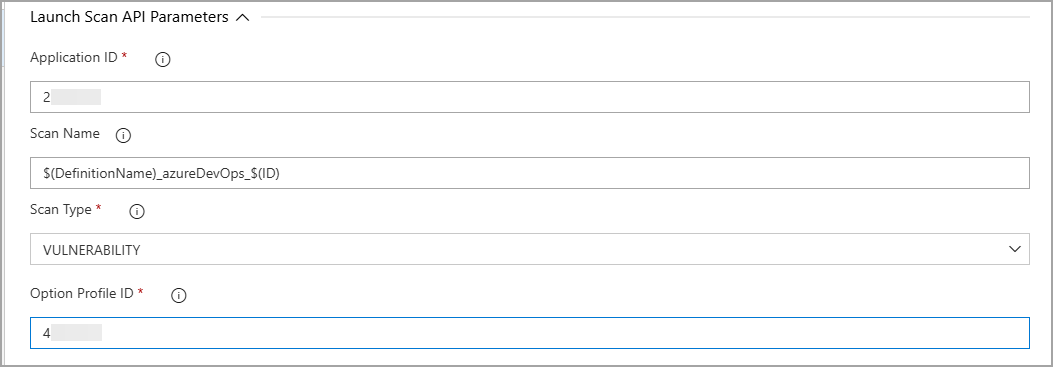
By default, the scan name is:
$(DefinitionName)_azureDevOps_$(ID)
You can edit the existing scan name, but a timestamp is automatically appended regardless.
If you are using plugin version 1.0.0, then the default WAS scan name is:
[Build.DefinitionName]_azureDevOps_build_[ Build.BuildID] + timestamp
After upgrading your plugin version, you can continue using the existing format for your existing build pipeline projects or switch to the new format.
You can choose to run a Discovery scan, a Vulnerability scan, or a Compliance Scan. The default is the Vulnerability scan.
Option Profile – The option profile contains various scan settings, such as the vulnerability types to test (detection scope), scan intensity, error thresholds, and more. The option profile ID is a mandatory field. You need to enter the Option profile ID.
Optional Parameters
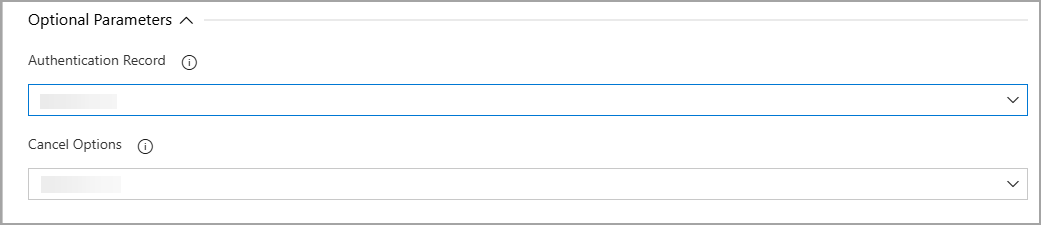
Next, configure optional scan parameters.
-
Authentication Record – You can choose to run the scan without authentication (the default) but keep in mind the scanner is not able to log into the web application and test the authenticated surface area of the application in that case. You may instead want to select Use Default, in which case we use the default authentication record for the web app in WAS (if any). When you select Other, you need to configure the authentication record ID.
-
Cancel Options - The default is not to cancel the scan; in that case, it runs to completion. However, you can cancel it after a set number of hours.
You may not get any results if you cancel a running scan.
Next, configure the pass/fail criteria for a build, the polling frequency for scan status, and the scan timeout duration.
Build Failure Conditions
Configure the scan pass/fail criteria to fail a build job.
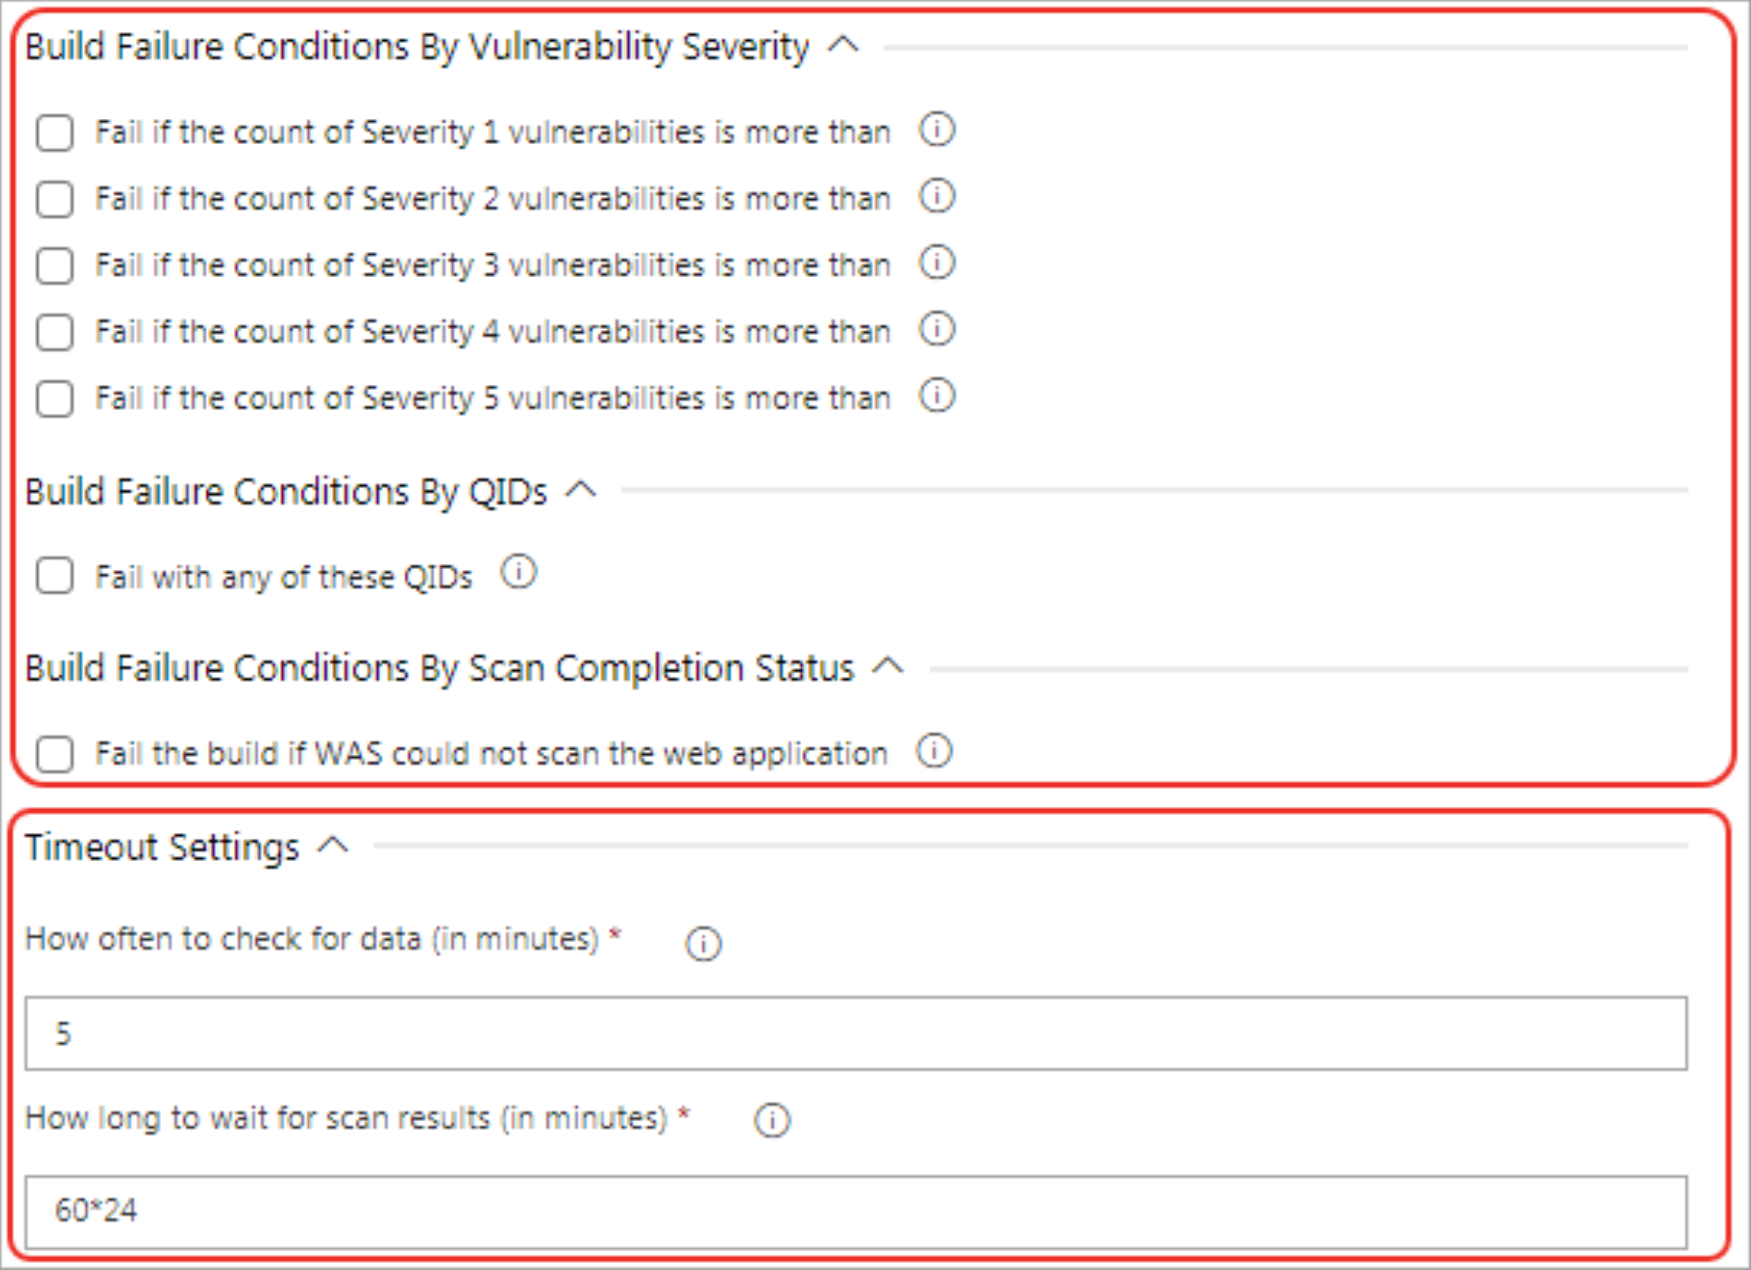
You can set conditions to fail a build by:
- Vulnerability Severity - To fail the build by vulnerability severity, specify the count of vulnerabilities for one or more severity types. A build fails if the number of detections exceeds the number specified for one or more severity types in scan results. For example, to fail a build if the severity 5 vulnerability count is more than 2, select the 'Fail with more than severity 5' option and specify 2.
A Qualys severity '5' rating is the most dangerous vulnerability, while severity '1' is the least.
- Qualys TAS Vulnerability Identifiers (QIDs) – To fail a build by QIDs, select the Fail with any of these QIDs check box and specify a comma-separated list of QIDs or a range of QIDs.
- You may also choose to fail the build if the plugin initiates the scan, but the TAS module could not complete this scan due to some issues, such as scanners not found, and so on. If any of these three conditions are satisfied, the build fails.
Timeout Settings
In the Timeout settings, specify the polling frequency in minutes for collecting the TAS scan status data and the timeout duration for a running scan.
Next, save the configuration and click Queue to run the pipeline.
Submit WAS Scans Without Waiting for Scan Results
The 'Do not wait for scan results' checkbox parameter allows you to control how the integration behaves after triggering a Qualys WAS scan.
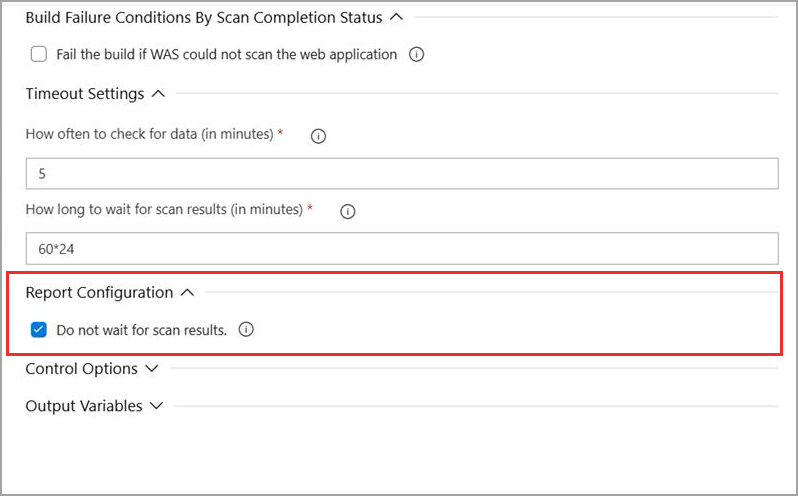
- If selected
-
The plugin submits the TAS scan and immediately exits, without waiting or polling for the scan status.
In this case, Qualy TAS Scan Status in the Azure DevOps pipeline does not generate a scan report; instead, it provides a URL to navigate and view the scan result on the Qualys Platform.
- To View/Access Scan result:
This setting should be used when scans are expected to take a long time and teams do not want the pipeline execution delayed.
-
The Qualys TAS scan URL is available in the logs to check the Qualys WAS scan results; it can be accessed directly with valid Qualys credentials to review them.
-
This URL is also published in the Artifact scan-results-notice.txt.
-
-
-
If unselected
-
The plugin waits for the scan to complete and continues polling its status until it is complete, after which it generates the scan result in the pipeline.
-
Generate Report as PDF
You can now choose to generate the TAS scan report in PDF format from your Build Pipeline Project configuration. By default, this checkbox will be unselected.
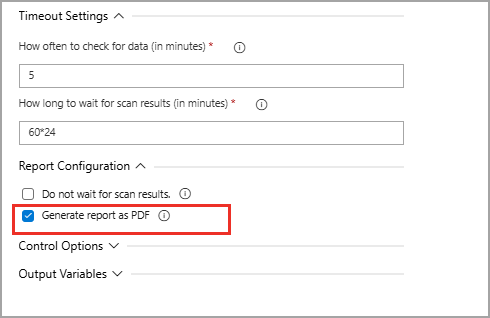
- If selected:
The scan report is available in both JSON and PDF formats.
To get the PDF report ref link- Download Qualys WAS Scan PDF Report
- If unselected:
The report is available only in JSON format. A PDF file is not generated.
If the Do not wait for scan result is selected, the PDF generation setting is not visible in the configuration.