Configure Plugin for Pipeline Projects
To configure the plugin for the Pipeline projects, perform the following steps:
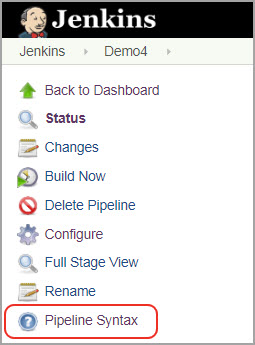
- Open your application’s pipeline project and click Pipeline Syntax to enter the Snippet Generator.
-
Select qualysVulnerabilityAnalyzer: Scan host/instances with Qualys VM from the drop-down menu.

Configure API Login
Now you are ready to configure the plugin.
Qualys recommends using a service account restricted to API access only (no UI access) and having the least privileges possible.
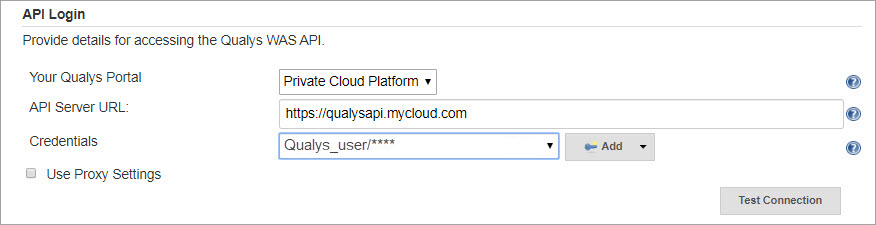
- Select the Qualys platform where your Qualys account resides and your account credentials for authenticating to the VM API server.
- Use the Add button to add account credentials in the Jenkins store for the new user.
Once added, the credential is listed in the Credentials drop-down.The options to select credentials are based on the Qualys platform used by your organization Learn more.
- If your Jenkins instance does not have direct Internet access and a proxy is required, click Use Proxy Settings checkbox and enter the required information.
- Click Test Connection.
Test connection is used to check API server connectivity from the Jenkins instance.
Qualys Enterprise TruRisk™ Platform via the Qualys VM API. " height="227" src="../assets/images/images/api_login_new.jpg" width="650" />
Once you have entered the correct API server URL and valid credentials, you get a 'Connection test successful!' message.
If your Qualys account resides on a private cloud platform, select Private Cloud Platform as your Qualys cloud platform, specify the API server URL and your account credentials to access the API.
Configure Scan Options
Perform the following steps to configure scan options:
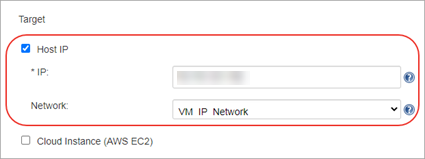
- Enter the host IP in your Qualys VM account or the AWS EC2 Cloud Instance information you wish to scan.
We currently support scanning only single IP or EC2 instances.
By default, the VM scan name is:
[job_name]_jenkins_build_[build_number] + timestamp
You can edit the scan name, but the timestamp is automatically appended.
-
Provide the Host or Asset IP and select the Network. You can also specify an environment variable for the Host IP.
Networks may not populate if the custom network list option is not enabled for your subscription or if no networks are assigned to you. Refer to FAQs.
Optionally, to scan your assets residing on an EC2 cloud instance:
- Provide the ID of the Amazon EC2 Instance on which you want to launch the VM scan.
- Select the connector name for the instance.
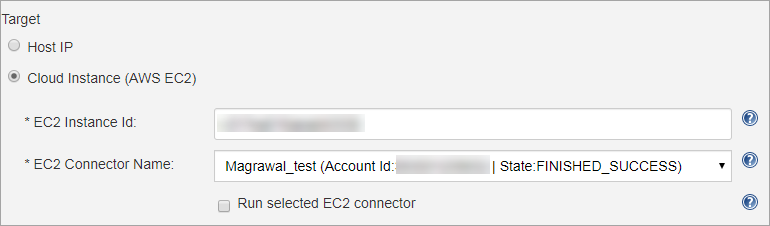
Currently, we support scanning a single Instance ID. You can also specify an environment variable for the EC2 ID.
When you select the Run selected EC2 connector check box, the connector run is executed to fetch the updated information about the instance. A scan is launched if the instance status is not known. If the instance status information is known, the connector run is not executed. Instead, the scan is directly launched. By default, this check box is selected.
To get the region/endpoint details, we call the hostasset API with the EC2 instance's ID and accountId.
Next, configure scan parameters.

Option Profile – The option profile contains the various scan settings such as the vulnerability types that should be tested (detection scope), scan intensity, error thresholds, etc. This is the recommended setting; however, you can also select the Other option and choose a specific option profile ID if desired. The default value is Initial Options.
Scanner Name – Select the scanner appliance name from the drop-down that VM uses to scan your host assets on your network or an EC2 instance for vulnerabilities. The default value is External scanner. Selecting the Host IP and Network shows you all the scanners that are in your network. Select the All Scanners in Network option if you do not want to select a particular scanner and let the backend decide to launch the scan using any available network scanners. Select this option if you want to reuse the saved plugin configuration and are unsure that the scanner you selected for the current scan will be available for the next scan.
When you select Cloud Instance (AWS EC2) option, only those scanners that are configured to scan EC2 instances are displayed. Select the appropriate scanner that is configured to scan your EC2 instance.
After the successful connection to the API server, the option profiles and scanners may take a bit longer to populate.
Configure Scan Pass/Fail Criteria
Next, configure the pass/fail criteria for a build, scan status polling frequency and timeout duration for the scan.
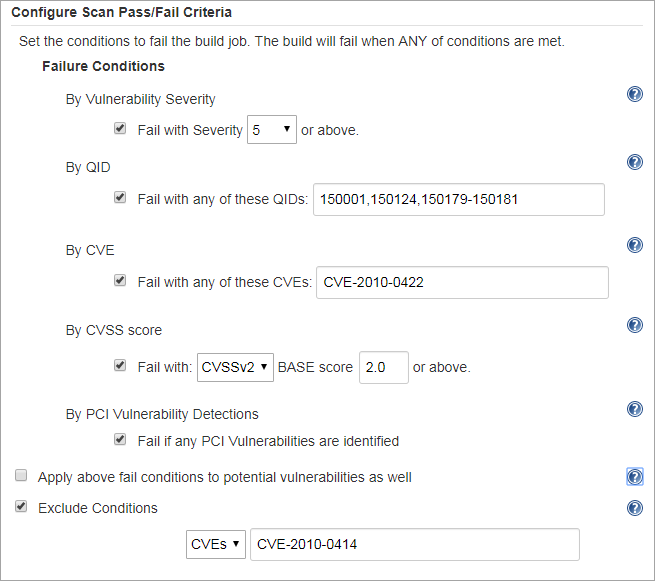
Failure Conditions
You can set conditions to fail a build by vulnerability severity, Qualys Vulnerability Identifiers (QIDs), CVE IDs, CVSSv2 or V3 with a specific base score and PCI vulnerability detections. A build will fail if the scan results contain vulnerabilities matching any specified failure conditions.
The failure condition by vulnerability severity fails a build if a vulnerability with a specified or higher severity is found. For example, if you set vulnerability severity to 2, then a build will fail if a vulnerability found in the scan has severity equal to or greater than 2, that is, 2,3,4, and 5.
A Qualys severity 5 rating is the most dangerous vulnerability while severity 1 is the least.
You also have the option to fail the build if the scan contains potential vulnerabilities. By default, failure conditions configured will be applicable only to Confirmed vulnerabilities. If you want to apply the conditions to Potential vulnerabilities as well, enable this option. A build will fail if the scan results contain potential vulnerabilities that match the conditions specified in the failure conditions. When you select this option, at least one failure condition must be set.
Exclude Conditions
You can use the Exclude Conditions option to ignore specified CVE IDs or QIDs while evaluating the vulnerabilities for failure conditions. For example, we will not fail a build if an excluded QID is detected for a vulnerability in the scan, even if that vulnerability meets the failure condition such as vulnerability severity. We evaluate the Exclude conditions first and remove the vulnerabilities that match the exclude conditions before evaluating the Failure Conditions.
Timeout Settings
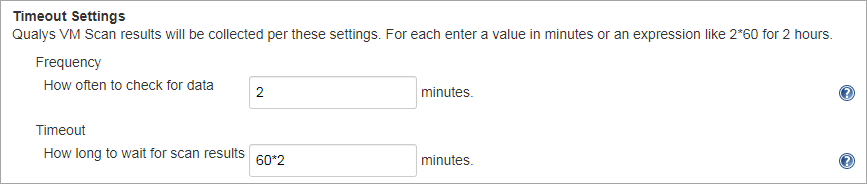
In the Timeout settings, specify the polling frequency in minutes for collecting the VM scan status data and the timeout duration for a running Jenkins build. The default value for polling frequency is 2 minutes, and the default timeout duration is 120 minutes.
Next, click Generate Pipeline Script. This is your pipeline snippet for launching a VM scan.

Note: If the custom network feature is not enabled in your subscription, you get Network selected as Enable the custom network list option for your subscription. For this scan, a predefined network will be used.

When you generate the Pipeline Script, the value for the network field in the script is ACCESS FORBIDDEN.
Access forbidden is not an error. The plugin gets this response for an API call, as the custom network feature for your subscription is not enabled. The plugin launches the scan with the global default network. It is recommended that no changes be made in the pipeline script generated by the Qualys host scanning connector.

The pipeline snippet is now ready to be plugged into your pipeline script.