Launching Virtual Scanner Appliance on Gov or Commercial Cloud Without Access to AWS Marketplace
To secure the AWS GovCloud, you need to follow the appropriate instructions based on your Qualys platform type.
Deploying qVSA from Gov or Commercial Cloud on PCPs or SCPs Without Access to AWS Marketplace
To deploy qVSA from AWS GovCloud or commercial cloud on PCPs or SCPs without access to the AWS marketplace, perform the following steps:
- Contact your Qualys Technical Account Manager (TAM) or Qualys Support to request access to the following:
- GovCloud Feature
- Qualys Virtual Scanner Appliance AMI
- Make sure to include your AWS Account ID, as access to the AMI is granted by Qualys Support for specific Account IDs.
Once your request is approved, Qualys Support will send you an email with the access information. - Create a Qualys Virtual Scanner Instance using the qVSA AMI, which will now be available in the My AMIs section of the Create Instance wizard. If you need to search for it, use the keyword qVSA to locate the Qualys scanner.
- Configure the Virtual Scanner Instance as outlined in the provided documentation.
To Launch Custom AMI from AWS Console
To launch from a custom AMI that has been shared with your AWS account:
- Log in to your AWS console.
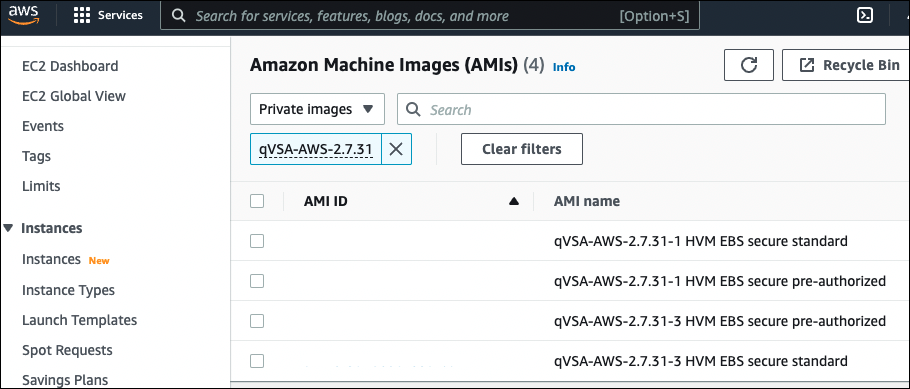
- Go to Images - AMI – Private Images.
- Enter qVSA in the search box.
- Check all Qualys virtual scanner images shared with your account:
-
Launch the virtual scanner AMI in a region.
-
Use the wizard to enter AMI settings. Qualys now also supports the V2(token required) version. In the Advance Details section, select Metadata version accordingly. So, in the User data field, you must enter the personalization code you obtained from the Qualys user interface and, optionally, the proxy server (if used).
Personalization Code - Enter the personalization code that you obtained from Qualys, preceded by PERSCODE=
Proxy Server (Optional) - Enter Proxy Server information on a separate line from the personalization code, preceded by PROXY_URL. A proxy server is used when your scanner does not have direct connectivity to the Qualys Enterprise TruRisk™ Platform.
Enter proxy information in the format username:password@proxyhost:port If you have a domain user, the format is domain\username:password@proxyhost:port If authentication is not used, the format is proxyhost:port
where proxyhost is the IPv4 address or the FQDN of the proxy server, port is the port the proxy server is running on.
Example:
PERSCODE=12345678901234

PROXY_URL=jdoe:[email protected]:3128
If you use a proxy server, ensure that you configure the Amazon EC2 API Proxy server settings in Qualys UI.
For more information, refer to Define Amazon EC2 API Proxy settings in Qualys UI.
Virtual Appliance Connecting to Qualys Enterprise TruRisk™ Platform
Once launched, the Virtual Appliance connects to the Qualys Enterprise TruRisk™ Platform. This step registers the Virtual Scanner Appliance with your Qualys account. Your appliance also downloads all the latest software updates immediately and is ready for scanning.