Deploying Virtual Scanner Appliance Using the GCP Portal
You can deploy a Qualys Virtual Scanner Appliance in either of the following ways:
- Deploying Scanner Appliance from Google Cloud Marketplace (SCP)
- Deploying Custom Image on Private Cloud Platforms (PCP)
Starting with qVSA image version 4.1.82, Qualys Virtual Scanner Appliances, deployed on GCP, supports the following Google Shielded VM features. To ensure proper functionality, these features must be enabled during deployment:
- Secure Boot
- Virtual TPM(vTPM)
- Integrity monitoring
For more information on how the Qualys Virtual Scanner Appliance is secured, see Scanner Appliance FAQs.
Deploying Scanner Appliance from Google Cloud Marketplace (SCP)
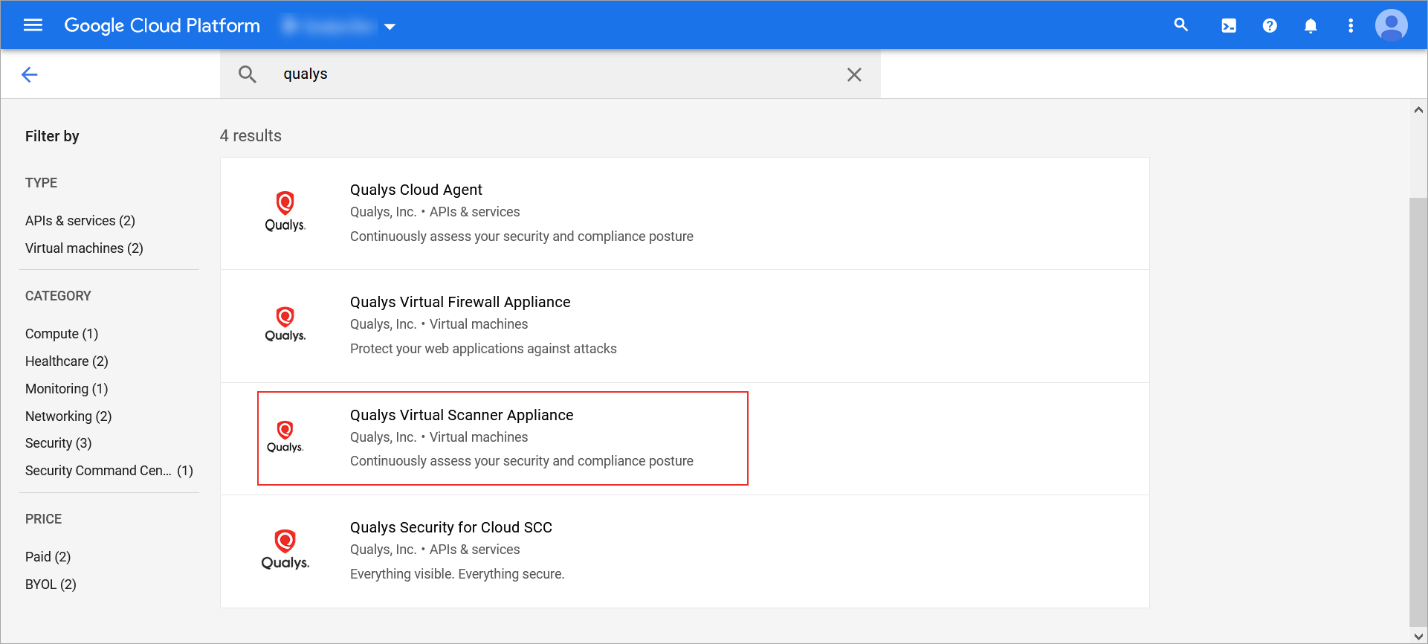
- Sign in to Google Cloud Platform and navigate to Marketplace.
-
In the Search box, type Qualys, and then from the search results, click Qualys Virtual Scanner Appliance.
To query for the latest version of the Qualys Virtual Scanner Appliance image in the marketplace via Google Cloud CLI, run the following command:
gcloud compute images list --filter="family=qvsa" --project
qualys-gcp-security --sort-by=~creationTimestamp --limit=1 --uri -
Click Launch.
- Provide the following details for the virtual scanner appliance instance:
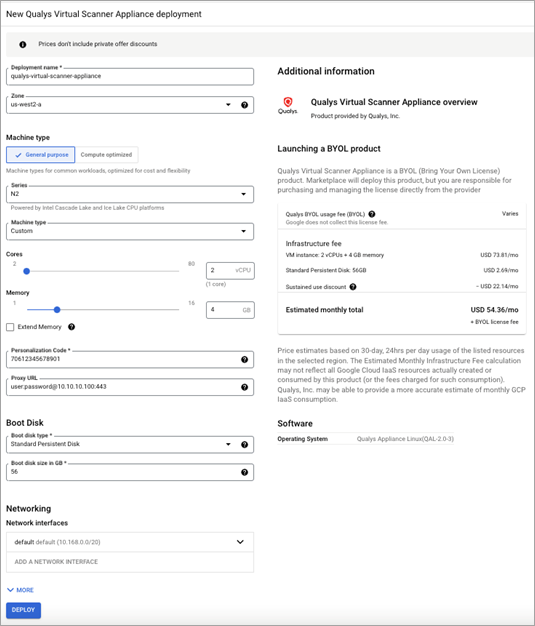
Refer to the following table for details of the fields and their values.
Field Values Deployment name It is advised to specify the same name that you use on the Qualys Enterprise TruRisk™ Platform while generating a personalization code. Zone Select a zone that co-locates the scanner instance with scan target instances. For the scanner to reach other zones, connectivity must be set up with appropriate network configurations. Machine type Select a machine type that offers a CPU-to-RAM ratio of 1:2 (For example, 4 CPUs and 8 GB RAM) or 1:3, depending on available machine types on the cloud platform. Personalization code: Provide the 14-digit personalization code generated from Qualys Enterprise TruRisk™ Platform. This is a one-time use code only. To register every new virtual scanner appliance instance, you must generate a fresh personalization code. Proxy URL (Optional) Add the proxy server URL to communicate with Qualys Enterprise TruRisk™ Platform via SSL tunneling proxy. We support both IP and FQDN for the proxy server configuration. Specify the proxy server URL as username:password@proxyhost:port Syntax for proxy URL
- If you have a domain user, use this syntax: domain\username:password@proxyhost:port
- If authentication is not used, use this syntax: proxyhost:port
where proxyhost is the IP address or the FQDN of the proxy server and port is the proxy port.
Examples
- doe:[email protected]:3128
- jdoe:[email protected]:3128
Boot Disk Do not change the following values unless instructed by Qualys Support:
Boot disk type: Standard Persistent Disk
Book disk size in GB: 56
-
Click Deploy and follow to the section Post-deployment Progress and Monitoring.
Deploying Custom Image on Private Cloud Platforms (PCP) or SCPs with No Access to Google Cloud Marketplace
We can deploy a custom Image on a private cloud using the following ways.
Here, you are expected to build a Qualys scanner image specific to your private cloud platform.
To import an image intended for Shielded VMs (Secure Boot, vTPM), use the gcloud tool. For more details, refer to Deploying Custom Image Using Command-line Tool.
To deploy a custom image on PCP or SCP, perform the following steps:
- Download the qVSA image file (tar.gz) by using the SAS link provided by Qualys Operations. For more details, contact Qualys Support.
- Create a Google Storage Bucket.
- Upload the downloaded qVSA image file to your storage bucket.
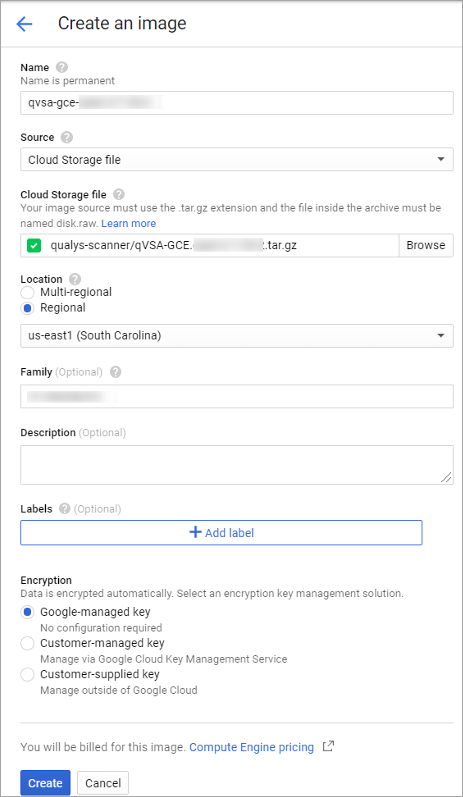
- Create the Qualys Scanner Image by using the uploaded QVSA Image file (tar.gz) file.
- Provide the following details for the virtual Scanner Appliance instance custom image.
Refer to the following table for details of the fields and their values.
Field Description Name Provide a unique name to identify the Qualys Scanner appliance image. Source Select Cloud Storage File which allows you to select the Qualys Scanner image file stored in the Storage Bucket. In the following image, qualys-scanner is a bucket name and qVSA-GCE-xxxxxxx.tar,gz is the Qualys scanner image file. -
Generate a personalization code. To learn more about generating a personalization code, click Generating a Personalization Code.
-
Provide the following details for the Virtual Scanner Appliance instance:
Refer to the following table for details of the field.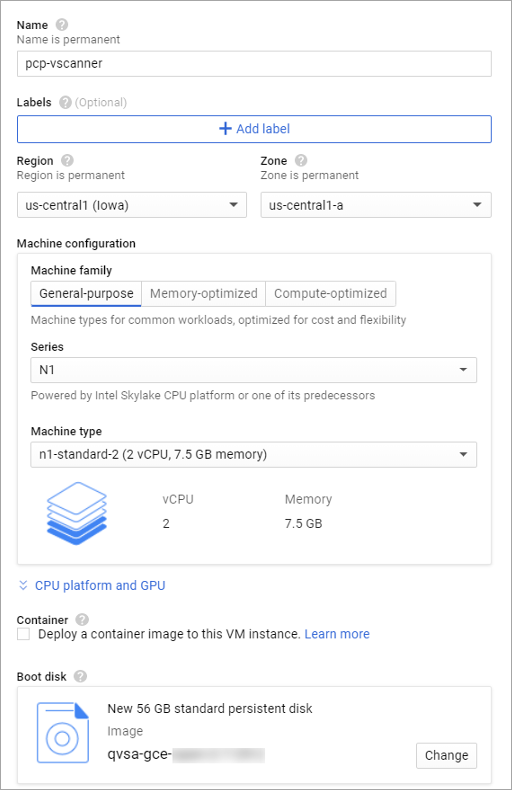
Field
Values
Deployment name It is advised to specify the same name that you use on the Qualys Enterprise TruRisk™ Platform while generating a personalization code. Zone Select a zone that co-locates the scanner instance with scan target instances. For the scanner to reach other zones, setup connectivity with appropriate network configurations is needed. Machine type Select a machine type that offers a CPU-to-RAM ratio of 1:2 (For example, 4 CPUs and 8 GB RAM) or 1:3, depending on available machine types on the cloud platform. Boot Disk
Change the boot disk to the newly created Qualys Scanner Appliance image disk.
Do not change the following values unless instructed by Qualys Support
Boot disk type: Standard Persistent Disk
Book disk size in GB: 56
-
Enter Metadata, PERSCODE and other details.
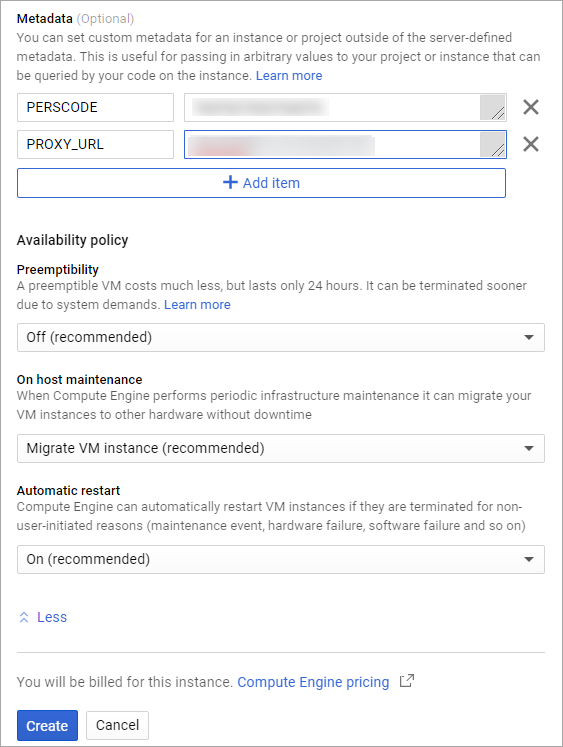
Refer to the following table for details of the fields and their values.Metadata (Optional) You can set custom metadata for an instance or project outside of the server-defined metadata. This is useful in passing in arbitrary values to your project or instance that can be queried by your code on the instance. PERSCODE Provide the 14-digit personalization code generated from Qualys Enterprise TruRisk™ Platform. Refer to the section Generating a Personalization Code. PROXY_URL (Optional): Add the proxy server URL to communicate with Qualys Enterprise TruRisk™ Platform via SSL tunneling proxy. We support both IP and FQDN for the proxy server configuration. Specify the proxy server URL as username:password@proxyhost:port Syntax for proxy URL
- If you have a domain user, use this syntax:domain\username:password@proxyhost:port
- If authentication is not used, use this syntax:proxyhost:port
Where proxyhost is the IP address or the FQDN of the proxy server and port is the proxy port.
Examples
- doe:[email protected]:3128
- jdoe:[email protected]:3128
- Click Create.