Installing and Configuring Qualys Cloud Agent for VMware Tanzu
This topic describes steps to install and configure Qualys Cloud Agent for VMware Tanzu.
Install and Configure Qualys Cloud Agent for VMware Tanzu
Steps to install the Qualys Cloud Agent for VMware Tanzu file on the Ops Manager Installation Dashboard:
- Download the product file from VMware Tanzu Network.
- Navigate to the Ops Manager Installation Dashboard and click Import a Product to upload the product file.
- Under Import a Product, click + next to the version number of Qualys Cloud Agent for VMware Tanzu. This adds the tile to your staging area.
- Click the newly added Qualys Cloud Agent for VMware Tanzu tile.
- Populate the data in the Qualys Account Configuration form.
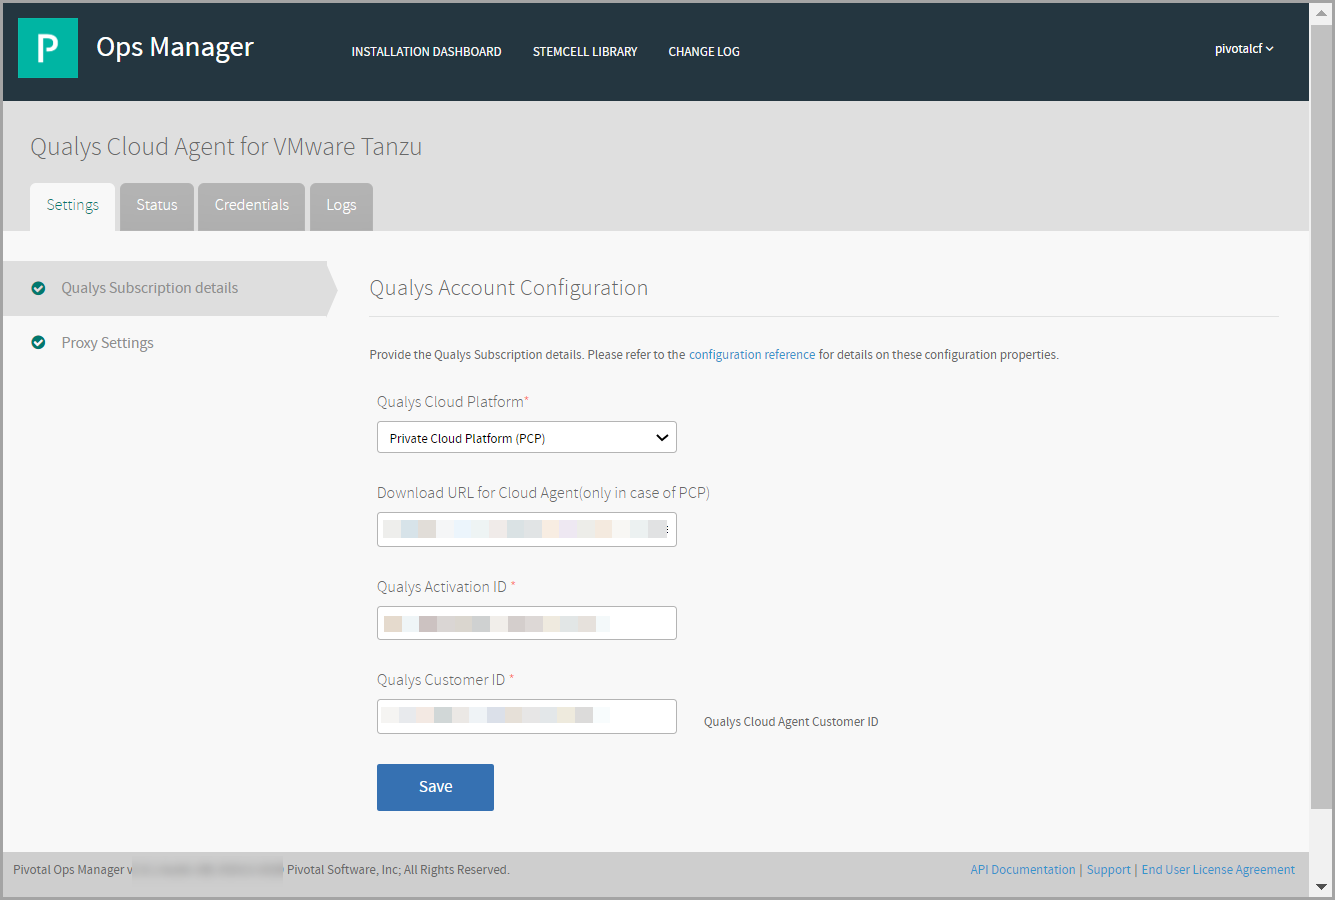
- For Qualys Enterprise TruRisk™ Platform, select a platform from the dropdown. If you select Private Cloud Platform (PCP), configure the URL in the Download URL for Cloud Agent field. The PCP users are required to host their cloud agent Debian package at some location internal to their network and then provide that URL in the Download URL for Cloud Agent field during account configuration. This .deb package should be downloadable through either curl or wget, and the location should be accessible within the deployments.
- Enter Qualys Activation ID and Qualys Customer ID obtained from the Qualys Platform. For more information about getting these parameters, refer to the Qualys Cloud Agent Getting Started Guide.
- If Qualys Enterprise TruRisk™ Platform is not directly accessible from target VMs, click Proxy Settings tab to configure proxy settings. These settings are optional and need to be provided only when you need a proxy for target VMs.

- For Proxy Server and Port, specify the proxy server and port in the http[s]://host[:port] format. For authenticated proxy, provide Proxy Username and Proxy Password. For PCP users to download Qualys Cloud Agent using proxy, select Use the same proxy for downloading Qualys Cloud Agent from your hosted location (applicable only to PCP customers) checkbox.
- Click Save.
- Return to the Ops Manager Installation Dashboard and click Apply changes to install Qualys Cloud Agent for VMware Tanzu tile. When installation is successful, you can see Qualys Cloud Agents installed on your deployments.
Verification of Installation and Configuration
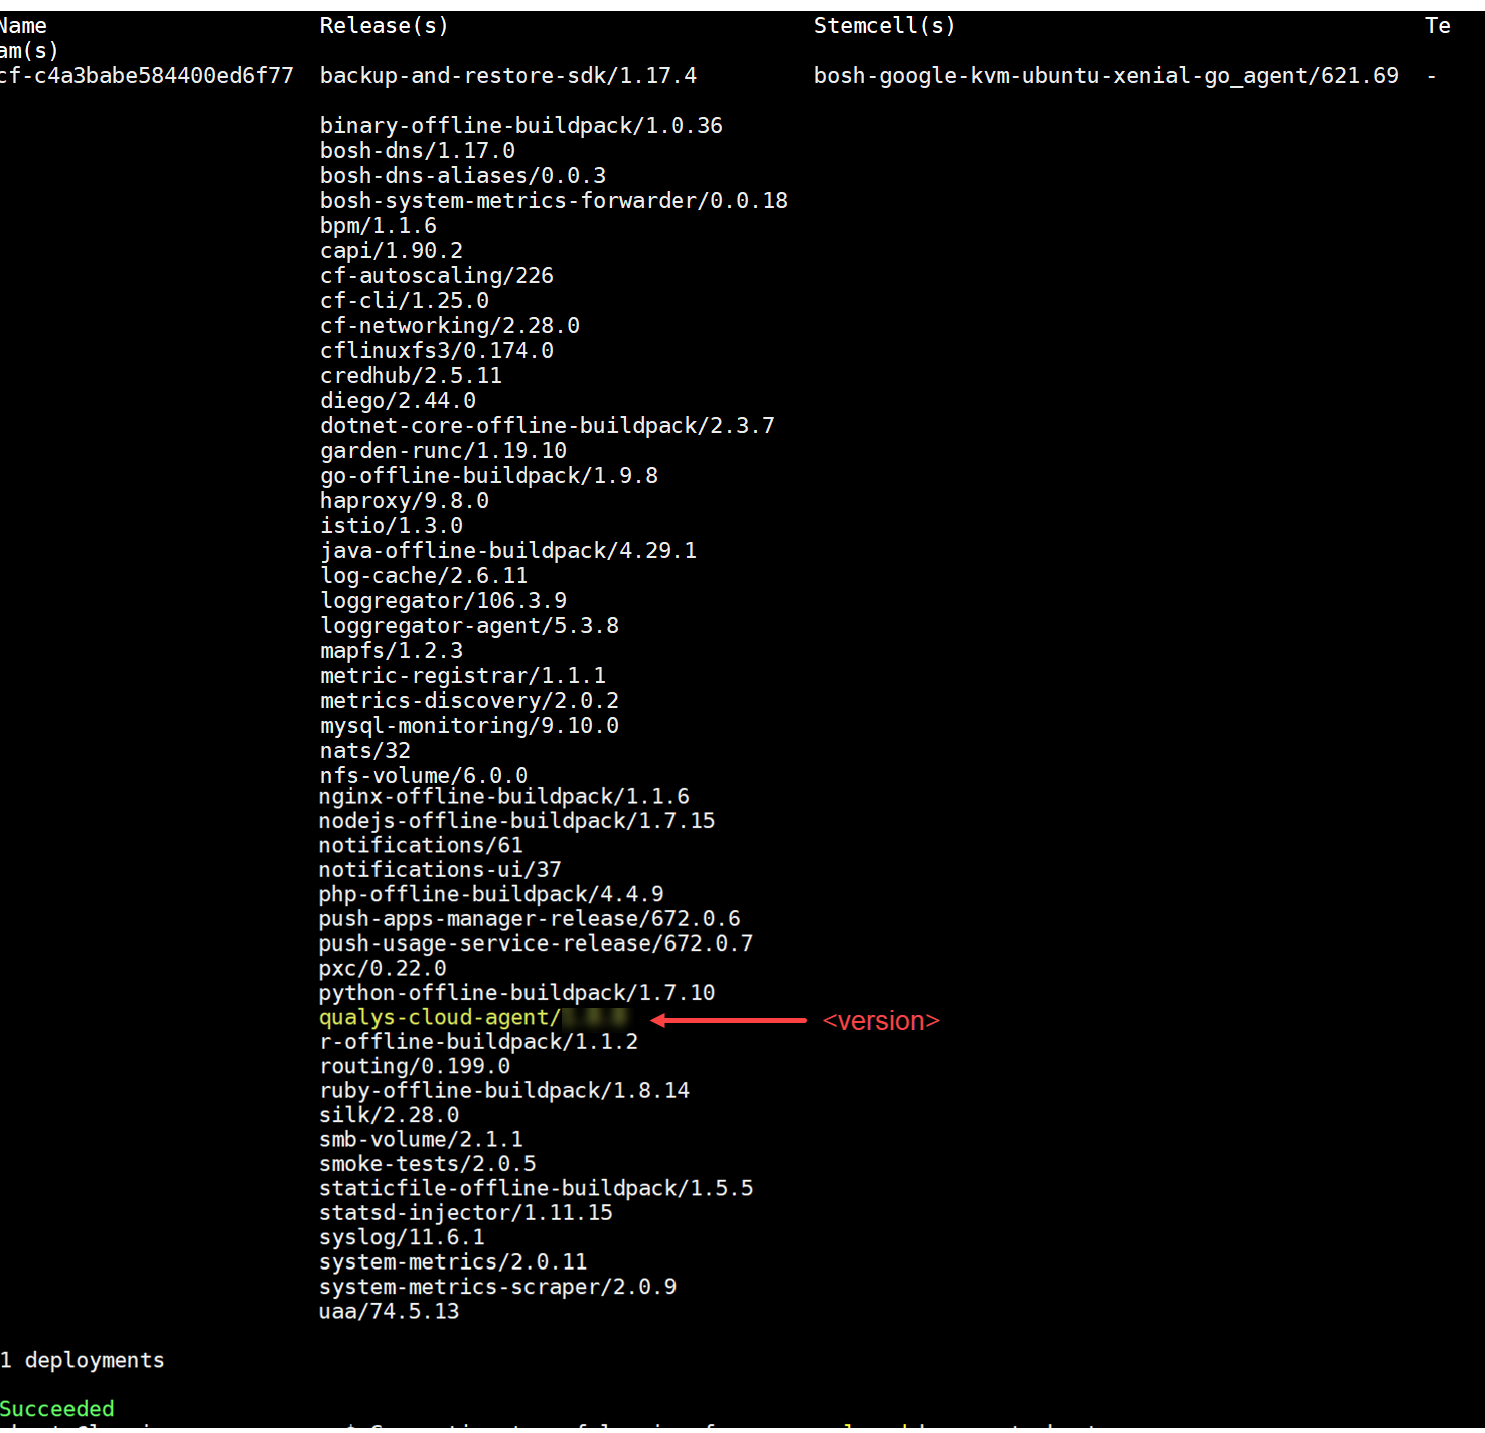
The screenshot shows the output of the following command: ‘qualys-cloud-agent/x.x.x’.
$bosh deployments
To verify the Qualys Cloud Agent installation and provisioning, you can use BOSH CLI on the Ops Manager VM and check with command:
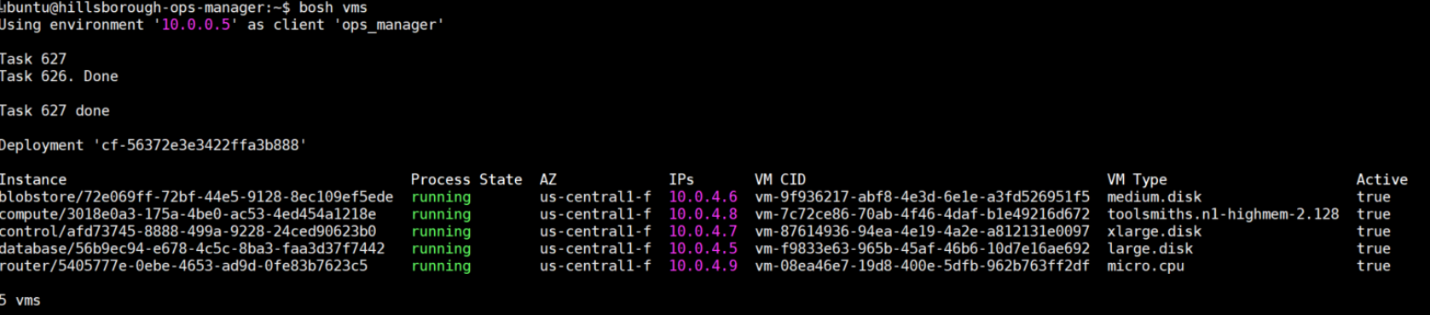
$bosh vms
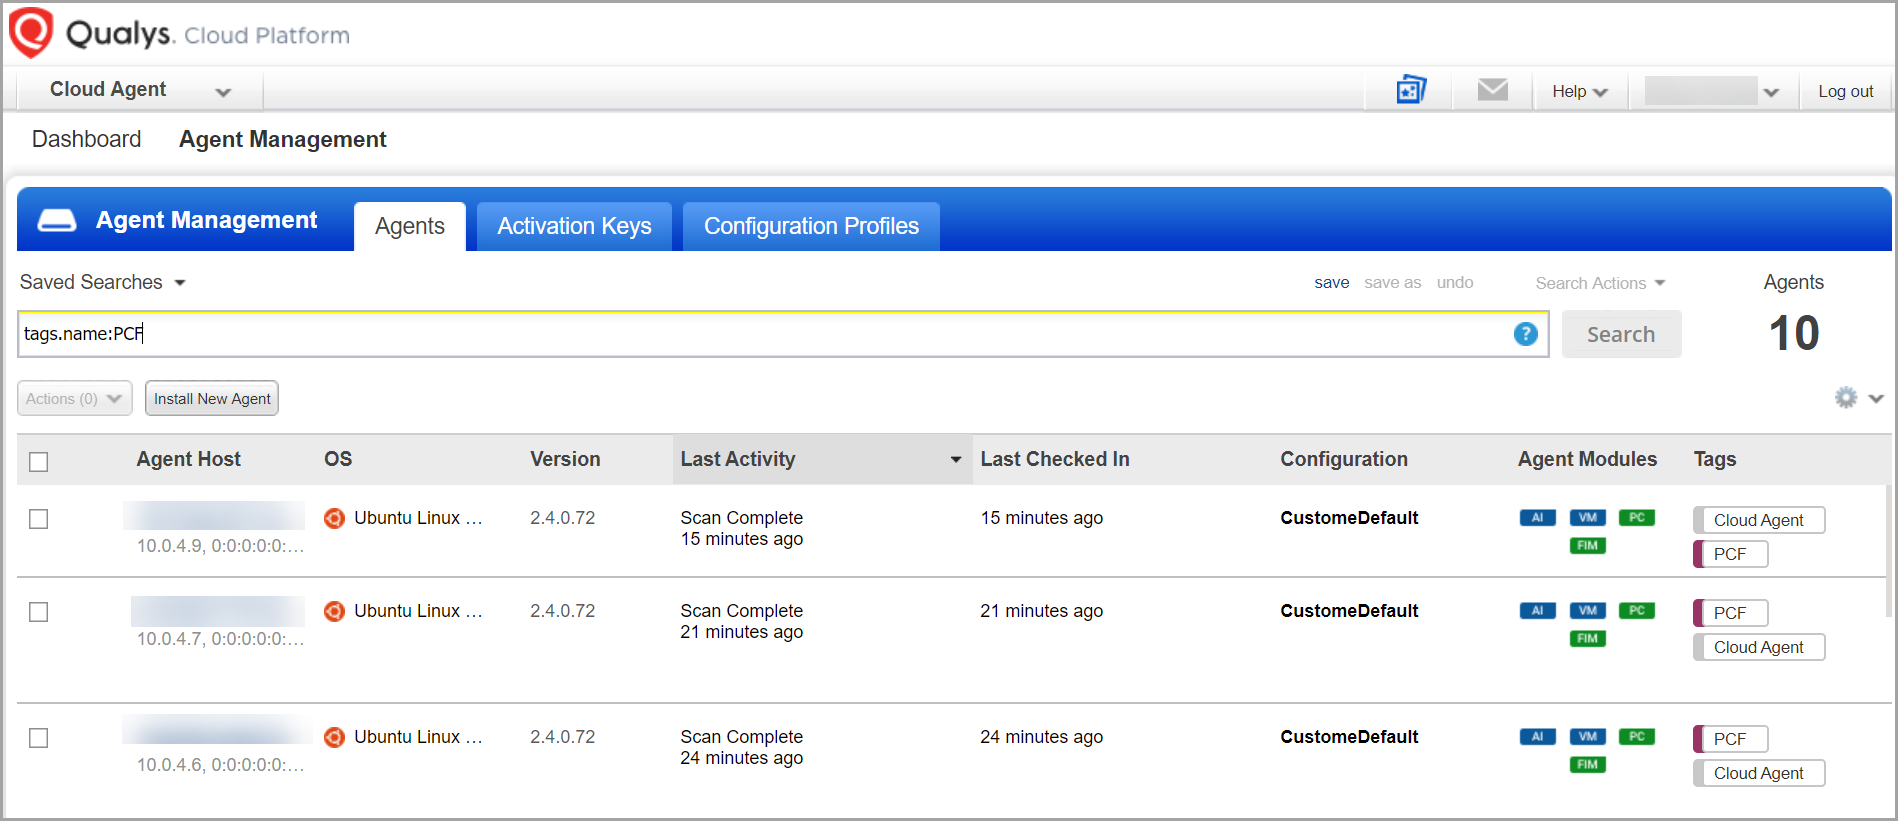
The List of VMs with IP address are listed in the following screenshot. You can check that same IP address is listed on the Qualys Platform UI. (Refer to screenshot in #5 listed below).

Qualys Cloud Agent is installed on all of the cf-XXXXXXX deployment VMs. You can ssh into any of these VMs and verify:
$ bosh ssh -d cf-56372e3e3422ffa3b888 compute/3018e0a3-175a-4be0-ac53-4ed454a1218e
To check if the Qualys Cloud Agent process is running, run the command:
$ ps -eaf | grep qualys
In case of custom BOSH deployments, other than cf-deployment, make sure to re-deploy the deployment after tile installation to get the Qualys Cloud Agent Bosh release deployed on its VMs.
You can check logs at
/var/vcap/sys/log/qualys-cloud-agent-linux/qualys-cloud-agent.log
You can verify on respective Qualys Platform UI > Cloud Agent module, to see if this new instance VM has a Qualys Cloud Agent provisioned and functioning properly.
Troubleshooting
This topic describes how to resolve common errors that arise when configuring Qualys Cloud Agent for VMware Tanzu.
- Prestart script failed
- Symptom: If you see an error while installing the tile: 1 of 7 pre-start scripts failed. Failed Jobs: qualys-cloud-agent-linux.
- Explanation: There could be an issue while running the pre-start script. If it's PCP, the agent download might have failed, or there might be an issue with installing the .deb package.
- Solution:
Log in to the VM for which the pre-start script failed. Check logs at the following location:
/var/vcap/sys/log/qualys-cloud-agent-linux/pre-start.stdout.log
/var/vcap/sys/log/qualys-cloud-agent-linux/pre-start.stderr.log
/var/vcap/sys/log/qualys-cloud-agent-linux/qualys-agent-pre-install.log
For PCP, the download URL might not be accessible within the deployment; check whether it is downloadable via curl from within the deployment VM.
-
Deployed VM and Vulnerability Data is not displayed on Qualys UI
-
Symptom: You do not see your deployment VM listed on Qualys UI and no vulnerability data associated with it.
-
Explanation: The Qualys Cloud agent might have not provisioned properly or there is issue with the deployed Cloud Agent communicating to Qualys platform.
-
Solution: Check the installation status in job start log at:
/var/vcap/sys/log/qualys-cloud-agent-linux/qualys-agent-install.log
Check the Qualys Cloud Agent logs at:
/var/vcap/sys/log/qualys-cloud-agent-linux/qualys-cloud-agent.log
You might see an API response code of 404 or another non-200 code; check whether the Qualys platform is reachable from the VM.
Also, re-check if you have used the correct Activation ID and Customer ID for the selected Qualys Platform.
If everything is in place and the Agent log shows successful API calls, wait a while for the data to be available in the Qualys UI. Depending on the Platform's workload, processing to data may take time. If still no data is available, contact Qualys support.
-