IBM Cloud Deployment Guide
This deployment guide contains the information for deploying, interacting, and configuring Centralized Appliance Management Service (CAMS) QGS Appliance on IBM Cloud.
Prerequisites
- Before creating a custom CAMS/QGS QCOW2 image, upload the image file to the designated storage bucket
- Ensure the system requirements (CPU, RAM, and storage) recommended in the Qualys Gateway Service User Guide.
Steps to Deploy IBM Cloud on QGS
- Creating a Custom Image from the CAMS/QGS QCOW2 Image
- Creating a Virtual Server Instance from the Custom Image
Creating a Custom Image from the CAMS/QGS QCOW2 Image
Prerequisite: Upload the CAMS/QGS QCOW2 image file to the designated storage bucket before proceeding.
This section is for internal use only and is not required while publishing on the Marketplace.
- Navigate to Infrastructure → Compute → Images and click Create.
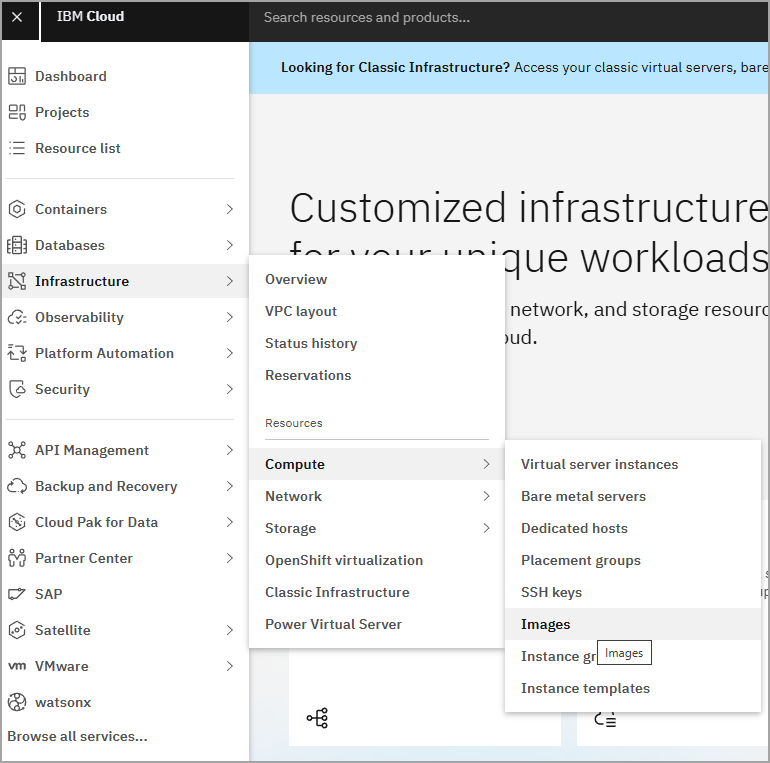

- Select the storage location where the QCOW2 image was uploaded.
- Enter a name for the custom image.
- Select the appropriate resource group for your environment.

- Under Image Source, select Cloud Object Storage.
- Select the correct Cloud Object Storage instance, Location, and Bucket. The uploaded QCOW2 image file will be listed automatically.
- Set the Operating System to Generic.

- Retain all other settings as default and click Create Custom Image.

- The image status will initially appear as Pending, then the status changes to Available after sometime.

Creating a Virtual Server Instance from the Custom Image
- Click on the custom image created in the previous section.
- Under Deploy Custom Image, select Virtual Server Instances for VPC.
- Click Continue to Provisioning. You will be redirected to the Virtual Server Instance provisioning page.

- Select the Location where the image is available.
- Enter the Instance Name under the Details section.
- Select the appropriate Resource Group for your environment.

- Verify that the correct Image Name is selected.

- Select the appropriate Profile based on the CPU, RAM, and storage requirements specified in the QGS User Guide, then click Save.

- Create an SSH Key.
Note: CAMS/QGS instances do not require an SSH key; however, IBM Cloud mandates its creation to proceed - Set the Primary Storage to 40 GB as per the system requirements in the User Guide.

- Select the appropriate VPC for your environment and configure the network interface.
- Configure the Security Group to allow the following required ports: 22, 443, 1080, and 8080. Refer to the Qualys Gateway Service User Guide for details.

- Retain all other settings as default.
- Click Create Virtual Server and wait until the instance status changes to Running.

Attaching a Secondary Disk
- Navigate to the CAMS/QGS instance and select the Storage tab.
- Select Create New Volume.
- Enter a name for the secondary disk.
- Enable the Auto-Delete option if the volume should be automatically deleted upon instance deletion.
- Select the appropriate Resource Group for your environment.

- Choose a Profile based on your use case and set the storage capacity to 150 GB. Refer to the Qualys Gateway Service User Guide for storage requirements.

- Click Save. The secondary disk will be automatically attached to the instance.

If the secondary disk is attached after the instance has been created, an appliance reboot is required for the changes to take effect.
Accessing the Appliance Text UI
The appliance Text UI can be accessed using either of the following methods:
Method 1 — From the Instance List:
- Navigate to Virtual Server Instances and locate the appliance.
- Click the More Options (⋮) at the end of the appliance row.
- Select the console access option from the menu.

Method 2 — From the Instance Details:
- Click on the instance to open its details page.
- Click Actions and select either VNC Console or Open Serial Console.

Once the Text UI is accessible, refer to the Qualys Gateway Service user guide - Appliance for further configuration steps.
Refer to Qualys Gateway Service user guide - Network Configuration to configure the network details (IP, DNS, etc.), and registration of the appliance.
