Deploy Qualys Virtual Scanner Appliance
Perform the following steps to deploy Qualys Virtual Scanner Appliances:
Create Qualys Virtual Scanner
Perform the following steps to create Qualys Virtual Scanner:
- Unzip the downloaded file qVSA<version>.vhdx.zip to obtain the virtual hard disk image file.
- Login to the Hyper-V server. Go to Manager > Hyper-V Manager and add a new Virtual Machine.
- The minimum supported instance size for a Qualys scanner deployed with qVSA image version 4.1 or higher is at least 2 GB of RAM and 2 CPU cores.
- Configure memory and CPU for your Virtual Scanner Appliance. Ensure that the CPU cores:RAM ratio is maintained at 1:2 or 1:3 for optimal performance. We recommend at least 4CPU cores and 8 GB of RAM for the Qualys Scanner VM.
Avoid excessive use of Dynamic Memory and be cautious when assigning maximum values to prevent memory contention.
Know more about RAM usage in scanners.Know more about RAM usage in scanners.
- Minimum RAM: This is the minimum amount of memory required for your virtual machine to function properly.
- Maximum RAM: This field sets the maximum RAM for your virtual machine. The Hyper-V host grants more memory if needed up to the amount set in the field.
- Memory Buffer: This setting controls the percentage of physical memory allocated to the VM as a buffer. Physical memory is reserved for VM's memory needs in a buffer. The default value for this setting is 20%, but it is possible to make adjustments.
Perform the following steps to add a new virtual machine:
- Open Hyper-V Manager Console.
- Open Hyper-V Manager and create a new Virtual Machine.
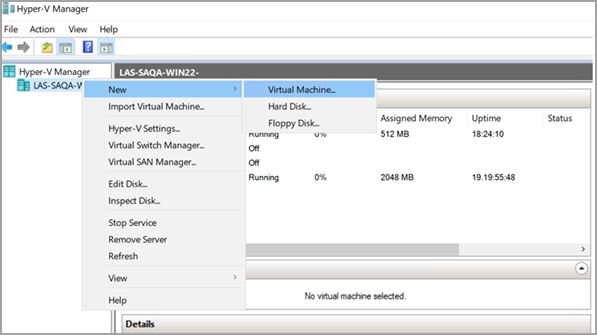
- A new virtual machine Wizard is displayed.

- Provide the following information in the wizard to complete the setup.
- Specify Name and Location.
- Specify Generation: select Generation 1 and click Next.
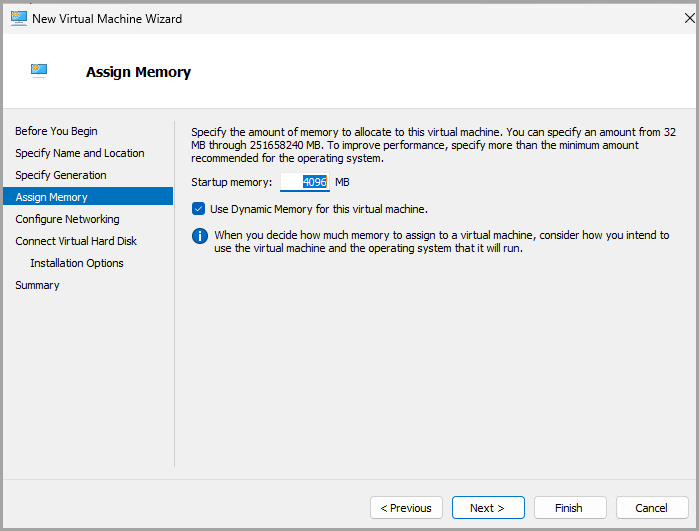
- Go to Assign Memory tab, allocate at least 4GB of memory, and click Next.
-
In the Configure Networking tab, select Connection as Default Switch and click Next.

-
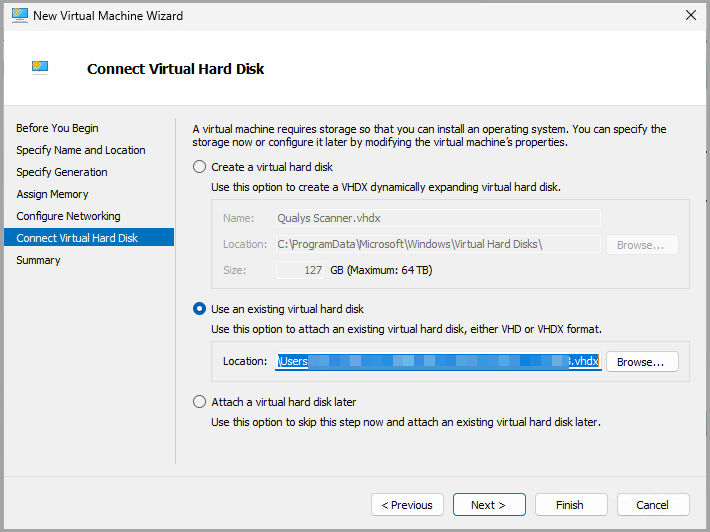
From the Connect Virtual Hard Disk tab, select Use an existing virtual hard disk, select Qualys qVSA .vhdx image, and click Next.
-
Review the Summary page, and click Finish.
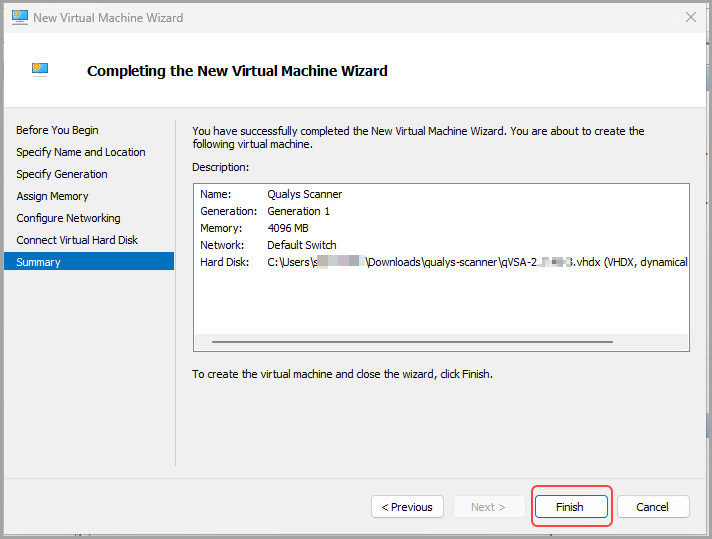
The Qualys Scanner virtual machine has been created but has not been started yet. For detailed steps, refer to the Start Virtual Machine section.
Network Setting and Proxy Configuration
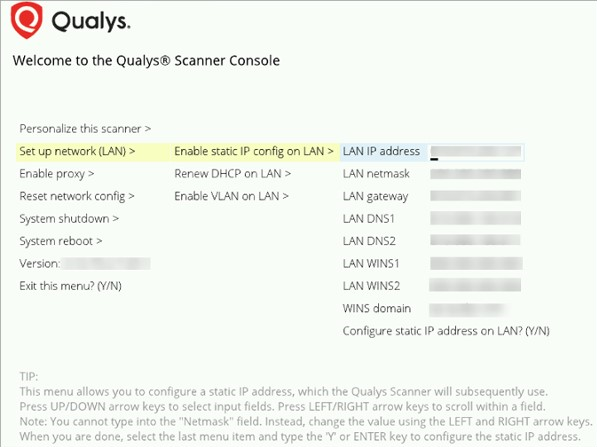
By default, the LAN IP address is configured with DHCP enabled. Select Set up network (LAN) to configure a static IP address.
Perform the following steps to set a static IP address instead of DHCP:
- Using the Virtual Scanner Console, go to the main menu.
- Select Set up network (LAN).
- Click Right arrow to highlight Enable static IP config on LAN.
- Click Right arrow.
- Enter settings.
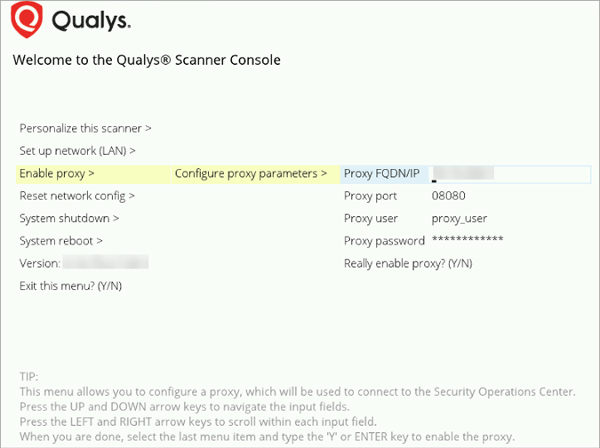
The scanner supports proxy configuration for the following:
- IP-based and FQDN proxy host.
- With or without authentication.
- Authentication modes: Basic and NTLM.
It is recommended that the proxy server has an assigned static IP address and allows transparent SSL tunneling. Proxy-level termination (as implemented in SSL bridging for example) is not supported. The scanner does not support proxy servers in networking environments where the proxy server IP address is dynamically assigned. SOCKS proxies are not supported.
Configuring Proxy Server on your Scanner (Optional)
Using the Virtual Scanner Console, go to the main menu.
- Select Enable Proxy.
- Click the Right arrow to highlight Enable Proxy.
- Click the Right arrow.
- Enter settings.
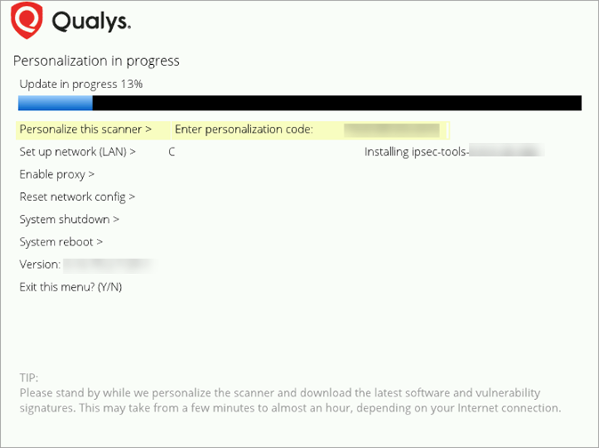
Personalize Qualys Virtual Scanner
Perform the following steps to personalize the scanner:
- Using the Virtual Scanner Console, go to the main menu.
- Select Personalize this scanner.
- Click the Right arrow to highlight Personalize this scanner.
- Click the Right arrow.
- Enter a 14-digit Personalization code.
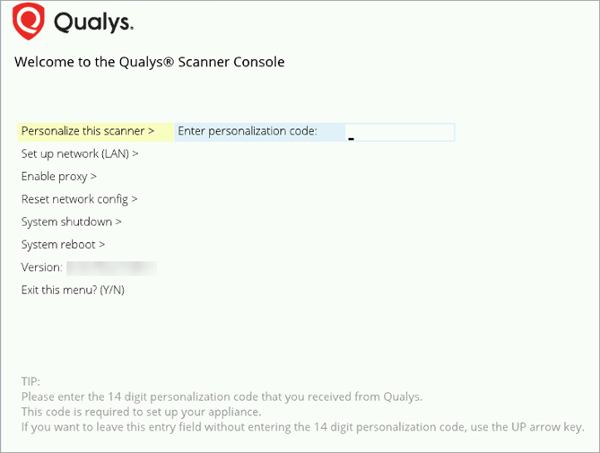
The activation process starts after entering the Personalization code, and the service reports the progress. Activation can take up to 10 minutes to complete.
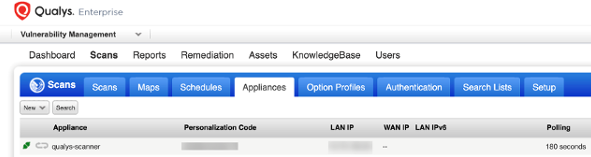
Check the Scanner Status in Qualys
To confirm that the scanner is ready to use, check the virtual scanner status in Qualys UI.
Perform the following steps to check virtual scanner status:
- Go to Scans > Appliances and find your scanner in the list.
- Check that the scanner's status is Connected.
The Qualys user interface can take several minutes to update after adding a new appliance. Refresh your browser periodically to ensure you see the most up-to-date details.