Deploy Qualys Virtual Scanner Appliance
Perform the following steps to deploy the Qualys Virtual Scanner appliance in vCenter:
- Launch the VMware-vSphere client and log into vCenter.
- Click your selected Data Center > Right-Click > Deploy OVF Template.
- Click Local File and choose the downloaded Qualys Virtual Scanner ova.
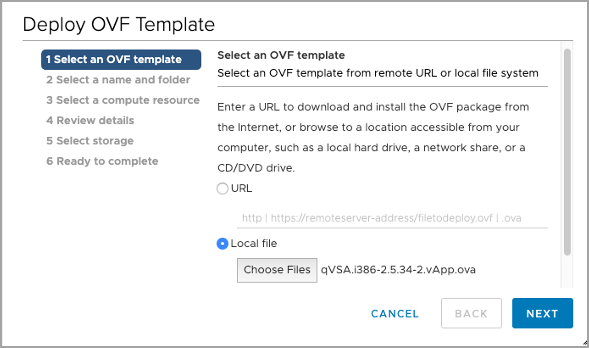
- Continue with the panel template to select compute resource and data storage.
Before version 3.10, the Qualys Virtual Scanner Appliance supported a maximum of 16GB of RAM and 16 CPU cores. In version 3.10, this restriction has been lifted.
- For Single Network scanning, select the desired Destination Network for LAN; WAN is not used.
Ensure the Destination Network is configured to allow HTTPS (443) outbound access to the internet.
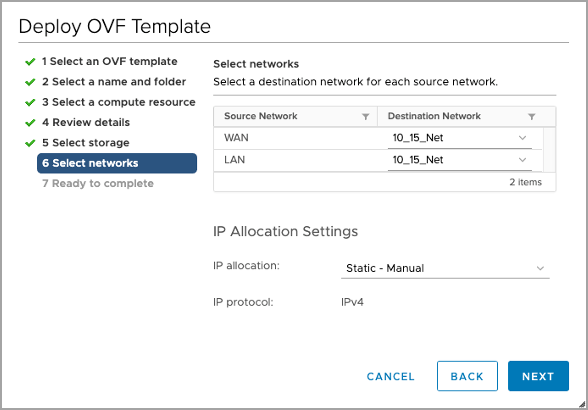
- For Split Network scanning, select different Destination Networks for WAN and LAN.
Ensure the Destination Network for WAN is configured to allow HTTPS (443) outbound access to the internet.

- Customize template – Enable properties settings appropriate for your environment:
Section
Description
Personalization Code
REQUIRED: Provide the 14-digit Personalization code obtained from Qualys
Enable WAN Interface
Optional: Enable for Split-Network scanning
HTTP Proxy
Optional: Add the proxy server URL to communicate with Qualys Enterprise TruRisk™ Platform via SSL proxy, which supports both IP and FQDN for the proxy server configuration.
Formatting:
Specify the proxy server URL as username:password@proxyhost:port
If authentication is not used, the format is proxyhost:port
where 'proxyhost' is the IPv4 address or the FQDN of the proxy server, the 'port' is the port the proxy server is running on
Examples:
jdoe:[email protected]:3128
jdoe:[email protected]:3128Configuring IPV6 proxy:
When configuring an IPv6 proxy, we must always enclose the proxy in square bracket [] to identify it as IPv6 address.
Example: HTTP_Proxy=jdoe:abc12345@[2001:470:8418:ffe:250:56ff:feb3:729b]:3128
LAN IP
Optional: Defaults to DHCP, otherwise, enter static IP address for LAN interface
LAN Default VLAN
Optional: Defaults to 0. Enter VLAN ID if needed
LAN Netmask
Optional: Defaults to 255.255.255.0
LAN Gateway
Optional: Defaults to DHCP. For static LAN IP, enter the LAN Gateway address.
LAN DNS Servers
Optional: For static LAN IP, enter LAN DNS servers
WAN IP
Optional: Defaults to DHCP, otherwise enter static IP address WAN interface – applicable to Split Network configuration.
WAN Netmask
Optional: Defaults to 255.255.255.0 - applicable to Split Network configuration
WAN Gateway
Optional: Defaults to DHCP. For a static WAN IP, enter the WAN Gateway address—applicable to the Split Network configuration.
WAN DNS Servers
Optional: For static WAN IP, enter WAN DNS servers – applicable to Split Network configuration
WINS 1
Optional: Primary WINS address
WINS 2
Optional: Secondary WINS address
WINS DOMAIN
Optional: WINS Domain
PREFER_USERDATA
Optional: When 'PREFER_USERDATA' is set to False (default), changes made through Scanner VM Console override user data settings specified via vApp options (base-64 encoded value provided for USER_DATA key): if set to True, all changes done via Scanner VM Console is overridden by user data settings on scanner reboot.
USER_DATA
Optional: Base-64 encoded values of user data such as PERSCODE, HTTP_Proxy, IPADDR, NETMASK, DNS, and so on. When this is set, the Scanner boots up with the values provided in encoded user data.
IPv6 Only Scanner Optional : Enables scanners in IPv6 only mode
Next Step
Power on Virtual Scanner Appliance