Release 10.32
January 10, 2025 (Updated on January 28, 2025)
What’s New?
Enhanced User Interface (UI 4.0) of the Qualys Enterprise TruRisk™ Platform
Introducing the new and improved UI. An exciting milestone in improving your platform experience. This new interface is designed to make your platform experience faster, smoother.
Check out our blog /video for insights to discover the key enhancements designed to improve your experience.
New UI Key Highlights
The new user interface is built with the following key highlights:
The redesigned navigation menu offers a streamlined layout with apparent distinction between primary, secondary, and tertiary navigation elements, making it easier to access critical features.
Primary Navigation Element
The vertical navigation bar on the left side of your screen offers quick access to modules, keeping your workspace organized.
Use the toggle icon in the top-left corner to dock or undock the bar and to show or hide icon labels as needed.
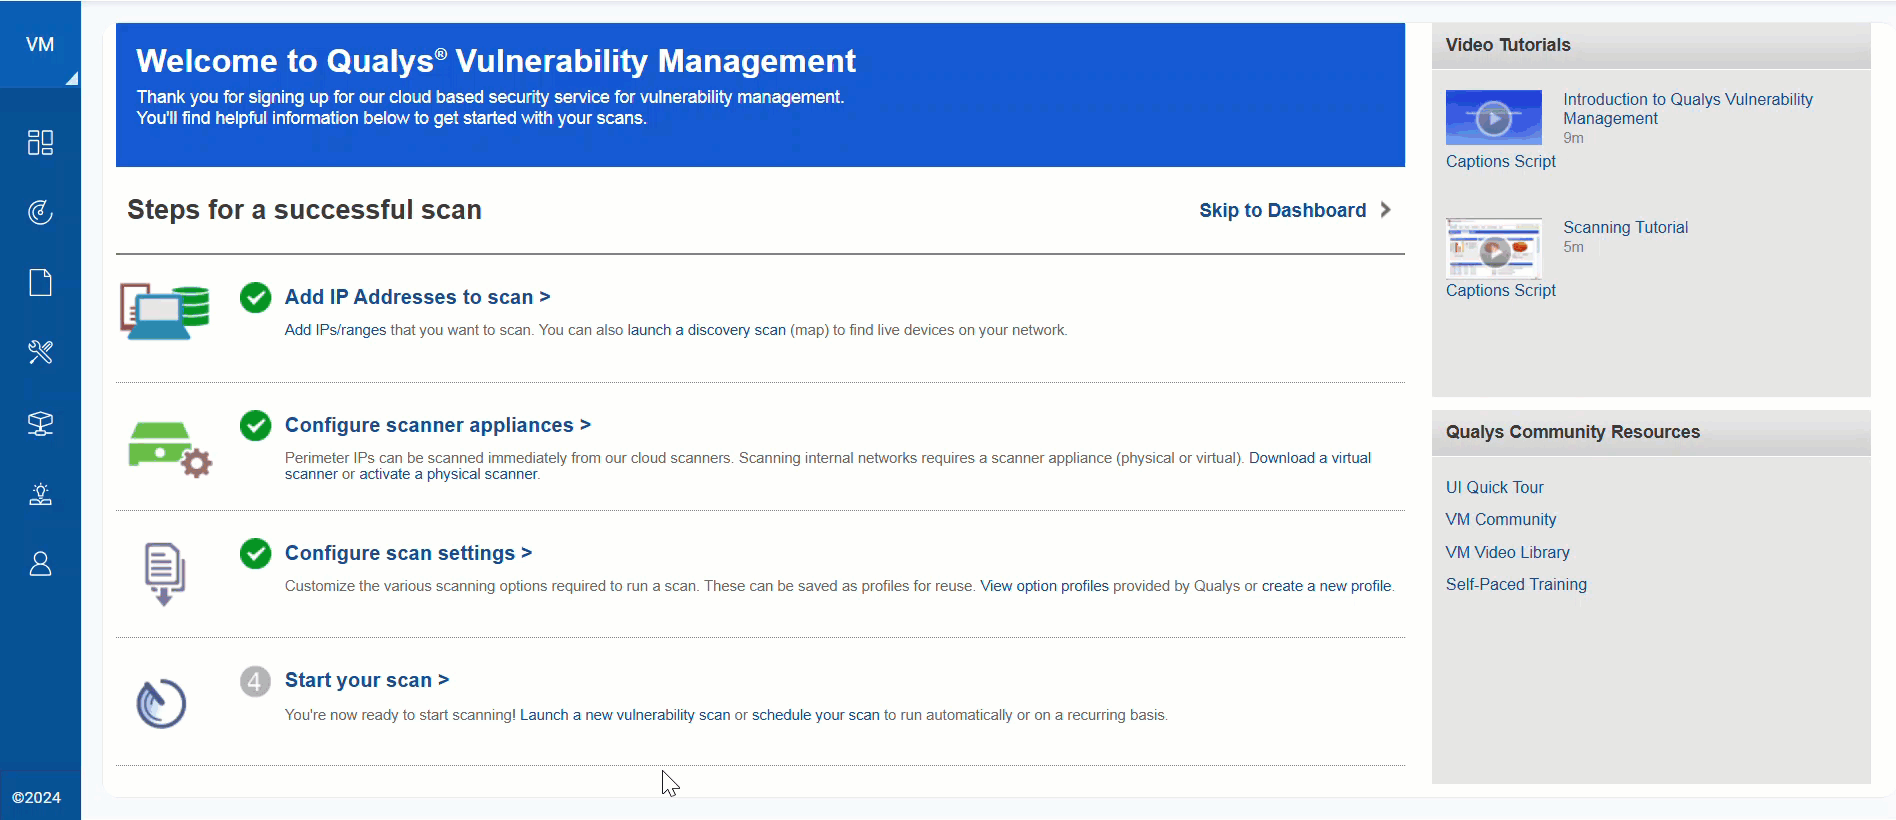
Secondary Navigation Element
The secondary navigation bar displays options horizontally at the top for easy access, with active tabs highlighted in bold for clarity.
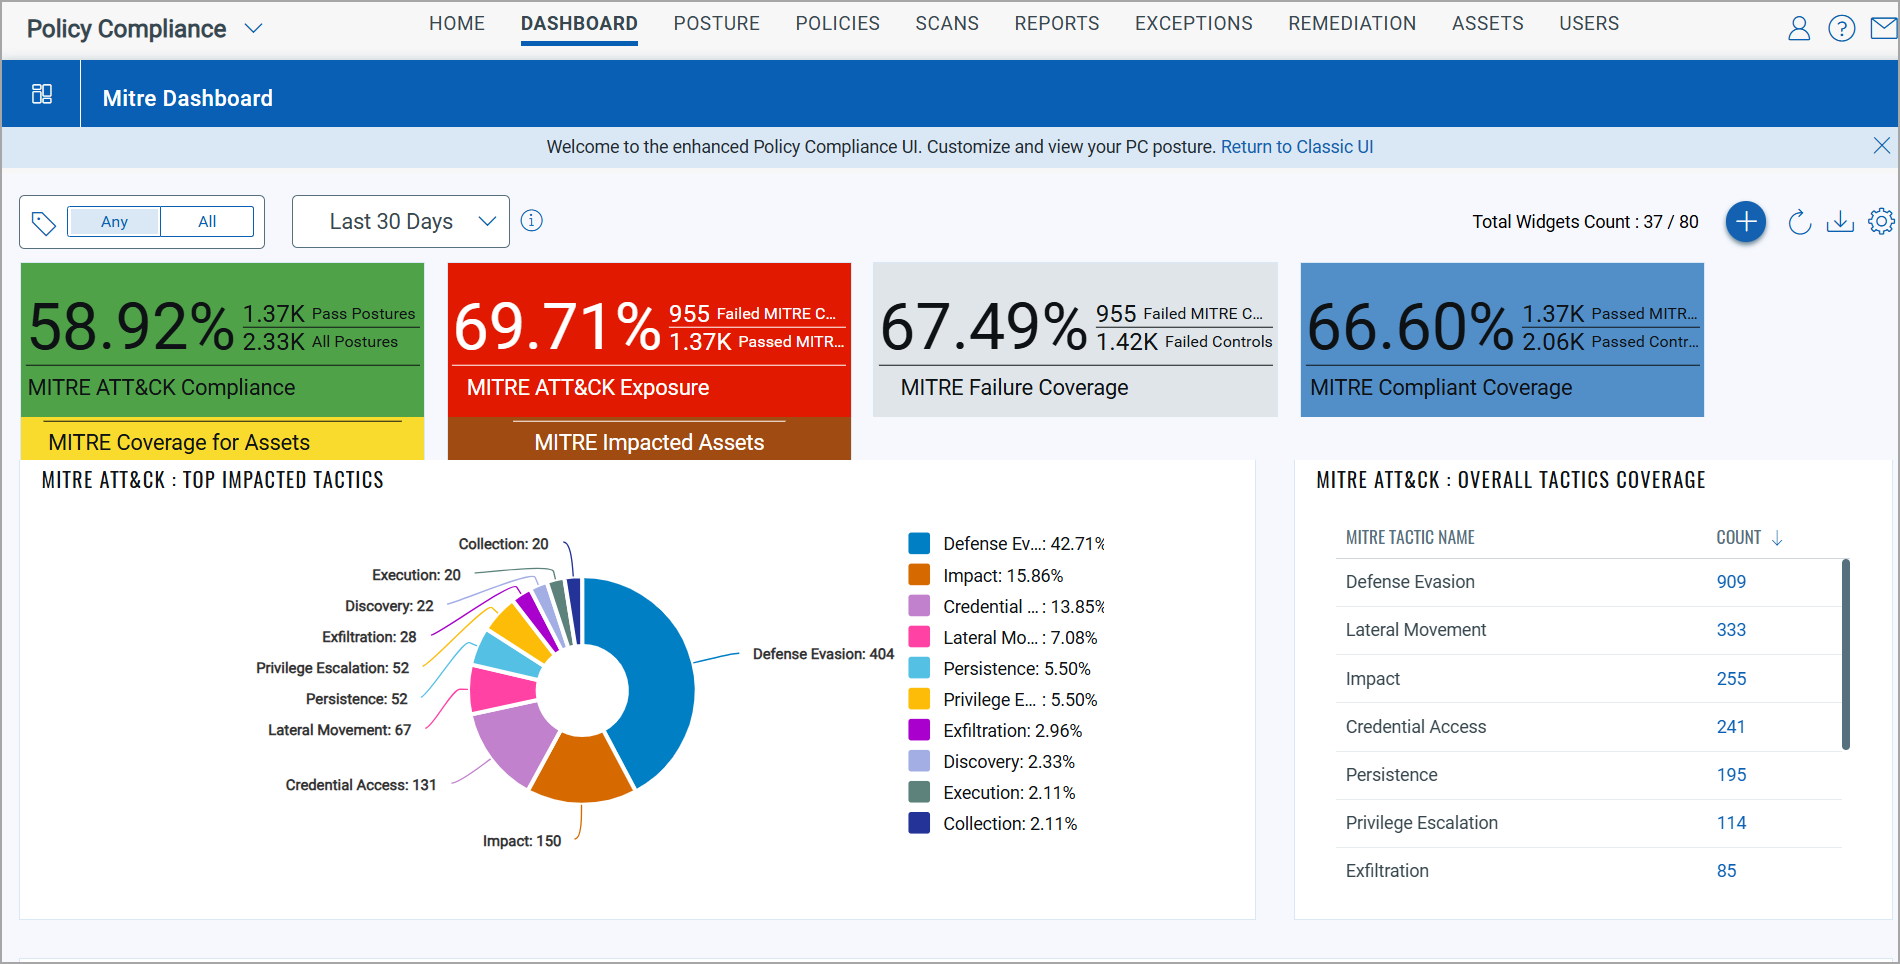
Refreshed dashboardsRefreshed dashboards
We have improved our dashboards for better accessibility, color scheme, typography, and data interpretation.
These updates ensure easy information consumption for all users.
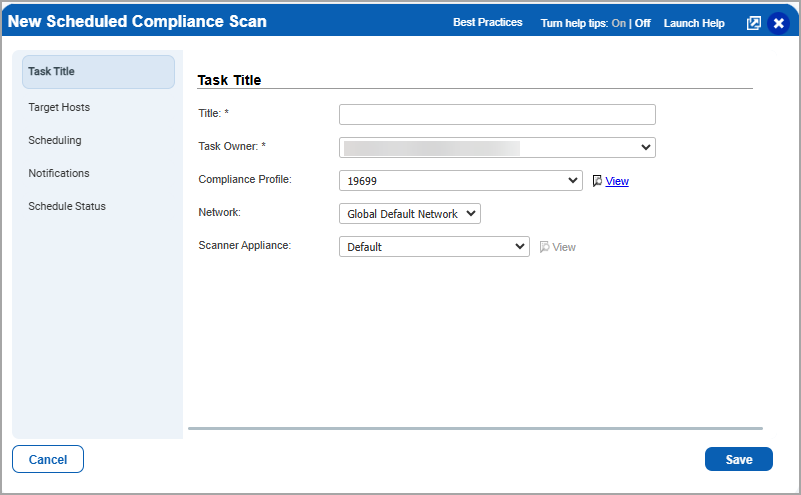
Standardized UI elements for seamless navigationStandardized UI elements for seamless navigation
We have standardized the look and feel across all modules to enhance usability and ease of transition, reducing the learning curve for a more intuitive experience.
For example, here’s our redesigned New Scheduled Compliance Scan window with improved UI components.
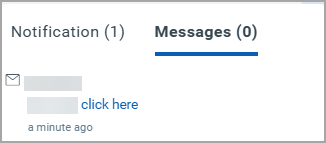
The Communication tab has been reorganized for better usability, with clear sections to help you quickly find important information.
Notification Section- This section focuses on items requiring immediate attention and followup.
Message Section- This section delivers general updates and information from the platform.
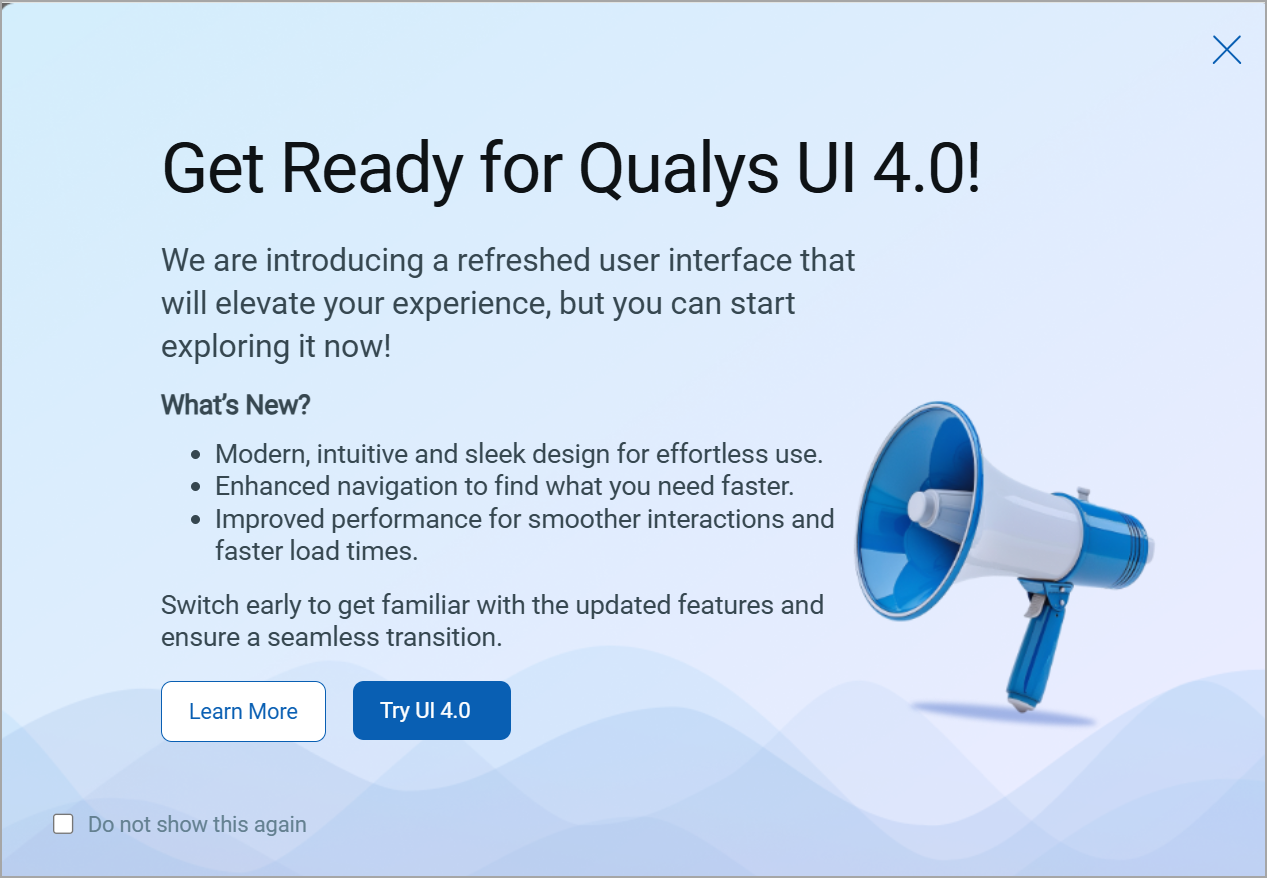
New UI Rollout
We are rolling out our newly designed user interface (UI) for the entire platform starting in the latter half of January 2025! This update introduces a consistent and streamlined experience across all applications simultaneously, ensuring that navigation and functionality are more intuitive than ever.
As part of this transition, when you log into your account, you will see a prompt to switch to the new UI. The rollout is designed to be seamless, ensuring all users enjoy the enhanced experience without interruptions.
To stay updated on the rollout schedule:
- Subscribe to Qualys Status for real-time updates.
- Keep an eye out for in-platform notifications that will guide you through the transition.
Note: For more detailed information on the rollout timeline and transition plan, we encourage you to check out our blog.
You can update your preference by switching between the Old and New UI using the toggle option until Day 90.
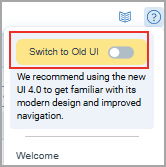
If no preference is set, the platform will default to the New UI after the 30 days transition period.
For more information on the rollout phase, refer to the Frequently Asked Questions.
Platform Name Change Update
We are renaming the Qualys Cloud Platform to the Qualys Enterprise TruRisk Platform. This change highlights Qualys' commitment to empowering CISOs, cybersecurity professionals, and risk stakeholders to effectively measure and mitigate the impact of cyber risk on their organizations.
The Qualys Enterprise TruRisk Platform is the only cybersecurity and risk management solution that enables you to measure, communicate, and eliminate cyber risk across the extended enterprise with precise remediation and mitigation actions.
This update does not affect the platform’s functionality or features. The name change will be implemented across all product interfaces in phases starting January 2025.
For more information, check out this blog.
Qualys Vulnerability Management (VM)
Azure Instance-Based Scans for Internal Assets
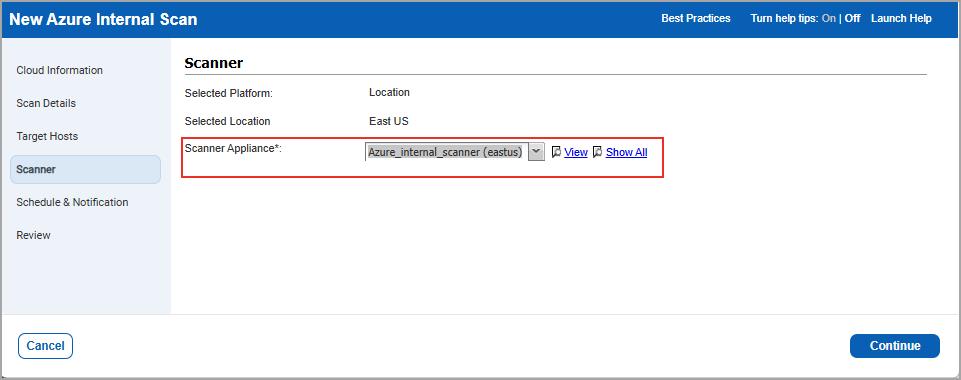
With this release, you can now perform azure instance-based scan for internal assets (Scans>New>Azure Internal Scan) using Azure connector based on either locations or virtual network.
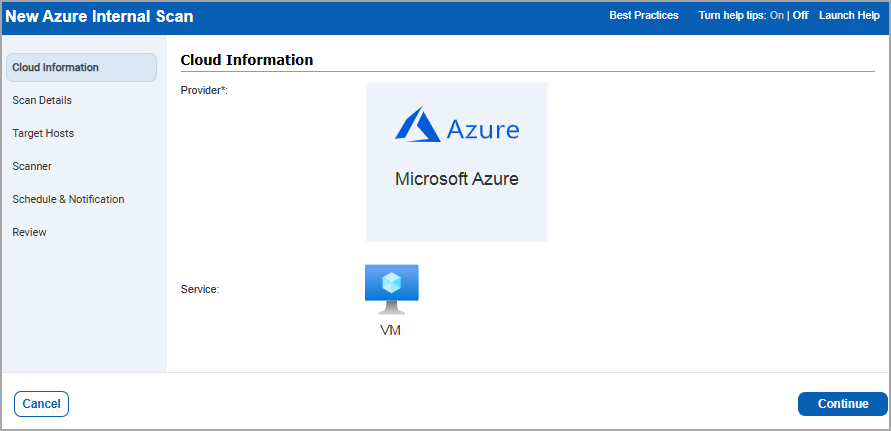
You must select the Azure connector and the platform as either location or virtual network from the target hosts. Based on the platform selected and the asset tags added, the connector discovers all the assets.
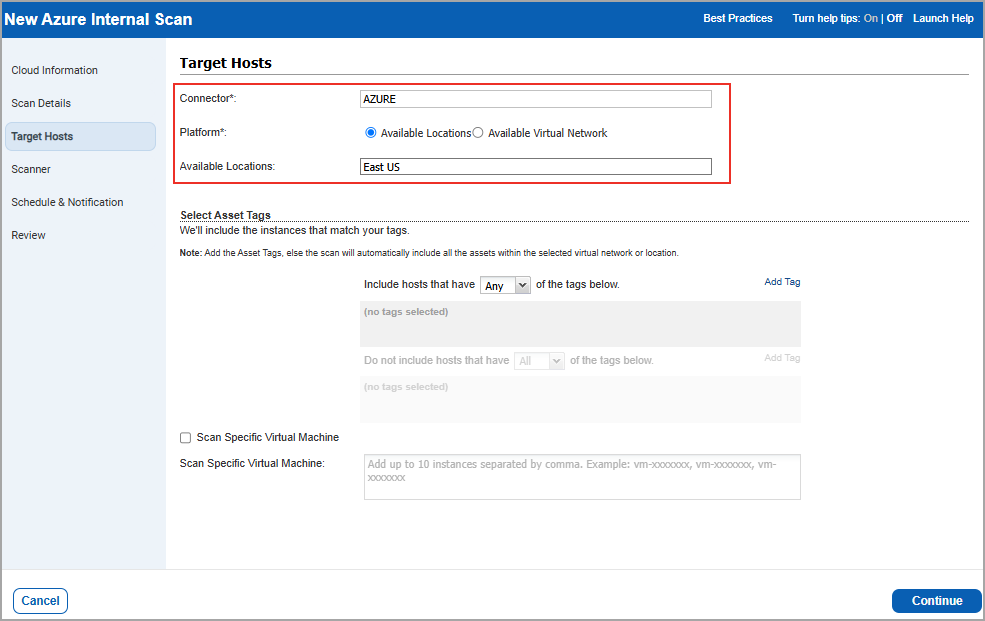
Select the Scanner Appliance based on the selected platform, either available location or virtual network, and initiate the scan.
The scan is automatically initiated once the Azure connector is configured. Azure internal scans are authenticated or unauthenticated and support only scheduled scans. You can generate a host based scan report that provides all the details about the Azure VM data and tags.
Notes:
- Azure connectors is mandatory to launch Instance-Based Scans for Azure Instances.
- Manager, Unit Manager, or Scanner role have permission to launch the Azure internal scan.
- Add the asset tags for the target hosts, else the scan automatically includes all the assets within the selected virtual network or location of the specified Azure connector.
Qualys API Support
For this enhancement, we have added a new API for Azure Internal Scan /api/2.0/fo/scan/cloud/internal/job/
and implemented the versioning for the APIs:
Scan API - /api/3.0/fo/scan/
Scheduled Scan API -/api/3.0/fo/schedule/scan/.
For more information, refer to Enterprise TruRisk™ platform 10.32 API Release Notes.
Simplified Login by Removal of Welcome Page
With this release, the Welcome page has been removed to streamline the login process.
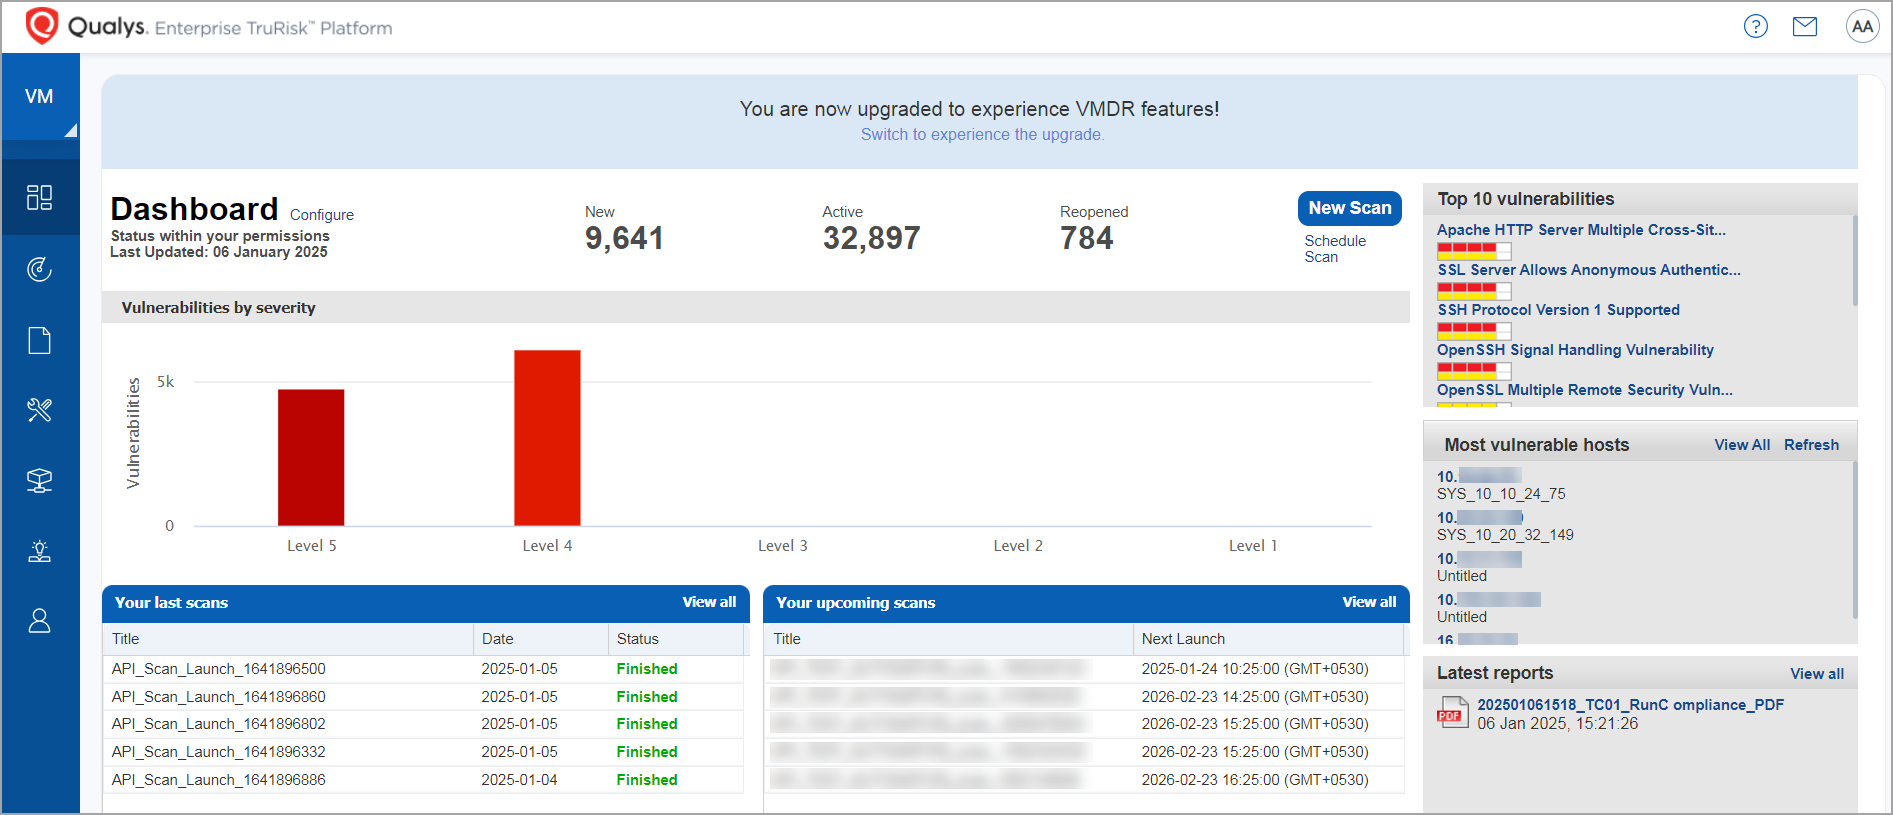
Previously, when logging into the Qualys Enterprise TrueRisk Platform, if the service type for your account was Express or Express Lite, you were redirected to the respective welcome pages. From there, you could select the desired application. This selection page was displayed even if you subscribed to a single application.
Now, users are redirected directly to the appropriate dashboard based on their subscriptions: VM to the VM dashboard, PC to the PC dashboard, and multiple subscriptions default to the VM dashboard, from where you can navigate to the choice of application.
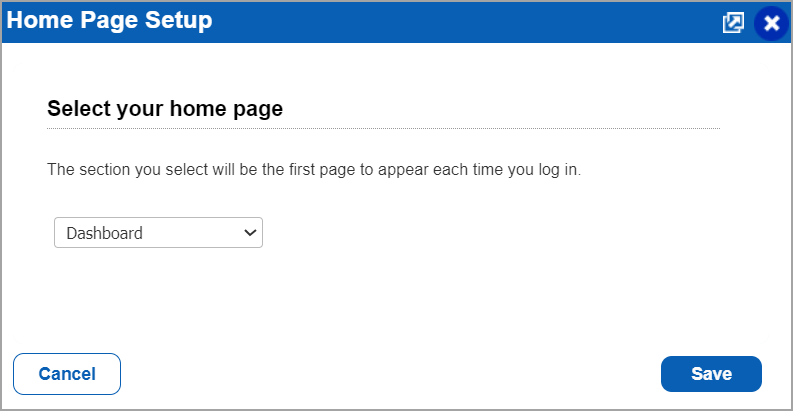
Additionally, the options for Express and Express Lite have been removed from the Home Page Setup window (Dashboard > ![]() > Home Page) which allowed users to select the first page displayed upon login.
> Home Page) which allowed users to select the first page displayed upon login.
Default Enablement of SwCA for New VMDR Subscriptions
With this release, we are introducing Software Composition Analysis (SwCA) support for all new VMDR subscriptions. With this capability, Qualys VMDR will be able to detect any vulnerability related to Open-Source Software (OSS) components. SwCA provides insights into your software stack, helping developers leverage open-source packages while managing organizational risks. At the same time, it ensures organizations remain protected from avoidable vulnerabilities and legal and compliance concerns.
To find SwCA vulnerablities, in VM/VMDR > Vulnerabilities > in the search box enter vulnerabilities.vulnerability.category:`SCA`. The list of SwCA vulnerabilities are displayed.
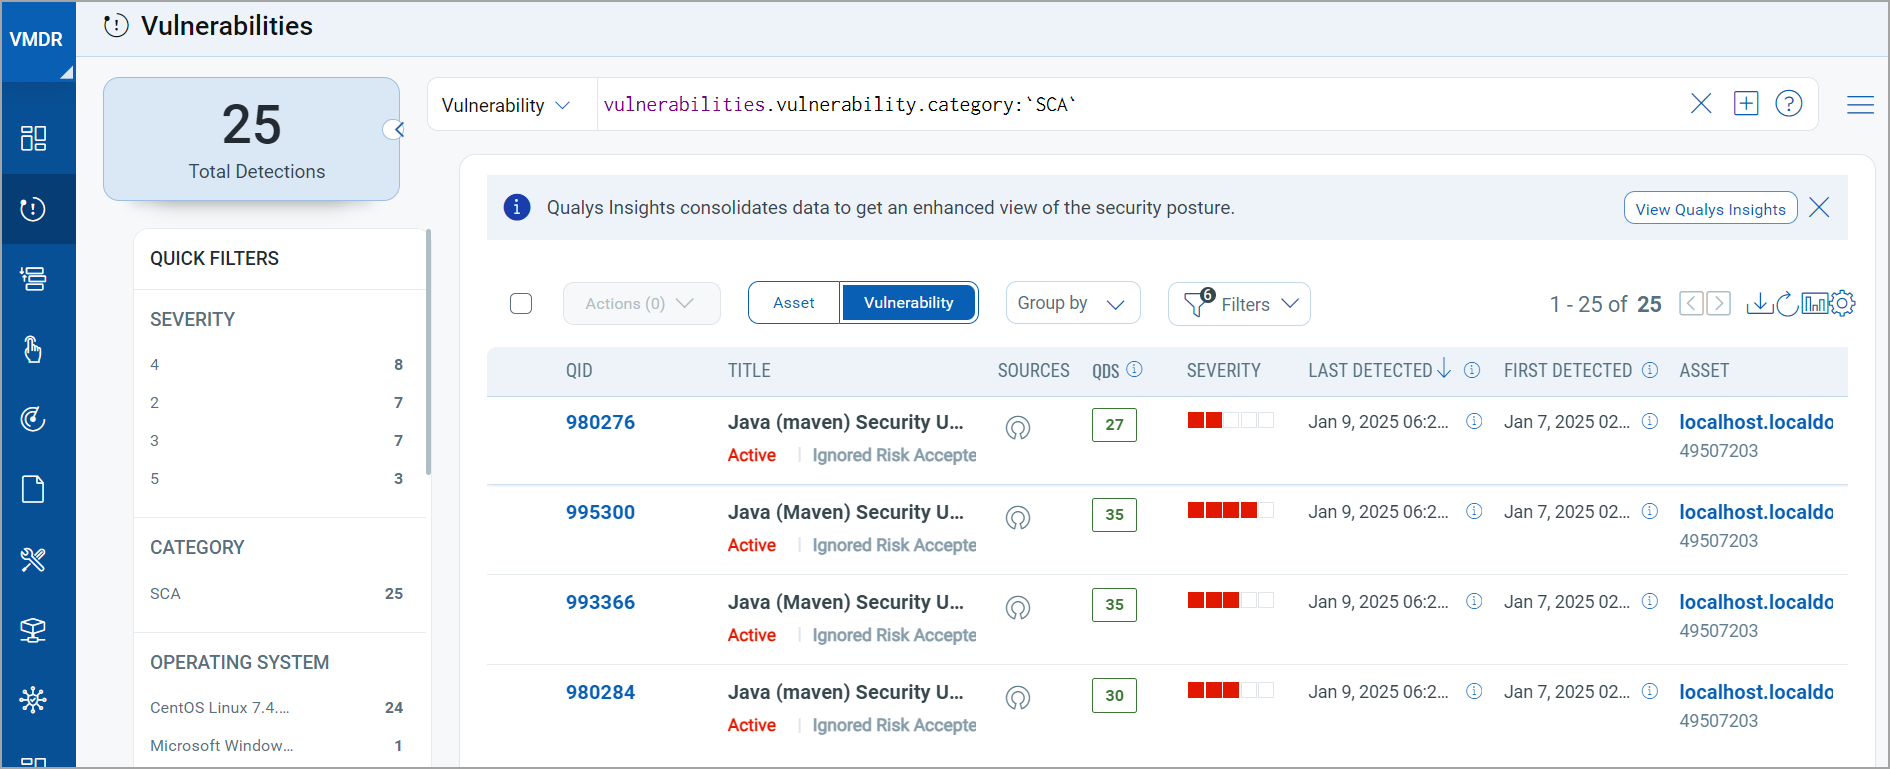
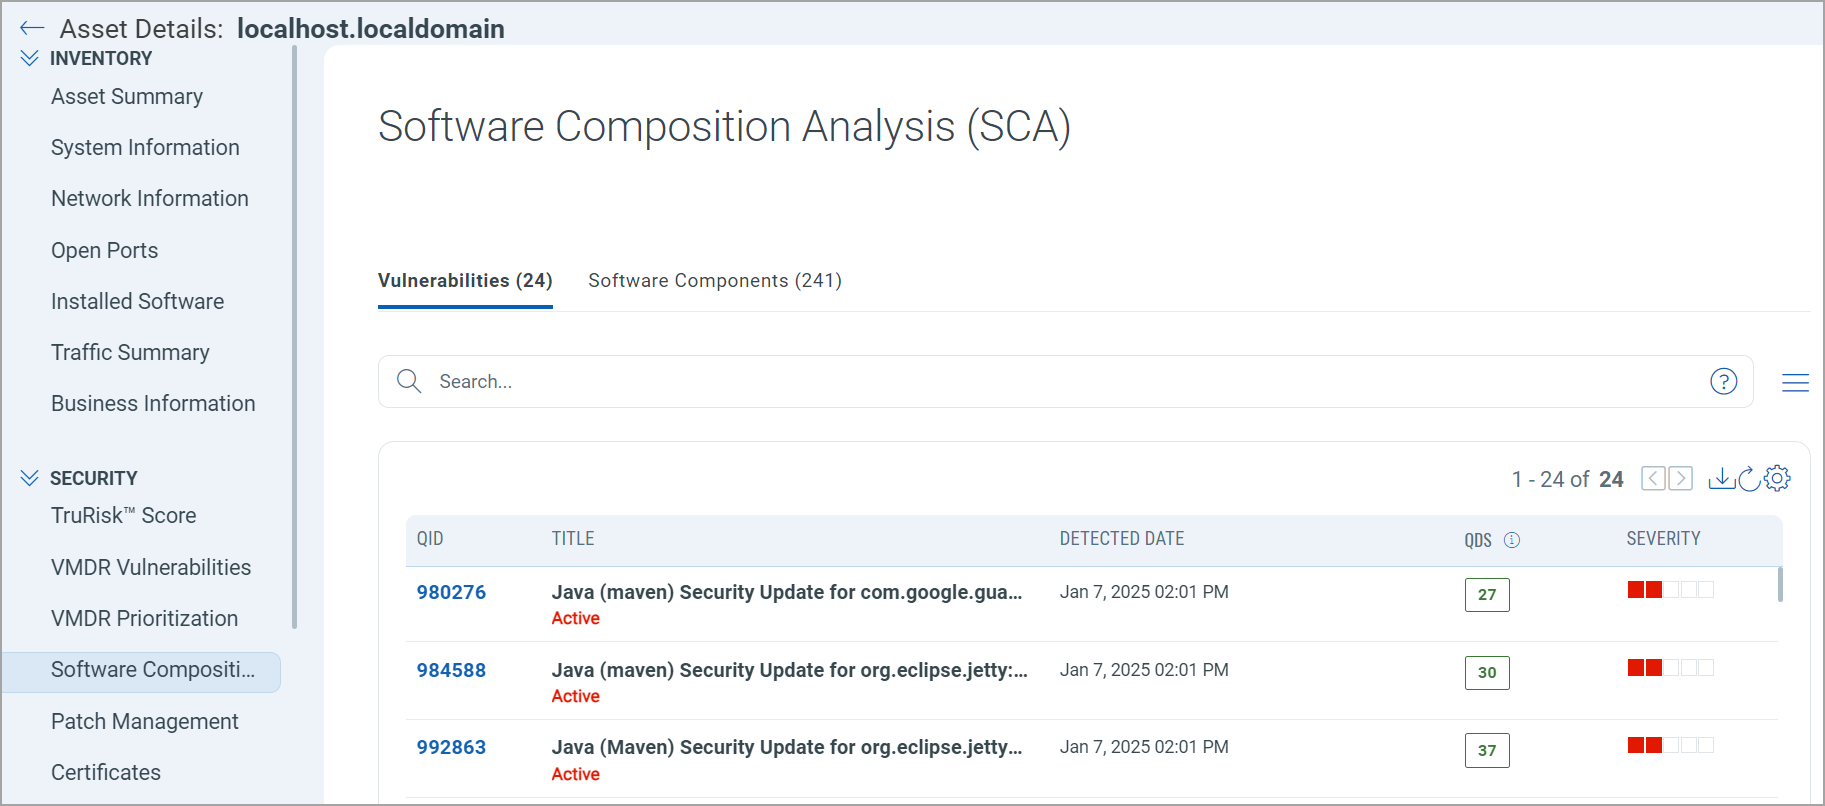
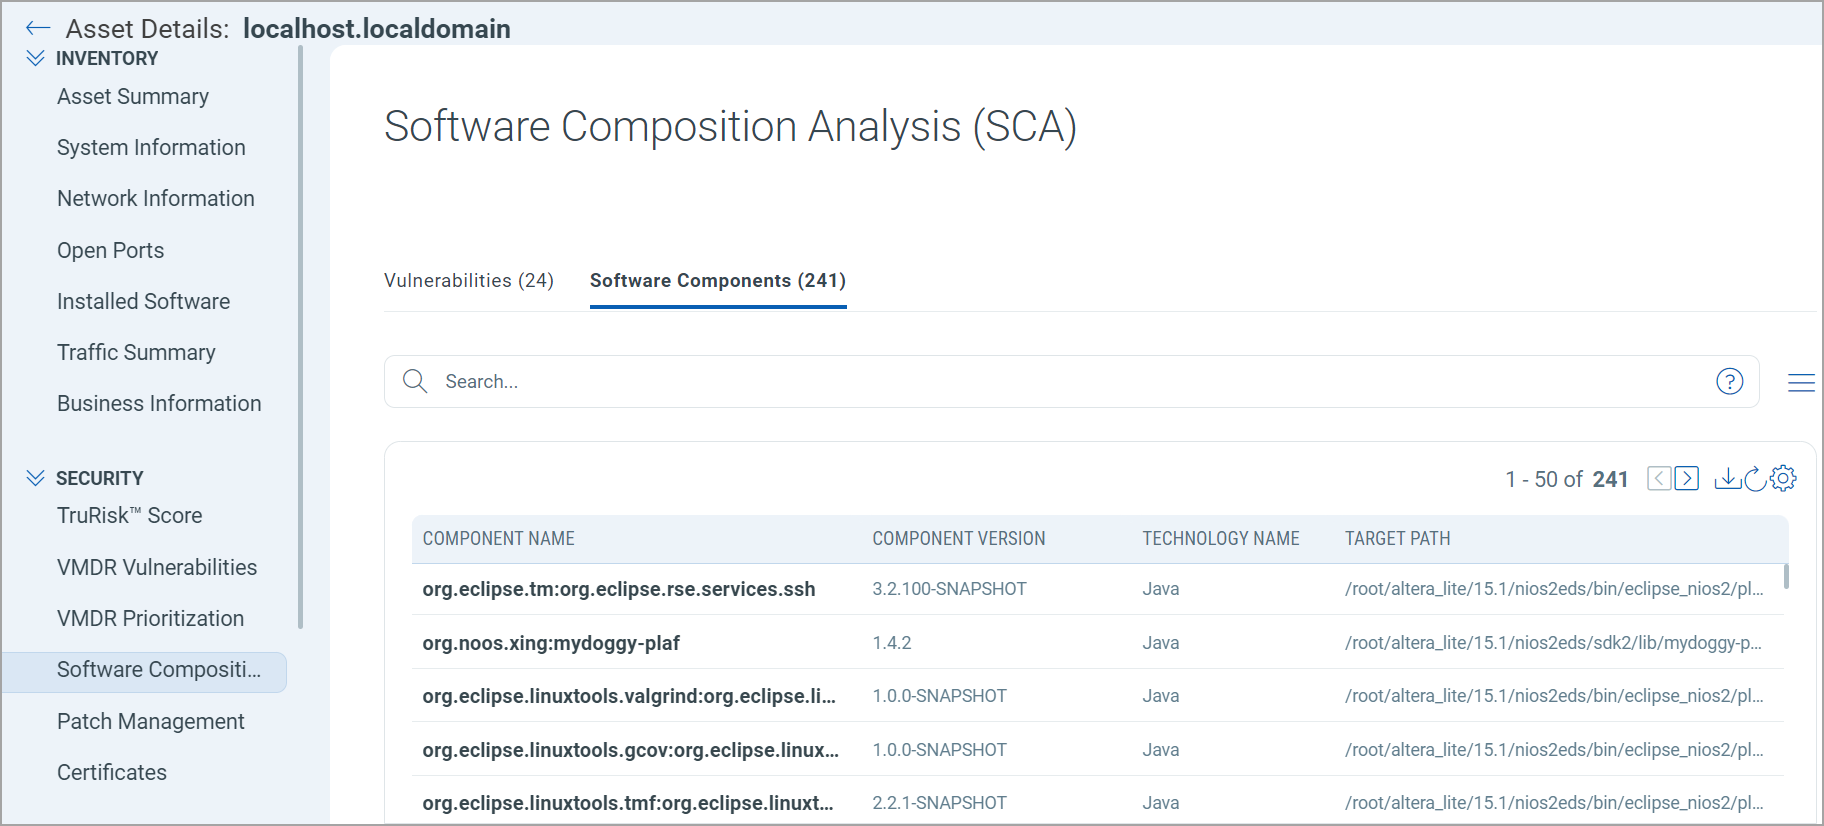
To view the SwCA Vulnerabilities and Software Components for an Asset. in VM/VMDR > Assets > select the TruRisk™ Score > in the left pane, click Software Composition Analysis (SCA).
Vulnerabilities tab
Software Components tab
To access SwCA, users must have an active Vulnerability Management Scan Process (VMSP) subscription enabled on their account. For an account without VMSP subscription, VMDR is enabled but without SwCA capabilities.
Qualys has also integrated Runtime SwCA into the Qualys Cloud Agent, enabling it to detect, manage, and mitigate software supply chain vulnerabilities in production environments. This capability works seamlessly without requiring additional infrastructure, tools, or processes. Runtime Software Composition Analysis provides continuous real-time visibility of the deeply embedded open-source packages and commercial software components in producing first-party and third-party applications on Windows and Linux operating systems.
For more details on the default enablement of SwCA for VMDR subscriptions, refer to the blog De-risk the Software Supply Chain by Expanding Unparalleled Detection Coverage With Qualys VMDR and Software Composition Analysis.
Qualys Policy Compliance (PC)
Onboarding
This feature introduces a new onboarding process. Onboarding is the process through which Qualys sets up the necessary configurations for you to perform compliance scans to assess the compliance status of your assets. This reduces the effort and time required to set up, configure, and start using PC for compliance assessment.
This feature is available by default only to the new customers and not to the existing customers.
Prerequisites
- Qualys Vulnerability Management must be available in your subscription and at least one VM scan (agent scan) should have been completed.
- Qualys Cloud Agent (for VM and PC) must be available in your subscription.
Key Highlights
- A wide array of industry standards tailored to your business needs to choose your compliance framework.
- Activate your assets for policy compliance automatically.
- Automatically import required policies, launch scans, and build insightful dashboards.
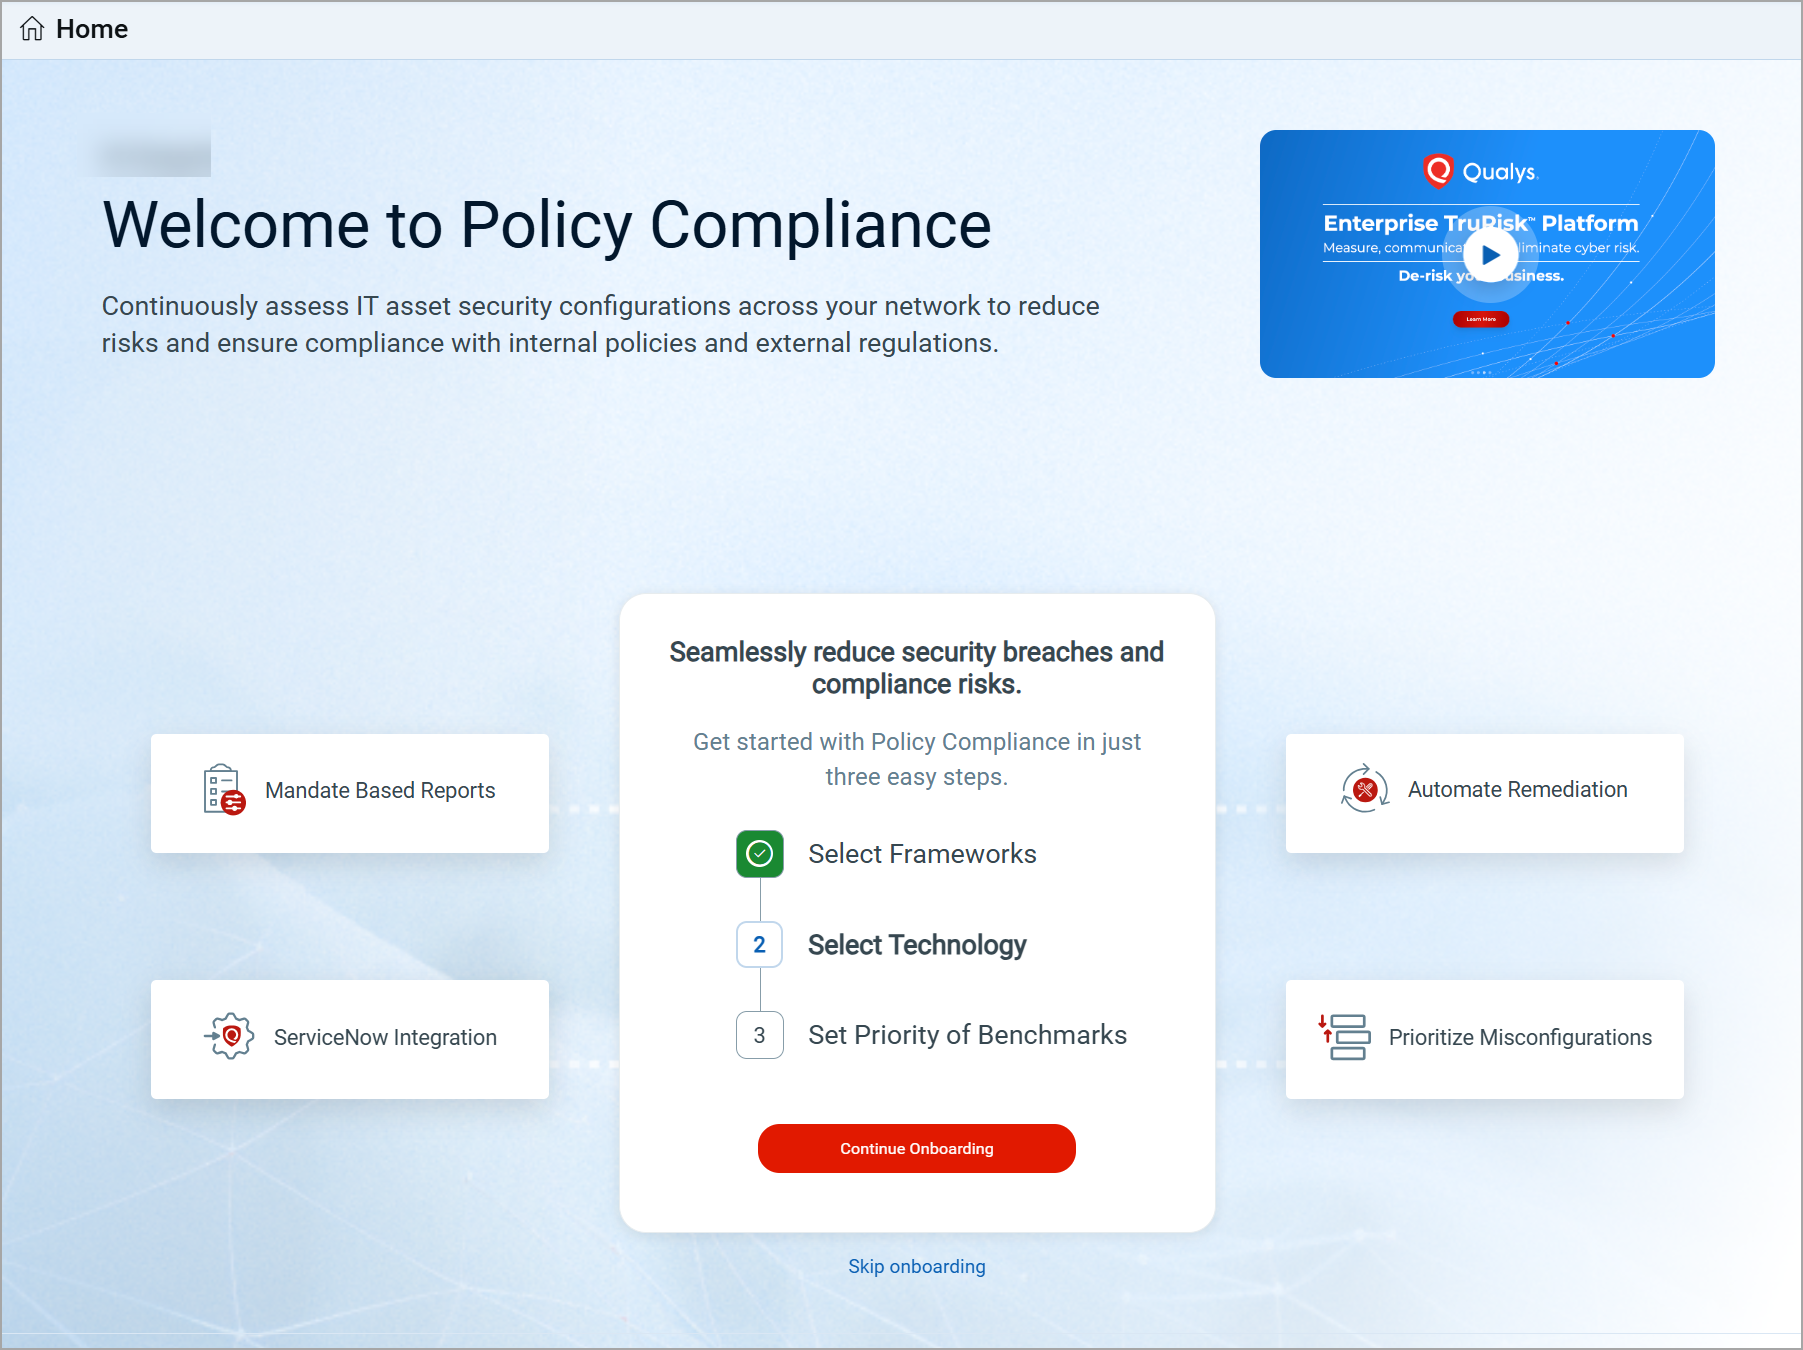
Show me onboarding workflowShow me onboarding workflow
Onboarding Workflow
The onboarding process consists of the following three steps:
- Select Frameworks- Select your compliance framework from a wide array of industry standards, tailored to your business needs. The framework list displays the top 9 most used frameworks.
- Select Technologies- Select the technologies that you want to evaluate for policy compliance.
- Set Benchmark Priority- Set the benchmark priority to let the system know the recommended order for importing policies tailored to your business requirements, such as CIS, DISA, Vendor, or Qualys.
After completing all onboarding steps, the policy compliance scan is initiated. Once the scan is finished, the compliance dashboard displays the overall compliance status.
For more information, refer to the PC Onboarding help.
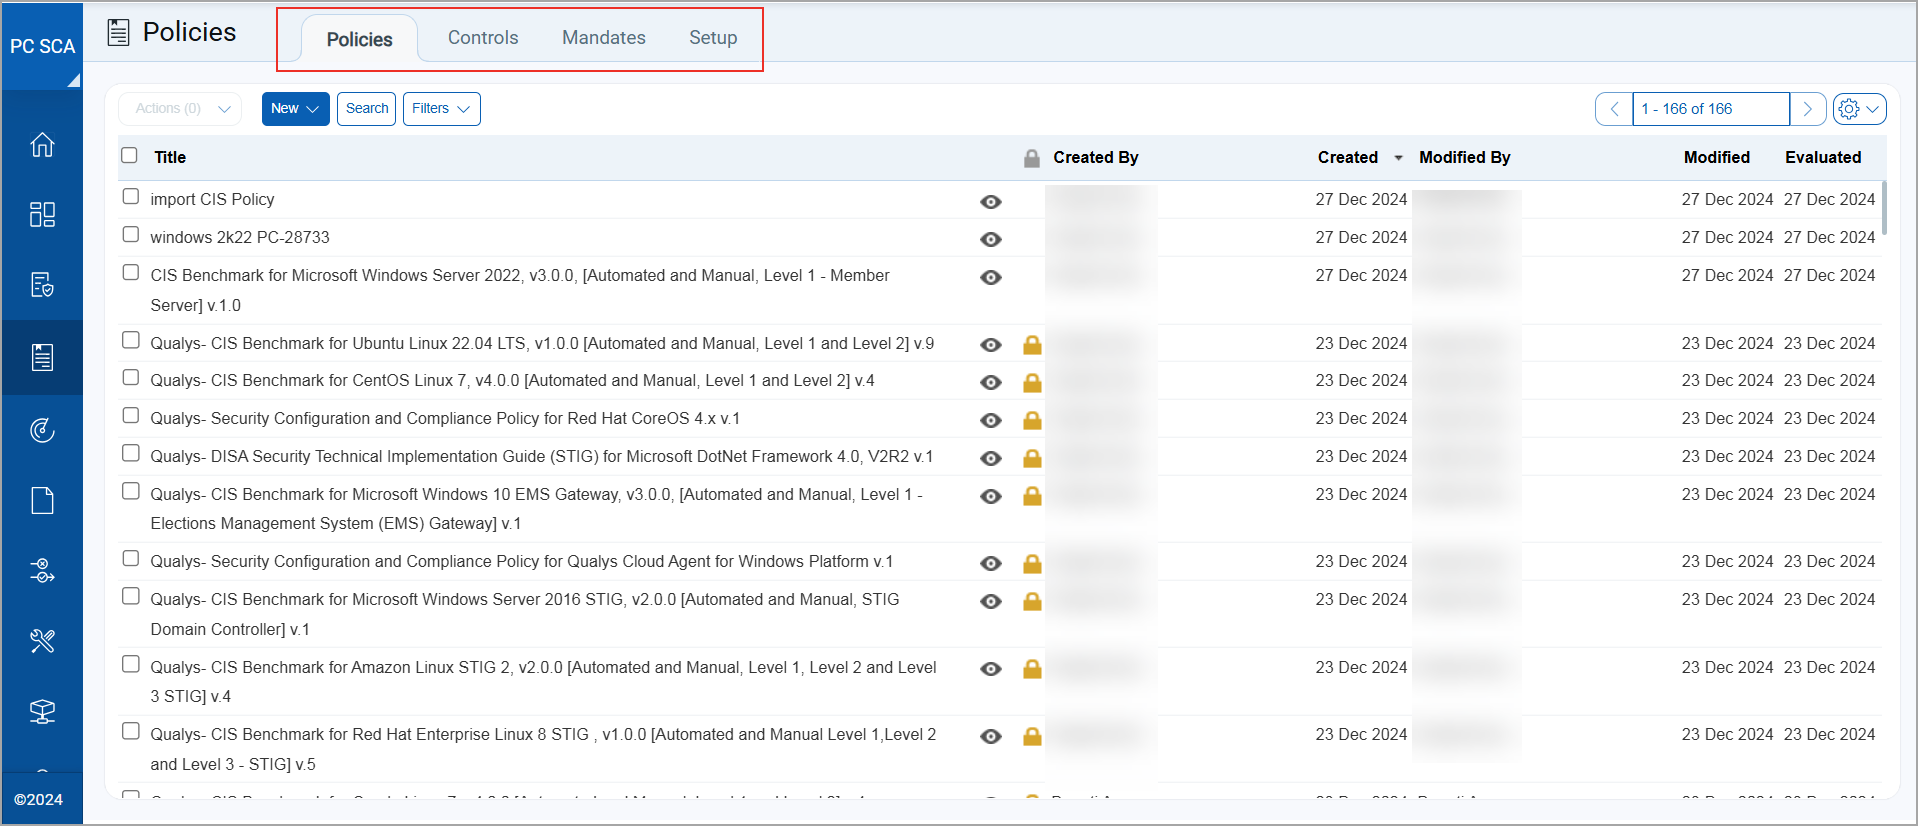
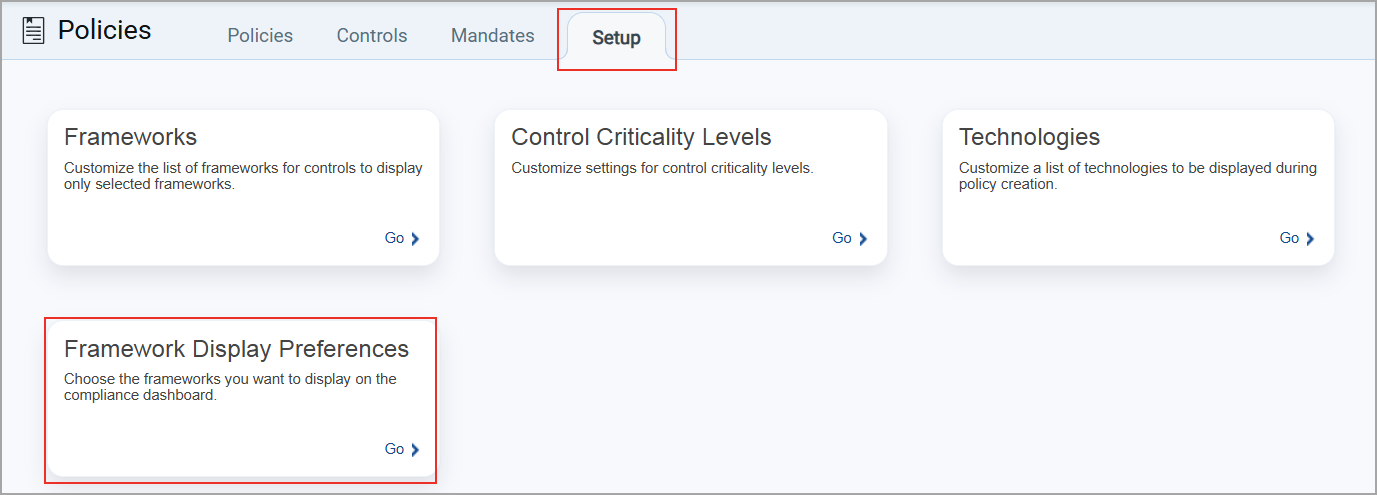
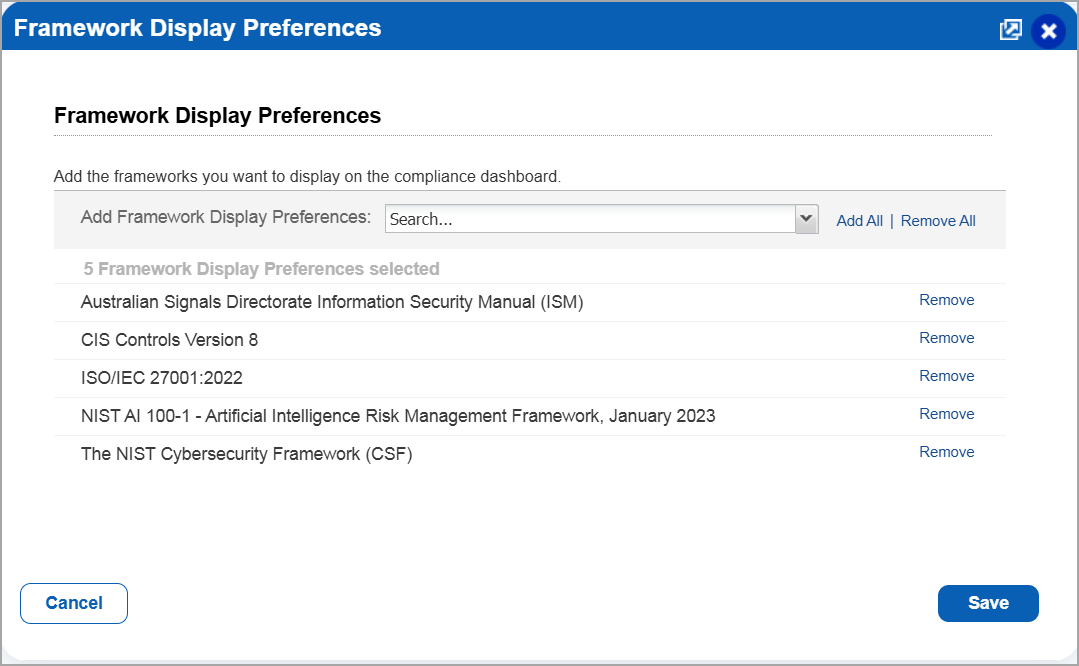
New Policies Setup Option: Framework Display Preferences
Policies Setup contains the global setup options for compliance policies. With this release, introducing one more setup option: Framework Display Preferences. As the name suggests, this setup option allows you to add/remove the frameworks/mandates to display on your compliance dashboard. It is useful when you want to modify the framework selection made during PC onboarding.
The Framework Display Preferences option is displayed in policies set only when the Onboarding feature is available.
 |
 |
Auto-Remediation for Failed Controls
Auto-remediation is a feature of the Policy Compliance application that allows remediation of failed controls in order to fix misconfigurations on assets at a larger scale. Failed controls correspond to settings that are not configured as per security guidelines, which may lead to data breaches. When you evaluate your assets against policies and your compliance report shows the status as Failed, you must fix the failed controls to pass the assessment and strengthen your compliance posture.
This is achieved using Custom Assessment and Remediation (CAR) scripts. The auto remediate feature lets you leverage Qualys CAR (Custom Assessment and Remediation) scripts to set control values according to security guidelines for passing controls in subsequent scans.
When a remediation job is executed, the values in the failed controls are changed to the expected value, making sure that the controls pass in the subsequent evaluation. Note that you can only remediate failed controls using the PC Auto Remediation feature. Errors in controls cannot be remediated. Additionally, only assets with a Cloud Agent installed are eligible for remediation jobs. For more information about the remediation job.
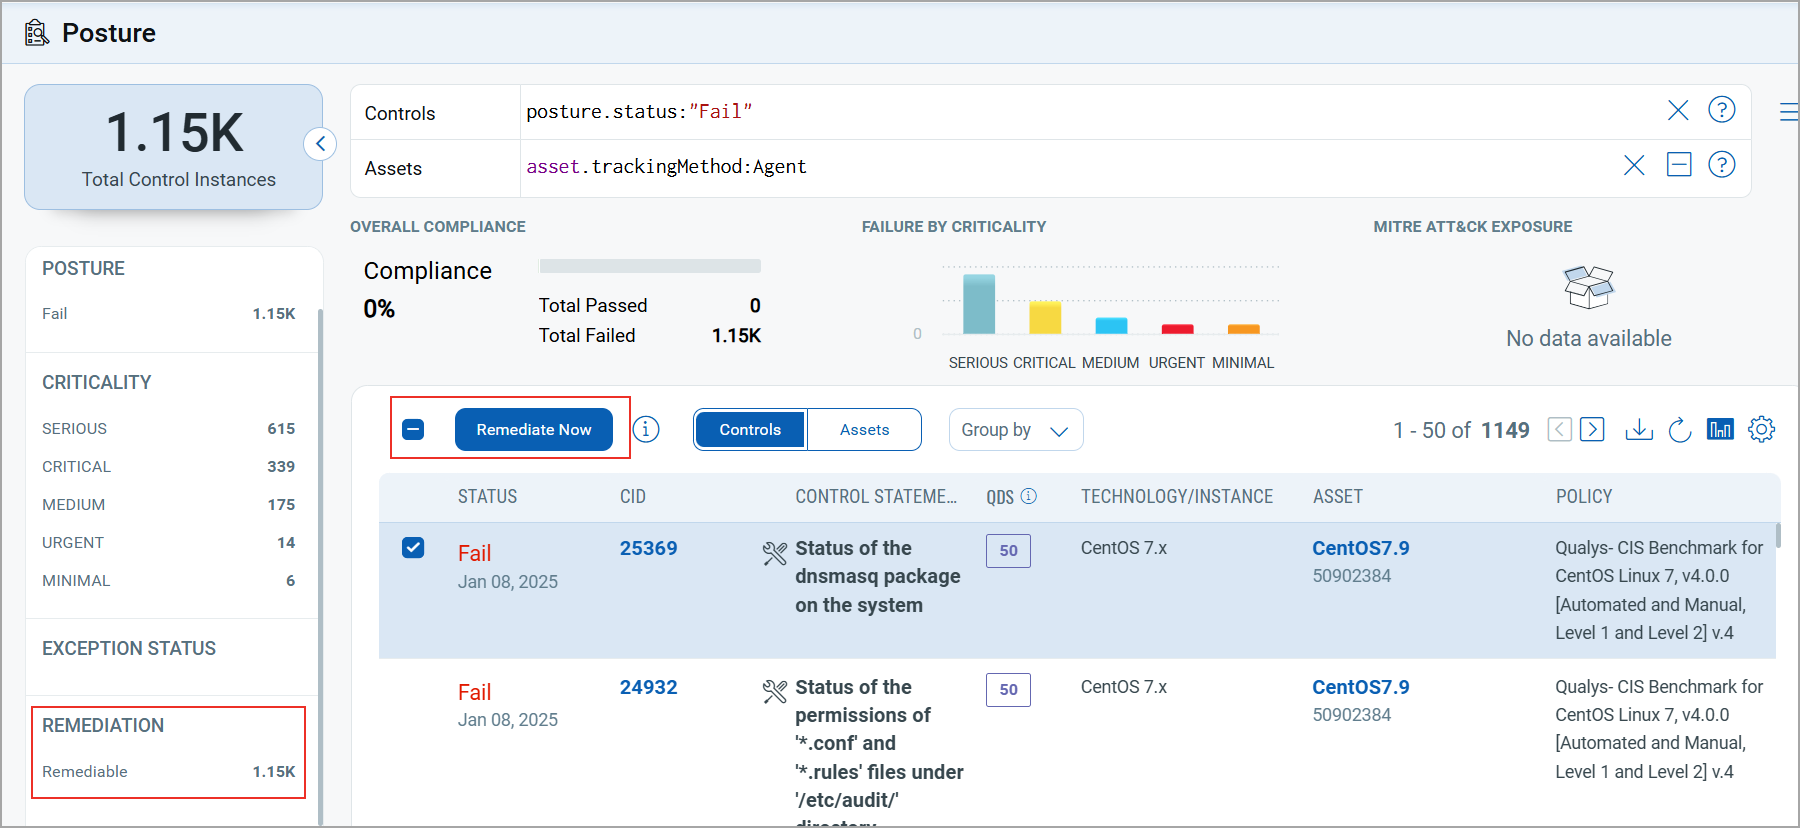
Key Highlights
- Identify quickly all the failed controls on the Posture tab using the quick option, Remediable.
- Create a remediation job to fix the failed controls by leveraging the out-of-the-box/custom scripts to fix the failed controls.
- Remediate failed controls on bulk assets using asset tags.
- Import OOTB (Out-of-the-box) scripts from the CAR library.
- Schedule the remediation jobs either on demand or at a future date and time.
- View the remediation job, job status, and script details once the job is created.
Benefits
- Enables you to fix misconfigurations on your assets at scale.
- Reduces cyber security risks that misconfigured assets expose you to.
- Lets you leverage Qualys CAR (Custom Assessment and Remediation) scripts to set control values based on security guidelines for passing controls in subsequent scans.
Things to considerThings to consider
Things to Consider
- Out-of-the-box (OOTB) scripts are available only for OS-based technologies.
- Custom scripts are executed on all assets selected through control selection as well as on the assets in the included asset tags.
Show me auto-remediation workflowShow me auto-remediation workflow
Auto-Remediation workflow
At a high level, the Auto Remediation workflow includes these steps:
- Identify the controls that failed in your compliance assessment that can be remediated.
- Use scripts in Qualys CAR or define custom scripts. To learn how to define scripts in Qualys CAR, refer to the Qualys Custom Assessment and Remediation (CAR) Getting Started Guide.
- Create a remediation job in the PC UI with the following:
- The failed controls that you want to remediate
- The scripts you want to execute
- The assets you want to protect.
- Specify when you want the remediation job to run – immediately, recurrent, or scheduled for later.
Click here for more information on auto-remediation.
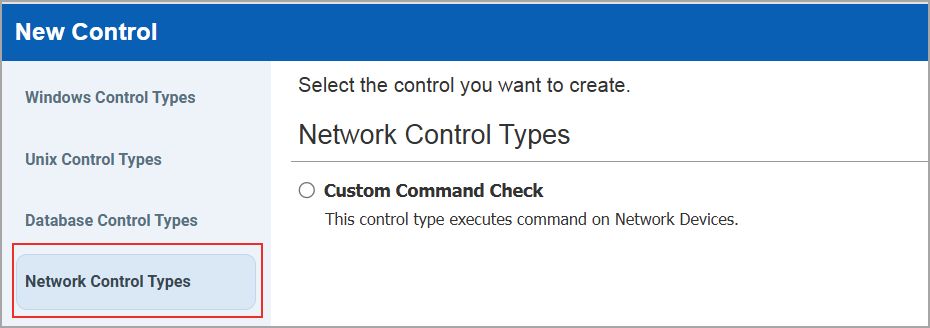
New UDC (User Defined Control) Type- Network UDC
Introducing Network UDC (user defined control) to create custom command check controls (non-agent) for network devices. This control is useful to do compliance assessments of network devices. Most network devices support Command Line Interface (CLI) to configure and manage the device. By using Network UDCs, you can create custom checks by executing commands on the network devices. You can then use the command output data for policy evaluation.
For more information on configuring network user-defined controls, refer to the help topic Configuring a Custom Command Check.
- This feature requires PCUI 1.5.2.
- Import and export of this UDC is not supported.
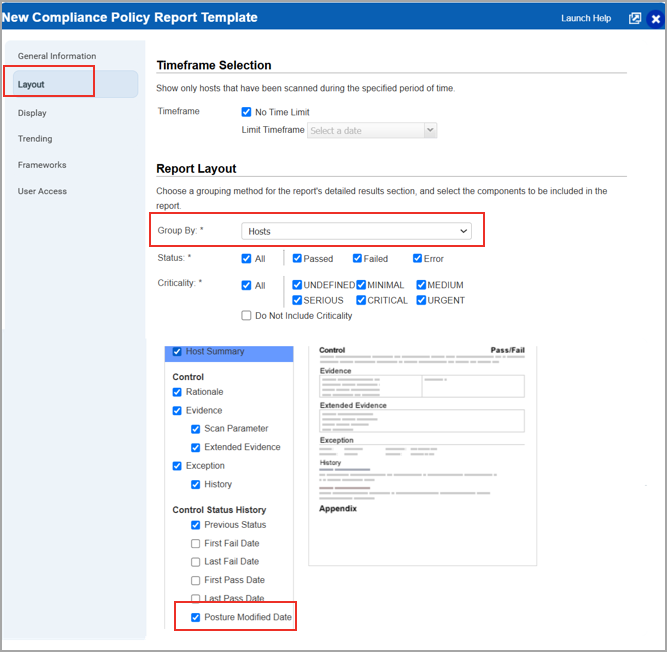
Enhancement in the Policy Compliance Report Template
With this release, as a part of this enhancement, we have updated the Compliance Policy Report Template by adding a new check box Posture Modified Date to the Layout section under Control status History (Reports > Templates> New/Edit > Policy Template> Layout > Group By- Host/Control > Posture Modified Date). When you select the checkbox, you can view the posture modified date in all the report formats, such as PDF(Portable Document Format), HTML (Hypertext Markup Language), XML(Extensible markup language), MHT(Web Archive), and CSV (Comma-Separated Value) under Detailed Control Section.
You can now retrieve the posture modification date in the report when each control posture status changes from Pass to Fail. Retrieving the posture modification date in the compliance policy report helps you monitor the 90-day SLA to remediate failed controls.
Qualys API Support
For this enhancement, we have updated the API /api/2.0/fo/report. For more information, refer to Enterprise TruRisk™ platform 10.32 API Release Notes.
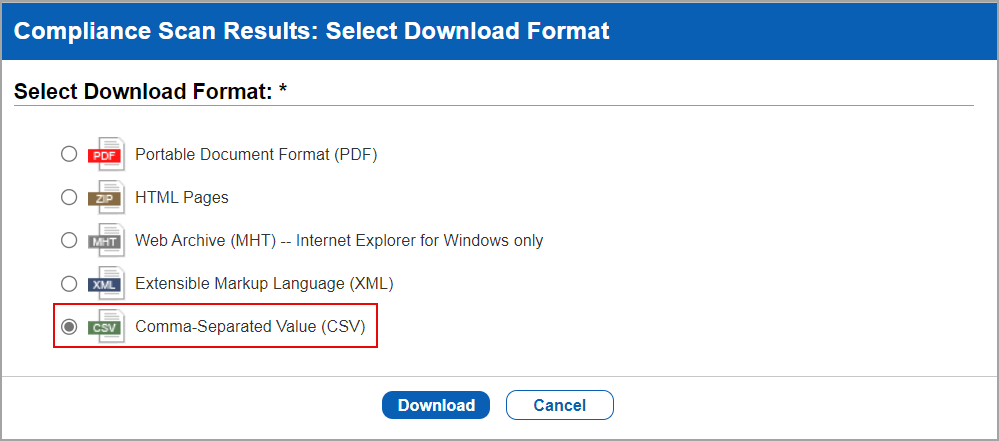
Support Added for CSV Formats for Scan Report Download
Previously, scan results could be downloaded in PDF, HTML, MHT, and XML formats only. With this release, we have added support for downloading the scan reports in CSV format.
Issues Addressed
The following reported and notable customer issues have been fixed in this release:
| Component/Category | Application |
Description |
| VM - Feature Request | Vulnerability Management | When the users launched the VM Scan Summary API (/api/2.0/fo/scan/vm/summary/?action=list), a scan was performed for the specified IP and IP ranges. Based on the inputs the scan results were displayed. However, if the total character count for the IPs exceeded 4000, the results included only a subset of the IPs (up to the 4000-character limit) instead of the complete list. Relevant code changes have been made to fix this issue. The scan results now display all the IPs and IP ranges as specified in the API. |
| VM - UI General | Vulnerability Management | When the user tried to launch an agent deployment job, with the user setting Allow connections from the following IPs only enabled, the Activation Key field displayed No Activation Key Available. Relevant code changes have been made to resolve this issue. Now, even with the user setting Allow connections from the following IPs only enabled, the activation key is displayed when launching an agent deployment job. |
| VM - Remediation | Vulnerability Management | When the users change the state of open tickets to closed or ignored, the due date is not consistently visible. While some tickets in the same state display the due date, others do not. Relevant code changes have been implemented to resolve this issue. |
| VM - Remediation | Vulnerability Management | When users manually edited an open Remediation ticket to change its status to closed or ignored, the ticket was updated correctly. However, when the Ticket History tab was checked, multiple log entries were displayed without a due date. Relevant code changes have been made to fix the issue. |
| VM - UILIB | Vulnerability Management | When the user tried changing the password, the captcha instruction was displayed as Type the letters you see in captcha. The user raised a change request to change this instruction because the captcha might consist of numerical. Relevant code changes have been made to incorporate this change request, and now, you can see the captcha instruction as follows: Enter the characters you see in the CAPTCHA image. |
| VM - Activity logs | Vulnerability Management | When the user referred to the Export User Activity Log API (/api/2.0/fo/activity_log/) in the API User Guide, they observed that the fields since_datetime={value} and until_datetime={value} did not mention that the inputs for the date and time must be in UTC/GMT. This information, specifying that these fields must be specified in UTC/GMT, has been added to the API User Guide (PDF and HTML). |
| Licensing - Addon Enable/Disable | Vulnerability Management | When the users re-activated their accounts with Software Composition Analysis (SwCA) subscriptions, they noticed that some active SwCA QIDs with older dates were still visible, even though these QIDs were remediated. Relevant code changes have been made to resolve this issue. The entries with older dates are now removed as these were remediated. |
| PC - Authentication Records | Policy Compliance | When users tried to fetch the status of authentication records, the status was not updated in the authentication record due to multiple hosts. Relevant code changes have been made to fix the issue. |