Creating a New Rule
Follow these steps to create a new rule:
1. First, navigate to the Rules sub-tab under the Rules tab.
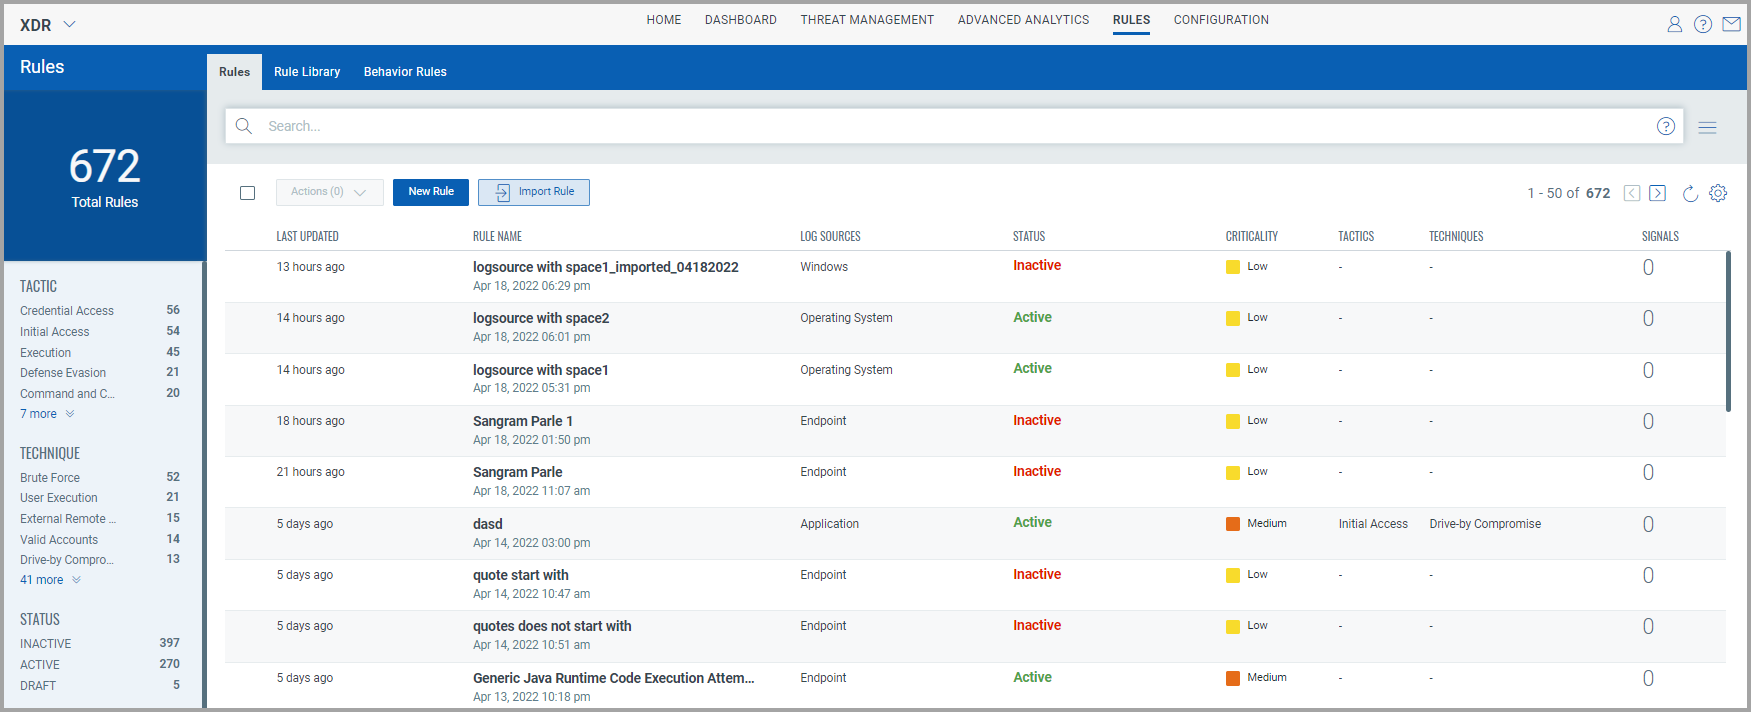
2. Next, click the New Rule button.
3. On the Create Rule page, enter a name and description for your rule.
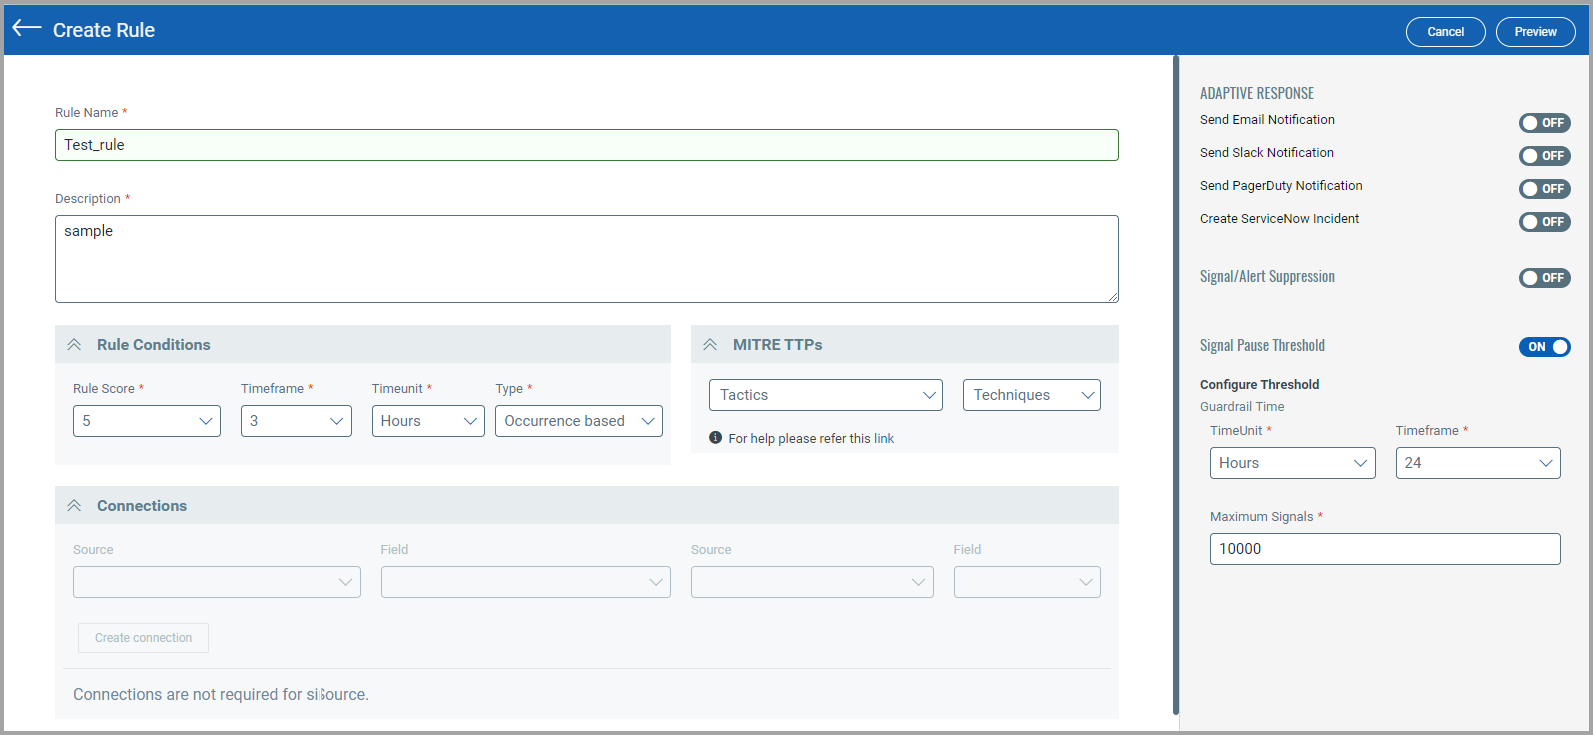
4. Next, define the condition for the rule:
a. Rule Score – Defines the criticality of a rule. The rule score is one of the factors in determining the criticality of the signal triggered.
b. Timeframe - Defines the time period for which the rule is checked. For example, if set to 2 and the Timeunit field is set to hours, the rule checks events that match the rule criteria during a period of 2 hours.
c. Timeunit - Defines the unit of time for which the rule applicable.
d. Type - Defines the type of the rule. A rule could be occurrence-based or aggregate-based. An occurrence-based rule keeps track of the number of times a particular event has occurred in the defined time frame and triggers accordingly. An aggregate-based rule is based on the total value of a certain field from the events that occurred during the defined time frame. For example, the total outgoing data in 2 hours.
5. If you prefer, you can also define the MITRE tactic and technique used to define this rule.
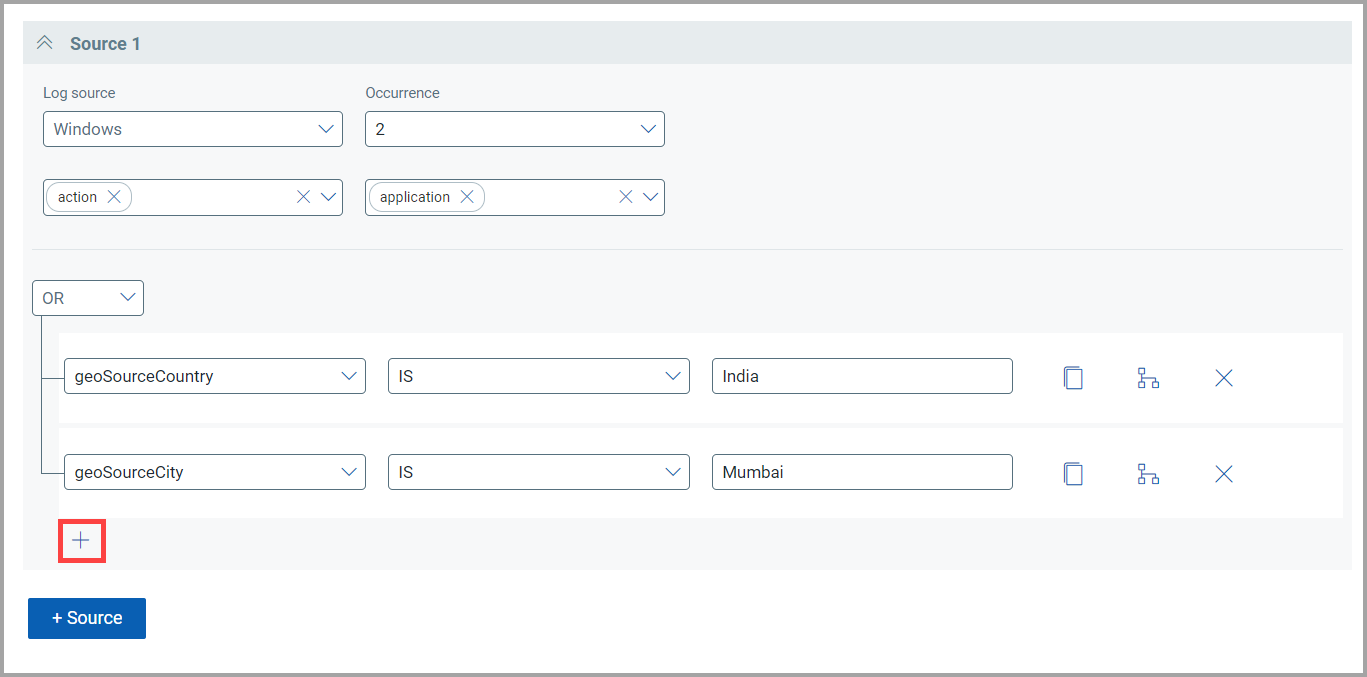
6. Next, define the event source that you want to track for this rule. You can define multiple sources for a rule. Click the +Source button to add multiple sources. When you add multiple sources, you will need to define the correlation between the sources as defined in step 7.
a. Log source - Defines the source type you want to track for this rule.
b. Occurrence - Defines the number of times you want a certain event to occur before triggering the rule.
c. Group By - Defines the field you want to group events by.
d. Differ By - Defines the field you want to track by.
Here's an example of how you could define a rule that checks the Firewall logs for events triggered by the same user, but from multiple source IPs. This rule will be triggered when Qualys Context XDR identifies 5 such occurrences in a span of 2 hours.
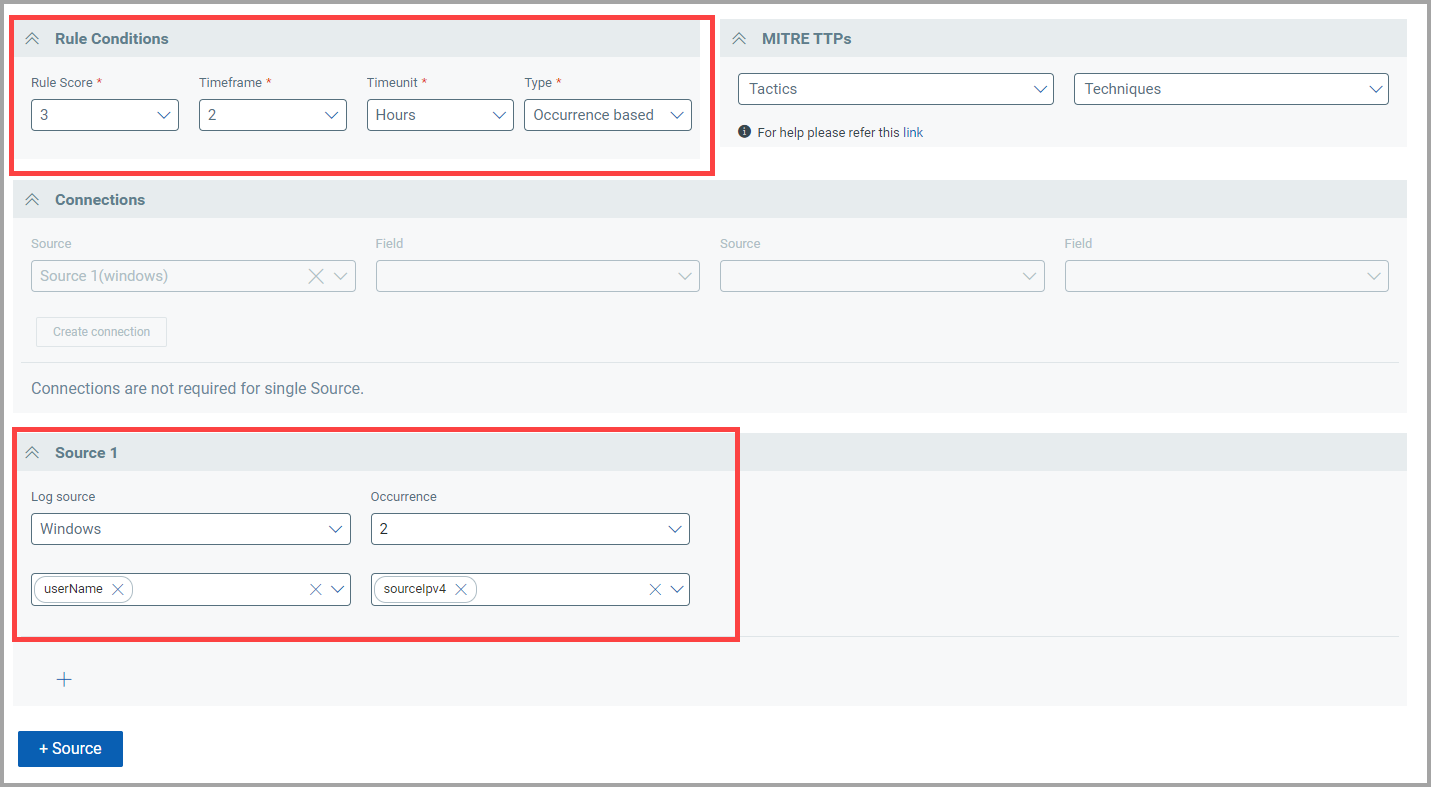
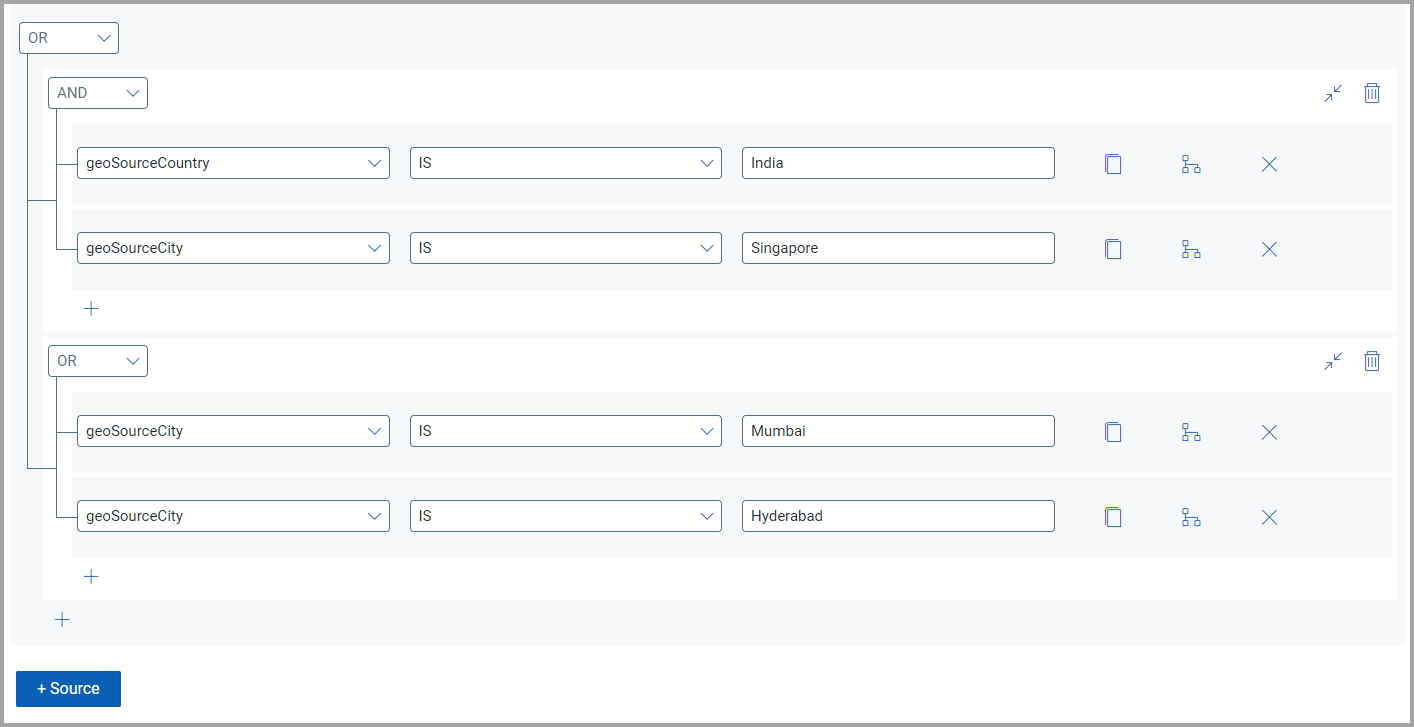
7. For each source, it is mandatory to define a filter condition to limit the number of events the rule tracks. Click the ![]() icon to define a group of such conditions for each source. You can add multiple such sources, with multiple conditions within each source with multiple nesting levels.
icon to define a group of such conditions for each source. You can add multiple such sources, with multiple conditions within each source with multiple nesting levels.
- Click this ![]() icon to duplicate the condition.
icon to duplicate the condition.
- Click this ![]() icon to convert the condition to nested group of conditions. See the following example as reference:
icon to convert the condition to nested group of conditions. See the following example as reference:
- Click this ![]() icon to remove the condition.
icon to remove the condition.
In this example, we are checking for events where users in Mumbai, India have different source IPs.
NOTE: To use the 'IN' or 'NOT IN' operator when defining a condition, you first need to define a lookup with a list of applicable values. See the Configuring Lookups topic for more information.
8. If you have multiple sources configured, define the correlation between the source events. The correlation basically helps XDR understand the commonality between the different sources. In the following example, the rule looks for events from Firewall and Proxy for the same user.

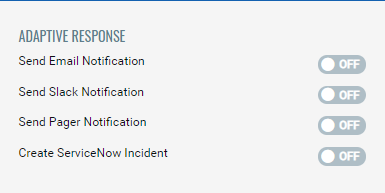
9. Next, from the right pane, configure responses to the rule. You can choose to:
a. Send an email notification. See the Configure email template section for information on configuring an email template.
b. Send a notification to Slack. See the Configure a Slack response template section for information on configuring a Slack response template.
c. Send a Pager notification. See the Configure a Pager notification template for information on creating a Pager notification.
d. Send a ServiceNow incident. See the Configure a ServiceNow Incident template for information on creating a ServiceNow Incident notification.
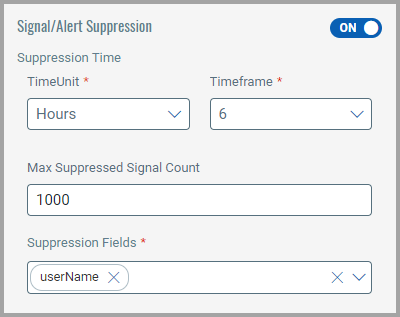
10. Next, you can enable the Signal/Alert Suppression for each rule to permit the signals suppression criteria to correlation rules. If you decide to enable, you need to provide the following details for configuration:
i. Select the TimeUnit and Timeframe for how long the signals should be suppressed.
ii. Then, enter a number for Max Suppressed Signals Count that are suppressed after that supression ends.
iii. Select the Suppression Fields from the drop-down list for the signals to be supressed. You can select the multiple fields if you want.
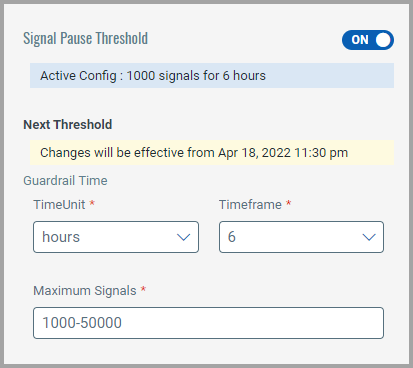
11. Next, you can enable to configure the Signal Pause Threshold for every rule. When a single rule generates the configured Maximum Signals in a defined time period (10k signals in 24 hours by default), that rule stops producing signals until the defined Timeframe expires.
An alert is generated to the administrator, when this condition is triggered to ensure the administrator is notified that the threshold is reached. Then, you able to edit/change the threshold values for continuing generating signals.
NOTE: kindly note that the updated settings changes will be activated from next schedule. You can view the tool tip for the changes to be effective from specific date and time.
NOTE: When the signals count reaches the maximum threshold you set. Then the rule status will be set to Threshold Paused and stops producing signals. You can able to override these settings with an Admin Activate option from the quick actions drop-down menu for each rule that are in Threshold Paused status to generate continuing signals.
12. When you have configured the rule, click Preview from the top-right corner to review the rule. The rule preview displays the rule in natural language for easy understanding.
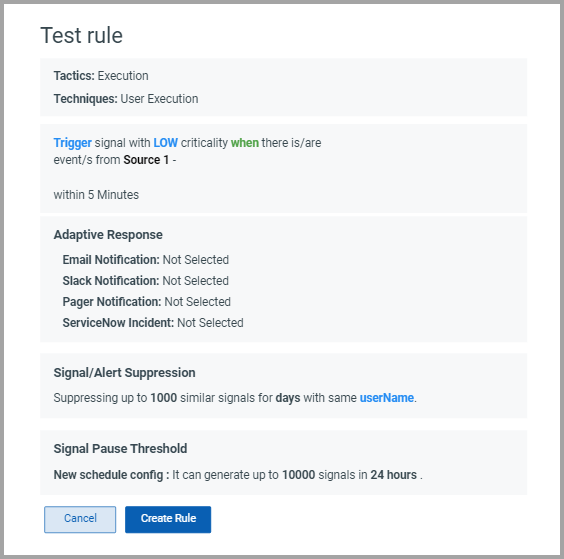
13. Click Create Rule to confirm the rule. The new rule is displayed under the Rules sub-tab.
Related Topics