Test Scripts

You can evaluate a script on a test asset before you execute it on production assets. This step is optional; however, it is recommended to test a script to avoid any failure in the production environment.

Testing can be done before or after a script is reviewed and approved.

To know more about reviewing a script, refer to Review.

To execute a selected script on test assets, follow these steps:

  1. Navigate to the Scripts tab. 
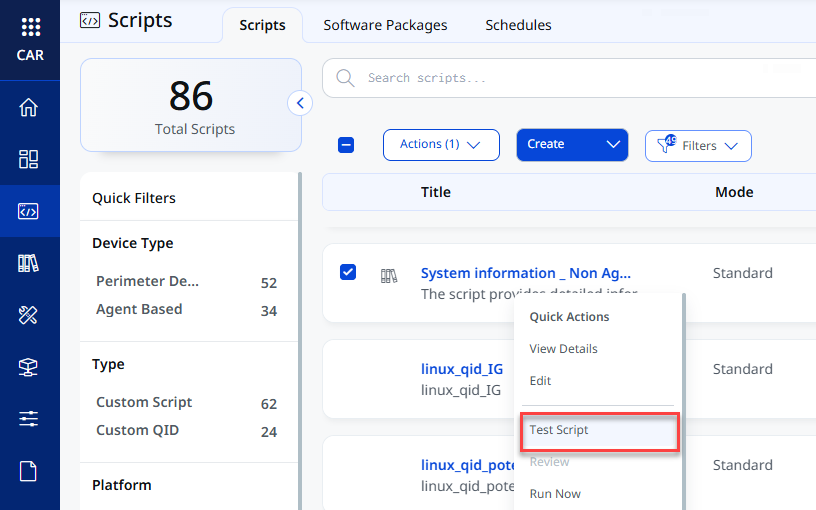
  2. Select a script and click Test Script from the Quick Actions menu.

    The Test Script option is disabled if the script is deprecated or rejected.
  3. In the Select Assets screen, define the scope of your script by selecting assets and/or by including asset tags. You can select any of the following options for asset selection while executing a script:
    1. Manual Asset Selection
    2. Import Assets
     a.  Manual Asset Selection:

    You can manually select the assets you want. 


    When executing a parameterized script, you can modify the Script Parameters value as required. 

     If you want to specify assets, follow these steps:

  • In the Add Assets section of the Select Assets page, click the + sign.
  • In the Select Assets page, select the assets that you want to include in the script run and then click Apply.

      If you want to include asset tags, follow these steps:

  • In the Add Asset Tag section of the Select Assets page, click the + sign.

  • In the Select Tags page, select the tags that you want to include in the script run and then click Apply.

You can add All or Any asset tags.

In the Exclude the Assets section, click the + sign. In the Select Assets page, select the assets that you want to exclude and then click Apply.  The Exclude host for the tags option is enabled only when you include asset tags. At times, you may want to exclude certain assets that are assigned to the tag that you have selected in the previous step. This option enables you to specify assets that you want to exclude in the script run.

b.  Import Assets: 
  • Upload a CSV file containing asset names and use those assets to execute a script and schedule it. It helps you quickly target multiple assets at a time. 
  • Click Browse to upload the CSV file from your destination. Before execution, all imported assets are automatically validated to identify any errors or inconsistencies.
    The feature supports both immediate execution and scheduled script execution workflows, providing flexibility in managing asset imports.
    • CSV file should be in the comma-delimited format. 
    • CSV files are allowed up to 2 MB in size and support up to 5,000 assets per import.
    • The CSV file must contain only unique asset names. Any duplicate asset names found in the CSV file are marked as invalid with the reason Duplicate assetEnsure each asset name appears only once in the file before uploading.

    The script runs on the assets listed in the uploaded CSV file. After uploading the CSV file, you can download a report that lists the assets that failed validation. Each entry includes the asset name and a validation message that explains why the asset was excluded.

  • The CSV file includes possible reasons for validation failures and their corresponding conditions:

    Validation Message Description
    Not found The asset name does not exist in your account.
    Lab asset The asset is a lab asset and is only available in test mode.
    Blocked asset The asset is in the global exclusion list and cannot be scheduled.
    Platform is invalid The asset's operating system does not match the script's platform.
    This is not lab asset In test mode, only lab assets are eligible for validation.
    Duplicate asset The same asset name appears more than once in the CSV file.
    Limitations 
    • Asset names must exist in the database to pass the validation.
    • Failed asset download information is available for a limited duration after validation.
  • Select the following toggle switch as required:
  • Bypass PowerShell Execution Policy: Use this toggle to specify if you want to override the PowerShell execution policy on Windows agents. When you switch this toggle to Yes, both signed and unsigned scripts are executed on the agent irrespective of the PowerShell execution policy set on the asset.

    This option is displayed only when you execute a Windows PowerShell script.

  • Reboot Host after Script Execution: If you turn this toggle to Yes and set a delay, the system waits for the selected duration after the script execution completes and then initiates the reboot process.
    The Delay before Reboot option enables you to specify a time period before the system is rebooted following the execution of a script.
    This ensures a smooth transition between the execution of the script and the reboot process, allowing you to manage system changes in a controlled and efficient manner.
  • Monitor this script’s output for any changes: Use this toggle to share the script output to monitor and detect any changes to the FIM assets and displays those changes as events in FIM.

  • Click Test Script.

Maximum of 10 assets can be tested at a time. Select tags option is not provided, since one tag may have more than 10 assets linked to it.

A new job is created and listed under the Jobs tab. For the test scripts, a job is created as: Test-ScriptName-TimestampEpoch (do not include milliseconds).

The manifest is executed every 15 minutes and the status is updated as 'Success' or 'Failure'.

In case of failure, you can edit the script and check for possible issues for failure. To edit a script, refer to Editing Scripts.

Related Topics

Testing Scripts

Reviewing and Approving Scripts

Executing Scripts

Exporting and Importing Scripts