Create a Connector to Onboard your AWS Account
Learn how to create an AWS Connector to onboard your AWS account with Qualys.
- Basic Details - Name and describe your connector.
- Authentication Details - Setup AWS Roles in the member accounts.
- Region Selection - Select the regions required for the connector to fetch resources from.
- Tags and Activation - Select tags to apply to the connector and its resource. Select the required services to activate after the connector is completed.
- Scan Settings - Configure the settings of your Cloud Perimeter Scan. This is an optional step that is active only when the CPS scan is selected.
- Assign Tags - Tag the connector and resources discovered by it for classification and identification.
You can create up to 10,000 connectors. Need more? Contact Qualys Support for help.
Steps to Create a Connector
Navigate to the Connectors tab, click Amazon Web Services Connectors, and then click Create Connector, and our wizard can walk you through the steps.
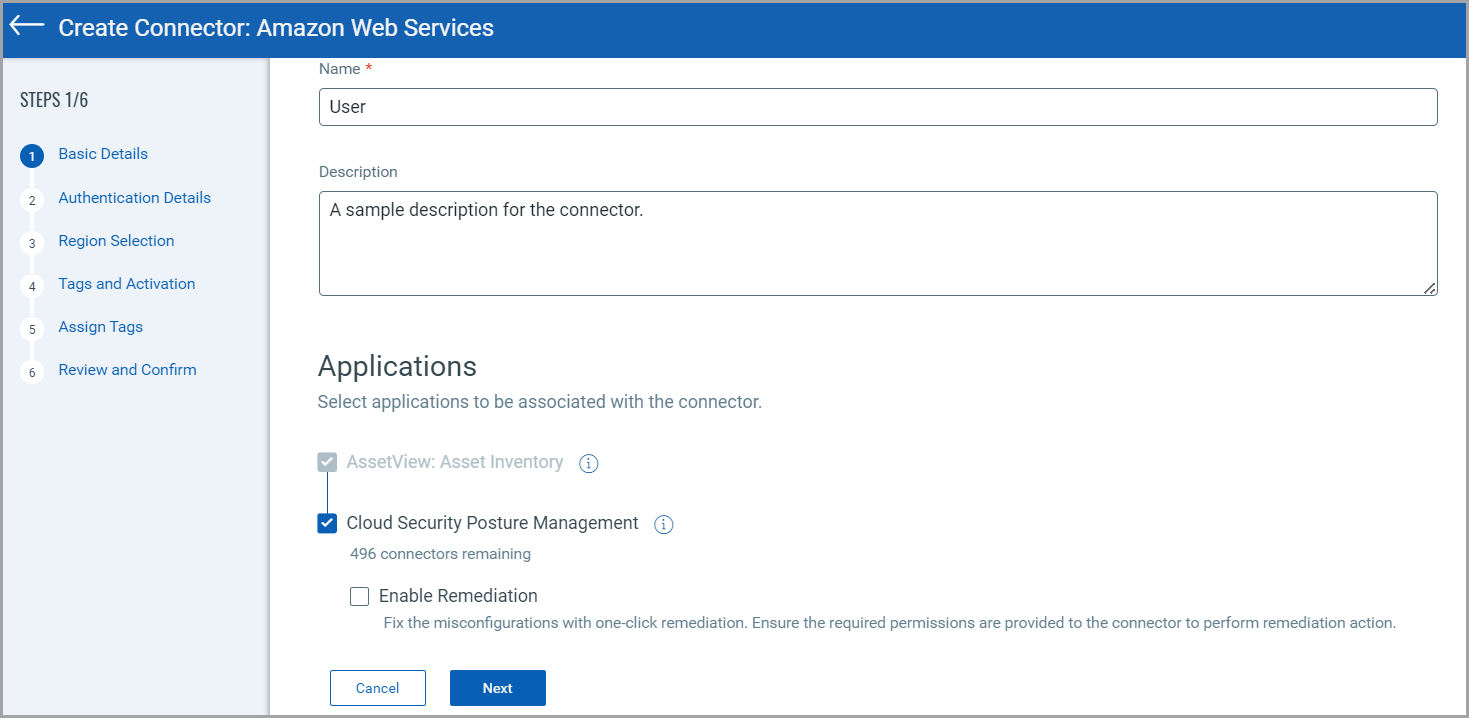
Basic Details
Provide a name and description for the connector. We recommend you provide a unique name for the connector.
Under applications, you can find two checkboxes.
- AssetView: Asset Inventory - The connector fetches cloud resource data and populates your Asset Inventory on CSAM. This is active by default for all connectors. This cannot be disabled.
- CSPM - The connector fetches cloud resource data and populates your Cloud Inventory on TotalCloud.
Select Enable Remediation to enable one-click remediation on the connector. One-click remediation is a TotalCloud feature that patches misconfigurations in your account with a single click. However, you need to configure additional permissions before you enable remediation for AWS connectors.
Ensure the connector has write access to the AWS account for which you enable remediation. Refer to Configuring Remediation for AWS.
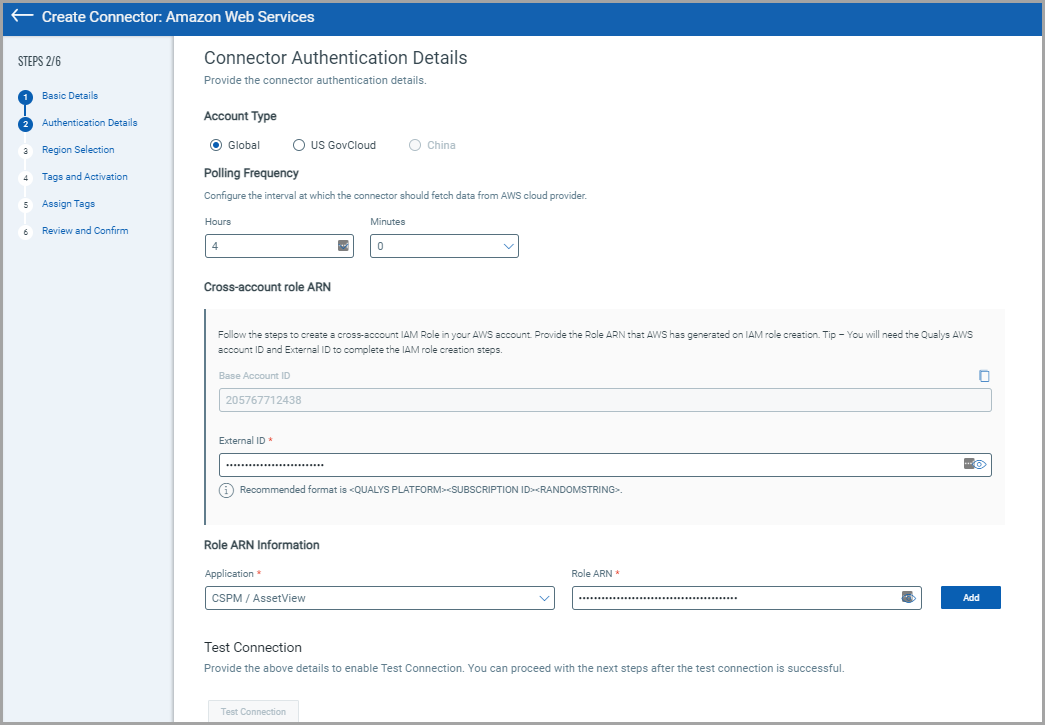
Authentication Details
Authenticate your cloud account with Qualys.
Account TypeAccount Type
Select an account type for your connector: Global, US GovCloud, or China. You can choose only one account type per connector.
Polling FrequencyPolling Frequency
Select a frequency at which the connector should poll the cloud provider and fetch data.
By default, the connector polling frequency is configured to be every 24 hours. As a result, the connector connects with the cloud provider every 24 hours to fetch the data.
You can configure the frequency from one hour to a maximum of 24 hours. We recommend configuring a frequency of 24 hours or more for optimal use of your connector. Configuring a low polling frequency (less than 24 hours) can affect the connector's performance and may result in an AWS API throttling error.
Cross-account ARNCross-account ARN
This lets you grant Qualys access to your AWS resources without sharing your AWS security credentials. Qualys accesses your AWS resources by assuming the IAM role you create in your AWS account. Learn more.
AWS requires that vendors provide a unique external ID value amongst all their customers when providing a vendor account for a trust relationship. However, we no longer require customers to adhere to any fixed format for external IDs. Learn more.
You must provide an external ID to download a valid template while creating a role using CloudFormation.
In the Application list, select TotalCloud/AssetView, paste Role ARN, and click Add.
Test ConnectionTest Connection
Click Test Connection to verify if the connector can successfully authenticate using the provided role ARN information. If the test connection is successful, proceed with the connector creation process. If the test connection fails, you may need to check and update the authentication details.
Region Selection
Select regions to discover the asset/resource, then fetch data from all selected regions.
Region selection is only applicable for AV connectors. CSPM connectors will continue to show resources for all the regions, even if a few regions are selected while creating connectors.
Tags and Activation
We can activate AWS assets for scanning automatically so you do not have to take this extra step. Select the required checkbox to enable activation for the app. We automatically activate the assets as they are discovered and even assign them tags if you want. Enable Vulnerability Management (VM) Scanning to scan discovered assets for vulnerabilities.
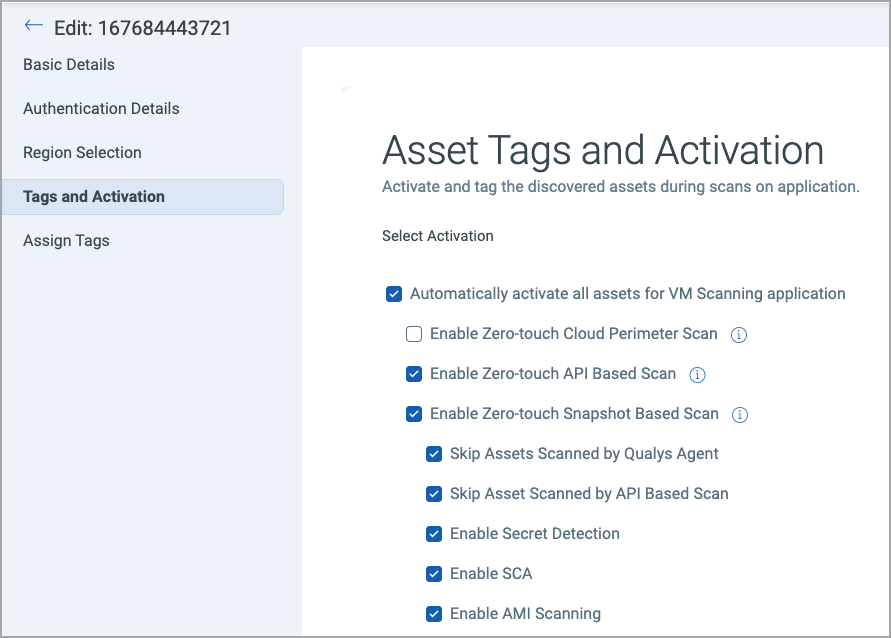
You can choose from different zero-touch VM scanning techniques called FlexScan techniques.
Enable Cloud Perimeter ScanEnable Cloud Perimeter Scan
When you select the Automatically activate all assets for VM Scanning application check box, you can see a check box to enable cloud perimeter scan.
Select the Enable Cloud Perimeter Scan if you want to enable launching perimeter scans on your EC2 assets.
Perimeter scan jobs are run automatically based on the settings defined in the Scan Settings step or the Cloud Perimeter Scan - Global Scan Configuration.
Enable Zero-touch API Based ScanEnable Zero-touch API Based Scan
When you select the Automatically activate all assets for VM Scanning application checkbox, a checkbox to enable zero-touch API-based scan becomes visible.
Select the Enable Zero-touch API Based Scan to utilize the cloud-native API to perform real-time vulnerability assessments on new EC2 instances.
The API scan captures events from your AWS environment in real time to identify new instances in the cloud inventory. To allow Qualys to listen to events in your AWS account for API scanning, refer to Configure Zero-touch API Based Scan.
Enable Zero-touch Snapshot-Based ScanEnable Zero-touch Snapshot-Based Scan
When you select the Automatically activate all assets for VM Scanning application checkbox, a checkbox to enable zero-touch Snapshot-based scan becomes visible.
Select the Enable Zero-touch Snapshot-Based Scan to run scans on snapshot images of your workloads for high-volume vulnerability analysis.
This scanning technique helps customers detect risk, vulnerabilities, and compliance posture for virtual machine/compute instances without affecting their current workload. Refer to Configure Zero-touch Snapshot-based Assessment.
The Skip Assets Scanned by Cloud Agent/API-Based Scan checkbox helps reduce redundant assessments when recent scan data is available. When selected, the Snapshot-based scans are deprioritized when Cloud Agent or API-based assessments have already scanned the asset within a defined time window.
The Skip functionality requires the following application versions in your subscription - TotalCloud 2.18, CSAM 3.16.1.0 and AWS CFT-S updated to version 10.
Additionally, we support 3 extended scan functionalities as well.
- Amazon Machine Images Scans - Scan your AMIs for vulnerabilities. Learn More.
- Secret Detections - Identify the exposed secrets in your workloads. Learn More.
- Software Composition Analysis - Scan the vulnerabilities of your deployed software assets. Learn More.
Enable AWS EventBridge Delta SyncEnable AWS EventBridge Delta Sync
The AWS EventBridge Delta Sync ingests real-time AWS resource change events into Qualys TotalCloud using Amazon EventBridge. Instead of waiting for the next connector run to scan your entire AWS environment for changes, the Delta Sync identifies resources that have changed since the last execution, leading to faster inventory updates and efficient evaluation cycles. Learn More.
You can enable scanning discovered assets on other Qualys applications for a thorough result. We offer activating scans from Policy Compliance/Policy Audit (PC/PA), Software Composition Analysis (SCA), and Certificate View (CertView).
Activating assets for PC/PA Scanning can only be accomplished after enabling PC/PA Agent and Compliance Manager. Contact support to enable them (Read More).
Select Asset Tags
We recommend you create at least one generic asset tag (for example, EC2) and have the connector automatically apply that tag to all imported assets. You can add more tags to your EC2 assets based on discovered AWS metadata.
Scan Settings
The step for defining scan settings is available only if you select the Enable Cloud Perimeter Scan check box in the Tags and Activation step.
In this step, you can define customized settings for cloud perimeter scans for the specific connector that you are creating.
If you do not define the custom scan configuration for the connector, the global scan configuration is used for launching the cloud perimeter scan. For details on global scan configuration, see Cloud Perimeter Scan - Global Scan Configuration.
Select the Enable custom scan configuration checkbox. You can define scan settings, such as prefixes, option profiles, recurrence, and timezone.
For details of the scan settings fields, see Cloud Perimeter Scan - Global Scan Configuration.
Assign Tags
Assign tags to the connector to categorize the discovered resources. Tagging can help with identification of your connectors and its findings. You can also create a new tag. For details on creating new tags, see Configure Tags.
Confirmation
Review the connector settings you configured and then click Create Connector.
That’s it! The connector connects with Amazon Web Services to discover resources from the configured region.
Once the connector is created, you can run the connector, disable or delete the connector, and view assets and resources information.
The Amazon Web Services page displays the list of AWS connectors. The Status column indicates the status of the connector created: Completed successfully, Completed with errors, Queued, Synchronizing, and Disabled.
Frequently Asked Questions
What if my EC2 instances have IP address changes?What if my EC2 instances have IP address changes?
Your EC2 instances may have IP address changes. We can continue to scan your EC2 instances because we scan by EC2 instance ID (not by IP address). If changes are found by an EC2 scan, you can see the new IP addresses in your scan results. Once these scan results are processed the new IP addresses are shown in your account and is included in your scan reports.
AWS Assets: Status and BehaviorAWS Assets: Status and Behavior
The AWS assets are detected by EC2 connector and/or Cloud Agent. The status in asset records from the EC2 connector is updated with every connector run. However, if an asset in terminated, only the asset records from EC2 connector reflects the terminated status after connector run.
The asset records from Cloud Agent running in AWS and instances from EC2 connector are automatically merged into a single asset record and it correctly reflects the status. The asset records from Cloud Agent, which are not merged with record fetched via connector does not reflect the terminated status.