Onboarding Guide: Agent Insta
This topic takes you through onboarding to InstaScan, from setting the detection scope to reviewing your first findings.
InstaScan finds newly disclosed vulnerabilities on your assets within minutes of a vendor advisory, without running a scan. It is delivered through Agent Insta, one of the Cyber Risk Agents in ETM. Agent Insta uses the software inventory that Qualys already holds for your assets and matches it against each new advisory as it is released. Matching findings go straight into TruRisk and your remediation workflows.
To learn what Agent Insta is and how it fits with your VMDR scanning, see Agent Insta.
Where to Find InstaScan in ETM
InstaScan appears in four places in ETM:
| Location | What You Find There |
|---|---|
| Cyber Risk Agents > My Agents | The Agent Insta card and its configuration summary |
| Configuration > InstaScan | The detection scope settings |
| Risk Management > Findings > InstaScan | New InstaScan findings from about the last 24 hours |
| Risk Management > Findings > Vulnerabilities | All vulnerability findings, including older InstaScan findings |
Step 1: Set the Detection Scope
The only setup you need is to tell InstaScan which assets to check. After the InstaScan feature is enabled for your subscription, open the Agent Insta card, click Edit Configuration, and set the following:
- Scope Type: Tags or Business Entities that cover your critical assets
- Last Seen: the time range in which an asset must have been seen to stay in scope
- Asset Criticality Score (optional): the lowest score an asset must have to be in scope
For the full steps, see Getting Started with Agent Insta. For advice on choosing a scope and a Last Seen value, see Best Practices for Using Agent Insta.
Step 2: Know What to Expect in the First Days
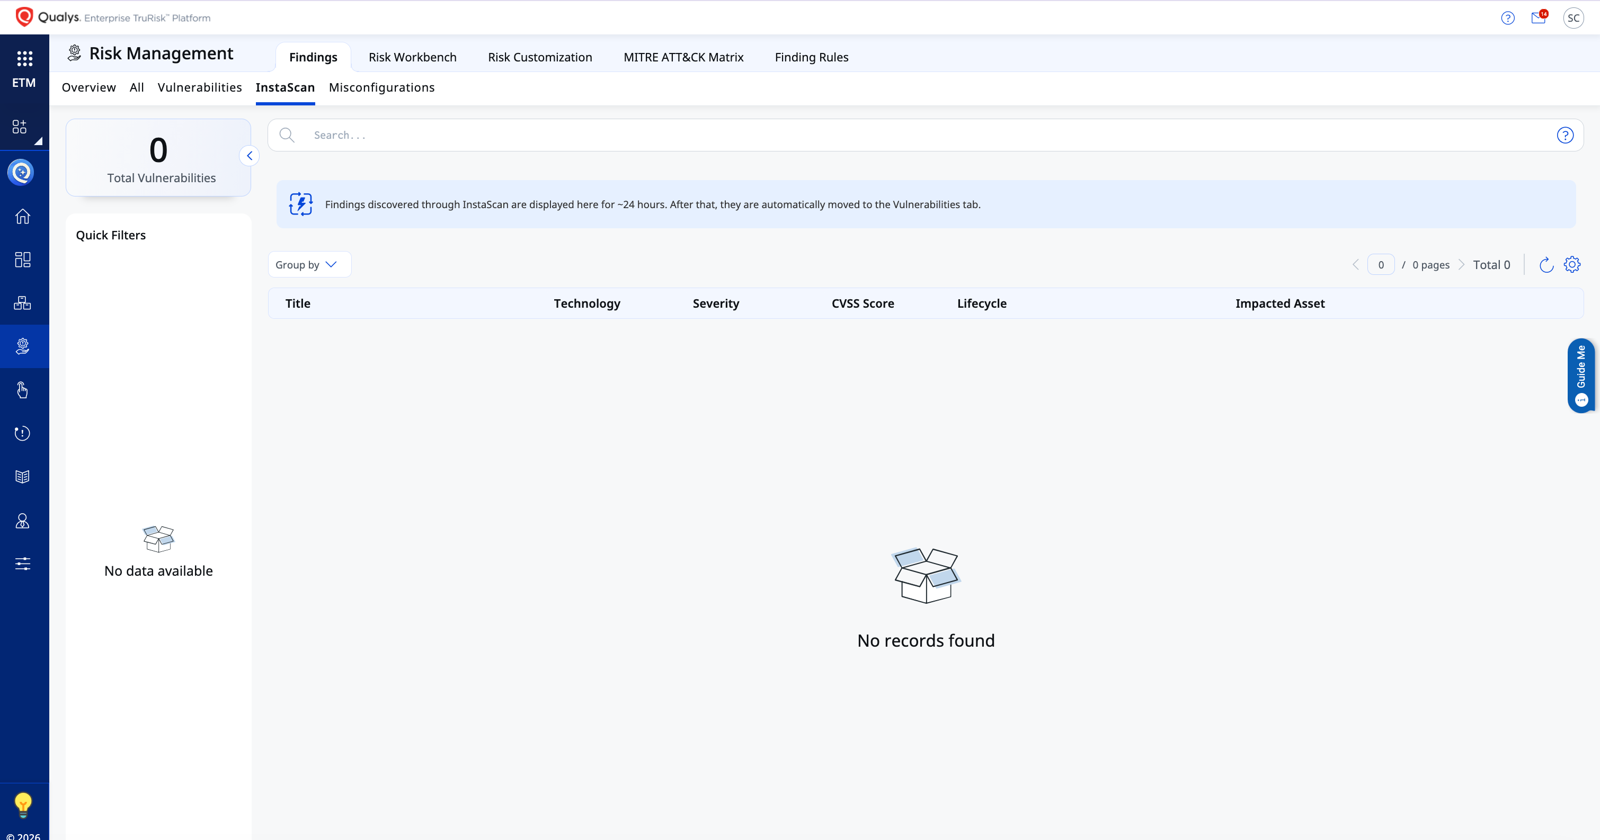
No findings at first is normal. InstaScan only reacts to advisories released after you enable it. The InstaScan tab stays empty until a new advisory is released that applies to an asset in your scope.
Come back after 24 to 72 hours to review your first results. Microsoft findings arrive mainly after Patch Tuesday, so the timing of your first findings depends on the vendor release schedule.
Step 3: Find Your InstaScan Findings
Agent Insta runs in the background and watches for new vendor advisories. When an advisory is released, Agent Insta checks every asset in your scope. If the advisory applies, it posts a finding to Risk Management > Findings > InstaScan. This usually happens within minutes of the advisory, and in almost all cases in under an hour.
Findings stay in the InstaScan tab for about 24 hours so that you can focus on what is new. After that, they move automatically to the Vulnerabilities tab with all your other findings.
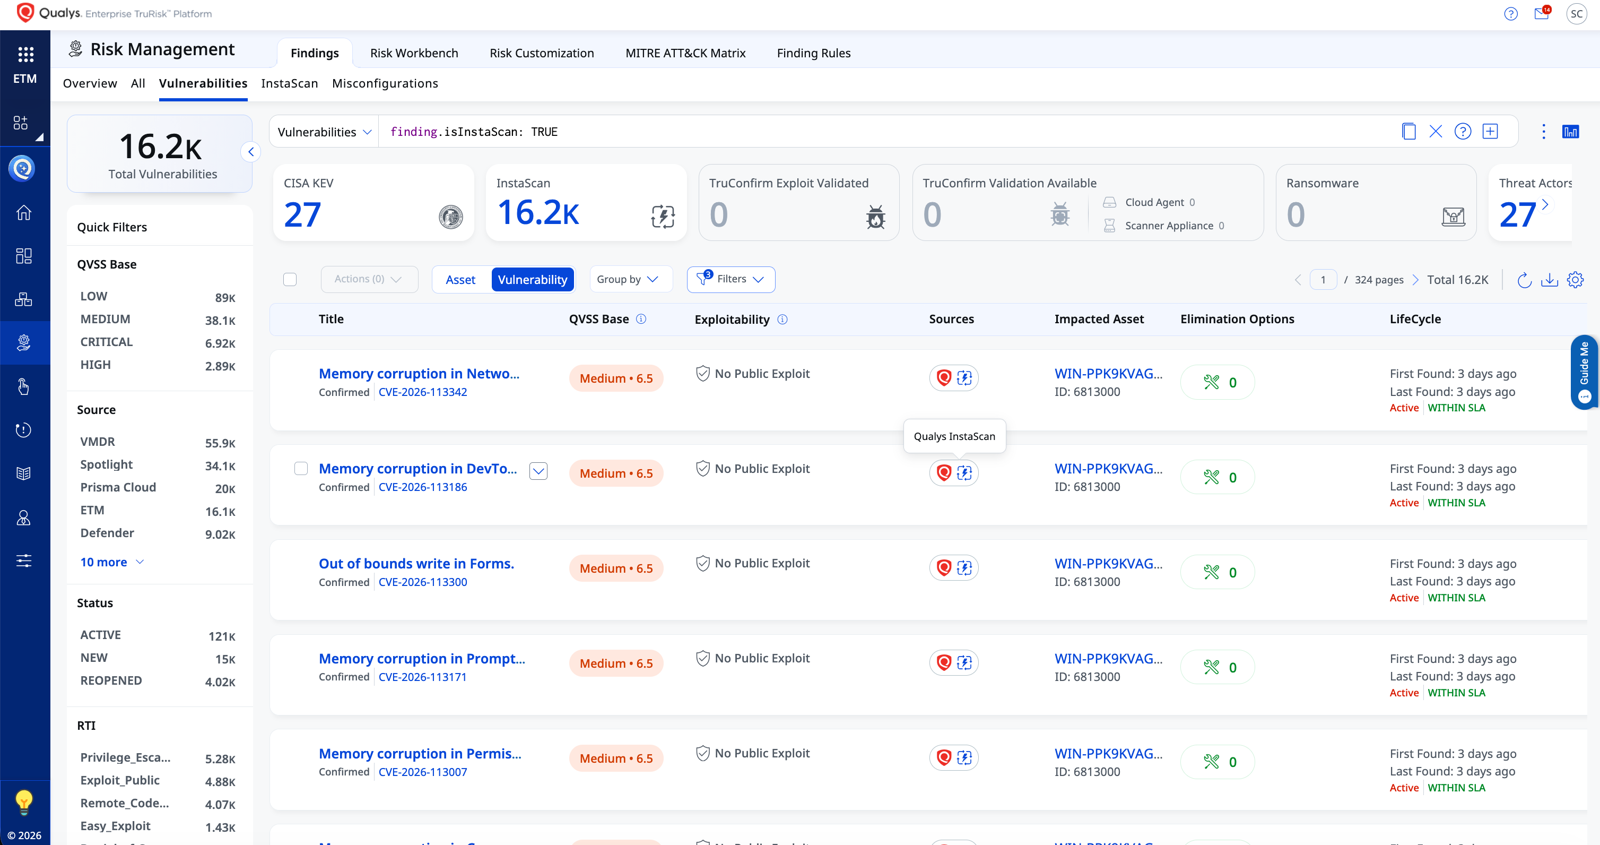
Use any of these ways to find InstaScan findings on the Vulnerabilities tab:
- The InstaScan icon
Every finding detected by Agent Insta shows the InstaScan icon in the Sources column. Hover over it to see Qualys InstaScan.
- The InstaScan card
Click the InstaScan summary card at the top of the page to show only these findings.
- A QQL query
In the search bar, enter finding.isInstaScan: TRUE.
Each finding shows the CVE, QVSS score, exploitability, impacted asset, and First Found and Last Found dates, the same as any other vulnerability in Risk Management.
InstaScan Detects from the Time You Enable It
InstaScan is event-driven. When a vendor releases a CVE in an advisory, Agent Insta matches it against the assets that are in scope at that moment. It does not look back at older advisories. This means:
- Advisories released before you enabled InstaScan do not appear as InstaScan findings. Your Cloud Agent and scanner continue to detect those vulnerabilities as usual.
- Assets you add to the scope later are checked only against future advisories. Older advisories that already applied to them are not detected by InstaScan. Your Cloud Agent and scanner cover those vulnerabilities.
InstaScan shortens the time between disclosure and detection for new advisories. It works alongside your Cloud Agent and scanner coverage.
When to Expect New Findings
The number and timing of InstaScan findings follow each vendor's release schedule. The InstaScan tab looks very different on the day after Patch Tuesday than on a quiet Friday. InstaScan covers advisories across supported technologies. The vendors in this table are common examples only.
| Vendor (Examples) | Typical Release Schedule | What to Expect |
|---|---|---|
| Microsoft | Monthly, on Patch Tuesday (the second Tuesday of the month) | A large batch of Windows findings in one day, then few findings until the next month |
| Google (Chrome) and Mozilla (Firefox) | Several times a week | Small, frequent batches on endpoints that have these browsers installed |
| Linux distributions (for example, Red Hat, Oracle Linux, and Ubuntu) | Daily | Frequent advisories. Each one creates a finding only if the affected package is installed on an asset in your scope. |
Matching is based on the actual software inventory of each asset. A Linux advisory for a package you do not run creates no finding, even if you have hundreds of servers on that Linux distribution in scope.
How InstaScan Findings Are Confirmed and Closed
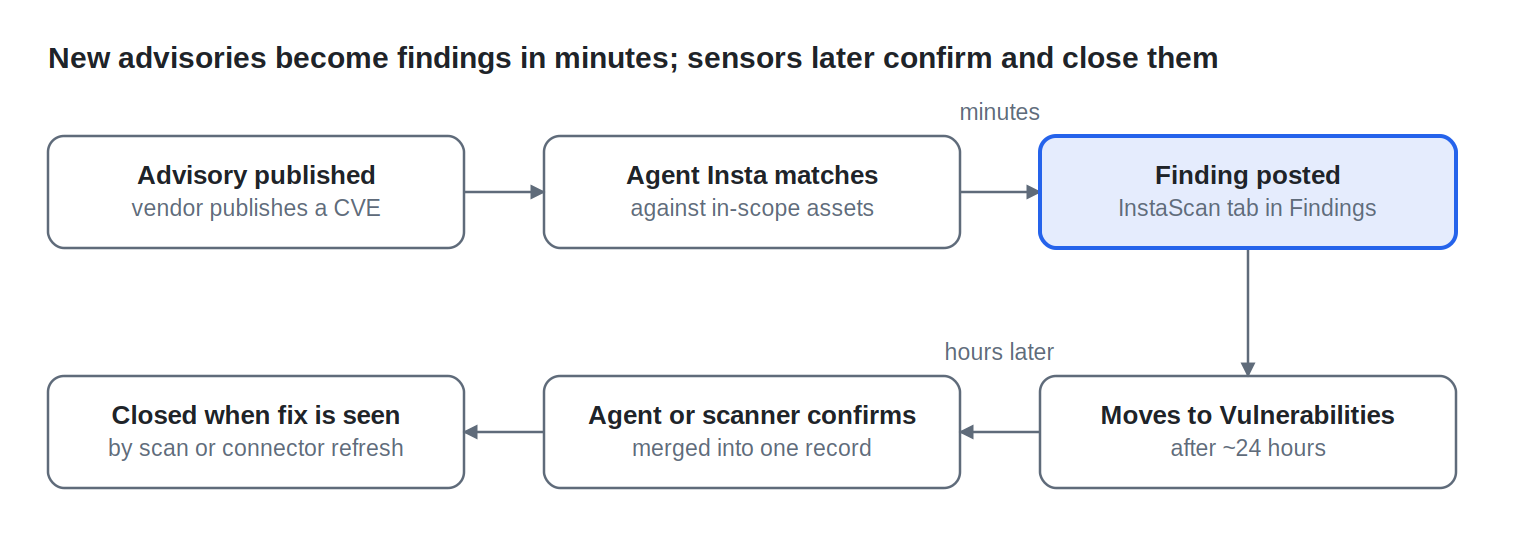
InstaScan is almost always the first to detect a new CVE. Your Cloud Agent or scanner usually detects the same vulnerability some hours later during its normal detection cycle. Both detections are merged into one finding, so you do not see duplicate records. For details, see Agent Insta.
InstaScan findings close the same way as any other vulnerability. You do not need a separate workflow:
- Cloud Agent or scanner
After the sensor has also detected the vulnerability and later sees that it is fixed, the merged finding is closed.
- Connector refresh
For assets that come from a third-party connector, a refresh that shows the affected software is patched or removed also closes the finding.
Until one of these confirms the fix, the finding stays active and is tracked against your SLA like any other finding.
Onboarding Checklist
Use this checklist to make sure your onboarding is complete:
- Confirm that InstaScan is enabled for your subscription and that the Agent Insta card appears under Cyber Risk Agents.
- Choose a scope type, Tags or Business Entities, and add the ones that cover your critical assets.
- Set Last Seen to a time range that leaves out old or retired assets.
- Optionally, set a minimum Asset Criticality Score.
- Review and save the configuration.
- After 24 to 72 hours, check Risk Management > Findings > InstaScan.
- On the Vulnerabilities tab, try the query finding.isInstaScan: TRUE.
- After the first week, review your results and widen the scope if needed.