Get Started with Network Passive Sensor
This section helps you get started with NPS, from completing sensor deployment to viewing results. You need to deploy the appliance on your network, generate a personalization code, and use the code to register the appliance with the Qualys Enterprise TruRisk™ Platform.
Mirror the traffic
Before you begin, you need to feed traffic to the sensor by mirroring it (using a physical tap or mirror port). Then, connect the mirrored port to the sensor's sniffing interface. This step is required to see discovered assets.
Network Passive Sensor supports mirror traffic of SPAN, RSPAN, and ERSPAN methods. For more information, refer to the Deploy Sensors.
1. Generate Personalization Code
A personalization code is required to enter in the sensor console to register the sensor with the Qualys Enterprise TruRisk™ Platform. You can generate this code while setting up the sensor via NPS UI.
Set up Physical Sensor | Set up Virtual Sensor
2. Deploy and Register Physical or Virtual Sensor via Console
Deploy the Physical or Virtual sensor in your network to capture your network traffic and register the sensors using the console interface.
Physical SensorPhysical Sensor
Depending on the appliance variant (with or without an LCD panel), you can configure the appliance either through the LCD interface or by using a remote console connected via a serial port.
Configuration using the LCD interface:
Connect the physical appliance to your network and use the LCD panel to set the required network configurations, such as static IP and proxy settings. You must also register the appliance by entering the personalization code (from Step 1) directly on the LCD panel. For detailed step-by-step instructions, refer to the Physical Sensor Help.
Configuration using the serial port:
Connect the physical appliance to your network and use a tool like PuTTY to establish a connection through the serial port. The remote console allows you to configure network settings, such as static IP and proxy. You can also register the appliance by entering the personalization code (from Step 1) in the remote console. For complete instructions, refer to the Physical Sensor Help.
Download the virtual appliance image from the New Sensor wizard or from Home > Deploy Network Sensor > Virtual Sensor in the Network Passive Sensor UI, and deploy it on either VMware ESXi or Microsoft Hyper-V.
When the virtual machine starts, a console window opens. Use this console to configure the network settings, such as static IP and proxy. You must also register the appliance by selecting the Personalize this scanner option in the console window.
For complete instructions, refer to the Virtual Sensor Help.
3. Register Sensor with the Qualys Enterprise TruRisk™ Platform.
After deployment, you need to register the sensor with the Qualys Enterprise TruRisk™ Platform via NPS UI.
Physical Sensor Registration via NPS | Virtual Sensor Registration via NPS
4. Configure Discovered Assets
Network Passive Sensor monitors traffic flows between two types of IP addresses: internal (within your network) and external (outside your network).
You can configure how discovered assets are categorized while monitoring traffic flow. The categorized assets are listed in the Assets tab of Global AssetView or CyberSecurity Asset Management.
Assets can be classified into the following types:
- Internal Assets: Assets that belong to your internal network.
- Excluded Assets: Assets that are discovered but intentionally excluded from monitoring or reporting.
- External Assets: Assets that reside outside your network.
5. Check Sensor Connectivity and Status
For asset discovery to begin, your sensor must successfully connect to the Qualys Enterprise TruRisk™ Platform. The connection and operational status of each sensor is displayed in the Sensors tab of the Network Passive Sensor UI.
Once a sensor is connected, it immediately starts reporting newly discovered assets. In the Sensors tab, you can view:
- The total number of assets discovered.
- The number of assets discovered in the last 24 hours.
6. View Discovered Asset Details
Network Passive Sensor reports all discoveries to Qualys Asset Inventory, where each discovery is validated against the existing list of managed assets.
Classification of Assets in a Network Passive Sensor
The Network Passive Sensor classifies IP addresses as internal or external for the purposes of asset inventory and traffic monitoring.
- The Internal range represents the IP ranges within an enterprise network that are valuable for asset inventory and monitoring.
- The External range represents all IP addresses outside the defined internal range. These are not inventoried individually. Instead, PS attributes all external IPs to a single logical asset named “External”.
From a traffic monitoring perspective, NPS tracks flows between inventoried IPs using a 4-tuple: Source IP, Destination IP, Destination Port, and TCP/UDP protocol. Individual external IPs are not tracked.
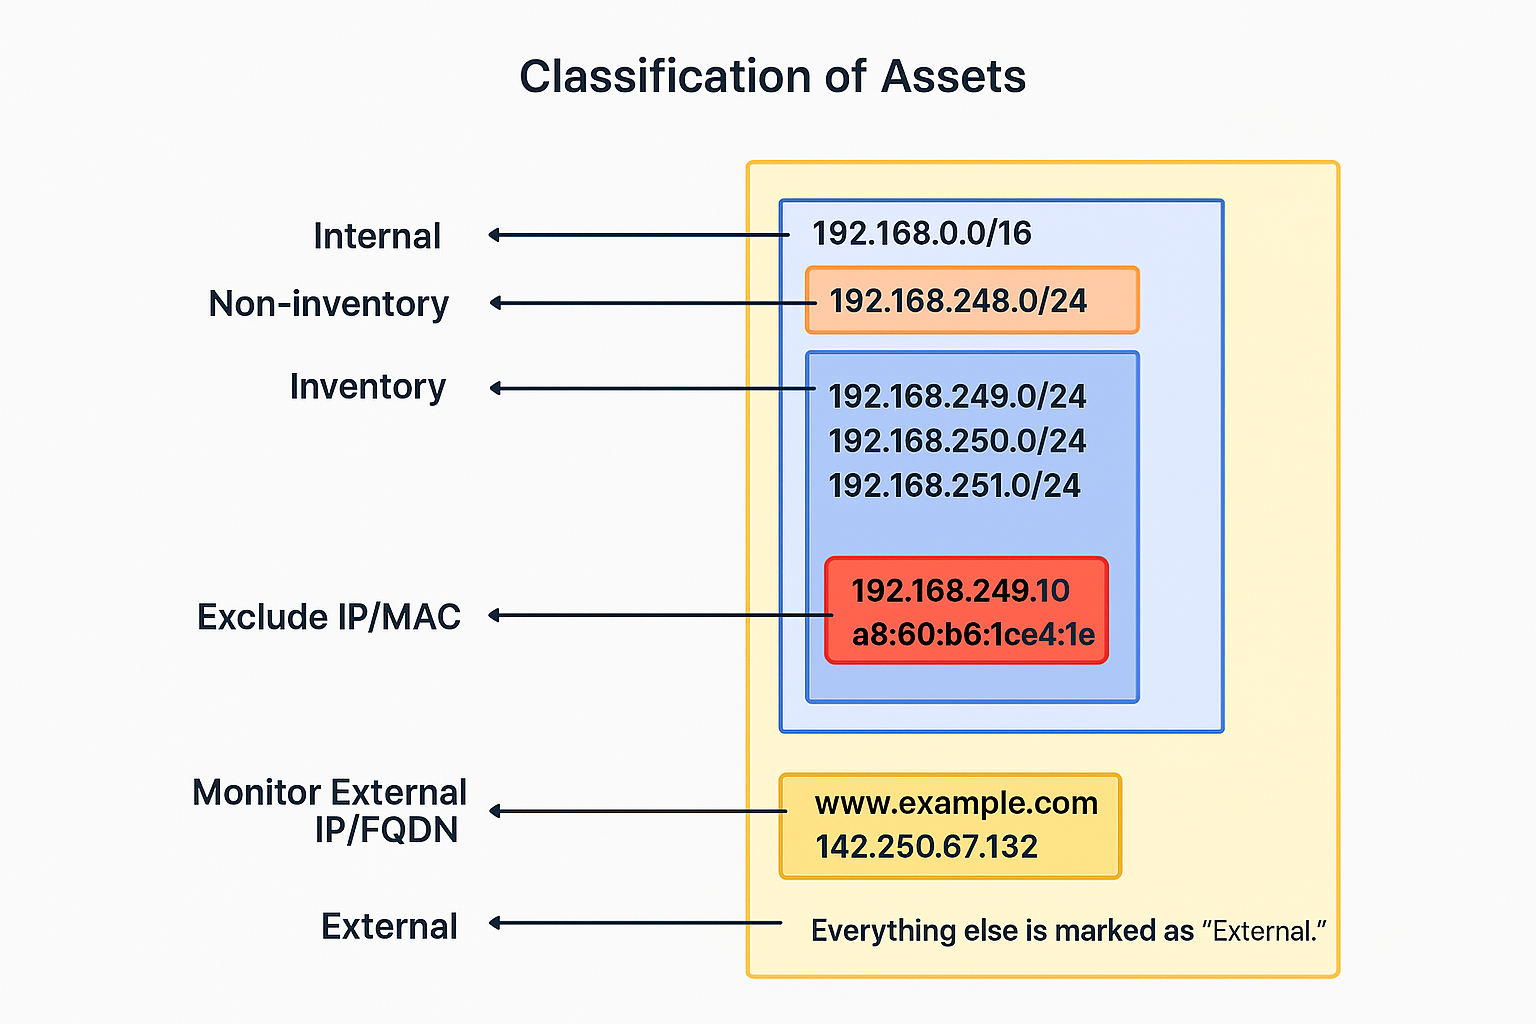
What is Inventory?
For IP addresses in the inventory range, PS performs the following:
- Creates assets and collects asset attributes such as hostname, MAC address, and protocol-specific attributes.
- Tracks traffic flows between internal IPs and between internal and external IPs.
Assets with IPs in this range appear in the CSAM inventory.
Traffic Flow Aggregation:
PS aggregates traffic flows between two internal IPs by 4-tuple. The appliance reports traffic flows at:
- 5-minute intervals for newly discovered assets.
- 30-minute intervals for asset updates.
Multiple flows with the same 4-tuple within the interval are aggregated into a single reported flow.
Example: If Asset A1 initiates multiple HTTP sessions with Webserver A2 within 30 minutes, PS aggregates these into a single HTTP flow from A1 to A2 at reporting time.
What is Non-Inventory?
For IP addresses in the non-inventory range, NPS only tracks traffic flows between these IPs and inventoried assets.
Assets in this range are not listed in the CSAM inventory. However, traffic flows involving these IPs appear in:
- The Network tab of CSAM.
- The Traffic tab of inventoried assets in CSAM.
What is Excluded?
Sensitive or confidential assets can be explicitly excluded from inventorying.
- You can configure specific IPs and/or MAC addresses in the Excluded range.
- PS does not collect any inventory data for excluded assets.
- These assets do not appear in the CSAM > Asset tab.
- In traffic flows, these assets appear simply as Excluded, without showing any IP address.
What is Monitored External?
By default, all external IPs are aggregated into the single logical asset External. However, you may want to monitor traffic flows to specific external IPs or domains (for example, to track traffic volume to social media sites such as Facebook or Twitter).
NPS provides a Monitored External configuration where you can define IP addresses or FQDNs to monitor. For monitored external endpoints, NPS tracks traffic flows and attributes them to a logical asset created per group.
These monitored external assets:
- Do not appear in CSAM.
- In traffic listings, appear as:
- External if an FQDN was specified.
- The actual IP address if an IP was specified.
Important to Know
Network Passive Sensor discovers assets in your network only when you have a valid Network Passive Sensor and Qualys Enterprise TruRisk™ Platform subscription.
If either subscription is inactive, the sensor behavior changes as described in the following table:
| Inactive Subscription | Sensor Status | Sensor Behavior |
|---|---|---|
| Qualys Enterprise TruRisk™ Platform | Deregistered | The sensor continues asset discovery for 30 days from the date the subscription becomes inactive. After this period, the sensor is automatically Deregistered.
After the subscription is reactivated, you must register the sensor again to resume asset discovery. |
| Network Passive Sensor | Paused | The sensor continues asset discovery for 30 days from the date the subscription becomes inactive. After this period, the sensor is automatically Paused.
After the subscription is reactivated, the sensor must be manually put back into the sensing state after reactivation. |