1. Log in to your Qualys Flow account. Navigate to the QFlow tab > Create QFlow > From scratch.
Add the basic details like the AWS Account's name and Description.
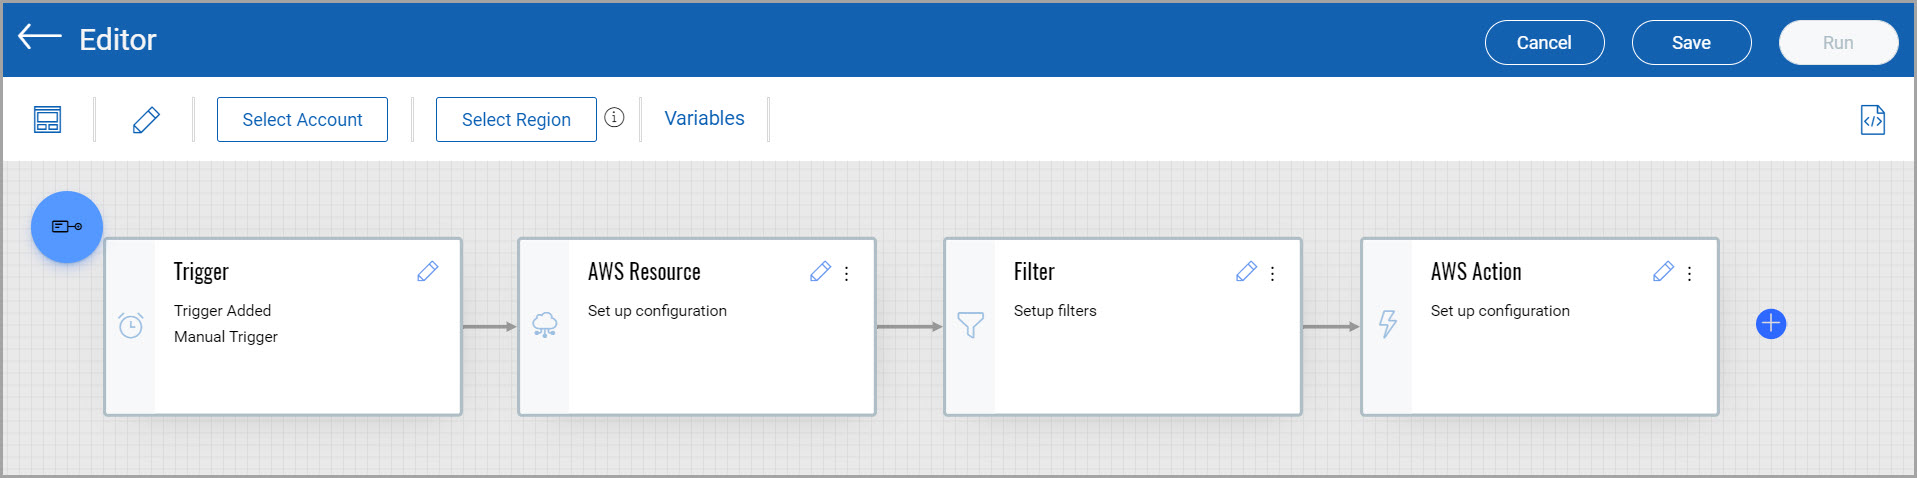
2. By default, the Trigger node is present as the first node in the QFlow. Configure the settings for the triggering.
3. Select the Resource node to get the resource from your cloud platform.
4. Select an AWS Account and a Region.
5. Use the Filter node to filter the resources to get specific output.
6. Use the Action node to remediate the filtered output if your QFlow executes the action.
For this QFlow, you need an AWS Resource node (accessing all RDS RB instances) and a Filter node (filtering out publicly accessible RDS DB instances).
Following are the steps to create the QFlow.
Step 1: Add basic detailsStep 1: Add basic details
1. Log in to your Qualys Flow account.
2. On the QFlow tab, go to Create QFlow and click From scratch.
3. From the Editor window, click the icon to enter the basic details of the QFlow.
4. Provide a QFlow Name and Description for your QFlow.
5. Select Security as Category from the list.
Note: You can select multiple categories from the list. These categories are filters you can apply while searching for specific QFlow among the multiple QFlow available on the QFlow tab.
Step 2: Add a Triggering methodStep 2: Add a Triggering method
The Trigger node is the first node in any QFlow and is set to manual trigger by default. The Trigger node defines the time of the execution of the QFlow. You need to set it to CloudView. For more details on nodes, refer to Knowing the Nodes.
Note: At a later time, if you do not want to link your QFlow with the CloudView connector, you can set it to manual trigger; in this way, you can execute the QFlow manually as per your requirement.
1. Click the icon to input the trigger method.
The Edit Trigger Node pop-up window is displayed.
2. Click CloudView trigger, toggle to Active and click Save.
Step 3. Add a Resource NodeStep 3. Add a Resource Node
Use this node to select the resources for finding all DB instances. Set the configuration. For more details on nodes, refer to Knowing the Nodes.
To find out all DB resources, follow these steps:
1. To add the Resource node, click the icon.
2. On the Explore Nodes pop-up window, go to AWS Nodes, select AWS Resource node.
AWS Resource node is added in the Editor.
3. Click the icon on the node to set up the configuration.
The Edit AWS Resource Node pop-up window is displayed.
4. Select RDS as Service and DB Instances as Method from the list.
5. Click Addons to select the additional resources that are linked with your resource.
Additional params are like filters that could be added to the cloud API calls that could narrow down the results returned. This is particularly useful if the data set is large (>100 objects).
Addons are additional API calls made to the cloud to fetch the details of resources that are related to the actualy API call configured in the resource node.
For example, in the case of DB instances, security groups are linked to these DB instances as Addons. These security groups may be allowing public IPs on the databases. You can also add those security groups to the resource node to get information about these resources. Based on your selected service, addons are auto-populated.
6. On the Select Addons window, select Security Groups from the list and click Apply.
Step 4: Select an AWS Account and a RegionStep 4: Select an AWS Account and a Region
Qualys recommends testing and verifying the QFlow with a single account and region before applying it to multiple accounts and regions. Once you are satisfied with the QFlow and outcome, you can deploy the QFlow on multiple accounts and regions. Load More option is provided to view all your accounts while selecting the account.
1. Click Select Account to choose the account from the list and then click Apply.
2. Click Select Region to choose the region from the list and then click Apply.
Step 5: Add the CloudView Control nodeStep 5: Add the CloudView Control node
Use CloudView Control node to take the output from the resource node and filter publicly available RDS DB instances. For more details on nodes, refer to Knowing the Nodes.
To find out all publicly available RDS DB resources, follow these steps:
1. Click the icon placed after the resource node.
2. On the Explore Nodes pop-up window, from General Nodes, select CloudView Control node.
3. Click the icon on the CloudView Control node to set up the configuration.
4. On Edit ControlView Control Node pop-up window, from the list for Data to evaluate field, select AWSResource.DBInstances.
To view all the publicly available instances, you need to apply two filter types:
- param filter with publicly accessible key
- security group filter that may have given access to public IP
5. From Evaluation Criteria, click Edit.
The Evaluation Criteria window is displayed to enter the details of both the filters.
6. Select Filter type as Param.
7. Select Key as PubliclyAccessible from the list, the Operator as == and write Value as true.
8. Click the Add Condition and select OR to apply the Security Group Filter Type.
9. To check for any publicly accessed IP which may be part of the security group, select Filter type as Security Group.
10. Select Type as Inbound, Port Range as All, Source as Public IPv4, IP/SG as 0.0.0.0/0, Protocol Type as Any, Protocol as ANY and click Save.
The Edit CloudView Control Node window is updated with the applied filters.
11. From Select Keys for evidence field, select ResourceID as DBInstanceIdentifier and DisplayName as DBName.
12. From Available Keys, select PubliclyAccessible and SecurityGroups.IpPermissions then click Save.
Now you have created QFlow. It is ready for testing and running.
Step 6: Run and check the functionality of nodesStep 6: Run and check the functionality of nodes
It is best practice to check the functionality of individual nodes before running the QFlow. It avoids data loss if any node is not working correctly because of some configuration error.
1. Click the three dots present at the top right corner of the specific node to get the Run till option for running the QFlow till that specific node.
The status of the running of the QFlow is displayed. The status of the input and output of the node is displayed in green.
You can view the execution history by clicking the icon to status for the details of the node’s output. For demonstration, we have shown the resource node’s execution history.
Once you verify the functioning of your QFlow, you can save the QFlow.
1. To save the QFlow, click Save.
2. Select the AWS Accounts, Regions from the list and click Save.
Your QFlow is ready. You can now create user-defined control in the CloudView application.