Configure Static IP Address
If DHCP is not on your network, you must enable the Scanner Appliance with a static IP address using the ENABLE STATIC IP ON LAN menu option. One of these configurations is required. Using IPv6-only mode? Refer to Network Settings in IPv6-only Mode for instructions.
Entry fields for IP addresses used in the static IP address configuration are pre-filled with three digits for all octets, and you must enter a value for each digit. For example, to specify the IP address '176.34.20.5', you input the IP address as '176.034.020.005'. Refer to IPv4 Addresses for details.
Steps to Configure Static IP Address
When enabling a static IP address on the LAN interface, you must enter network configuration settings for the Scanner Appliance so that the Appliance can communicate with the Qualys Enterprise TruRisk™ Platform. Also, you have the option to enter some network settings for informational purposes.
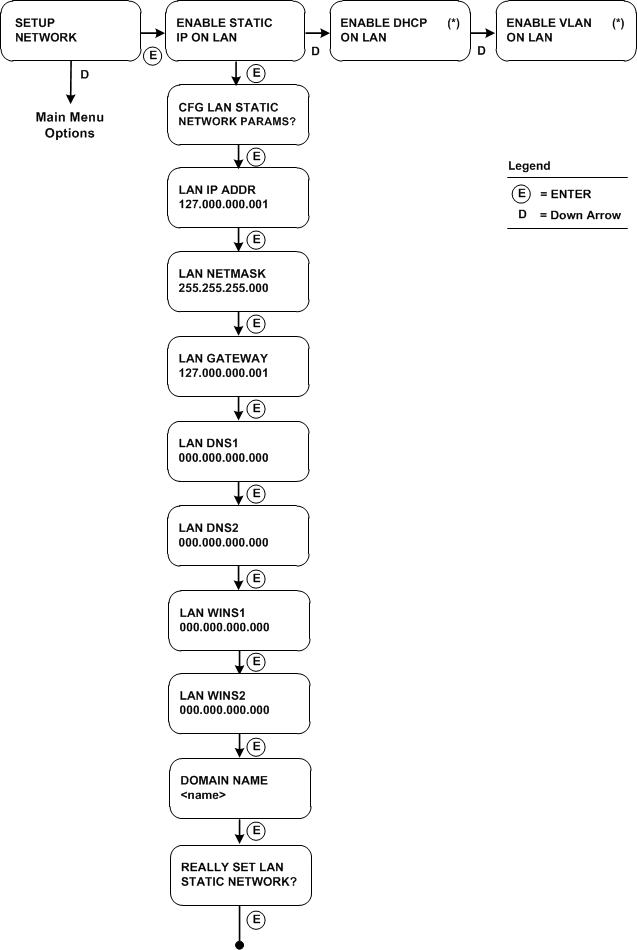
To enable a static IP address on the LAN interface for the Scanner Appliance, follow these steps:
- Go to SETUP NETWORK menu option and press ENTER to continue.
- Press the Down arrow until the ENABLE STATIC IP ON LAN menu displays. Then press ENTER to continue.
- When the CFG LAN STATIC NETWORK PARAMS? prompt displays, press ENTER to continue. Or press the Up arrow to quit this procedure and return to the SETUP NETWORK menu.
Enter Parameters
The Scanner Appliance user interface (LCD and Remote Console) allows users to enter information in the fields provided using the arrow keys. Use the Left and Right arrows to move the cursor to the left and right, and use the Up and Down arrows to scroll through characters. With the Remote Console interface, you have the option to enter characters using the VT100 terminal’s keyboard.
- When the LAN IP ADDR prompt displays, enter the static IP address, and then press ENTER to continue.
- When the LAN NETMASK prompt displays, use the Up and Down arrows to scroll to the desired netmask value. For information about netmask values, refer to Tell me about LAN Netmask. After selecting a netmask value, press ENTER to continue.
- When the LAN GATEWAY prompt displays, enter the gateway IP address, and then press ENTER to continue.
- When the LAN DNS1 prompt appears, enter the IP address for the primary DNS server, and then press ENTER to continue.
- When the LAN DNS2 prompt displays, enter the IP address for the secondary DNS server. This entry is optional. Press ENTER to continue.
- Next are three optional network settings, used for informational purposes only. These Appliance settings are not used to access the internal network for scanning or the Qualys Enterprise TruRisk™ Platform for software updates. To skip these settings, press ENTER three times.
- When the LAN WINS1 prompt displays, enter the IP address for the primary WINS server, if any. Press ENTER to continue.
- When the LAN WINS2 prompt displays, enter the IP address for the secondary WINS server, if any. Press ENTER to continue.
- When the DOMAIN NAME prompt displays, enter the domain name for the DNS server (for example, mydomain.com). Press ENTER to continue.
- When the REALLY SET LAN STATIC NETWORK? prompt displays, press ENTER to continue. Or press the Up arrow to quit this procedure and return to the SETUP NETWORK menu option.
- Review the confirmation messages. The Scanner Appliance attempts to make a connection to the Qualys Enterprise TruRisk™ Platform using the new configuration. Upon success the SCANNER APPLIANCE NAME–IP ADDRESS message displays and the static IP address is enabled.
Confirm the configuration
When you see SCANNER APPLIANCE NAME–IP ADDRESS this means you are ready to start scanning. This message displays if the Scanner Appliance made a successful connection to the Qualys Enterprise TruRisk™ Platform using the new configuration.
An appliance configuration error displays if the Scanner Appliance failed to make a connection to the Qualys Enterprise TruRisk™ Platform. An error may occur because the static IP parameters you entered are incorrect, or they do not match the static IP configuration on your network. Refer to Troubleshooting for help with resolving the issue.
Tell me about LAN Netmask
When entering static network parameters, you may notice that the cursor does not appear after the LAN NETMASK prompt and you cannot enter characters in the entry field. At first, the netmask '255.255.255.000' displays. Use the Up and Down arrows to scroll through valid netmasks. When the appropriate netmask value displays, press ENTER to confirm.
Possible netmask values are listed below. If you press the Down arrow, the values appear in this order: '255.255.255.000', '255.255.254.000', '255.255.252.000... If you press the Up arrow, the values appear in this order: '255.255.255.000', '255.255.255.128', '255.255.255.192'...
Scrolling netmask values in the Netmask Field
The following table includes scrolling prefixes and netmask values
|
Prefix |
Netmask value |
|---|---|
|
/24 |
255.255.255.000 |
|
/23 |
255.255.254.000 |
|
/22 |
255.255.252.000 |
|
/21 |
255.255.248.000 |
|
/20 |
255.255.240.000 |
|
/19 |
255.255.224.000 |
|
/18 |
255.255.192.000 |
|
/17 |
255.255.128.000 |
|
/16 |
255.255.000.000 |
|
/15 |
255.254.000.000 |
|
/14 |
255.252.000.000 |
|
/13 |
255.248.000.000 |
|
/12 |
255.240.000.000 |
|
/11 |
255.224.000.000 |
|
/10 |
255.192.000.000 |
|
/9 |
255.128.000.000 |
|
/8 |
255.000.000.000 |
|
/7 |
254.000.000.000 |
|
/6 |
252.000.000.000 |
|
/5 |
248.000.000.000 |
|
/4 |
255.000.000.000 |
|
/3 |
224.000.000.000 |
|
/2 |
192.000.000.000 |
|
/1 |
128.000.000.000 |
|
/30 |
255.255.255.252 |
|
/29 |
255.255.255.248 |
|
/28 |
255.255.255.240 |
|
/27 |
255.255.255.224 |
|
/26 |
255.255.255.192 |
|
/25 |
255.255.255.128 |
Interface - Enable Static IP on LAN
(*) One option may be enabled: ENABLE VLAN ON LAN or ENABLE DHCP ON LAN. After one option is enabled, the other option disappears from the SETUP NETWORK menu.
We update menu options once you configure settings. Once you configure ENABLE STATIC IP ON LAN the option changes to CHANGE STATIC IP ON LAN. Once you configure ENABLE DHCP ON LAN the option displays as RENEW DHCP ON LAN.