Create Security Policies
You can create policies in Container Security to manage configurations, vulnerability management, compliance, access, and auditing in containerized environments, thus automating the process of securing images and containers. Policies provide a combination of rules that assess specific artifacts such as images, and containers, and provide actions associated with the rules.
Currently, image assessment policies for CICD and Kubernetes Admission Controller are available. You can define rules for scanning container images for known vulnerabilities before deployment and specify the actions to be taken if the count of vulnerabilities of specific severity is exceeded.
Create a CI/CD Policy
With CI/CD policies, you can block a CI/CD build if the count of vulnerabilities of specific severity is exceeded.
- Go to Policies > Image Assessment, and click Create Policy.
- In the Policy Details step, enter the name and description for the policy. To activate and enforce the policy, ensure Active option is selected under Policy Mode.
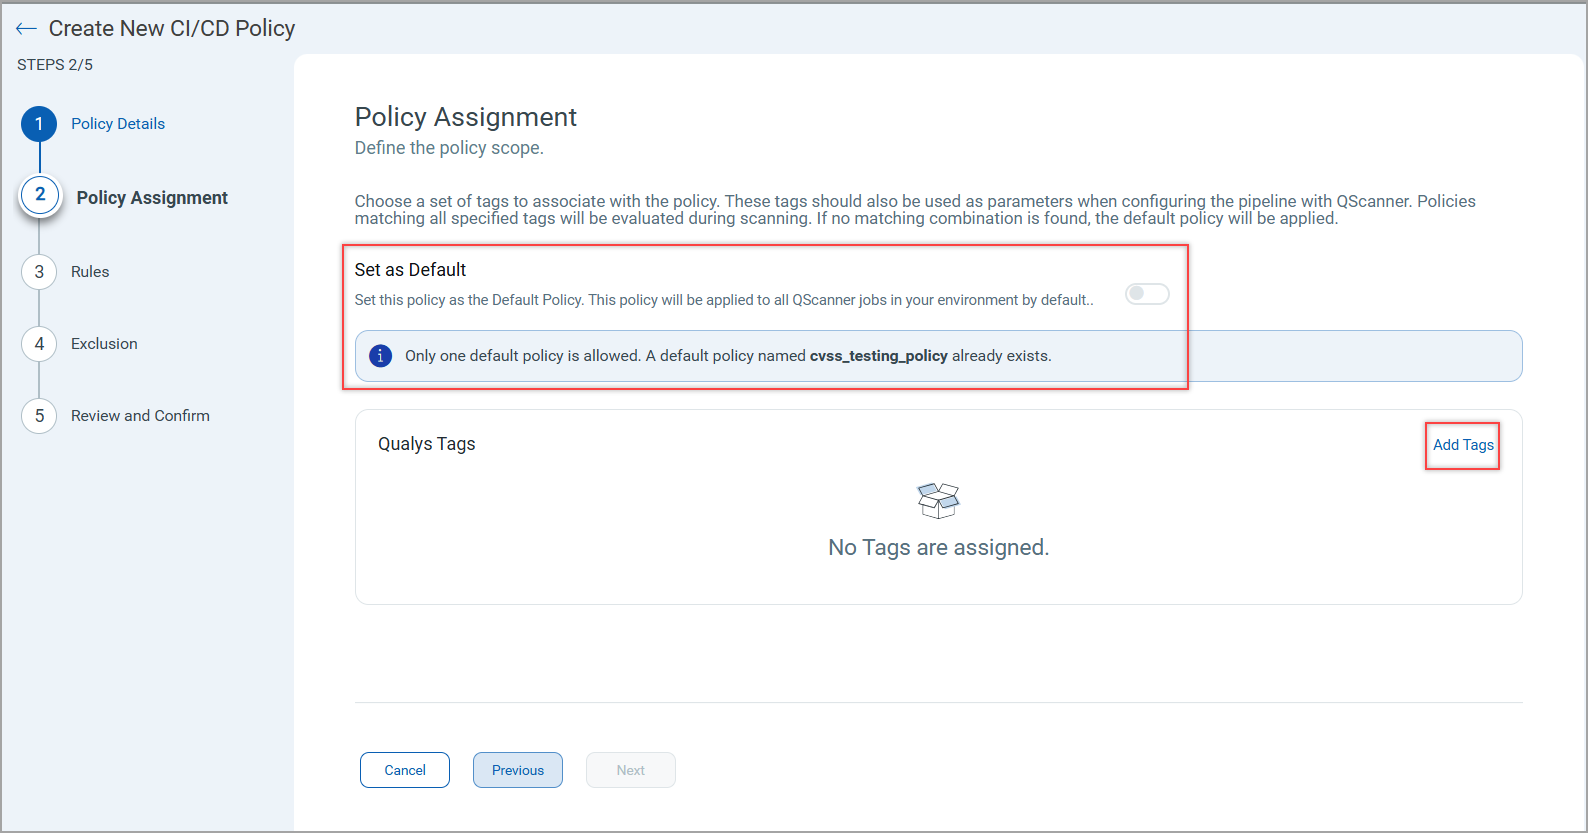
- In the Policy Assignment step,
- (Optional) Toggle the Set as Default bar to make this policy as the default policy.
To set the current policy as the default policy, you first need to unset the existing default policy. If a default policy is already available, its name is displayed in the user interface.
- Click Add Tags to assign existing tags to the policy. You can also create tags using Create New Tag option.
Use the same tags while configuring your events or utilities. During scanning, a policy that matches all the specified tags is evaluated. If the tag combination does not match, the default policy is applied.
- (Optional) Toggle the Set as Default bar to make this policy as the default policy.
- In the Rule step, click Add Rule to assign a policy rule.
-
The CI/CD policy provides Image Security as an image assessment rule and supports the following rule types.
Rule Sub Type Description Limit Vulnerability using Severity Specify the action to be taken if the vulnerabilities count of specific severity is exceeded. Block Known Vulnerability using QIDs Blocks the known vulnerability if the specified QIDs are found in an image. If the image has any of the specified QID, the policy fails. Block Known Vulnerability using CVEs Blocks the known vulnerability if the specified CVEs are found in an image and the policy is failed. Limit Vulnerability using CVSS Limits the vulnerability count if the specified CVSS are found in an image. Based on this, the policy is passed or failed. Enforce Qualys Detection Score Threshold Based on the Qualys Detection Score, the policy is passed or failed.
For example, 'don't allow high or above'Block Unauthorized Software Blocks the specified software if it is found in an image and hence the policy is fails.
Duplicate data separated by commas will be merged.
Example 1:org.springframework
This will match fororg.springframework*similar toorg.springframework:spring-core.
Example 2:spring-core
This will not match fororg.springframework:spring-core.Block Unauthorized Author Block images with unauthorized authors based on 'CREATED BY' value. Block Images with Secrets The image fails if it has the specified secrets. Block Older Vulnerability Block images based on vulnerability publish date. Block known compliance using Controls Block image compliance based on the Controls. Limit Compliance using Criticality Limit image compliance based on the criticality. Select the on-screen options available under each rule sub-type. To enable this policy rule, ensure that the Status is Enabled. Click Add Rule to add the rule then click Next to move to the next step.
-
In the Exclusion step, enter the QIDs of the vulnerabilities to be excluded from the policy scan. Excluding QIDs will bypass rules checking these QIDs.
You can also choose
- Exclude Non-patchable Vulnerabilities to ignore the vulnerabilities if the patch is not available.
- Exclude Recently Published Vulnerabilities to ignore the vulnerabilities published up to the last 45 days.Qualys recommends that exclusions are regularly reviewed to maintain a healthy security posture.
-
In the last step, review and confirm the filled details and click Save. The new CI/CD policy is saved and enforced.
Create an Admission Controller Policy
With Admission Controller policies, you can allow or deny the CREATE and UPDATE request to the Kubernetes API server if the count of vulnerabilities of specific severity is exceeded for an image. This allows you to block vulnerable images from getting spawned. You can assign the policy to clusters or namespaces.
Before you start creating an admission controller policy, install a Qualys Admission controller in your cluster. For more information about Qualys Admission Controller, see Admission Controller Online Help.
Once you have installed the Admission Controller, follow the steps mentioned below.
- Go to Policies > Admission Controller, and click Create Policy.
- In the Policy Details step, enter the name and description for the policy. To activate and enforce the policy, ensure Active option is selected under Policy Mode.
- In the Policy Assignment step, select either of the following options to assign the policy along with Cluster and Namespace details.
- Organizational Level Policy: Sets the current policy as the default policy. This policy applies to the admission controller in your cluster by default. To set a new policy as the default policy, you first need to unset the existing default policy. If there is a default policy already available, its name is displayed in the user interface.
- Cluster Level Policy: Assigns the policy to the selected clusters.
- Namespace Level Policy: Applies the policy to the selected namespaces of clusters. Select a cluster and then specify a namespace in the cluster.
- In the Rule step, click Add Rule to assign a policy rule.
- The Admission Controller policy provides Image Security and POD Security as admission controller rules and supports the following rule types.
Rule Rule Sub Type Description Image Security
Limit Vulnerability using Severity Specify the action to be taken if the count of vulnerabilities of specific severity is exceeded. Block Known Vulnerability using QIDs Blocks the known vulnerability if the specified QIDs are found in an image. If the image has any of the specified QID, the policy fails and action is denied. Block Known Vulnerability using CVEs Blocks the known vulnerability if the specified CVEs are found in an image. Limit Vulnerability using CVSs Limits the vulnerability count if the specified CVSs are found in an image. Based on this, an image is passed or failed. Enforce Qualys Detection Score Threshold Enforces Qualys Detection Score to pass or fail an image. Block Unauthorized Software The image fails based on the specified software.
Duplicate data separated by commas will be merged.
Example 1:org.springframework
This will match fororg.springframework*similar toorg.springframework:spring-core.
Example 2:spring-core
This will not match fororg.springframework:spring-core.Block Unauthorized Author Block images with unauthorized authors based on 'CREATED BY' value. Block Images with Secrets The image fails if it has the specified secrets. Block Specific Images Deny the admission if it has the specified images. This is based on 'image name'or 'image name regex' value. Block Older Images Deny the admission if it has images older than the specified days. This is based on image creation date. Block Older Vulnerability Block images based on vulnerability publish date. Block Images with Malware Block images based on malware found (true or false). Block known compliance using Controls Block image compliance based on the Controls. Limit Compliance using Criticality Limit image compliance based on the criticality. POD Security Forbid HostPath Volumes Prevents access to the host file system, protecting host files and directories from
unauthorized access or modification by containers.Disallow Host Ports Blocks binding to host ports, preventing containers from interfering with
host network services or unintentionally exposing ports.Prevent Sharing Host Namespaces Blocks sharing of host namespaces to protect sensitive host information and resources from unauthorized access or manipulation. Disallow Host Process Containers (Windows) Prevents containers with privileged host access, enhancing isolation between containers and the host system and reducing the risk of host compromise. Block Privileged Containers Stops deployment of containers with elevated privileges, minimizing the potential for containers to perform unauthorized actions or escape confinement. Enforce Default /proc Mount Type Requires default /proc mount settings, limiting access to kernel and process information and mitigating potential exploits. Prohibit Insecure Capabilities Ensures containers don't have exploitable capabilities, reducing the attack surface by limiting container capabilities to only what is necessary. Prevent running Container as Root Mandates that containers run as non-root, minimizing damage in case of a breach since non-root have limited system access. Prevent Privilege Escalation Stops processes from gaining higher privileges, ensuring that processes within containers cannot gain unauthorized control over the system. -
In the Exclusion step,
Exclude Images
Enter the names or regex of the images to be excluded from the policy scan. Use this to exempt critical trusted images.
Exclude Namespaces
Enter the namespaces to be excluded from the policy scan. Use this to exempt specific namespaces from enforcement by the admission controller.You can also choose,
- Exclude Non-patchable Vulnerabilities to ignore the vulnerabilities if the patch is not available.
- Exclude Recently Published Vulnerabilities to ignore the vulnerabilities published up to the last 45 days.Qualys recommends that exclusions are regularly reviewed to maintain a healthy security posture.
-
In the last step, review and confirm the filled details and click Save. The new Admission Controller policy is saved and evaluated.
-
After a successful evaluation, the new policy is enforced and an cluster admission event is created. See Container Security > Events > Cluster Admission to find the new event. To know more about events, refer to Cluster Admission Events topic.