Prioritization Workflow With TruRisk Eliminate
The prioritization workflow helps you move from a broad set of findings to a clear, actionable list of the most important items to address.
Prerequisite
The availability of Elimination-specific capabilities depends on TruRisk Eliminate licensing and subscription.
Workflow Overview
- Start Prioritization
- Define the Scope
- Select a Prioritization Approach
- Run Prioritization
- Review Prioritized Results
- Save the Plan
1. Start Prioritization
Navigate to Risk Management > Risk Workbench and click Start Prioritizing.
2. Define the Scope
- Select one or more Business Entities.
- Or click Choose Tags Instead to prioritize tagged assets.
- Click Choose Tags Instead. The Select Tags dialogue box is displayed.
- Select the desired tags and then click Add Tag.
3. Select a Prioritization Approach
Decide the prioritization approach to discern and filter the findings requiring immediate attention. To do this effectively, structure the approach based on certain filters :
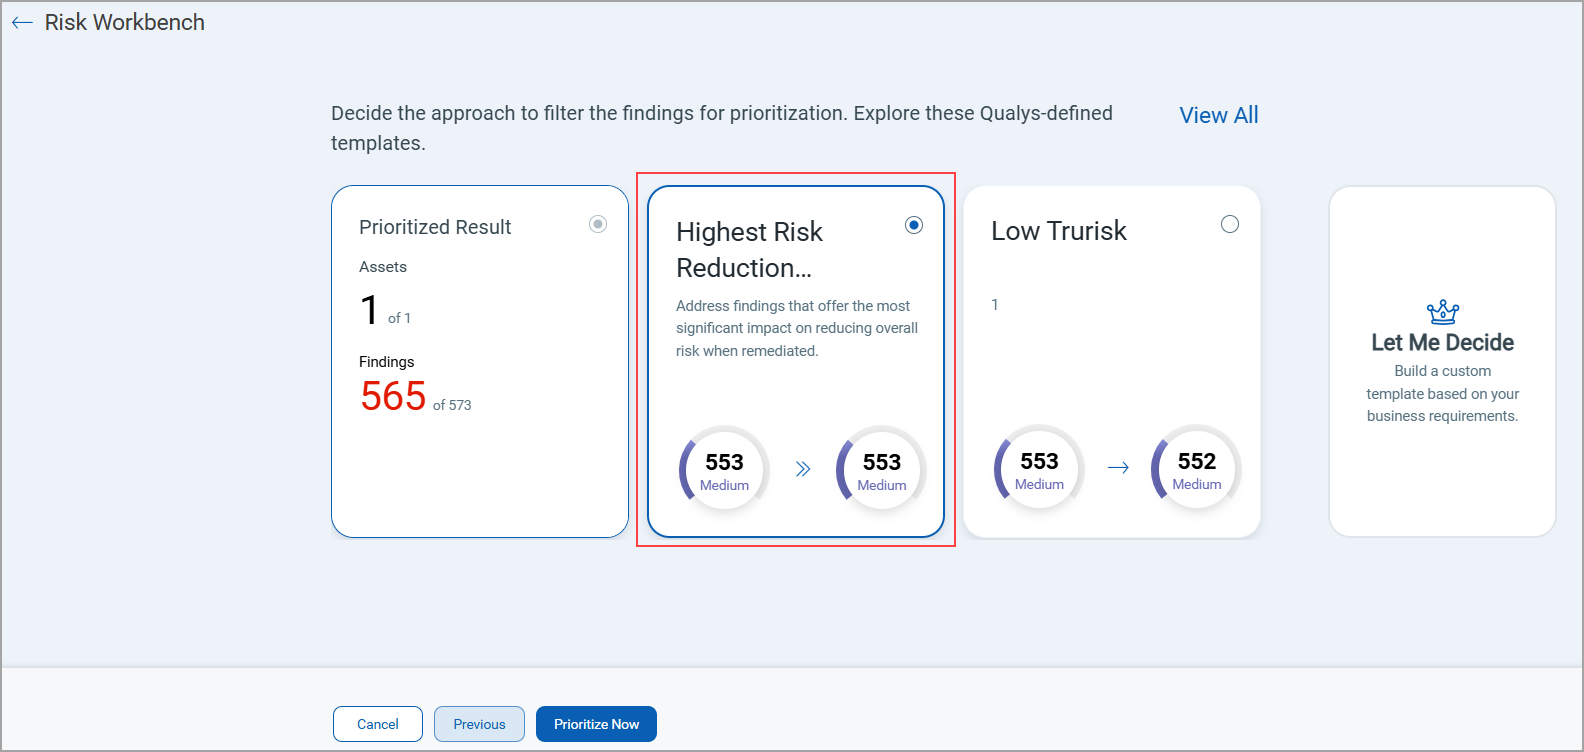
Highest Risk Reduction
Use the default template when you want the system to automatically prioritize findings that provide the greatest reduction in organizational risk.
Compare Templates Before You Pick One
The Select Prioritization Approach page shows the scope you selected and its current TruRisk score at the top. Each template card shows:
- A short description of the template.
- Assets: How many assets in your scope match the template, for example, 14 of 29.
- Findings: How many findings in your scope match the template, for example, 869 of 1.49K.
Use these counts to compare templates side by side and pick the one that fits your goal. These templates include the templates that Agent Sara Chat Now uses. Click View All to see all templates in a table. In this table, the TruRisk Score column shows the score for each template. This column was earlier named Risk Reduction.
Create a Custom Template
You can prioritize active vulnerabilities and misconfigurations on-demand across tagged assets or selected Business Entities.
- Click Let Me Decide.
- Add Common, Vulnerability, and Misconfiguration filters.
- Common Attributes: These filters are common across both the finding types (vulnerabilities and misconfigurations)
- Vulnerabilities: These filters are only applicable to vulnerabilities.
- Misconfigurations: These filters are only applicable to misconfigurations.
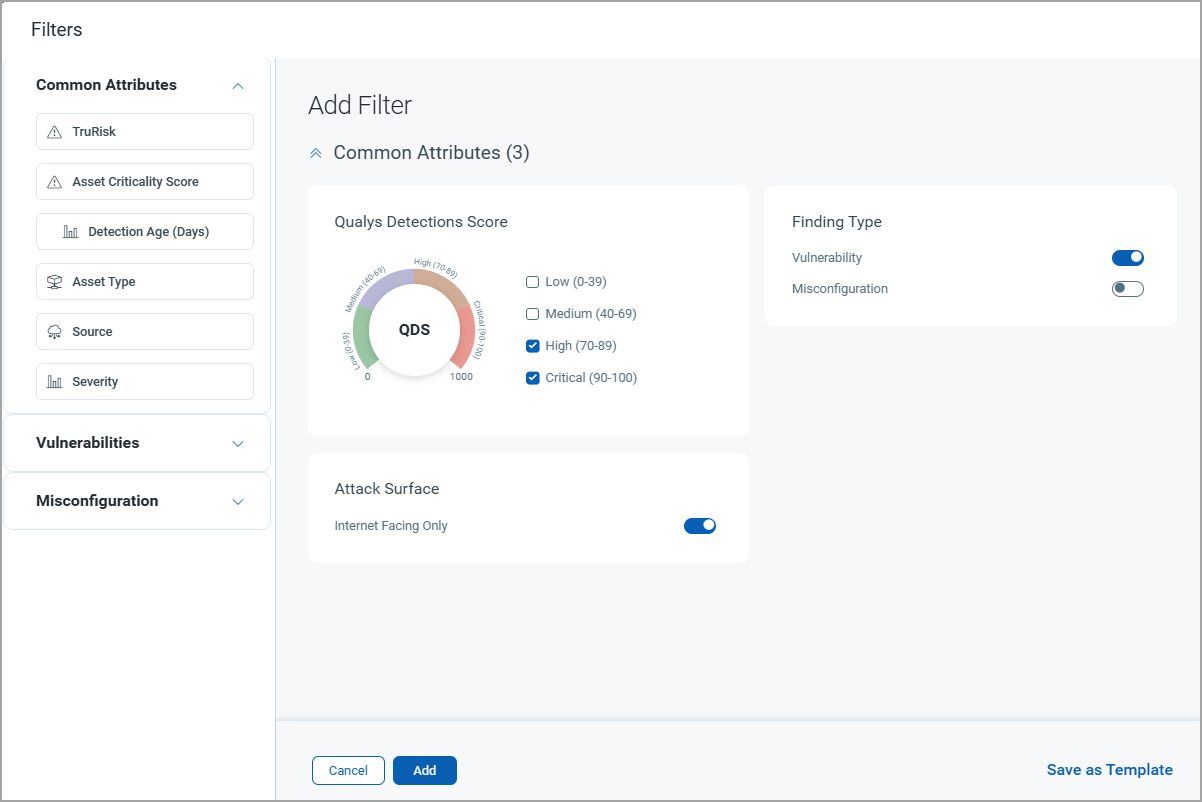
- Expand each filter type and then drag and drop the desired filters to build your custom template.
- Click Add.
- Click Save as Template if you desire to save this custom template for future use.
- In the Save Filter As A Template dialog box, enter the Name and Description of the template and click Save.
The saved template is displayed on the Select Prioritization Approach page.
4. Run Prioritization
Click Prioritize Now. The application calculates the prioritized findings and projected TruRisk reduction. If calculations continue in the background, informational status messages are displayed until processing completes.
5. Review Prioritization Results
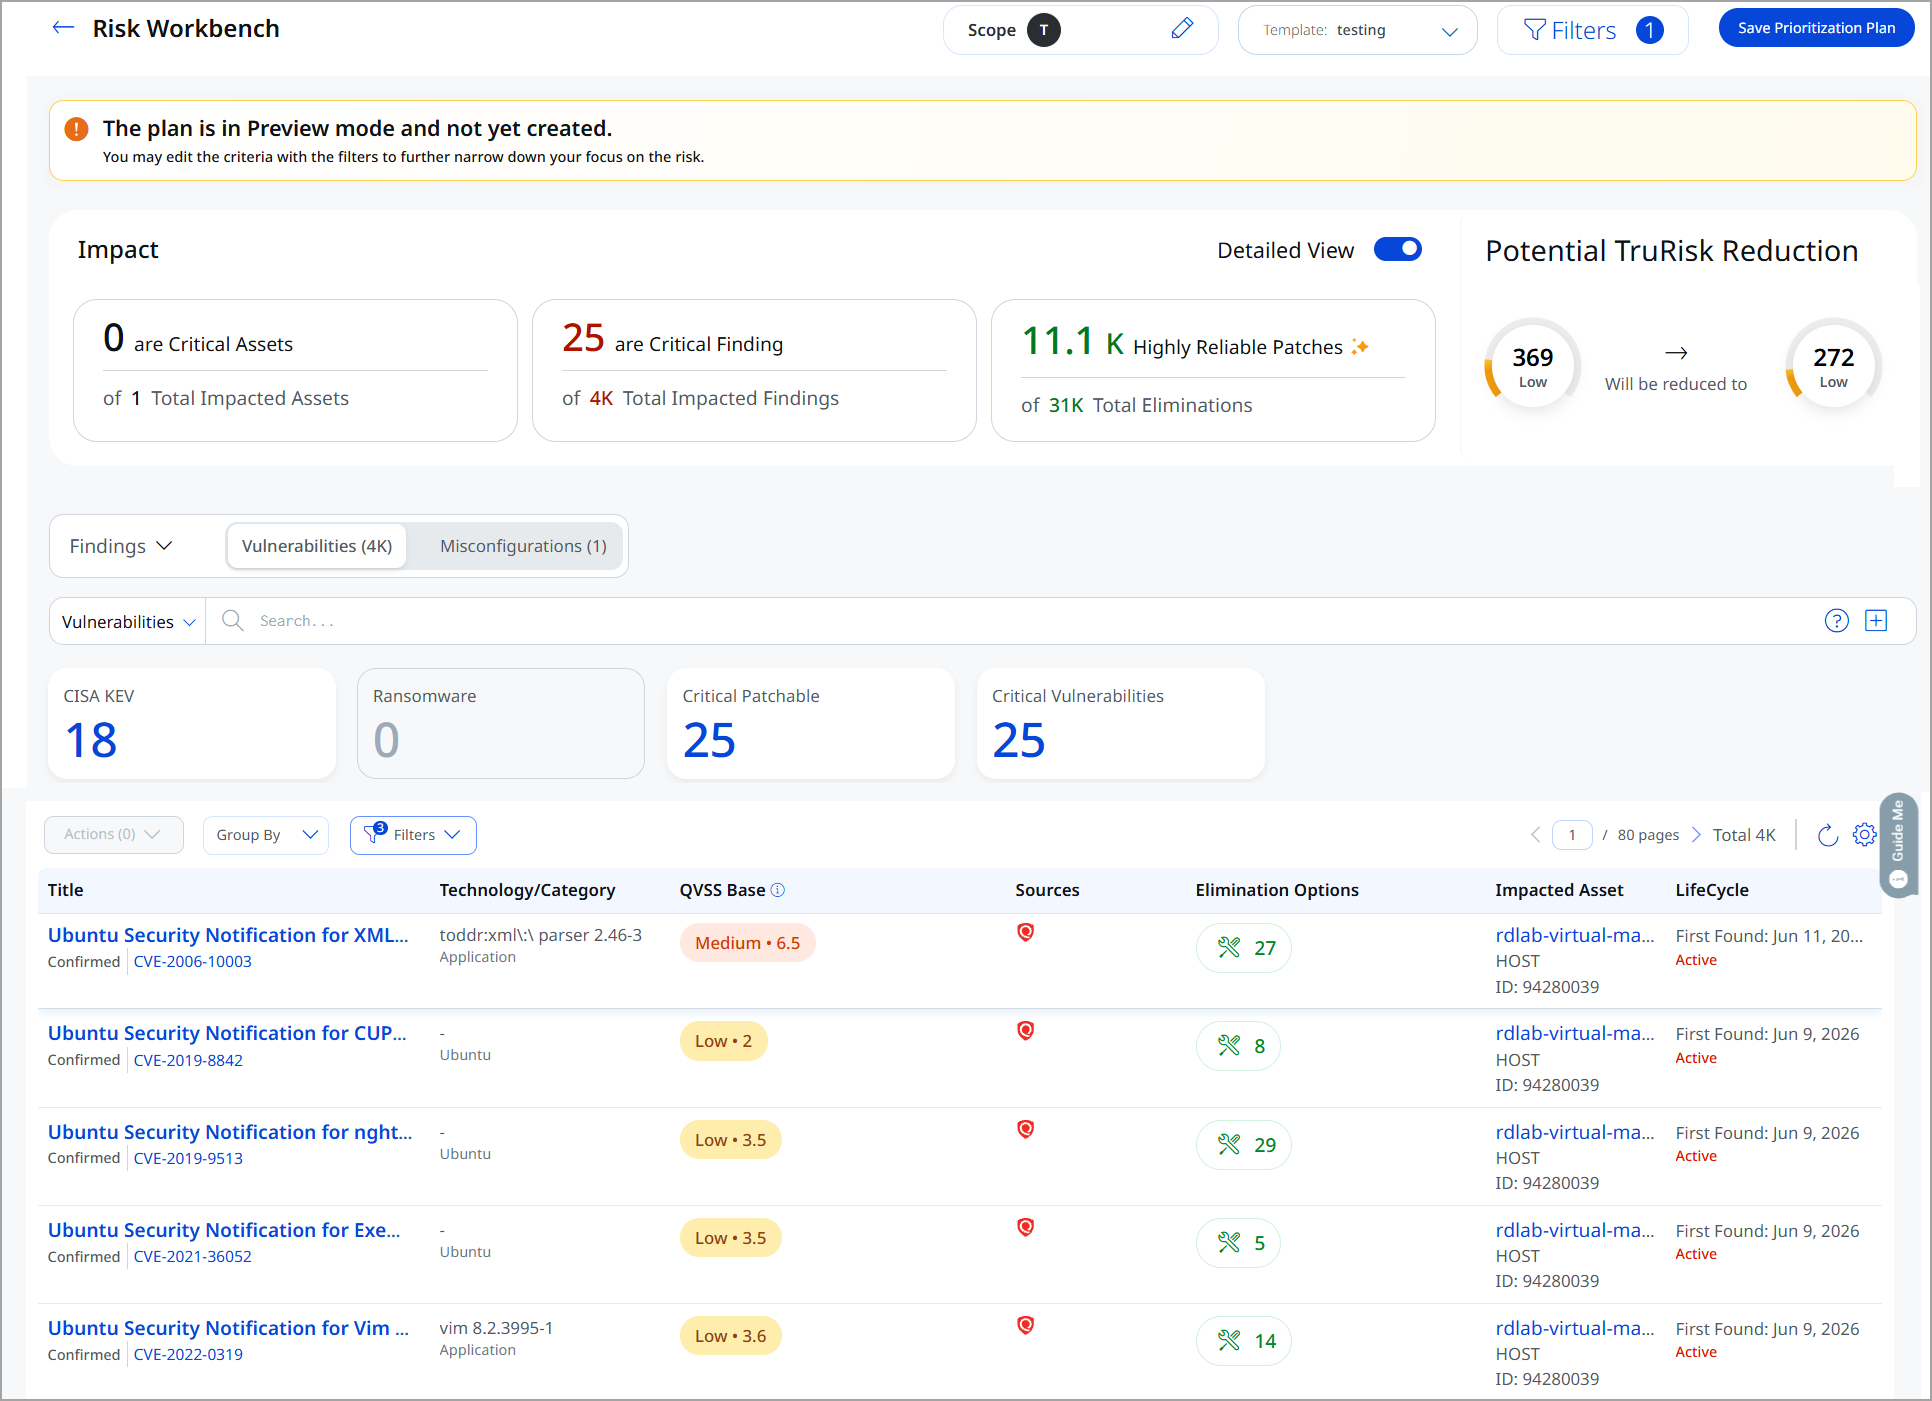
After the calculation completes, review:
- Preview Mode banner indicating the plan has not yet been saved.
- Impact cards showing Critical Assets, Critical Findings, and Highly Reliable Patches. Each card now shows the total too, for example, 1 Critical Asset of 29 Prioritized, or 52 Highly Reliable Patches of 683 Available.
- Permanent Fixes card showing fixable findings and available mitigations, for example, 7 of 19 Mitigations Available.
- Potential TruRisk Reduction showing the projected score improvement. The card shows the date of the current score, for example, Score as of October 5, 2026. While ETM calculates the projected score, you see Computation in progress. Scores do not appear in preview mode. Save the plan to see them.
- Findings table with severity, technology, impacted assets, lifecycle, and elimination options.
- Elimination Options to review available remediation methods.
- Group By, Filters, and Search to further refine findings.
6. Save the Plan
- Click Save Prioritization Plan.
- Enter a name and description.
The saved plan is displayed on the prioritization listing page on the Risk Workbench tab.
7. Move the plan to the Eliminate Remediation
Your prioritization plan is ready to hand off to IT Operations. Save the plan to create an Elimination Plan in TruRisk Eliminate to manage remediation activities and track progress.
To assign the plan, click Hand off to IT Ops, and then select your IT Operations user. The plan appears in TruRisk Eliminate under Eliminations > Risk Elimination Plan.
8. Remediate or Mitigate the Findings
In TruRisk Eliminate, your IT Operations user can now both remediate and mitigate the findings in the plan. A mitigation lowers the risk of exploitation with a compensating control, such as a registry update, without changing the vulnerable software. Use a mitigation when a patch is not available or you cannot apply it yet.
- From the plan: Open the plan in TruRisk Eliminate, filter the findings that can be mitigated, and create a mitigation job.
- From a single finding: In ETM, create a mitigation job for one finding from the Findings list, if the asset is activated for mitigation. For details, refer to Mitigate a Vulnerability with Mitigate Now.
A mitigation job runs once. You can run it on demand or schedule it for a later time, but you cannot set it to repeat.
To find the findings that you can mitigate, use the finding.isQualysMitigable token. For all mitigation and patch tokens, refer to Search Tokens for Findings.
Track Plan Progress
ETM now tracks plan progress as findings addressed, not only findings fixed:
- Plan Performance shows Findings Addressed instead of Fixed Findings.
- On the Risk Workbench list, the Plan Progress column shows the percentage Addressed instead of Fixed.
Export Results
You can download the Prioritization report from hamburger menu. The generated report includes enhanced, plan‑level contextual details, such as:
- Plan title and description
- Scope and applied filters
- CVSS metadata
- Vulnerability count
- Impacted findings
- Asset details and asset IDs
- Additional relevant metadata
Improvement from the Traditional Prioritization Plan
The risk reduction view is updated with a more comprehensive impact section that highlights the following features.
| Enhancement |
Description |
|---|---|
|
Static Plan Scope |
The scope of a Prioritization Plan is locked at the time of creation.
This enables accurate progress tracking and reporting throughout the lifecycle of the plan. |
|
Remediation Owner Column
|
You can assign a Remediation Owner when handing off a plan to operations teams, providing clear accountability for remediation activities. |
|
Plan Progress Column |
A new Plan Progress column displays the percentage of findings addressed through TruRisk Eliminate. |
|
Enhanced Impacted Findings |
A redesigned Impact section provides a consolidated view of Critical Assets, Critical Findings, and Available Patches. |
|
Remediation Insights |
View remediation and patch information for prioritized findings to identify available actions and monitor remediation activities. |
|
Performance Trending |
Monitor remediation performance over time with trend reports for open findings, fixed findings, and remediation progress. |
|
Prioritization Plan Details |
The Plan Details page includes key impact information, including affected critical assets, critical findings, and available patches within the selected scope. |
|
Findings Listing |
The Findings table displays available remediation and patch options for eligible findings. |
|
Elimination View |
A dedicated Elimination view provides visibility into remediation activities, including available and applied remediation, associated CVEs, and remediation status. |