Configuring Correlation Rules to Auto-Create Incidents
We can help you automate the incident creation based on a QQL rule query defined in a correlation rule. To help you create correlation rules, FIM provides a Correlation Rule wizard. In the wizard, define a query to specify criteria for events you want to create incidents and a schedule to indicate when and how often you want to run the rule to create incidents for the events that matched the rule query.
Through auto correlation rules, incidents get created when there is an event created that matches the Incident criteria.
You can access the Correlation wizard from the following pages:
- Go to Incidents > Correlation Rules > Create Correlation Rule.
- Go to Events > All Event tab or Events > Event Review tab. Enter a search query in the search box and press Enter. Click the menu button next to search box and select Create Correlation Rule from Search Query. When you create a correlation rule, the search query provided on the page is copied to the new correlation rule.
You can enable the Service Legal Agreement(SLA). Once you enable SLA, provide SLA duration and select the timeframe from the respective drop-down list.
The SLA time for the autocorrelation rule is counted post the end time of the correlation rule.
You can edit the enabled SLA. Only the reviewers for whom you enter an email ID, receive notifications. You must enter valid email IDs of the reviewers to ensure they receive the notification emails.
- Go to the Assets tab, select an asset, and from the Quick Actions menu select Create Correlation Rule to create a correlation rule for an asset. When you create a correlation rule for an asset, the agent ID of the asset is copied to the new correlation rule. Use the operators 'and/or' to customize your search query.
For events with 'reputationStatus' as 'MALICIOUS', an Automated Incident is created with the following configuration:
Disposition = Malware
Change Type = Compromise
Approval Status = Policy Violation
Start review option is available immediately.
Creating a Correlation Rule Using Correlation Rule Wizard
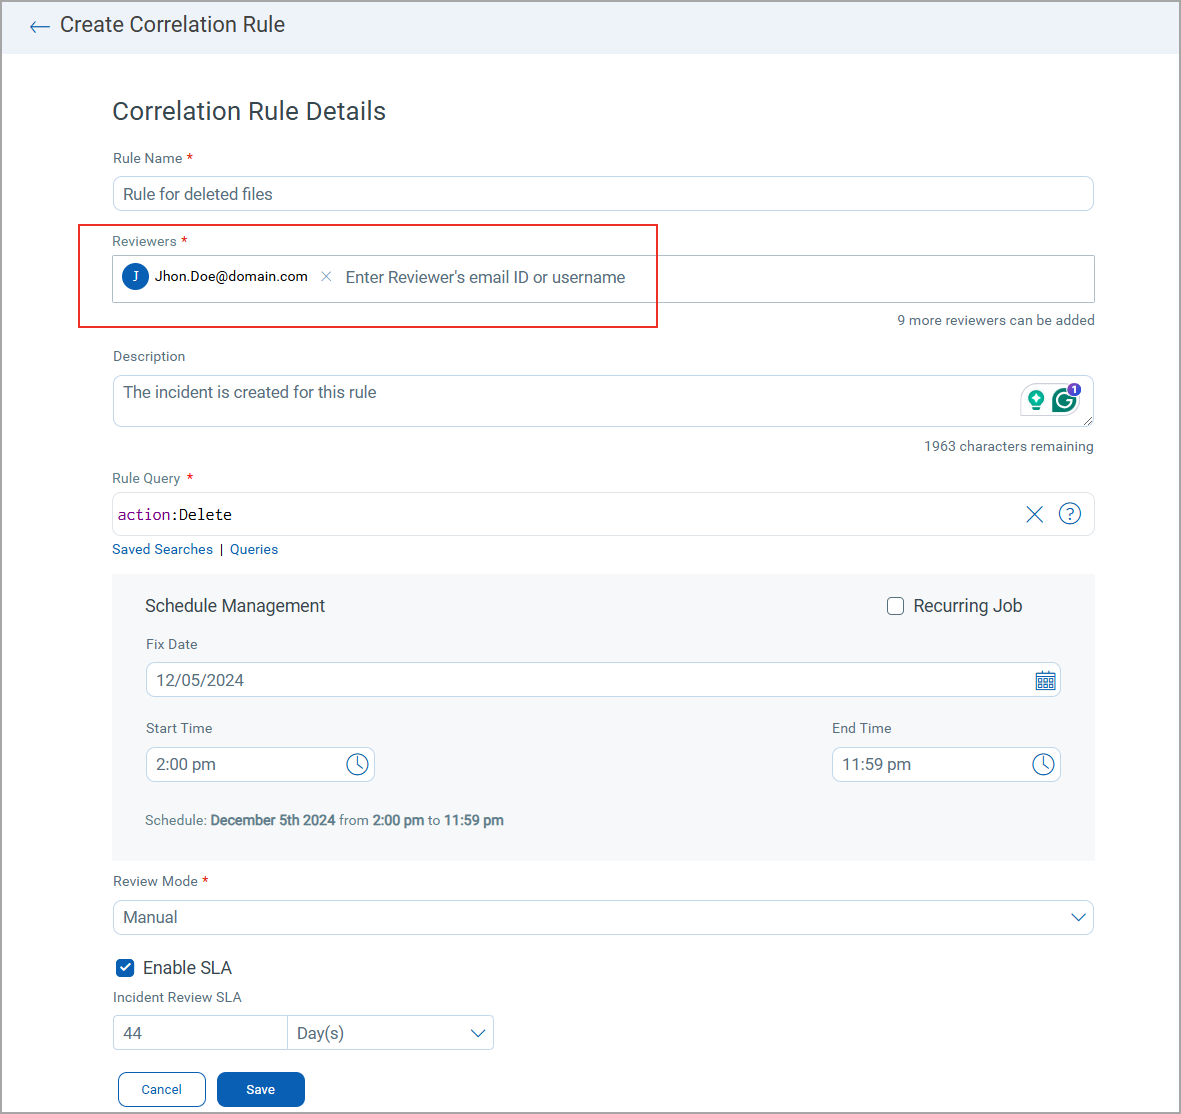
Provide the correlation rule name and the names or email IDs of the reviewers. The logged in user's name is listed by default as the reviewer. You can enter up to 10 reviewers. When an incident is generated using the rule that you have created, it gets assigned to the users that you enter in the Reviewers text box.
If Tag-based User Scoping is enabled for the reviewer, ensure that the reviewer's scope is equal to or greater than yours. This ensure that the incident is reviewed by the reviewer who has access to all events in it.
The users who you set as reviewers receive a notification in the following scenarios:
- Every time there is a user action on the rule
- Every time an incident is generated by the rule
- Only the reviewers for whom you enter an email ID receives notifications. You must enter valid email IDs of the reviewers to ensure they receive the notification emails.
- FIM supports sending alert notification using a Distribution List (DL) which contains multiple recipients. For more information on configuring DL, refer to Configure Distribution List for Alerts.
Enter a rule query. When the rule is triggered, the events matching the rule query are picked and added to the incidents. Optionally, use the Choose from my saved searches option to select a search query. We also provide a link to fetch queries from the library that lets you choose predefined queries. See Query Library.
After you upgrade the Cloud Agent to 4.1 and above, the File Path is displayed as (c:\directory\sub-directory\file.ext). If all the agents in your subscription are not upgraded to 4.1 and above, edit the existing QQL queries to add the new File Path format along with the old one.
Schedule the Rule
Next, select the schedule to indicate when and how often you want to run the rule. By default, the rule is set to run once. Schedule the rule by choosing a date, a start, and an end time. To set a recurring schedule, select the Recurring Job check box. You have the option to schedule the rule to run daily between a Daily (specified time), Weekly (every week), or Monthly (every month) on chosen days between a specified period.
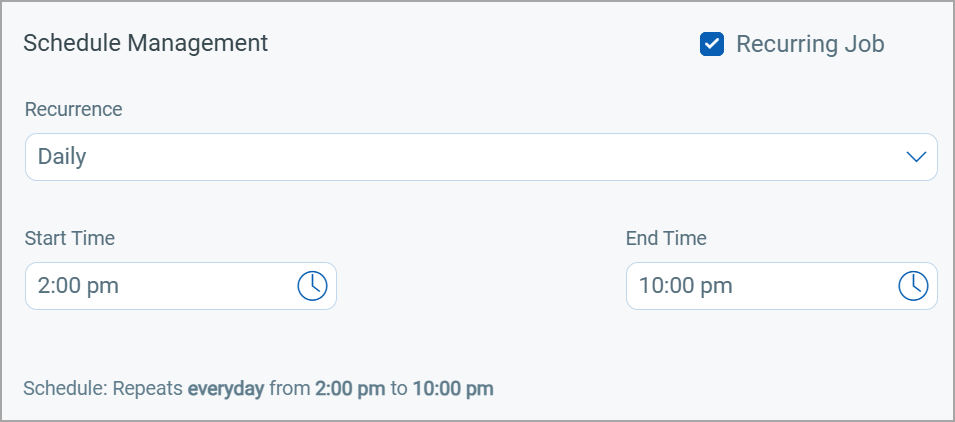
Daily
The Daily scheduling option enables you to schedule the rule to run everyday between a specified time.
For example, if you select a Start Time of 2:00 PM and an End Time of 10:00 PM, the rule runs daily from 2:00 PM to 10:00 PM.
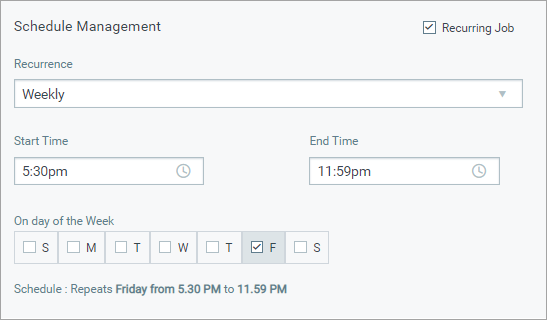
Weekly
The Weekly scheduling option enables you to set a rule to repeat for Specific Days or Full Week:
-
On Specific Days of the Week: Schedule the rule to run on one or more specific days of the week.
For example, if you select Tuesday with a start time of 12:00 PM and an end time of 11:59 AM (the next day), the rule will run from Tuesday at 12:00 PM to Wednesday at 11:59 AM. This schedule will repeat every week on the selected days until you disable the correlation rule.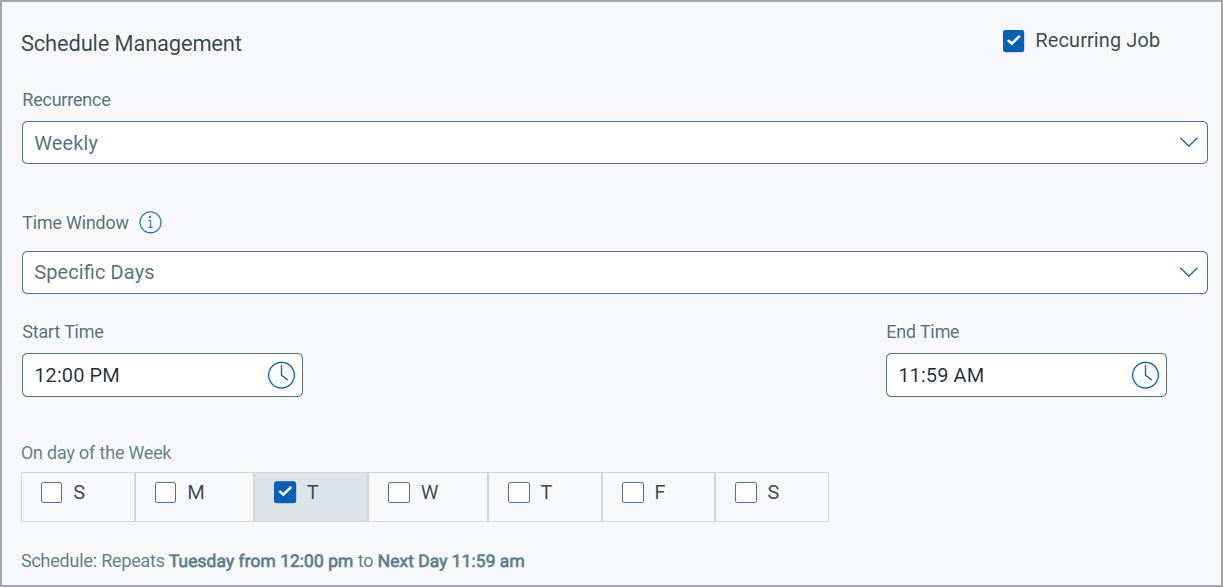
-
Full Week Starting from a Selected Day: Schedule the rule to run for an entire week, starting from a specific day.
For example, if you select Friday with a start time of 12:00 PM, the schedule runs continuously from Friday 12:00 PM to the next week's Friday 12:00 PM, covering the entire week until you disable the correlation rule.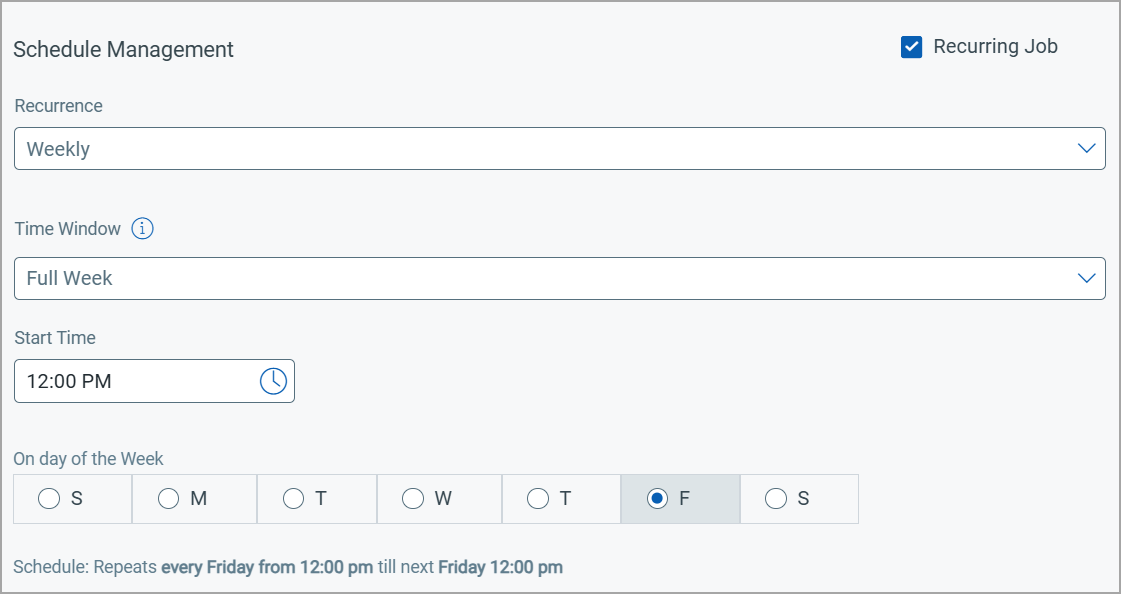
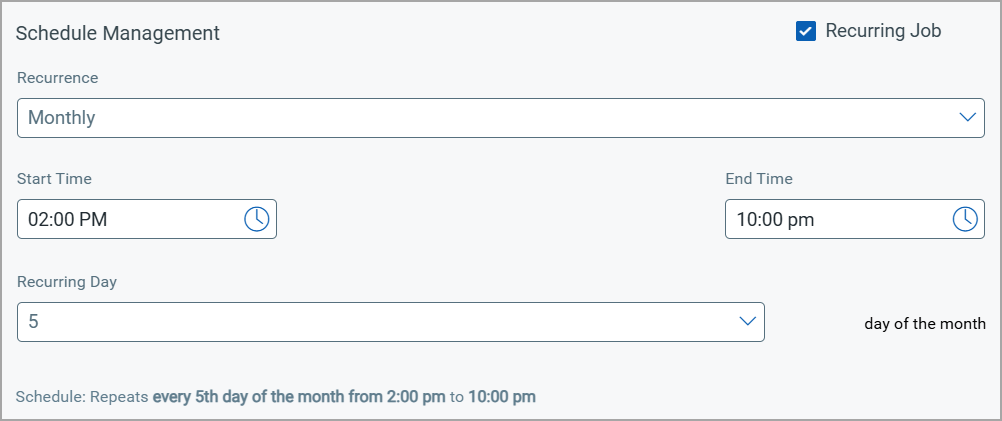
Monthly
The Monthly scheduling option enables you to schedule the rule to run every month on a selected day between a specified time.
For example, if you select a Start Time of 2:00 PM and an End Time of 10:00 PM and set the Recurring Day to 5, the rule runs every 5th day of the month from 2:00 PM to 10:00 PM.
If you schedule the rule to recur on the 1st of every month in IST, it occurs on the 31st of the months with thirty one days when for UTC.
FIM also supports cross date scheduling. Correlation can start at 10 PM on day 1 and end at 2 am on day 2 (effective schedule of 4 hours). If the end time is less than or equal to start time, the end time is considered as the time of next day. There is no end date for the schedule. User can deactivate or delete a correlation rule to stop creating incidents for the rule.
The scheduler runs every 5 minutes to pick up new jobs. Hence, it is recommended that while creating a schedule, you choose a "Start Time" greater than 15 minutes from the current time for a job to get picked up. If you choose a Start Time less than 15 minutes, it is possible that by the time you have created the rule, the scheduler has already picked up the job. In such a case your job is picked up in the next scheduled cycle. This means the One-Time rule never runs because the time set for running it has already passed, and if it's a Recurring rule, it runs at the next schedule.
When the correlation rule is run during the scheduled time, FIM picks up all the events that are raised during the scheduled time and that match the search query provided in the rule. All these events are then added to the newly created incident. The naming convention used for incidents is correlation rule name followed by incident creation date and time. Note that you cannot change the Trigger criteria of a correlation rule in the edit mode.
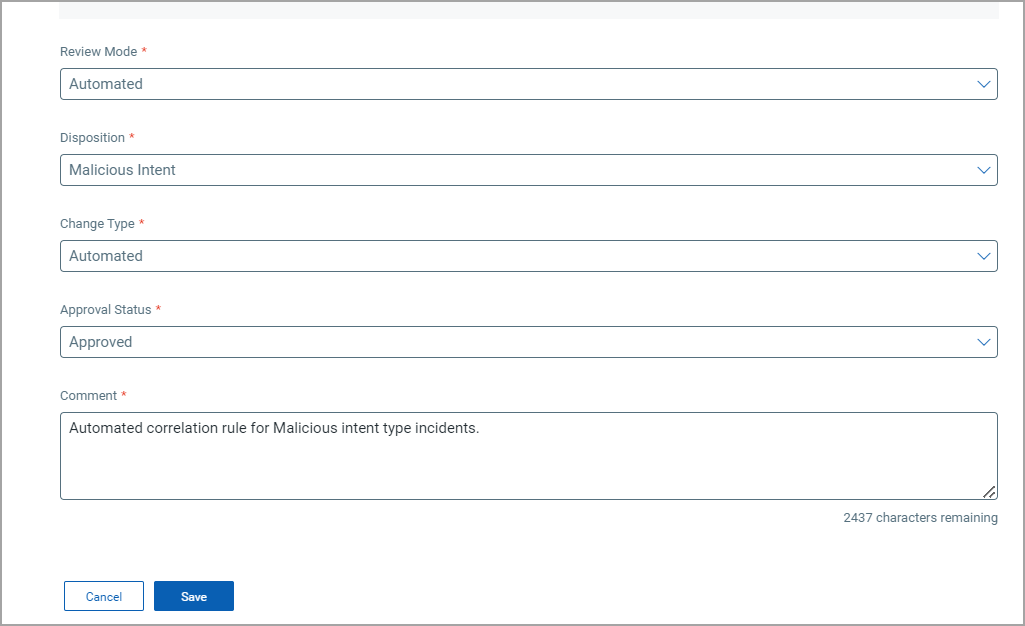
Choose Review for the Auto-created Incidents
Finally, select the Change Type to indicate whether you want to automate the review process for the incident or manually review it. For Automated review mode, select a disposition category for reporting and classification, choose the change type, mark the incident Pending, Approved, Unapproved Change, or Policy Violation, and provide a comment. Click Save to create the correlation rule.
When you choose the option to create a rule, FIM opens the Alert Rule wizard to help you configure the alert rule. The new alert rule name and description is the same as the correlation rule name and description from which the alert rule is created. The search query for the alert rule defaults to Incidents, and a query gets created with the incident status being either open or closed, along with a correlation rule ID. See Configuring Rule-Based Alerts for Events and Incidents.
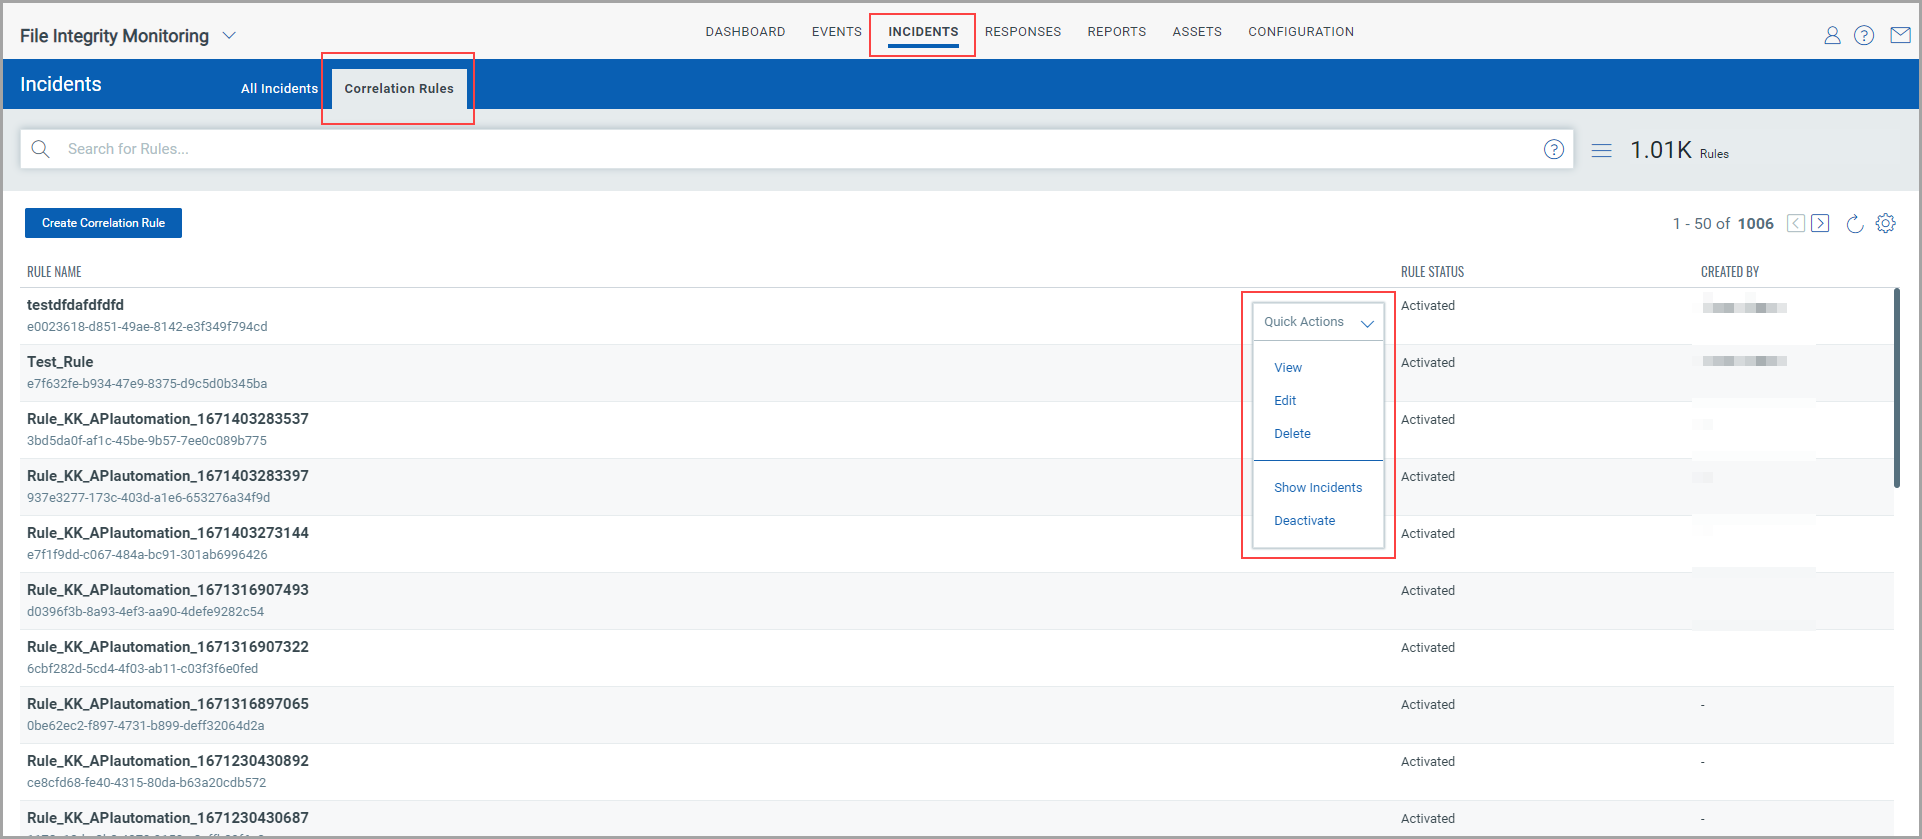
Managing Correlation Rules
The Correlations Rules tab lists all the correlation rules. The page shows details such as the Rule name with rule ID, whether the rule is currently active or deactivated, Created by. The Quick Actions menu on the page provides you options to view, edit, delete, activate/deactivate a rule and view the incidents of a rule.
- The activate/deactivate option is available for correlation rule that has a recurring schedule.
- REVIEWER column is renamed as CREATED BY.
Managing Incidents
All the incidents generated for a correlation rule are listed in the All Incidents tab with type as "Automated". Note that you can not delete an incident that is generated for a correlation rule.

Reviewing Incidents
An incident generated for a correlation rule is available for manual review after a grace period of 10 minutes from the scheduled end time of the rule. The Start Review option on the Quick Actions menu is available for the incident after the grace period ends.