Creating a New Alert Rule
You can create a new rule from the following pages:
- Go to Responses > Rule Manager and click New Rule.

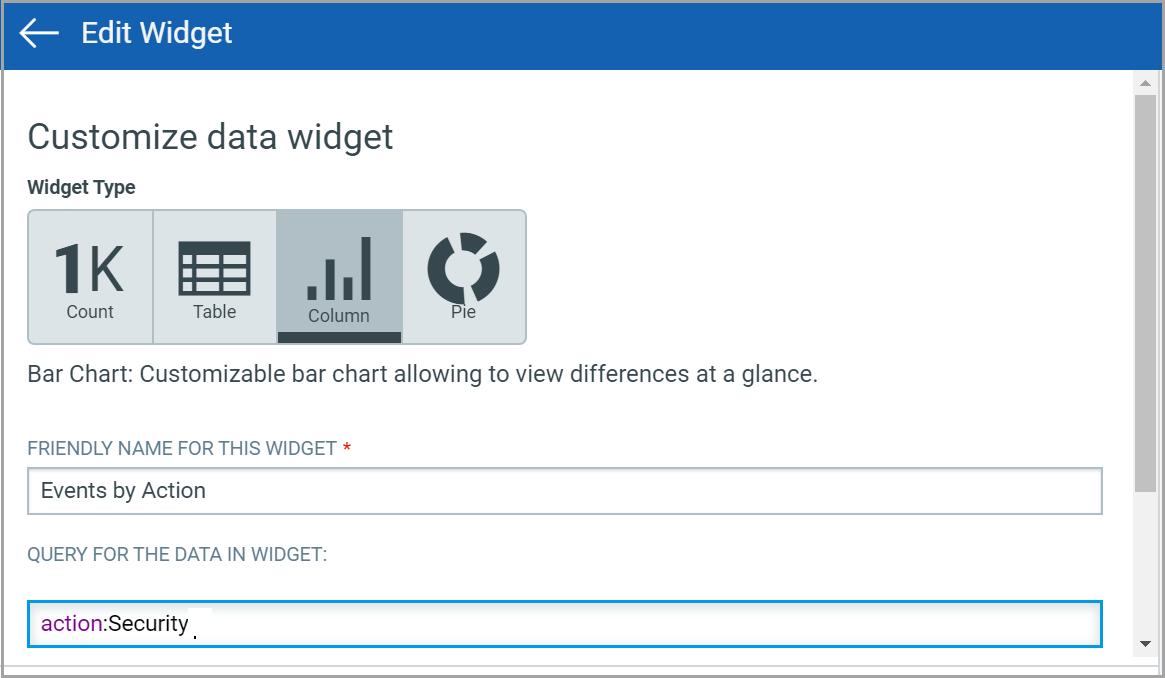
- Go to the Dashboard tab and choose a widget that uses a customized query for fetching the widget data. Then select the Widget menu and choose Create Rule from this Widget to create alert rules based on the customized query that you used for creating the widget.
To create a rule from a widget, a search query is required in the Query for the data in the widget field.
After you upgrade the Cloud Agent to 4.1 and above, the File Path is displayed as (c:\directory\sub-directory\file.ext). If all the agents in your subscription are not upgraded to 4.1 and above, edit the existing QQL queries to add the new File Path format along with the old one.
- Go to the Events > All Events tab or Events > Event Review tab. Enter a search query in the search box and press Enter. Click
 menu next to search box and select Create Alert Rule from Search Query. When you create an alert rule, the search query provided on the page is copied to the new rule.
 - Go to Incidents. Enter a search query in the search box at the top and press Enter. Click menu button next to the search box and select Create Alert Rule from Search Query. When you create an alert rule, the search query provided on the page is copied to the new rule.
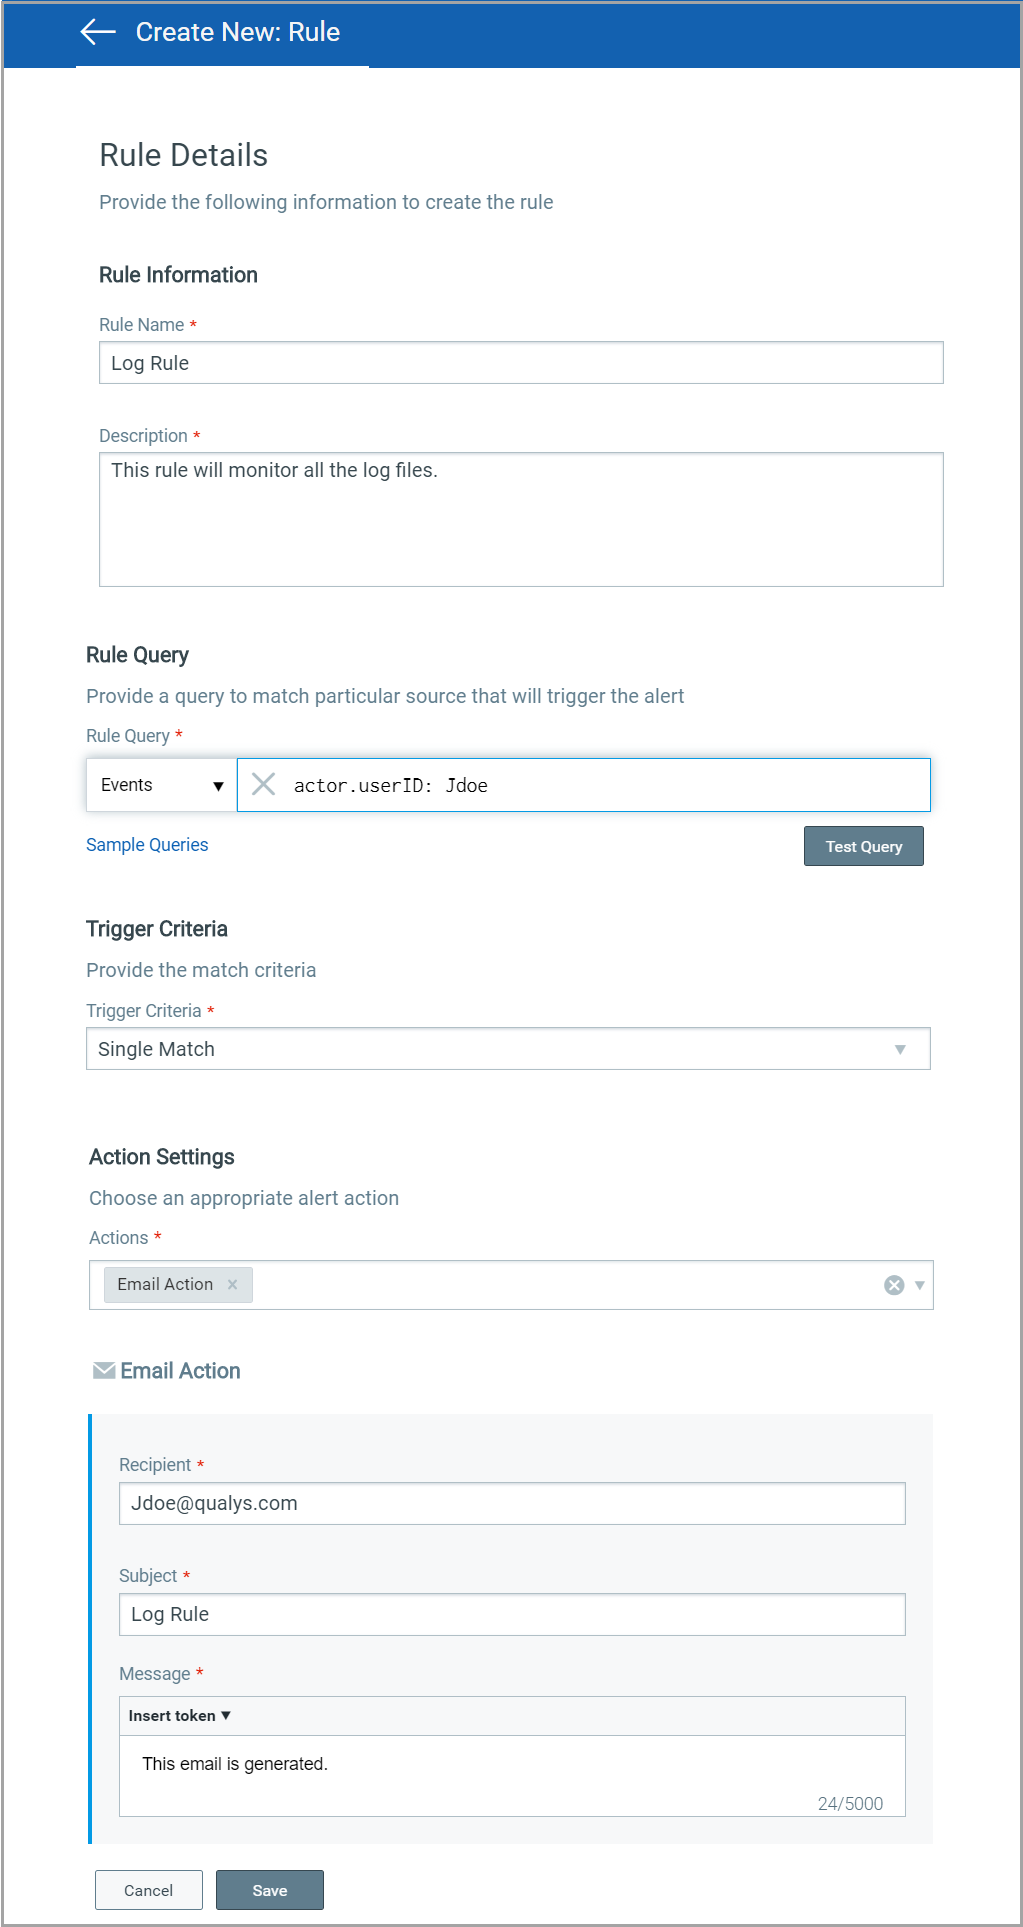
- Provide required details in the respective sections to create a new rule:
- In the Rule Information section, provide a name and description of the new rule in the Rule Name and Description.
- In the Rule Query section, choose Events or Incidents and specify a query for the rule. The system uses this query to search for events/incidents. Use the Test Query button to test your query. Click the 'Sample Queries' link to select from predefined queries.
- In the Trigger Criteria section, choose from three trigger criteria that work in conjunction with the rule query. The trigger criteria are: Single Match, Time-Window Count Match and Time-Window Scheduled Match. Refer to Trigger Criteria.
- In the Action Settings section, choose the actions that you want the system to perform when an alert is triggered.
FIM supports sending alert notification using a Distribution List (DL), which contains multiple recipients. For more information on configuring DL, refer to Configure Distribution List for Alerts.
Trigger Criteria
Single Match
Select Single Match if you want the system to generate an alert each time the system detects an event or incident matching your search query.
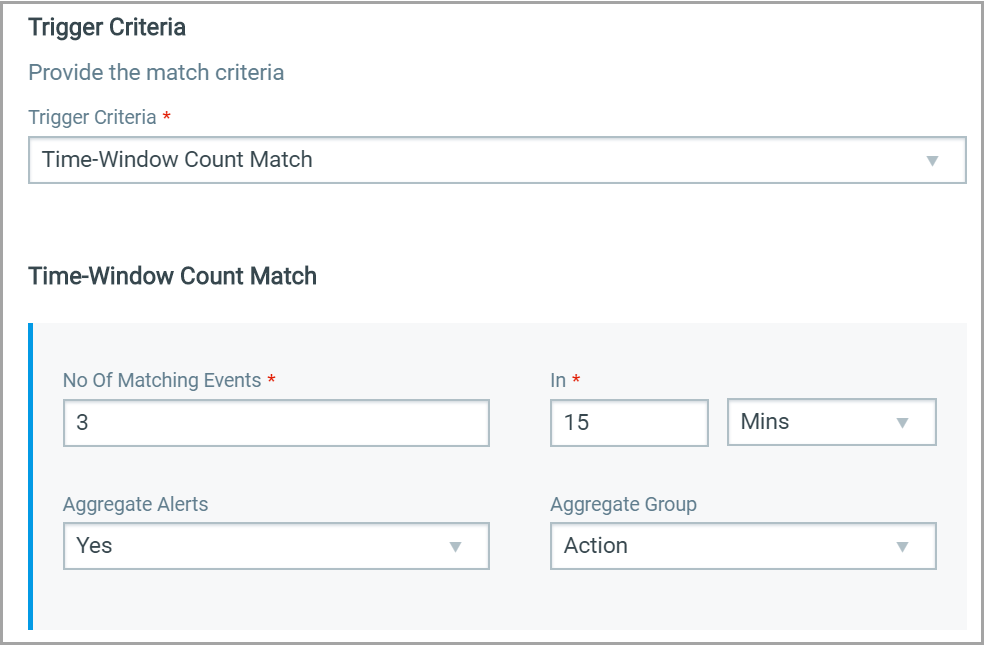
Time-Window Count Match
Select Time-Window Count Match when you want to generate alerts based on the number of events/incidents returned by the search query in a fixed time interval.
For example, an alert will be sent when three matching events are found within a 15-minute window.
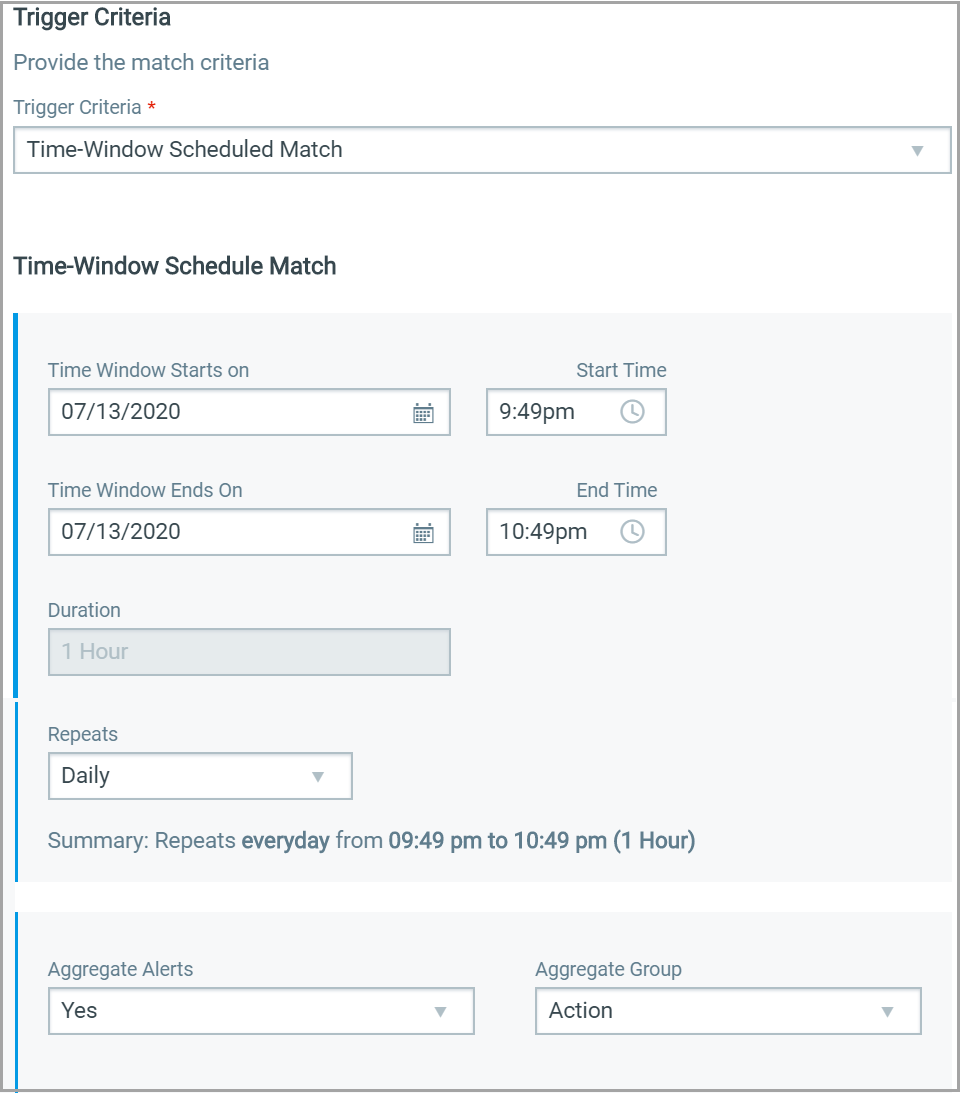
Time-Window Schedule Match
Select Time-Window Schedule Match when you want to generate alerts for matching events or incidents found during a scheduled time. The rule will be triggered only when an event/incident matching your search criteria is found during the time specified in the schedule. Choose a date and time range for creating a schedule and specify how often you want to run the schedule, for example, daily, weekly, and monthly.
For example, send alerts daily with all matches in a scheduled window between 07:00 AM and 09:00 PM.
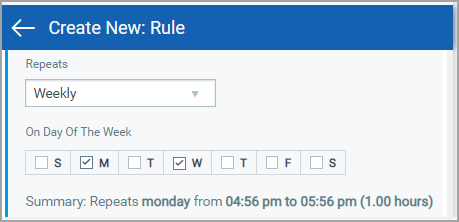
For the Weekly option, select the days of the week on which the rule will run.
For example, send weekly alerts with all matches generated between 07:00 AM and 09:00 PM every Monday.
For the Monthly option, specify the day of the month on which the rule will run.
For example, send monthly alerts on the first day of every month.
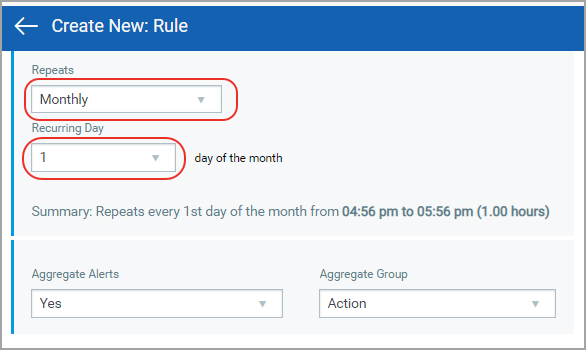
For Time-Window Count Match and Time-Window Scheduled Match, you have the option to aggregate the alerts by aggregate groups, such as based on action, asset host name, and so on. When you choose an aggregate alert option as Yes for a rule, FIM combines all the alerts generated during a schedule under a selected aggregate group, and when the schedule ends, FIM sends a single alert message that contains all the alerts. If you select the aggregate alerts option as No, then FIM sends you an alert message for each alert generated between the start and end of a specified schedule.
Action Settings
Choose the action that you want the system to perform when an alert is triggered. You can choose one of the following actions: Send Email (Via Qualys),Post to Slack, and Send to Pager Duty.
These actions must be configured before creating the Rule. For more information on actions, refer to Create a new action.
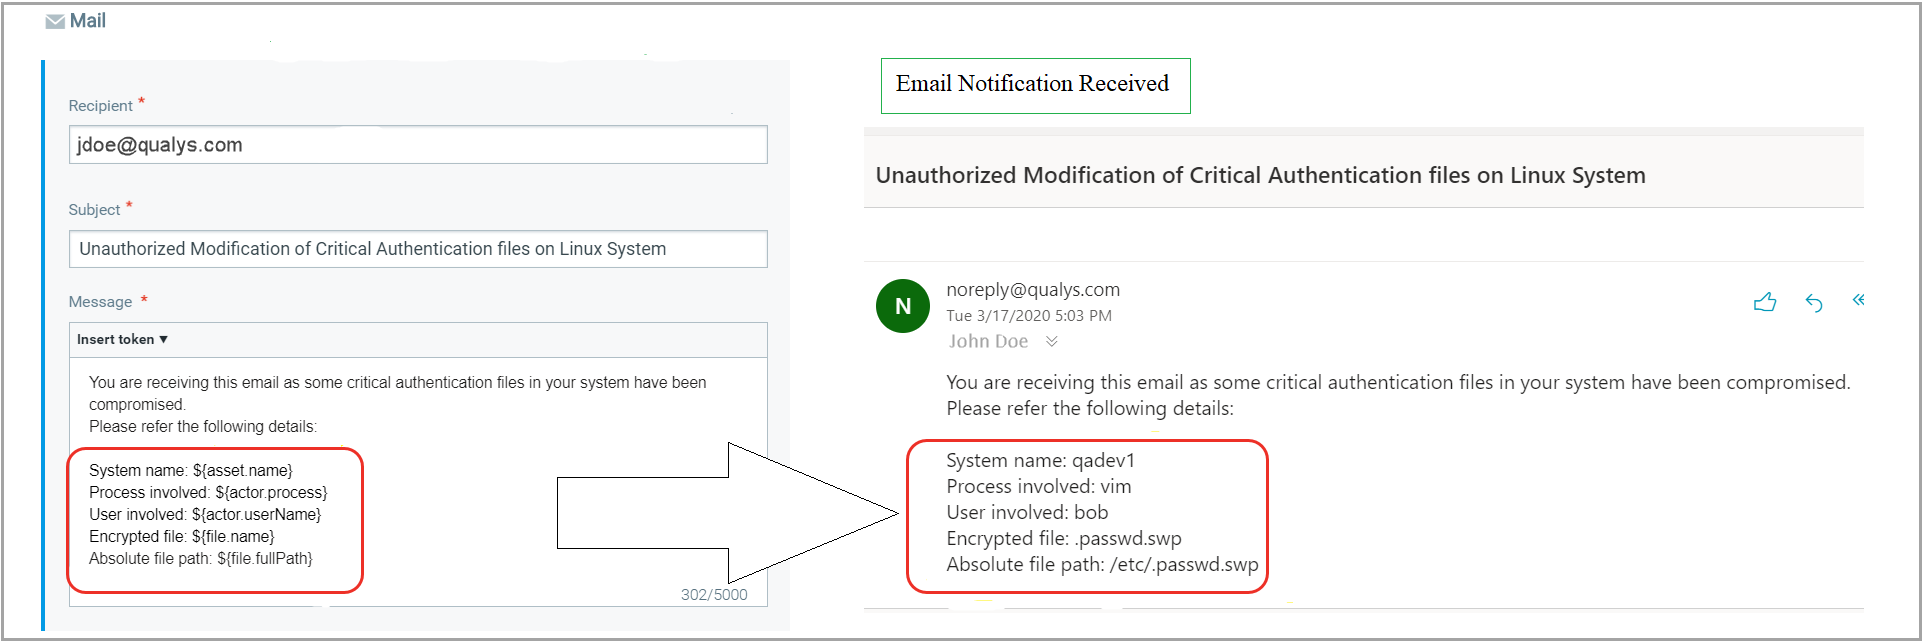
For example, you select the action Send Email (Via Qualys). Add the following information in the mail section to get all the relevant information in the email.
- Recipient: Specify the recipients' email ID who will receive the alert email.
- Subject: Subject of the alert message. For example, "Unauthorized Modification of Critical Authentication files on Linux System"
- Message: You can customize the alert message. Click on the arrow next to Insert Token and add all the relevant tokens. For more information on the tokens, see Searching Events | Searching Incidents | Searching Correlation Rules |Assets fields.
Ensure you add all the relevant information and tokens in the Message section to get all the crucial details of the alert in the notification.