Get Started with Consultant Scanner Personal Edition
Welcome to Qualys Consultant Scanner - Personal Edition! This lightweight scanner appliance is ideally suited for consultants using the Qualys Enterprise TruRisk™ Platform to provide vulnerability and compliance services for their clients.
Quick Look at Scanner
The Qualys Consultant Scanner's look and physical appearance are explained as follows:
Front panel
The image below shows the front panel of the Consultant Scanner.

The scanner’s front panel gives you operational indicators.
- These LEDs tell you about the WAN interface, which is disabled by default. When split network configuration is enabled for your scanner, the left LED is lit (blinking) when there is WAN interface activity, and the right LED is lit (solid) when the WAN interface is enabled. For more details, refer to Split Network Configuration.
- These LEDs tell you about the enabled LAN interface. The left LED is lit (blinking) when there is LAN interface activity, and the right LED is lit (solid) when the LAN interface is enabled.
- Disk - This LED is lit (blinking) when there is disk activity.
- POWER - When powered on the scanner, this LED is lit (solid).
Back panel
The below image shows the back panel of the Consultant Scanner.
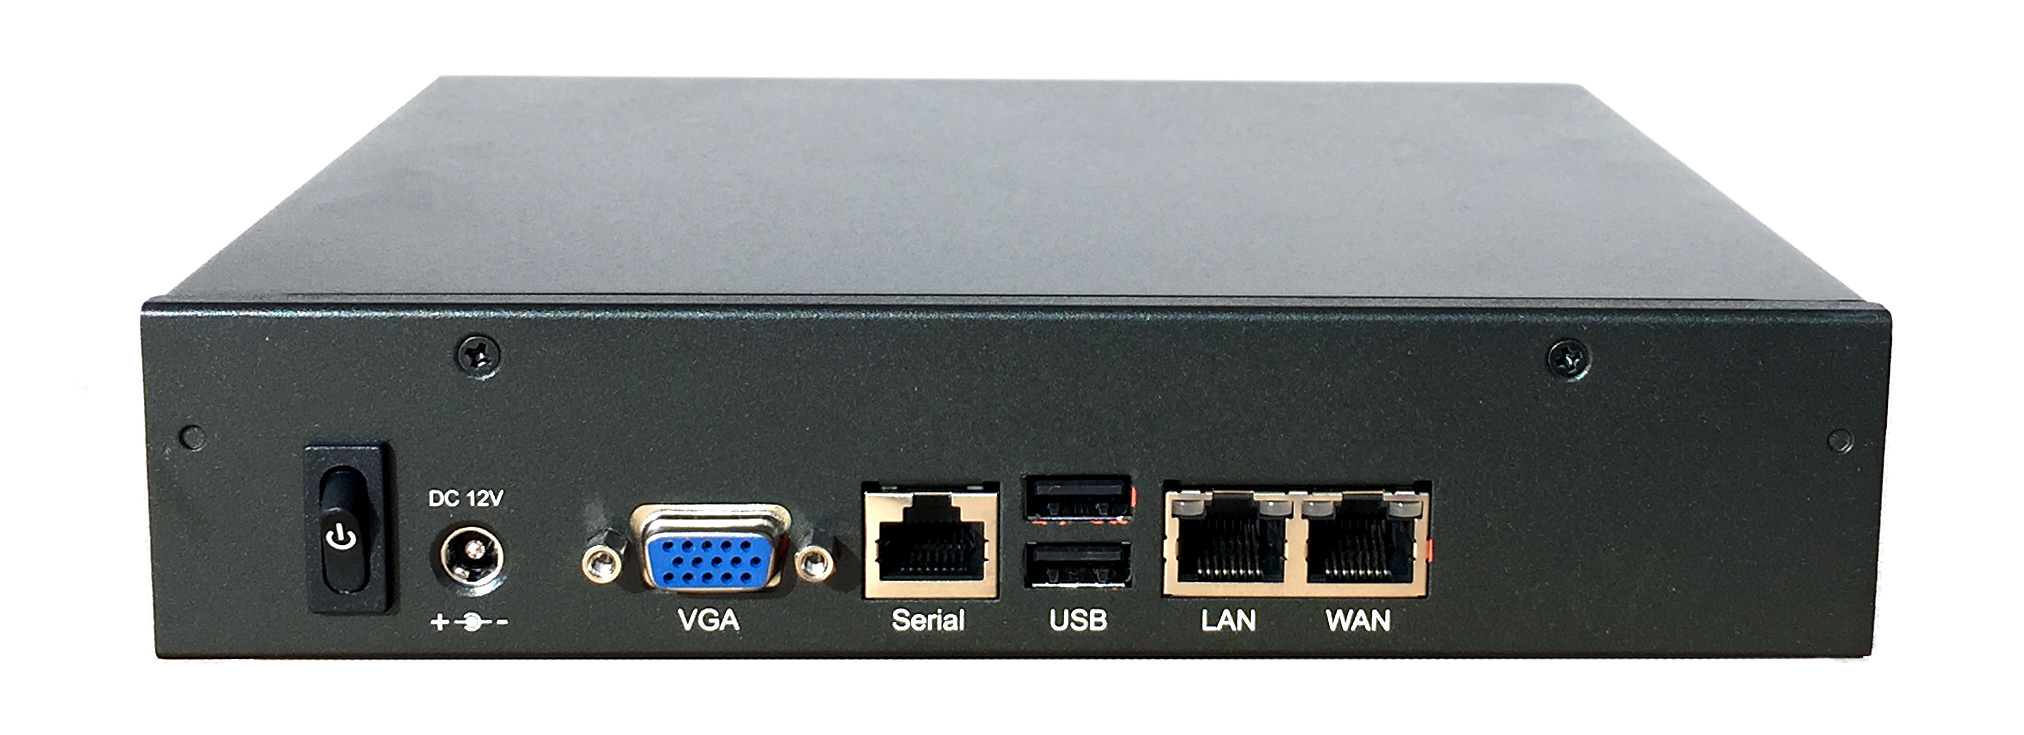
The scanner’s back panel includes a power switch, a power socket, a VGA socket, two USB ports, and Ethernet LAN and WAN ports.
The Serial Ethernet port shown is not used; this scanner does not support serial communication. The only way to access the scanner console is to connect a monitor to the VGA port and a keyboard to one of the USB ports.
Your scanner package from Qualys also includes accessories for proper setup in your networking environment.
For more details, refer to Product Specifications and Credits
Features
The following are the key features of Consultant Scanner:
- Super compact and lightweight
- Plug in any VGA monitor and access the built-in console
- Activate in minutes. DHCP is enabled by default
- Easily configure as needed static IP, proxy, and more
- Bind/unbind with different subscriptions, unlimited times
Prerequisites
To configure Consultant Scanner, the following prerequisites must be met:
- Consultant Scanner Personal Edition packaging from Qualys.
- Qualys Cloud Suite account with Consultant Scanner - Personal Edition enabled. The manager or Unit Manager role is required.
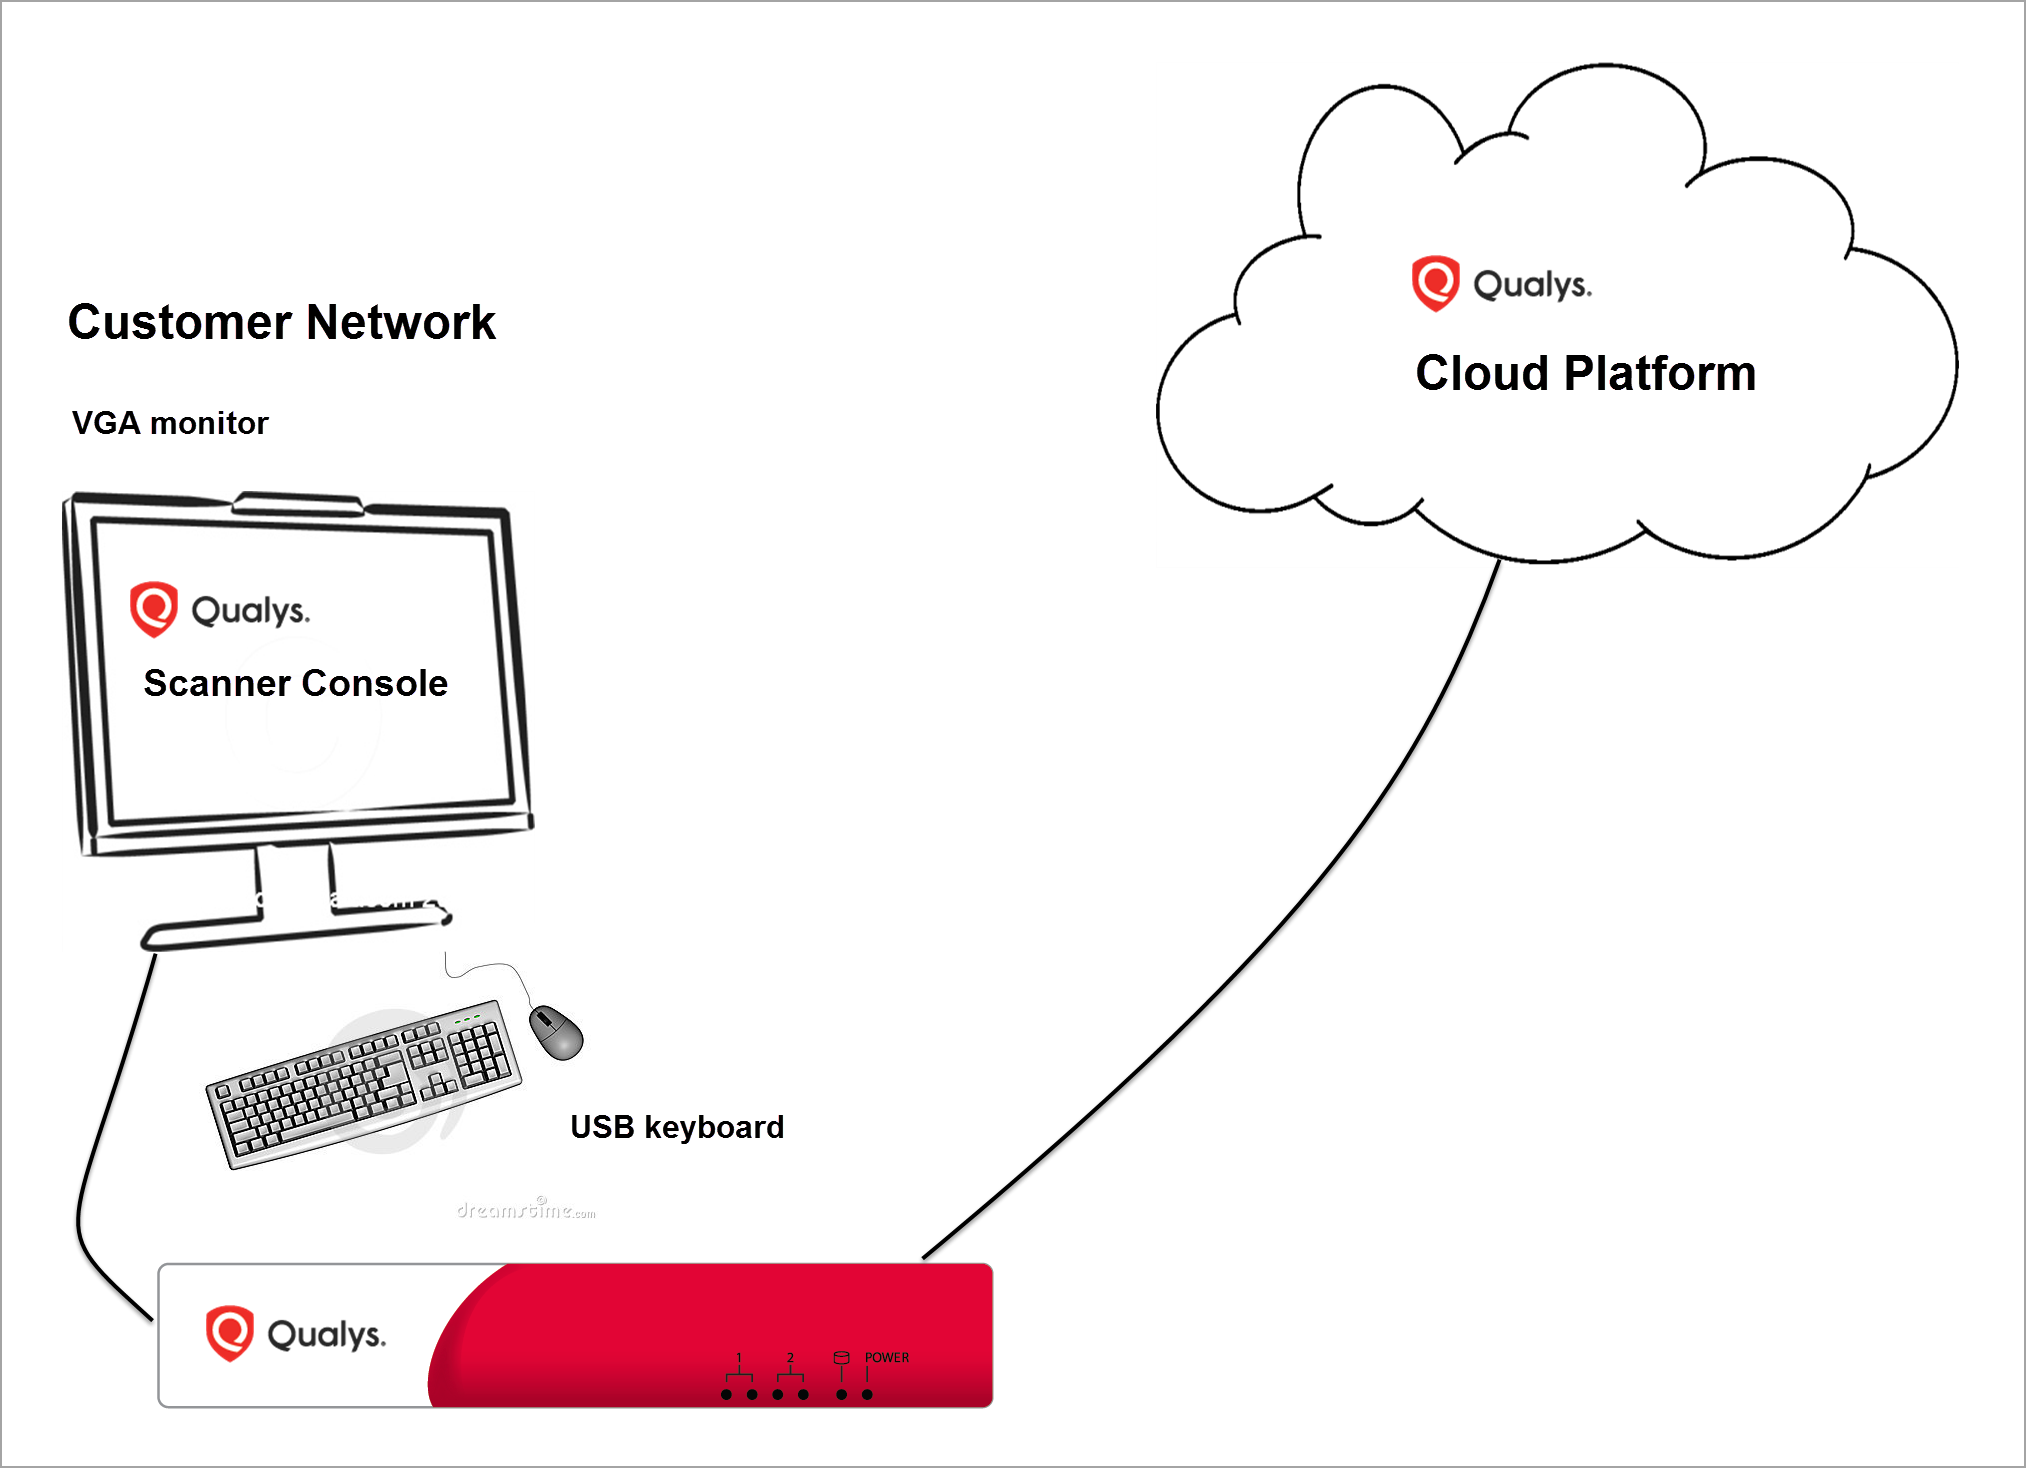
If you are interested in Consultant Scanner - Personal Edition, contact Qualys Support or your Qualys Account Manager. - VGA monitor to connect to Qualys Consultant Scanner Personal Edition.
- USB keyboard to connect to Qualys Consultant Scanner Personal Edition.
Network Requirements
For proper scanner configuration, the following network requirements must be met:
| Parameter | Description |
|---|---|
|
Bandwidth |
Minimum recommended bandwidth connection of 1.5 megabits per second (Mbps) to the Qualys Enterprise TruRisk™ Platform. |
|
Outbound HTTPS Access |
The local network must be configured to allow outbound HTTPS (port 443) access to the Internet so that the Scanner Appliance can communicate with the Qualys Enterprise TruRisk™ Platform. |
|
Network Mode |
When you deploy a Scanner Appliance, it is in IPv4+v6 network mode by default. If your network is configured so that only IPv6 addresses can be used, you must switch to IPv6-only mode. See Enable IPv6-only Mode. |
|
Access to Qualys Enterprise TruRisk™ Platform |
The Scanner Appliance must be able to access certain infrastructure at the Qualys Enterprise TruRisk™ Platform, where your Qualys account is located. Log in to the Qualys Enterprise TruRisk™ Platform and go to Help > About to see the Qualys Enterprise TruRisk™ Platform servers that need to be allowed. |
|
Access to Target Assets |
The assets to be scanned (IP addresses, web applications) must be accessible to the Scanner Appliance. |
|
DHCP (default) or Static IP |
By default, the scanner appliance is preconfigured with DHCP. If it is configured with a static IP address, be sure you have the IP address, netmask, default gateway, primary DNS, and WINS server (if appropriate). |
|
The scanner appliance includes Proxy support with or without authentication - Basic or NTLM. The Proxy server must be assigned a static IP address, allowing transparent SSL tunneling. For example, proxy-level termination (as implemented in SSL bridging) is not supported. Refer to Proxy Configuration for more details. |
|
|
LAN Interface (default) or Split Network config |
The LAN interface services scanning and managing traffic to the Qualys Enterprise TruRisk™ Platform unless Split Network configuration is enabled. Refer to Split Network Configuration for more details. |
|
WINS Support |
If your network is running Windows Internet Naming Service (WINS), the Scanner Appliance needs to use it for hostname resolution during scanning. Using a static IP address, the WINS servers are defined with the static IP settings using the Scanner Console. For more details, refer to Configure Static IP Address. |
|
VLAN Support |
These options are supported
Refer to VLAN Configuration for detailed information. |
Quick Steps to Start the Scanner
Perform the following steps to start the scanner:
-
Get your Activation Code.
You can locate the Activation Code on the Qualys sticker attached to your scanner. -
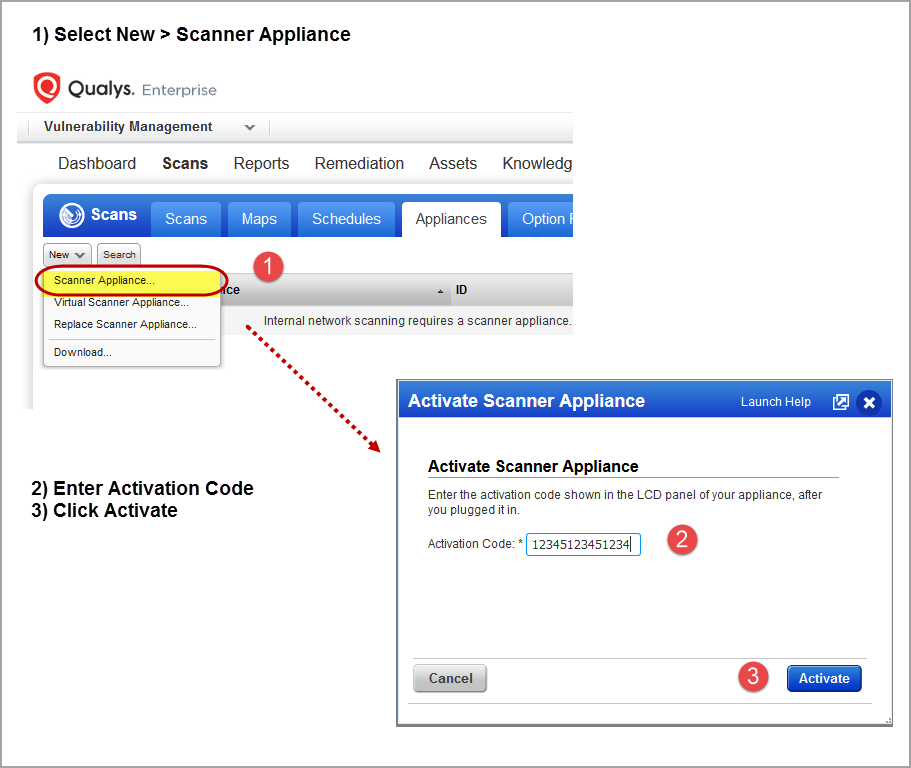
Log in to Qualys Enterprise TruRisk™ Platform and enter your Activation Code.
Navigate to Scans > Appliances and perform the following steps:- Click New.
- Choose Scanner Appliance.
- Enter Activation Code.
- Click Activate.
If you have a Unit Manager role, you must select an asset group to add the scanner for activation. This makes the scanner available to all Unit Managers in your business unit.
-
Power on the Scanner.
Upon success, you can see the scanner appliance name and IP address. This appears only after the scanner successfully connects to the Qualys Enterprise TruRisk™ Platform.
Once the power is on, it tries to connect the appliance to the Qualys Enterprise TruRisk™ Platform using DHCP by default. Use the Scanner Console to configure network settings as needed. For more information, refer to Configure IPv6 Address for scanning.