Scans FAQs
What vulnerabilities do scans check for?What vulnerabilities do scans check for?
Our KnowledgeBase of vulnerabilities is the largest in the industry and it is available to you at all times. Multiple sources contribute to updating the KnowledgeBase on a continuous basis, including the research of our own Security Engineers. When you launch a vulnerability scan, we'll check for all vulnerabilities if you choose the option profile called "Initial WAS Options". Want to limit the scan to certain vulnerabilities? No problem, just update your option profile before you launch your scan. Go to the KnowledgeBase and create a search list (this is a list of vulnerability QIDs), then edit the option profile you'll use for the scan and select the search list.
Each vulnerability in the KnowledgeBase is assigned a unique ID (QID), a type (vulnerability, potential vulnerability, information gathered) and additional information for classification and tracking. Learn more
Tell me about the ScanTrust optionTell me about the ScanTrust option
Enable the ScanTrust option to scan a web application protected by WAF. This lets you get visibility on vulnerabilities that are not yet fixed but blocked by WAF. Learn more
How to view and understand the scan status?How to view and understand the scan status?
The scan status appears in scan results and reports, and you can see the status of your running and completed scans in the Status column of the scans list. To track the progress of a running scan, hover over the scan in the scan list and choose View from the menu. Learn more
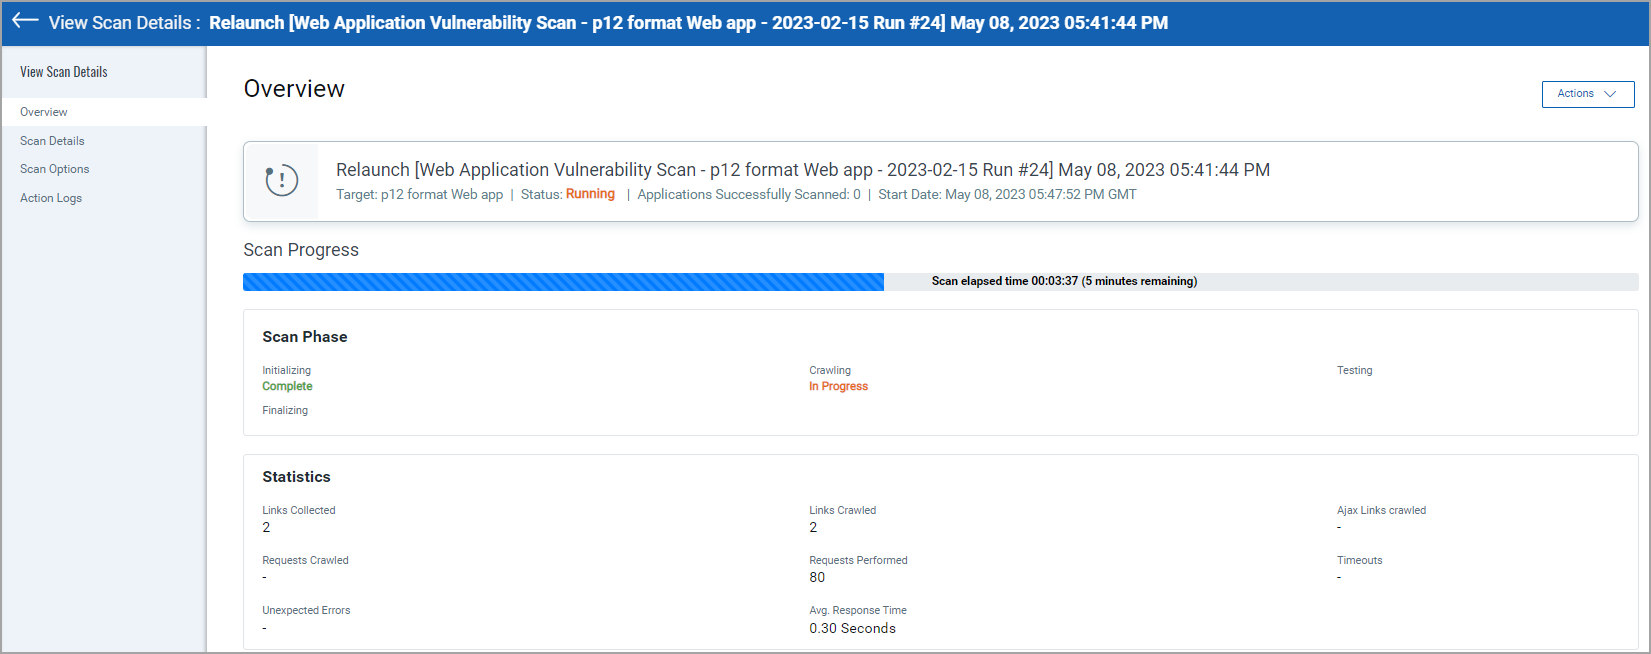
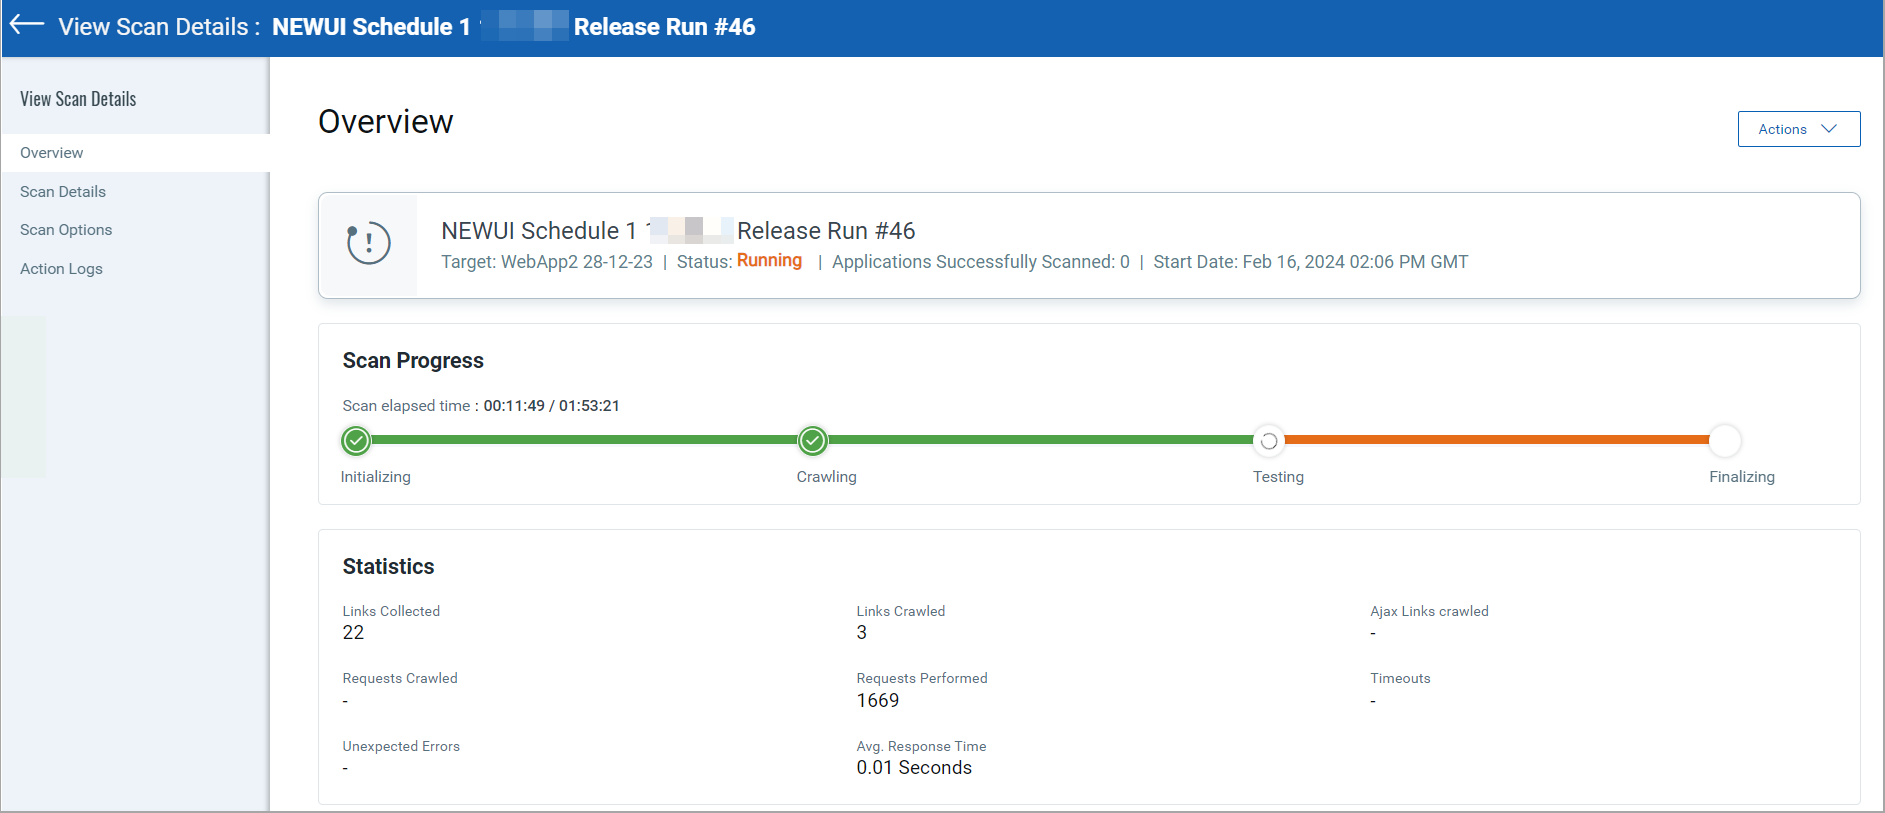
Tell me about scan progressTell me about scan progress
We display more information in the scan view to give you a better picture about the scan progress by displaying the scan phases along with the status. Once the scan is launched, go to the quick actions menu and select View. You can view the scan progress and the various phases it undergoes before the scan is completed. We display the progress of each phase for you to know the scan status.
- Initializing
- Crawling
- Testing
- Finalizing
We also display the scan progress bar that tells you the time elapsed since the scan was launched. The elapsed time portrays a clear picture of how long the scan has been in progress from the time it has been launched.
How can I tell if authentication was successful?How can I tell if authentication was successful?
The scan preview and results tell you whether authentication was successful. If authentication was successful, the authentication record name appears in green. If not successful, the name appears in red. Learn more
Tell me about scan statisticsTell me about scan statistics
You can view scan statistics that can help you analyze your scan in a better manner. Once the scan achieves Finished status, you can select View from the Quick Actions menu and view the scan statistics. The statistics display Ajax Links Crawled, Request Crawled, Timeout Errors, and Unexpected Errors for the scan.
How to understand when the scan is completed?How to understand when the scan is completed?
When the scan is completed, the scan status is displayed as Finished. At this time you can select View from the Quick Actions menu to see an overview of the scan. If you have notifications turned on you can get an email. This is especially useful if you logged out of the application while the scan was running. Learn more
Can I schedule scans?Can I schedule scans?
You can setup scheduled scans so that scans run automatically and you receive scan results on a regular basis - daily, weekly or monthly. Regular scan results give you the most meaningful reports and help you lower security risk. To schedule scans, go to Scans > Schedules and click New Schedule.
Can the scan be deactivated?Can the scan be deactivated?
How to download the schedules to iCalendar?How to download the schedules to iCalendar?
Can I cancel a scan after it's launched?Can I cancel a scan after it's launched?
Yes, you can cancel an unfinished scan (child scan in a multi-scan as well). Just select the scan in the scans list and choose Cancel from the menu. The Results will not be returned for scans canceled in this way. To return results for a cancelled scan, we recommend using the cancel setting when launching or scheduling your scan. (Note: the Cancel Scan option is enabled only after 20 minutes of scan goes into Running status.)
Choose the Scan Cancel option to cancel a scan automatically after some period of time - a number of hours, or at a specific time. You can choose the Cancel Option for a new scan, child scan of a multi-scan and a scan schedule, and for a web application's default scan settings.
Yes, you can use Cancel Scan with Results option from the quick action menu to cancel a unfinished scan and then retrieve the partial scan results. (Note: the Cancel Scan with Results option is enabled only after 20 minutes of scan goes into Running status.)
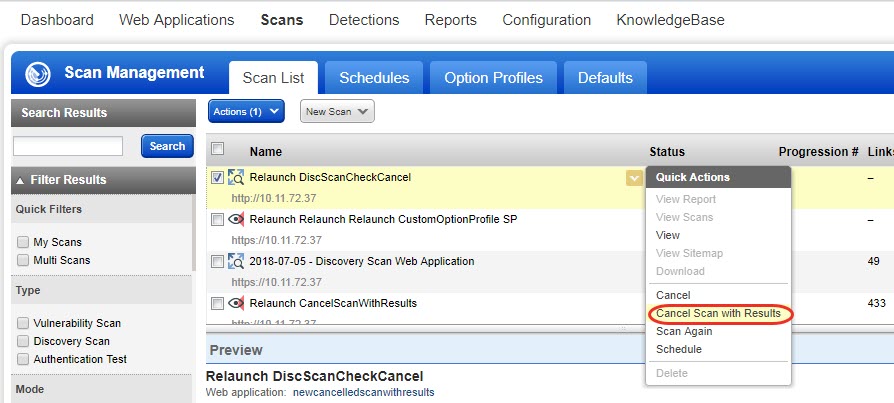
To view the partial data that has been retrieved by the unfinished scan, click View Report from the quick actions menu for scans with Canceled With Results status. The Cancel Scan with Results option is available for child scan in a multi-scan as well.
Yes, you can. Like "Canceled with Results" scan, you can view the findings (vulnerability, sensitive content, and information gathered) for scans with status as "Service Errors Detected". You can see all the findings that were detected till the scan got terminated. Findings for these scans will be visible in the web application report and Detections tab.
In the Service Error Detected scans, we will not mark any finding that was detected in an earlier scan as "Fixed" because we do not know if the finding is present or not as the scan could not be completed. For such findings, we display a message that the vulnerability is not tested in the findings' history on the Vulnerability Details screen.
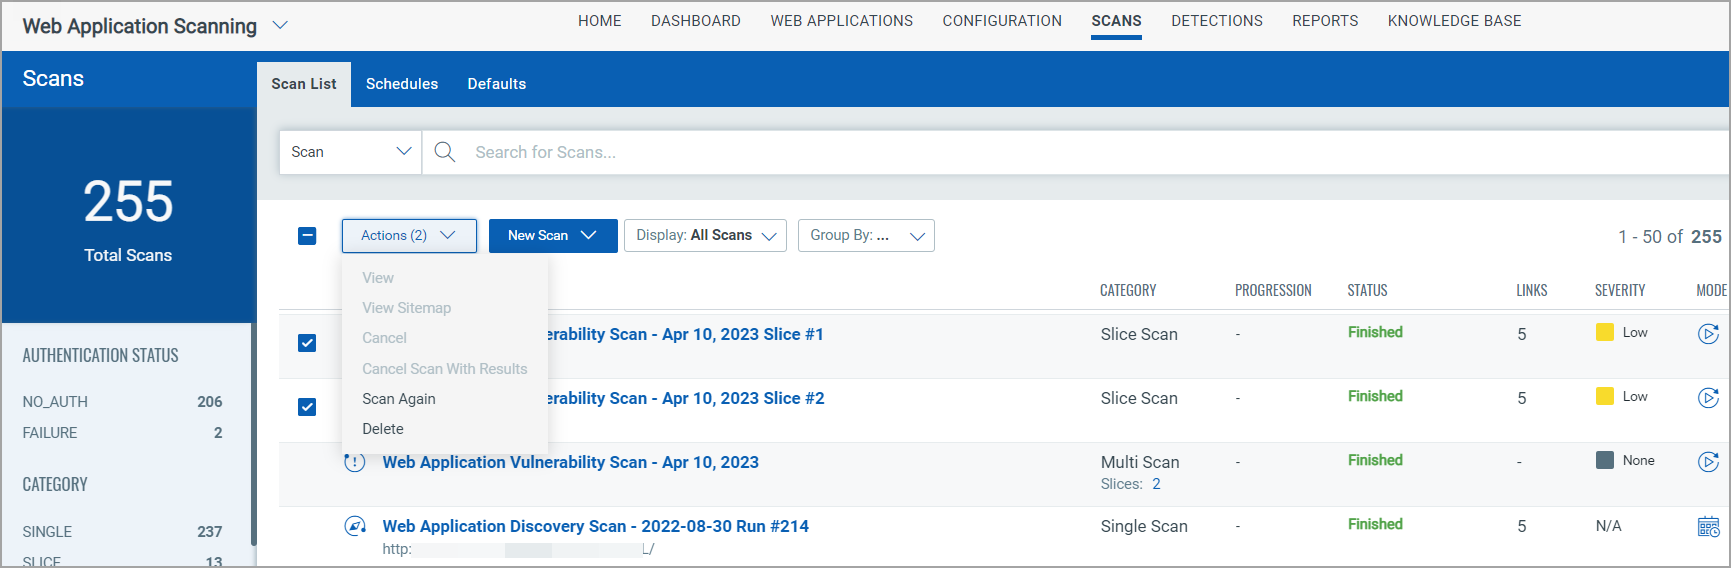
Can I run my scan again?Can I run my scan again?
Yes. Identify the scan you want to run again and choose Scan Again from the Quick Actions menu. We'll do our best to pre fill the scan settings to match the original scan. We may not be able to pre fill settings if there were changes in your account like the option profile was renamed. Interested in automated scanning? Go to the Schedules tab and set up a recurring scan schedule for continuous monitoring.Type your dropdown text here
How long are my scan results saved?How long are my scan results saved?
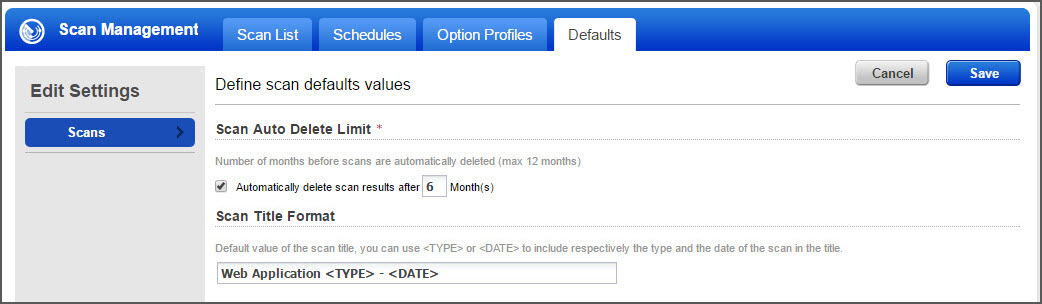
By default, scan results are Never Deleted. Scan owners have the option to set a storage limit of 1 to 13 months. You define scan storage settings in the WAS application.
How do I configure scan storage?
Choose Web Application Scanning from the application picker and go to Scans > Defaults. Click Edit to define your scan storage settings.
Select the "Automatically delete scan results after __ months" check box to define the scan storage settings.
How to understand how a scan is launched?How to understand how a scan is launched?
You can view how the scan is launched from Mode displayed in the Scan List tab with different icons. Learn more
How can I troubleshoot a scan?How can I troubleshoot a scan?
You can troubleshoot most scan problems by viewing the QIDs in the scan results. Learn more
You might see this error reported for a web application scan. For details on how to reproduce Learn more
Multi-Scan Support - For high volume scanningMulti-Scan Support - For high volume scanning
Web Application Scanning is the most scalable solution. WAS has the ability to support large web application scanning programs by adding the ability to scan any number of web applications as a Multi-Scan. This feature enables you to scan hundreds or even thousands of web applications you may have in your organization with granular insight into what scans are running and which ones are complete.
You can:
- Use asset tagging to categorize applications and scan the assets together - just select the tags for your scan. If you have not tagged the applications, select the appliactions names for scanning.
- For a Multi-Scan in a Finished state, you can delete some or all of the individual (child) scans. If you delete all individual scans, you have an option to delete or keep a parent multi scan. In this case, the parent scan is empty and has no scan results associated with it.
- To relaunch only a few of the slice scans, go to Scans > Scan List and select the multi-scan, then click View from the Quick Actions menu. Select the required slice scan and then click Scan again from the Actions menu to relaunch the required child scans. The title for such scans is in the format: Relaunch [original scan name] <DATE> <TIME>
For multi-scan is completed, if you see ![]() , it indicates that one or more scans ended in "Error" status or some other problem occurred in the Multi-Scan itself.
, it indicates that one or more scans ended in "Error" status or some other problem occurred in the Multi-Scan itself.
Multi-Scan Support - For advanced frameworksMulti-Scan Support - For advanced frameworks
The SmartScan feature provides additional scanning capabilities and techniques for scanning sites that use advanced JavaScript frameworks and/or rely heavily on AJAX calls. To use the SmartScan feature, you need to enable SmartScan in the WAS option profile.
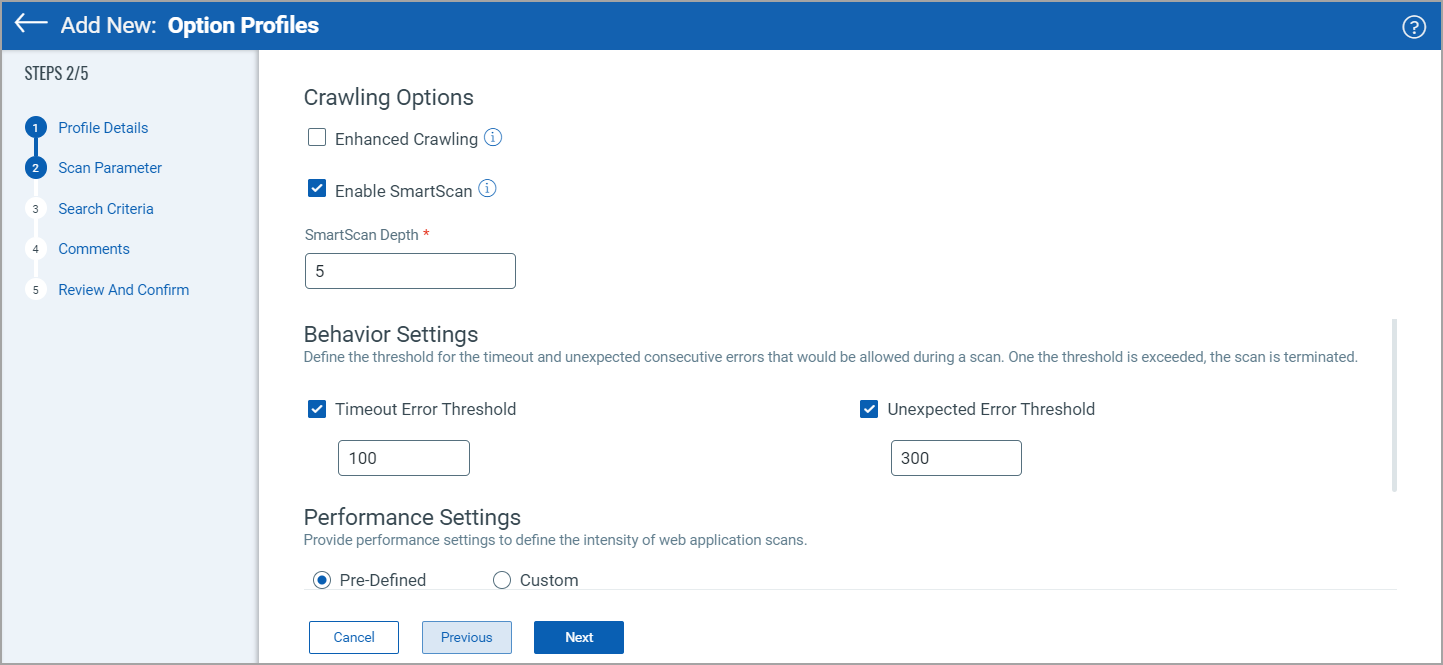
Enhanced Crawling: The enhanced crawling in your option profile for your scans improves scan coverage for your web application. With the enhanced crawling enabled, more links can be crawled. We will re-crawl individual directories present in the links which are found during crawling. Learn more
How do you configure the default settings?How do you configure the default settings?
You can easily configure default values for scan at the user level. You can configure the number of months for which you want to retain the scan data and default format of the scan title. User default settings will always override the subscription default settings.
Simply go to Scans > Defaults to view the current settings. Click Edit to change the values and save your changes.
Type your dropdown text here