Adding a New Registry to Scan
This topic explains the Docker host requirements, registry sensor deployment, adding a new registry for scanning, and scan configurations.
Docker Host Requirements
As a prerequisite, you must install the registry sensor on a docker host (with Docker, Containerd, or CRI-O Runtime) which has access to the registry to pull images to scan.
| Docker version | 1.12 or later |
|---|---|
| Disk space on docker host | Minimum 20 GB of free space on the partition where docker is installed. This is required to scan registry images. Additionally, 1 GB of free space is required for persistent storage. |
Connectivity
The registry sensor host should have connectivity to the registry to be scanned. If the runtime is Docker, you can validate connectivity by performing a successful Docker login from the host to the registry. If runtime is Containerd or CRI-O, you can validate connectivity by pulling any image from the registry.
| Docker Runtime |
Command: Example: |
|---|---|
| Containerd/CRI-O Runtime |
Command: |
Download and Deploy Registry Sensor
To download and install a Registry sensor, refer to Installing Sensors.
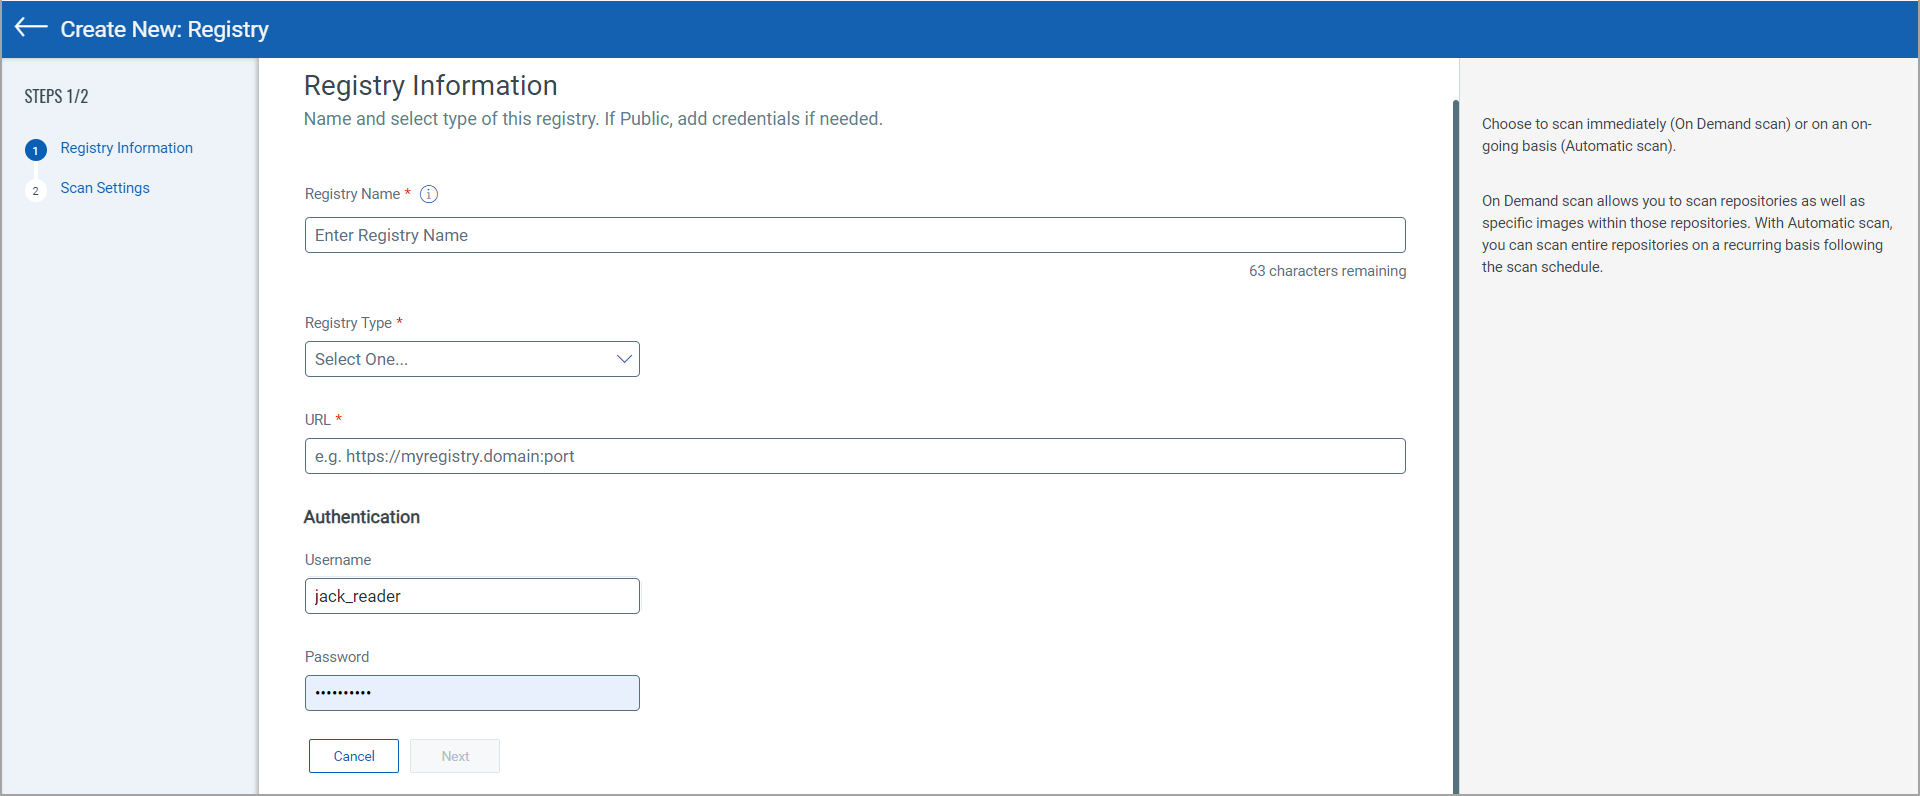
Add Registry Information
You need to add a registry in order to scan it. Go to Assets > Registries, and click New Registry. (Ensure that the registry sensor deployed on the docker host is in running state.)
To perform vulnerability and compliance scans we need to connect to the registry using credentials. Different types of credentials are needed to connect to different registries. Credential types supported are Token, BasicAuth, DockerHub, and AWS.
Click any link below to see the steps for connector creation.
AWS ECR Connector (Global and US GovCloud)
Azure Container Registry Connector
Google Cloud Registry Connector
Google Artifact Registry Connector
Using OpenShift?
Use the Docker V2-Private registry type, and provide the OpenShift URL. See the following link to learn how to create a service account and extract the service account token.
See the following links for help with registry settings:
JFrog Artifactory Private Registry
Configure Scan Settings
After adding registry information, click Next to continue to Scan Settings.
You can choose to scan immediately (On Demand) or on an on-going basis (Automatic). An on-demand scan allows you to scan repositories as well as specific images within those repositories (use date and tag filters). With an automatic scan, you can scan entire repositories on a recurring basis following a user-specified scan schedule.
Add one or more repositories to scan. In the Repository field, enter the full repository path up till the last sub-directory containing the images you want to scan (except for Google Cloud Registry and Google Artifact Registry, see the Notes below).
The following command helps you to get a list of full repository names that are part of a registry:
curl -u : https:// url>/v2/_catalog
-
For Google Cloud Registry, the repository name should not include location information, because you have already provided the location under registry information. For example, the repository name should be: project-Id/repository-name.
-
For Google Artifact Registry, only the repository name is needed. We'll auto-populate the full path.
-
Wildcard support may be enabled for your subscription. See Wildcard Support below.
Using Filters for On Demand ScansUsing Filters for On Demand Scans
When the scan type is On Demand, you'll see filters that allow you to select specific images within the repository to scan.
-
By Date: Filter the list of images based on when the image was created. Select one of the options on the Created Date menu for the number of days, weeks or months ago the image was created.
-
By Tags: Filter the list of images to scan within the repository by selecting tags assigned to those images. Enter a single tag name and click Add. Then enter another tag name and click Add, and so on.
Using JFrog Artifactory Private registry? In this case, you'll need to select images by tag name. You can further filter images by the image pushed date.
Pushed Date: This option allows you to filter the images to be scanned based on when each image was pushed into the repository being scanned. Choose an option from the Pushed Date menu (e.g. Today, Yesterday, Last 7 Days, Last 30 Days, etc). Choose "All" to scan all images pushed into the repository regardless of the pushed date or "Custom Days" to only scan images pushed into the repository a set number of days ago that you specify.
Scan Schedule for Automatic ScansScan Schedule for Automatic Scans
Configure how often an Automatic registry scan job will run – daily or weekly. Choose an option from the Recurrence menu under Scan Schedule.
For daily scans, select the time of day you want the scan to start from the Start Time menu. The scan starts every day at the selected time.
For weekly scans, select a day of the week and the start time. The scan happens every week on the specified day and time.
The Scan All Images OptionThe Scan All Images Option
You can get this feature enabled for your subscription. Contact your Technical Account Manager or Qualys support to enable it.
When this feature is enabled, you can select the Scan all images check box to force the scan on all images every time the registry scan is launched.
The Scan All Images Option for On Demand Scans:
By default, the first scan for a new registry scan schedule scans all matching images and creates a baseline. The subsequent scans include only newly found images.
The Scan All Images Option for Automatic Scans:
In automatic scans, the Scan all images option scans all images from the specified repositories every time a scan is launched.
In an Automatic scan schedule, this option is available for selection only when you have selected a weekly recurrence.
When selecting this option, you need to select either of the following options to limit the number of images retrieved for scanning:
-
Image Tags Limit: Specify the maximum number of image tags to be scanned. You can enter up to 20. The tags are selected based on their created or modified date. For example, for the image tags limit of 5, the last five created or modified tags are selected. All images with the selected tags are scanned.
-
Created Date: Select a time period to scan all the images created during that period. You can select up to the last three months.
-
You need sensor version 1.22 or later to use the Scan all images option for automatic scans.
-
The public registry must be accessible from the host where the sensor is deployed.
Wildcard SupportWildcard Support
This feature must be enabled for your subscription. Please reach out to your Technical Account Manager or Qualys Support if you're interested in this feature.
When this feature is enabled, you’ll be able to use wildcards when entering the repository name or image tag name when configuring a registry scan schedule. Automatic scans support wildcards for repository names. On Demand scans support wildcards for repository names and image tag names.
You have these options:
- Enter .* in the Repository field to match all repository names or in the Images field to match all image tag names. For JFrog Artifactory registry, you must use AQL regular expression syntax. In this case, enter * on its own (instead of .*) for repository name or image tag name.
- Use the wildcard (*) at the start of the repository or tag name like *value to match any name that ends with the value. For example, *ABC would match DemoABC, RepoABC, SampleABC, etc.
- Use the wildcard (*) at the end of the repository or tag name like value* to match any name that starts with the value. For example, 123* would match 123456, 123ABC, 123Sample.
-
For automatic jobs, if a wildcard entry is provided in the repository along with an Image tag limit filter, the sensor will scan the specified number of images from each repository.
For example, if theimage tag limitvalue is set to '2', the sensor will scan 2 images from each repository.
What happens next?
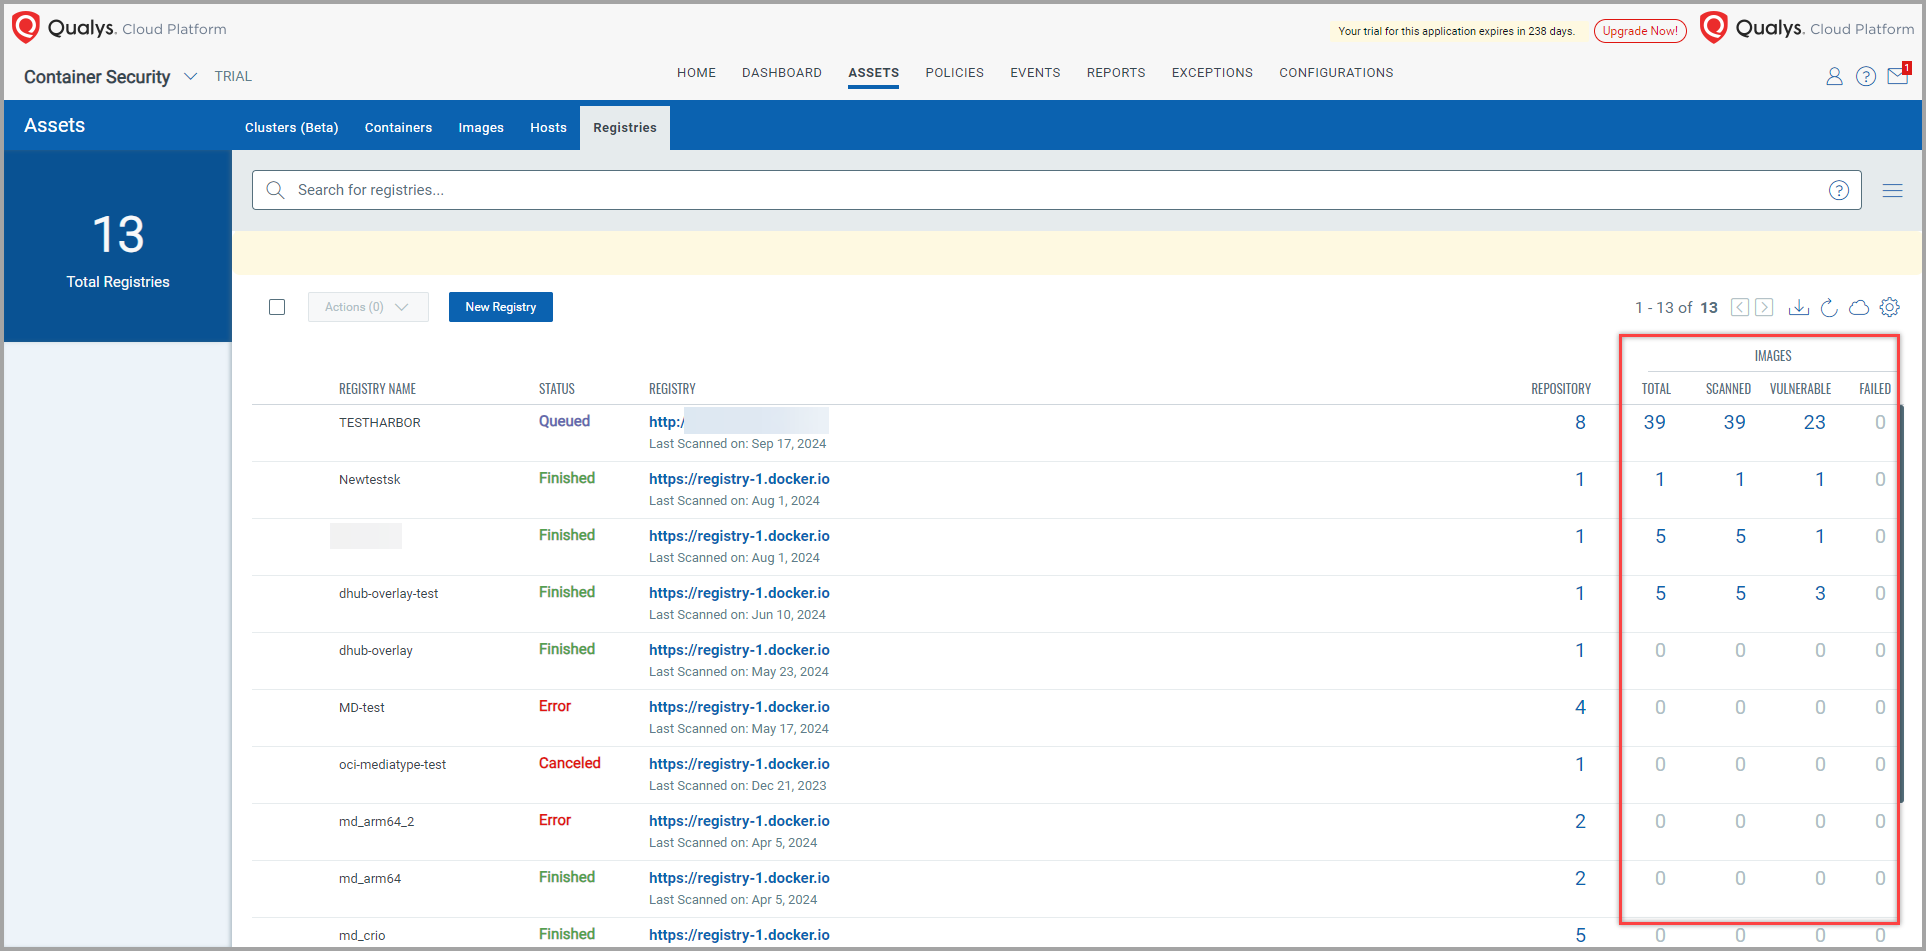
Once you connect to the registry, Container Security pulls the inventory data and performs scans on repositories and images within the registries. Vulnerable images are listed on the Assets > Images tab.
To get the total count of vulnerable images in a registry, go to the Assets > Registries tab. This Registry listing page provides details about the registry name, registry path, and count for scanned, vulnerable, failed images in that registry.
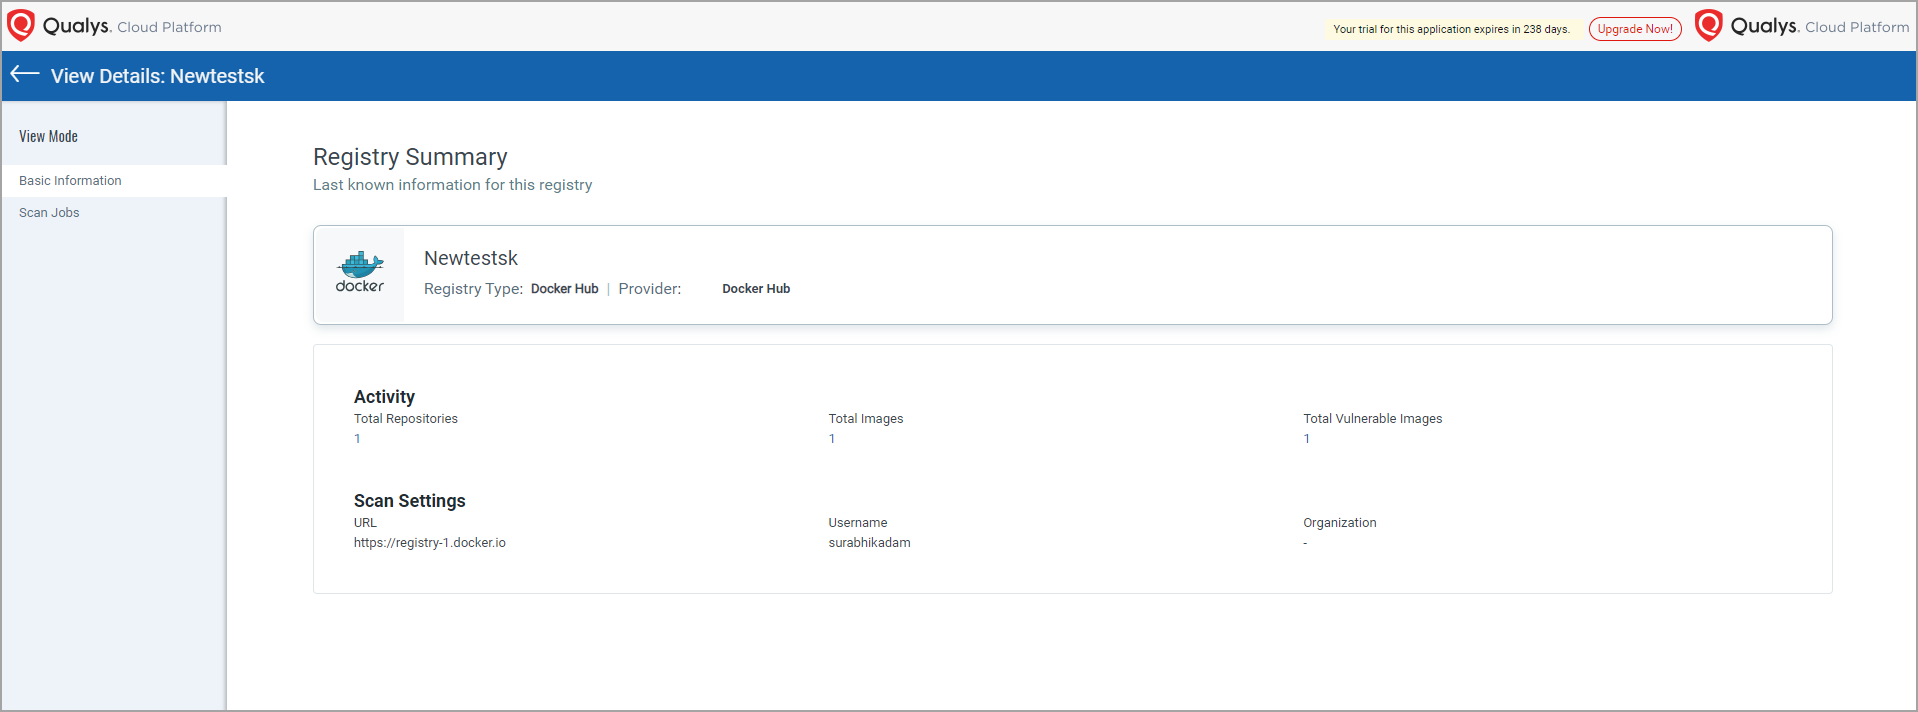
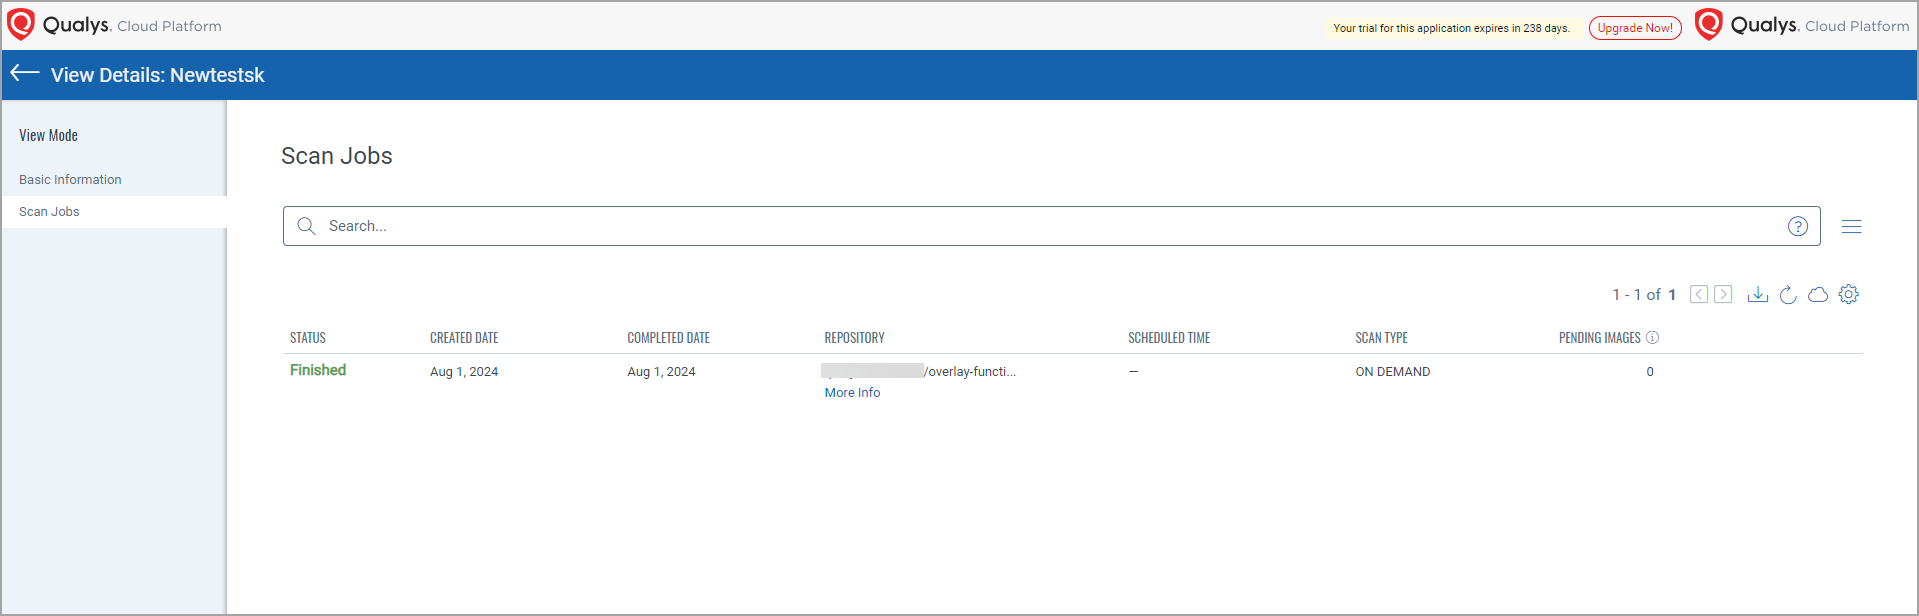
To get Click View Details in the Quick Actions menu of a registry.

The View Details page provides more information about the Registry under Registry Summary and the scanned job under Scan Jobs.
See Also