Enterprise TruRisk Management Release 1.9
June 05, 2026
Stay Informed with TruConfirm Scan Notifications
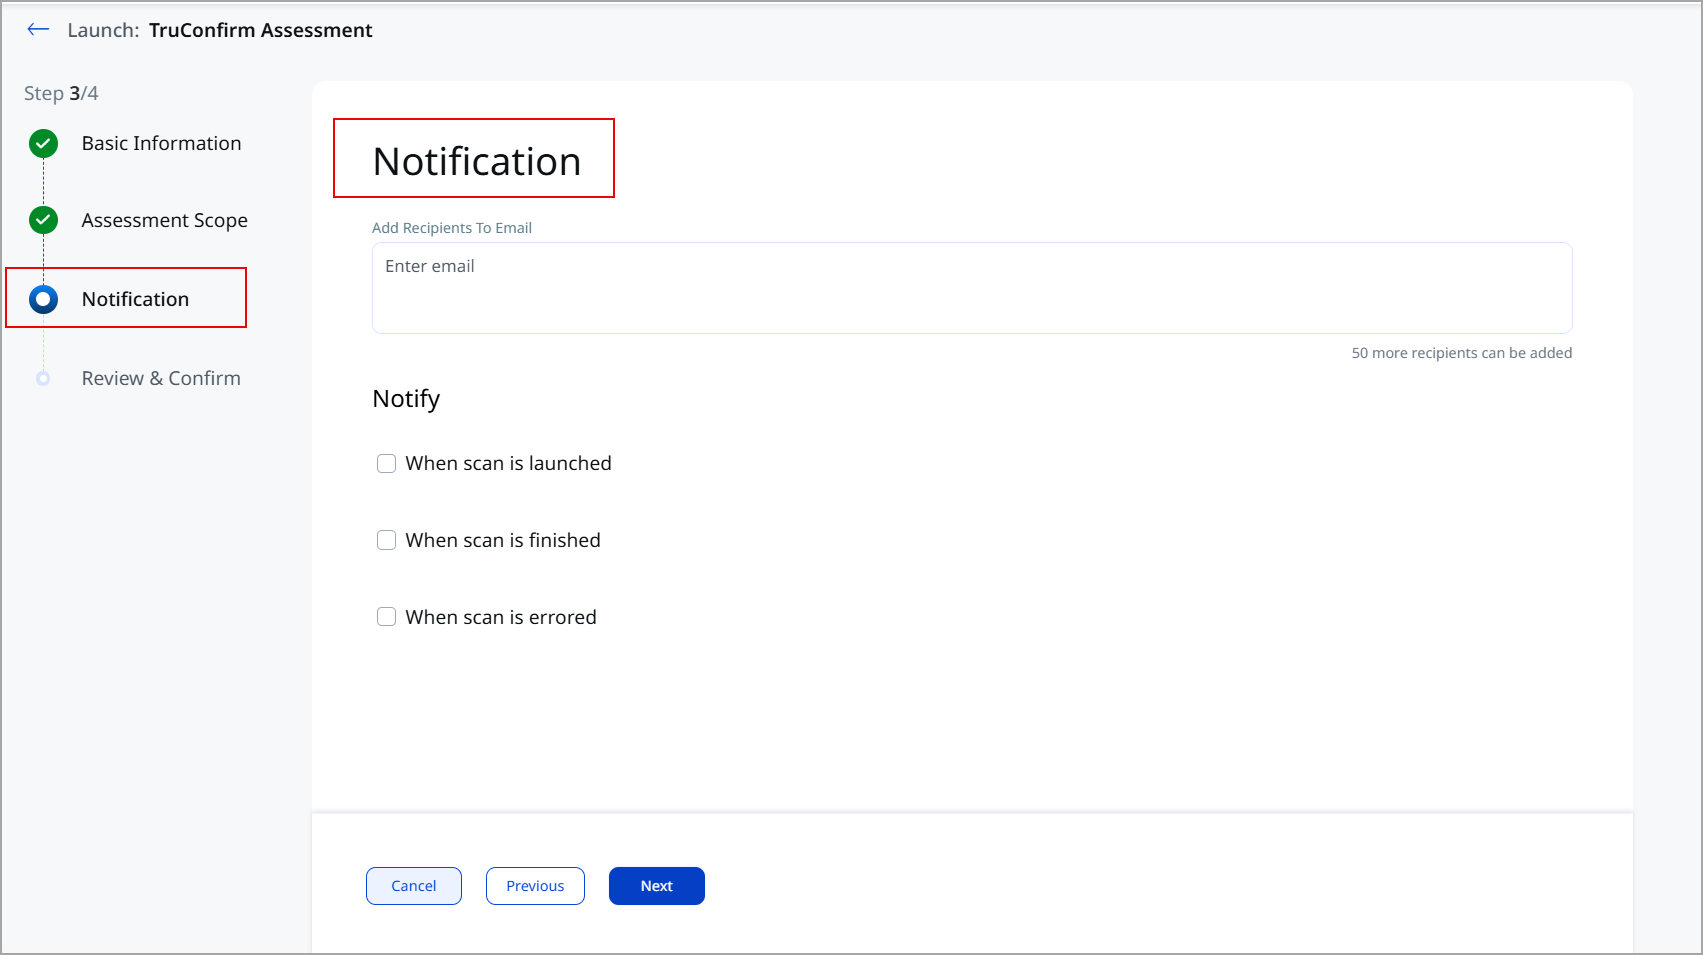
You can now set up and manage email notifications for your TruConfirm scans to stay updated on the scan status. Whether it is a launched, errored, or a finished scan, you can receive clear, detailed email updates to help you stay on top of your TruConfirm scan operations. To configure the scan, the system offers the following key capabilities:
- Easy recipient management: add multiple email recipients and easily track how many more recipients you can add.
- Customizable notification triggers: choose when to send notifications, whether it’s when a scan is launched, finished, or errored. When you select any of these required options, the platform allows you to enter a custom message to be included in the email. If you do not enter a custom message, the platform adds a default message to the email.
- Review before you confirm: check all your notification settings in a clear, read-only summary before proceeding.
How to set up notifications?
When configuring a TruConfirm scan, the platform shows the Notification step. In this step, specify who should receive the notifications and when to send the notifications:
- When scan is launched.
- When scan is finished.
- When scan is errored.
Residual Exposure Gap Tooltip Enhancement
The Residual Exposure Gap (REG) section tooltip is enhanced for improved clarity and usability:
- The Overview section explains REG calculation using WOW (attacker weaponization speed) and AWE (remediation speed), with visual context.
- The States section clearly defines outcome conditions such as Exposed, Defended, Tied, and additional scenarios like Open · Growing, 0-Day, and No Data. This enables quicker understanding of exposure risk and more confident decision-making with clearer definitions and context.
Exploit Status Visibility Enhancements for Improved Threat Prioritization
We have refined how exploit statuses are displayed to provide clearer, more actionable insights into vulnerabilities.
- Actively Exploited: Indicates that the vulnerability has been actively exploited in the past 30 days.
- Exploited: Indicates that the vulnerability has been exploited more than 30 days ago but is not actively being targeted.
- Weaponized/ POC/ No Exploit: Indicates that there is no active exploitation, based on the vulnerability's potential risk level.
This enhancement provides a more intuitive, actionable view of vulnerability statuses, helping you effectively prioritize threats. You can see these statuses across key pages, including CVE lists, Findings Listings, and Findings Details, making it easier than ever to stay informed and prioritize your security efforts.
KnowledgeBase Tab Enhancements
This release introduces the following enhancements in the KnowledgeBase tab:
- Tooltip for Exploitability Insights
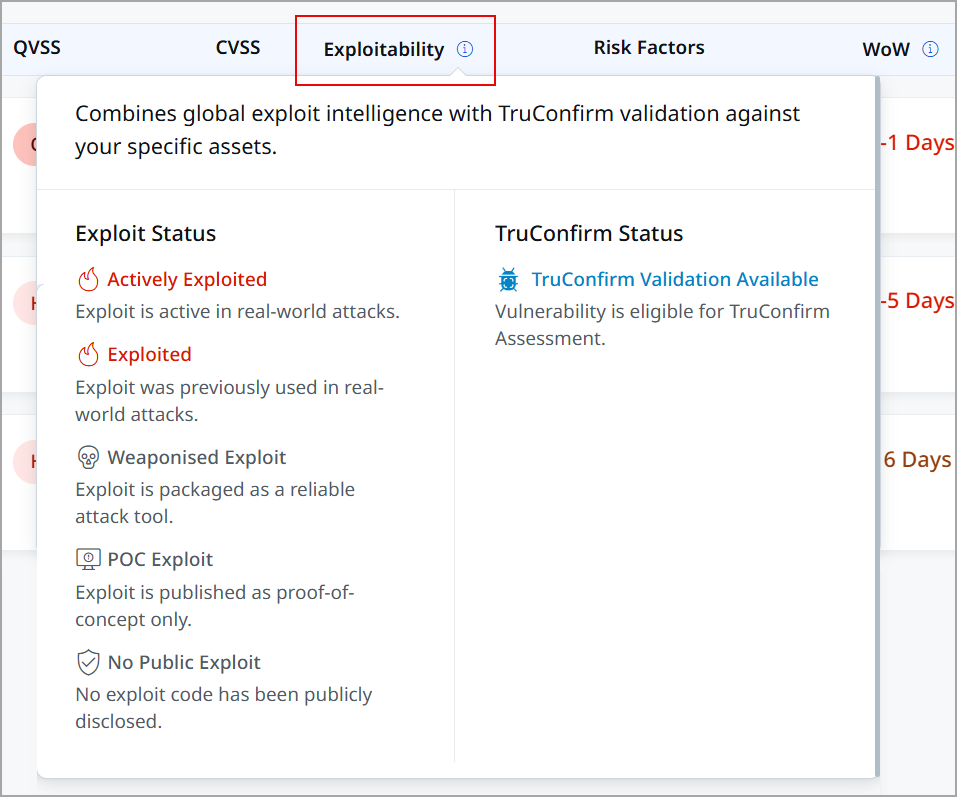
We have updated the Exploitability column tooltip. This tooltip now provides a clear, structured breakdown of exploit statuses and TruConfirm validation results, enabling users to make data-driven decisions with ease. The tooltip categorizes vulnerabilities into exploit status (such as actively exploited, exploited, or weaponized) and TruConfirm status. The intuitive, color-coded icons and concise descriptions ensure quick interpretation, streamlining the identification and remediation of high-risk vulnerabilities.
- Introduced New Impacted filter
We have added an Impacted filter to the KnowledgeBase tab, making it easier for you to focus on the vulnerabilities that directly affect your assets. You can simply click the Filters drop-down and select Impacted to filter the details. This new filter helps you quickly narrow down results to prioritize high-risk issues, ensuring your remediation efforts are targeted and effective.

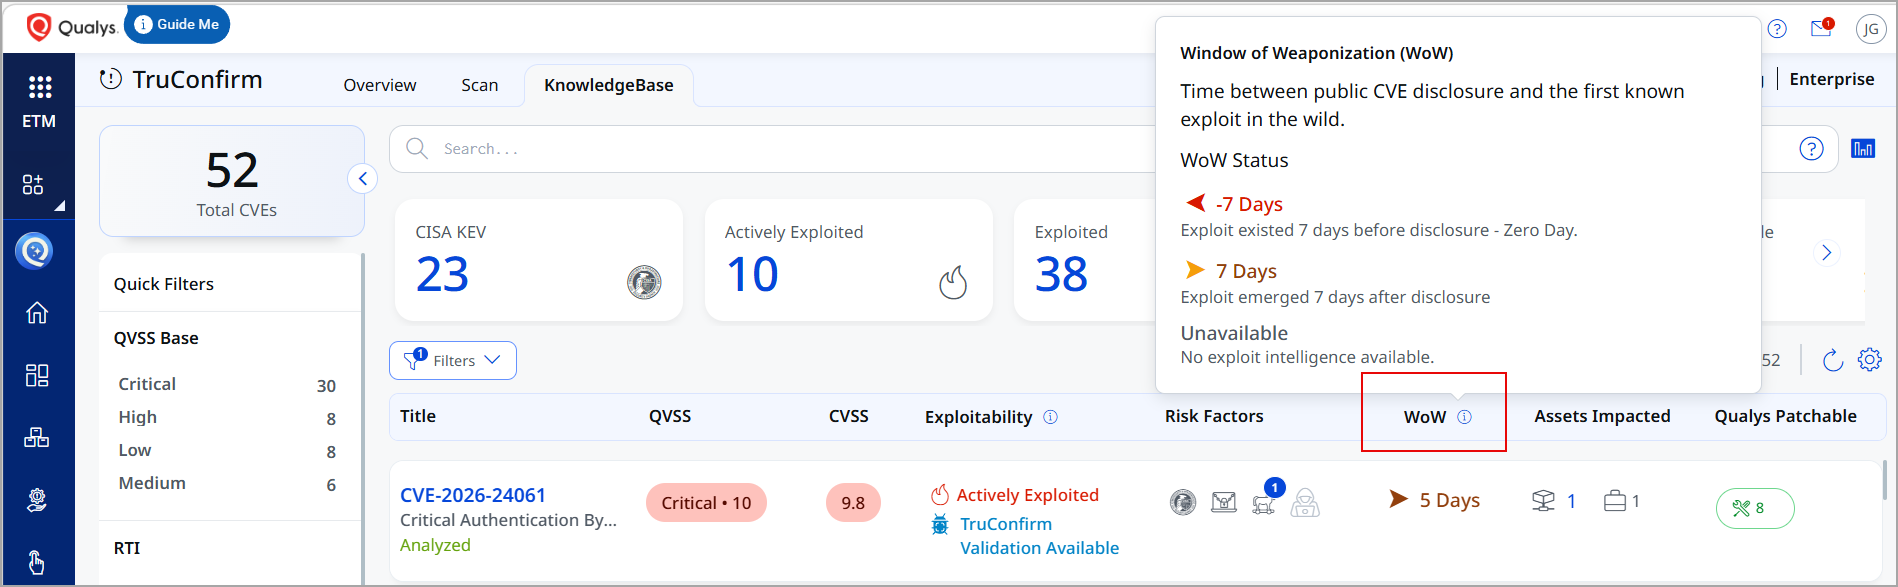
- Introduced New Window of Weaponization column
We have added a new column: Window of Weaponization (WoW). This column represents the time interval between public CVE disclosure and the first known exploitation observed in the wild. It helps assess how quickly vulnerabilities are weaponized:- Negative values indicate pre-disclosure exploitation (zero-day) (for example, -7 days).
- Positive values indicate post-disclosure exploitation (for example, 5 days).
- Unavailable indicates that no exploit intelligence is currently available.
- Exploited Vulnerabilities summary card
A new Exploited card is added to the KnowledgeBase tab that displays the total number of exploited vulnerabilities, enabling users to quickly identify and prioritize risks associated with known exploits. - Introduced Sorting Support
You can now click any column heading to sort vulnerabilities in the KnowledgeBase table, enabling quicker prioritization. -
Title Column displays the Vulnerability status
You can now view vulnerability status directly in the Title column below the CVE ID. - Threat Actor insights in Risk Factors column
You can now view the threat actors icon within the Risk Factors column. If you click this icon, the platform displays a dialog that shows the threat actor names and associated count.
Exploitability Tag in Overview
You can now view an Exploitability tag (Actively Exploited, Exploited) on trending CVEs in the Overview page, along with a tooltip displaying the last exploited date, helping you quickly assess the relevance of active threats.
CVE Details Page Enhancements
Following are the enhancements in CVE Details tab:
- Exploited Flag Visibility: You can now view an Exploited flag in the following two locations on the CVE Details page:
- Above the CVE ID along with a tooltip displaying the Last Exploited Date
- In the TruConfirm section.
- Fallback description in CVE Details: The CVE Details page automatically displays an AI-generated description if it is unavailable; then, the standard vulnerability description gets displayed.

Business Entity Enhancements
Business Entities help you organize assets to match real business units, services, and applications. When you link assets to these entities, your organization can assess cybersecurity risk based on business value, financial impact, and risk tolerance. This approach goes beyond just technical severity.
Business Entities now provides a broader and more detailed view of business risk across your organization. Previously, you could only see the Business Entity tab. With this update, Business Entities move from a single view to a multi-dimensional framework. This framework includes applications and organizational structures. The new tabs give you more insight into how business risk and value are linked to applications and organizational structures.
These updates provide:
- Clearer visibility into your business hierarchy
- Stronger mapping between technical risk and business impact
- Effective prioritization based on business needs
- Increased awareness of financial risk
- Improved alignment of governance across entities, applications, and assets
Business Apps Tab
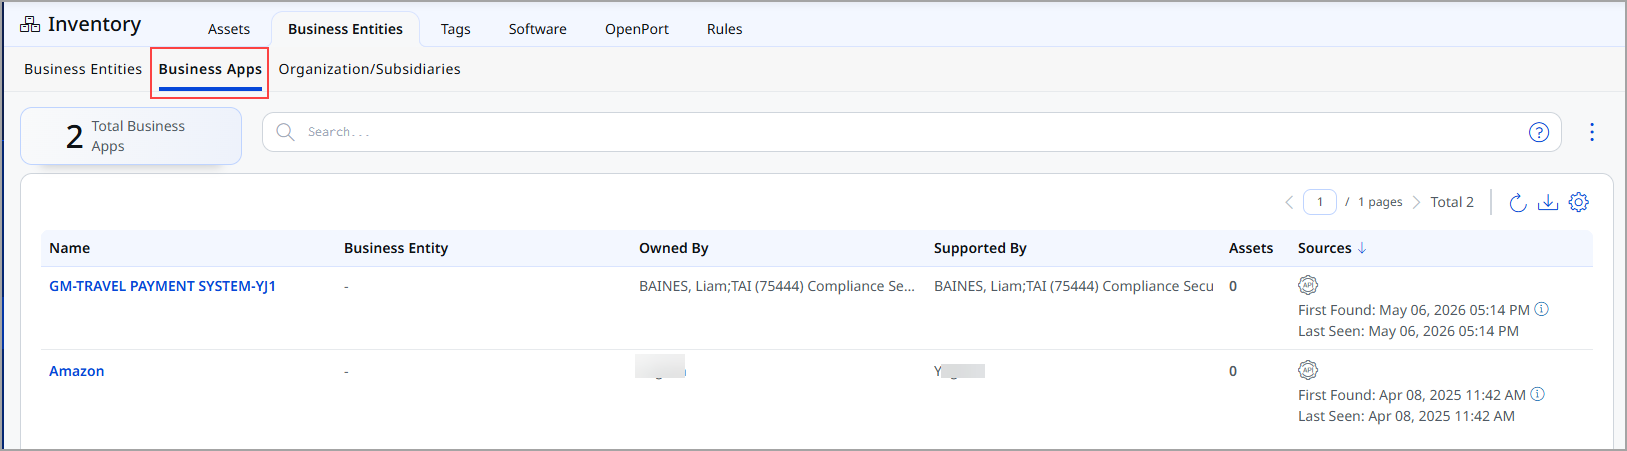
The Business Apps tab enables centralized management of business applications and their related assets within your organization.
With this tab, you can:
- View all business applications and their related assets
- Understand who owns each application, which teams support them, and their operational context
- Assess asset risk in the context of your most important business applications
- Explore application details, including asset TruRisk™ scores and classifications
To view the business apps, go to Inventory > Business > Business Apps.
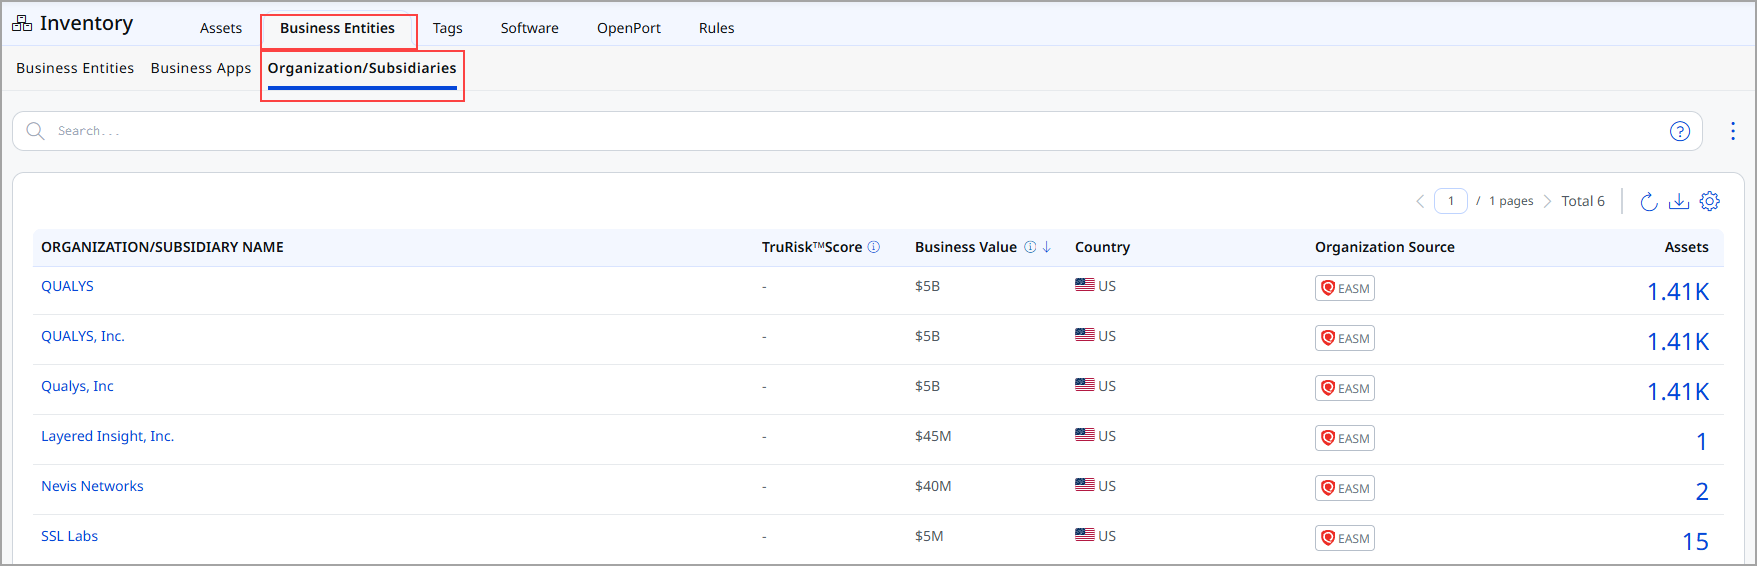
Organization/Subsidiary Tab
The Organization/Subsidiary tab provides a hierarchical view of your organization.
It allows you to:
- View organizations or subsidiaries along with their assets
- Compare business valuations and TruRisk™ scores across various entities
- Identify subsidiaries with the highest risk or concentration of assets
- Update business values and country information as required
To view the organization and subsidiaries, go to Inventory > Business > Organization/Subsidiaries.
Cyber Risk AI Assistant – ROCky Enhancements
We have enhanced the Cyber Risk AI Assistant ROCky to improve usability, transparency, and user engagement. These updates introduce chat history management and real-time response streaming, enabling you to track better, reuse, and understand AI-driven interactions.
The AI Chatbot, ROCky, is accessible through the ETM platform. To enable this feature, connect with Qualys Support or your Technical Account Manager (TAM).
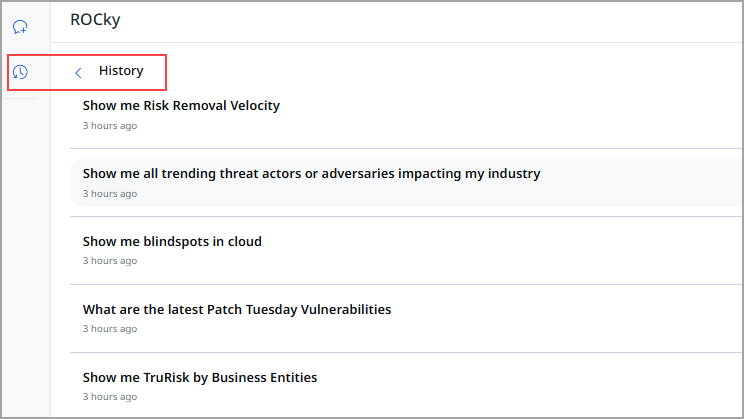
Chat History Management
ROCky now automatically saves all user conversations, making it easy for users to access, review, and reuse previous interactions.
In ROCky, the chat history is specific to each user. This means that a user's conversation history is private and not visible or accessible to other users.
Key capabilities are:
- Automatic Conversation Saving
All prompts and responses are saved by default without user intervention. - View Chat History
A new History button allows users to view all saved conversations. - Conversation Replay
You can click any past conversation to:- View previous queries and responses
- Continue interaction from the saved context
- Copy responses for reuse
- Start New Conversations
- You can initiate a new chat while retaining access to previous history.
Streaming Response and Execution Visibility
ROCky now provides real-time streaming of intermediate steps, improving transparency into how responses are generated. This provides a better understanding of system behavior and increased engagement during response generation. ROCky displays dynamic, step-by-step execution progress, such as:
- Analyzing request
- Searching the knowledge base
- Fetching sources
- Executing tools
You can give feedback on the results of your query. When you use the thumbs up or down, your feedback is sent to train ROCky.
The following GIF displays various execution steps.
Role-Based Access Control for ROCky Administration
We have introduced Role-Based Access Control (RBAC) for the ROCky. This enhances security and governance by enforcing role-based visibility and control.
The Role-Based Access Control ensures:
- Manager users can grant or revoke access for users to view the ROCky from the Administration application.
- Manager users have default access to view ROCky.
For more information on Cyber Risk AI Assistant – ROCky, refer to the ETM Online Help.
Risk Factor and Compensatory Factor Enhancements
We enhanced Risk Factors and Compensatory Factors to improve filtering, consistency, and user control. It focuses on global exclude filters, clearer status updates, and better rule behavior, all while making sure not to disrupt any current workflows.
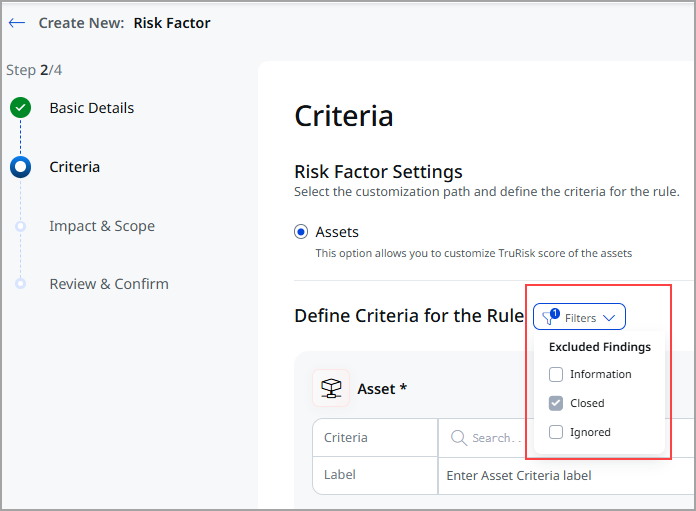
Support of the Exclude Filter
Now, Risk Customization supports the Excluded Findings filter while creating Risk Factors and Compensatory Factors. The Excluded Findings filter helps you ignore specific assets, findings, or configurations during evaluation. You can review the applied exclusion criteria and decide whether to use or ignore them when creating rules. Excluded or closed findings are not evaluated again.
The following screenshot displays the option for Risk Factor.
The following screenshot displays the option for Compensatory Factor.

Enhanced Status-Based Filtering
For Risk Factors and Compensatory Factors, rules now display the following statuses more consistently:
- Active
- Open
- Ignored
- Closed
This improves accuracy when evaluating findings and avoids unintended rule application.
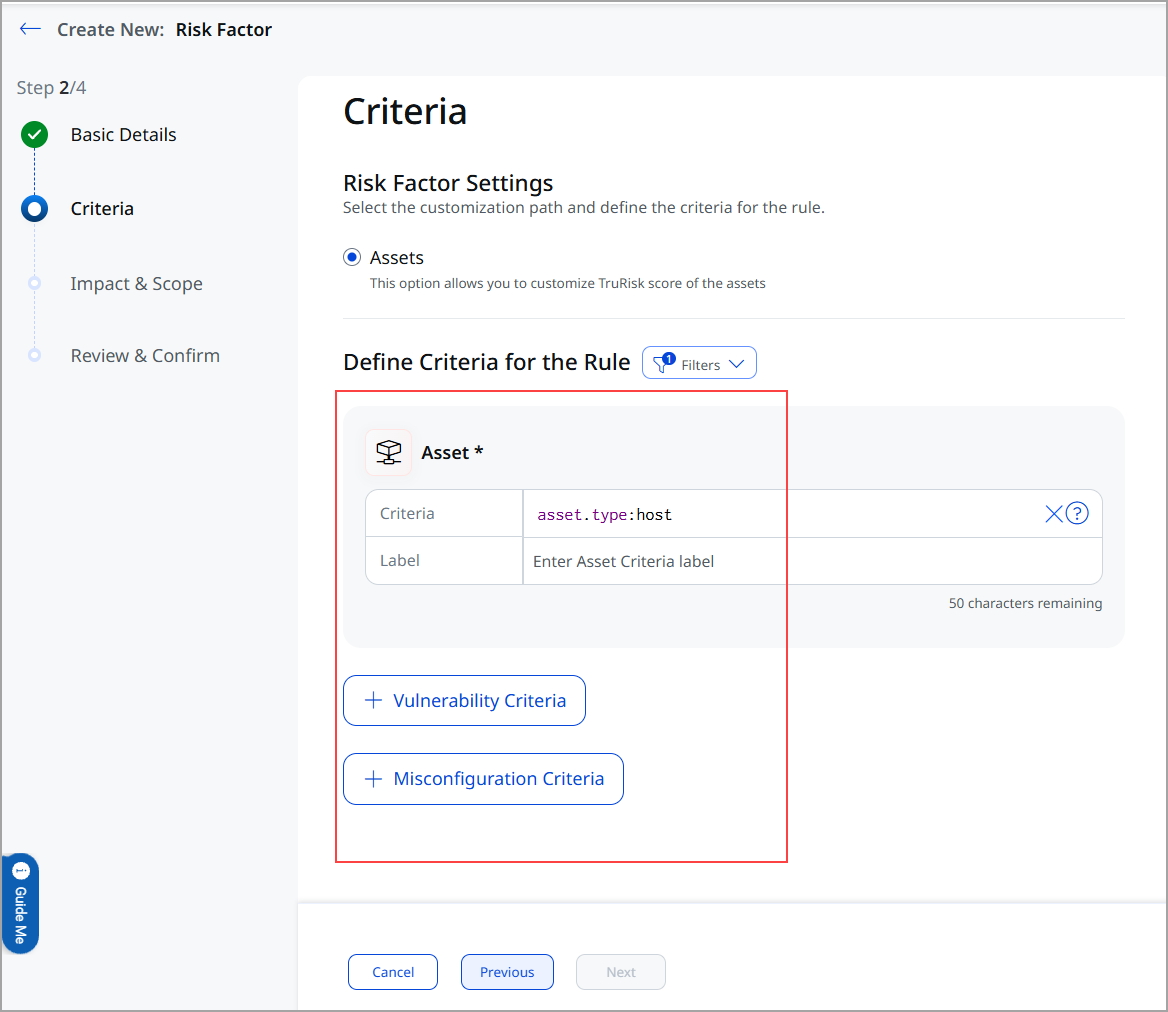
Risk and Compensatory Factors Criteria Updates
Now, Risk Factors and Compensatory Factors can be configured based on:
- Asset
- Asset + Vulnerability
- Asset + Misconfiguration
- Asset + Vulnerability + Misconfiguration
This screenshot displays the Risk Factors option. You can also find a similar option for Compensatory Factors.
Disabled Rule Behavior for Risk and Compensatory Factors
To prevent confusion around asset evaluation, we have updated how disabled rules function in the interface.
The key changes are:
- Disable a Rule
When you disable a rule, you cannot view or edit it until you enable it again. - Evaluation
When a rule is disabled, it cannot evaluate assets. - Impact asset count
When a rule is disabled, the impacted asset count is shown as 0.
Introduced New Tokens for Risk Factors
We added new tokens to help you refine your risk factor searches.
|
Token |
Tab |
Description |
|---|---|---|
|
asset.riskFactor.name |
Risk Management > Findings tabs > Asset |
Use this token to filter and display assets associated with specific risk factor name. |
|
asset.compensatoryFactor.name |
Risk Management > Findings tabs > Asset |
Use this token to filter and display assets associated with specific compensatory factors name. |
|
riskFactor.name |
Risk Management > Risk Customization tabs > Risk Factors |
Use this token to filter and display risk factors with specific names. |
|
compensatoryFactor.name |
Risk Management > Risk Customization tabs > Compensatory Factors |
Use this token to filter and display compensatory factors with specific names. |
For more information on Risk Factors and Custom Factors, refer to the ETM Online Help.
Risk Workbench Enhancements
We have enhanced usability, filtering, action, and reporting to the Risk Workbench feature.
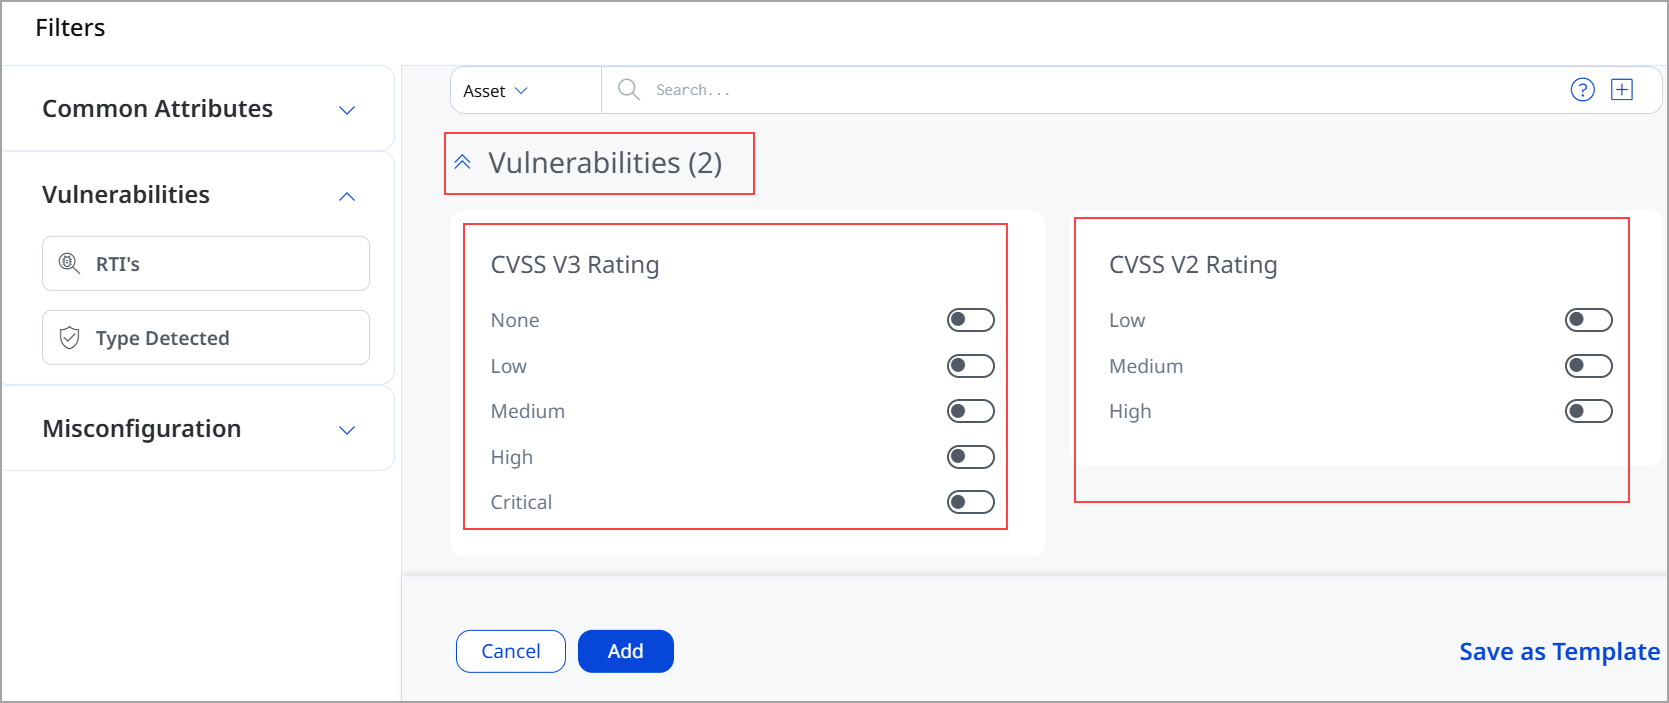
New Filters in Risk Workbench
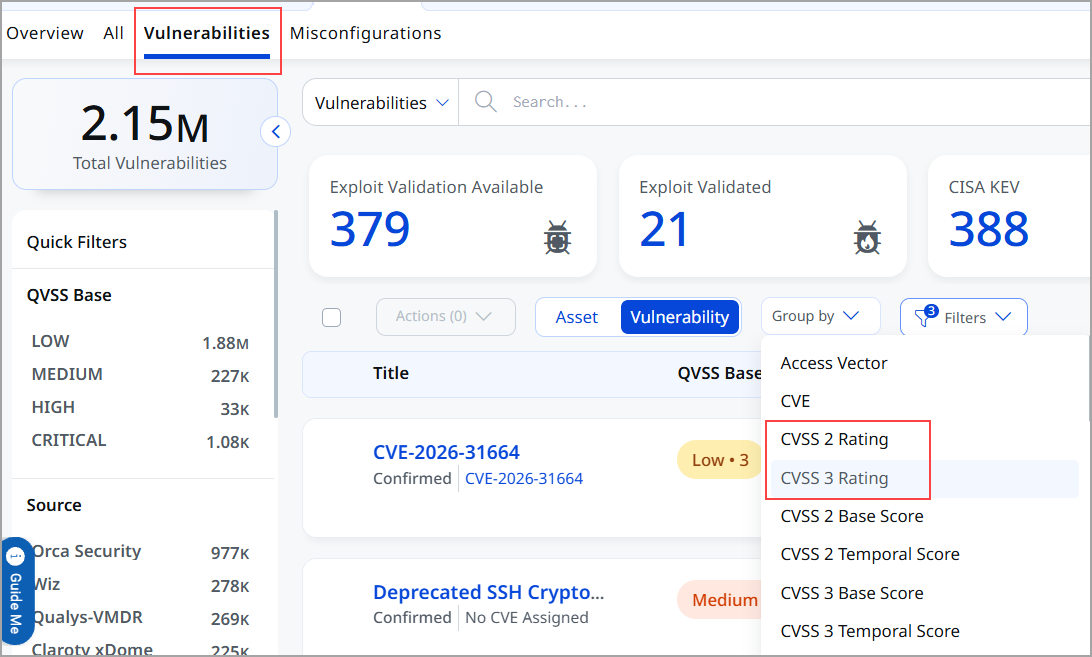
We added two new drag‑and‑drop CVSS-Based Filters in the Vulnerabilities section:
- CVSS v2 Rating
- CVSS v3 Rating
The filters support multiple severity thresholds, such as Critical, High, None, and can be combined with existing filters. It enables faster and more precise vulnerability prioritization. Improves control over severity-based analysis.
To view these settings, navigate to Risk Management > Risk Workbench > Start Prioritization. While proceeding with Prioritization and selecting filters, you find this option under Vulnerabilities Filters.
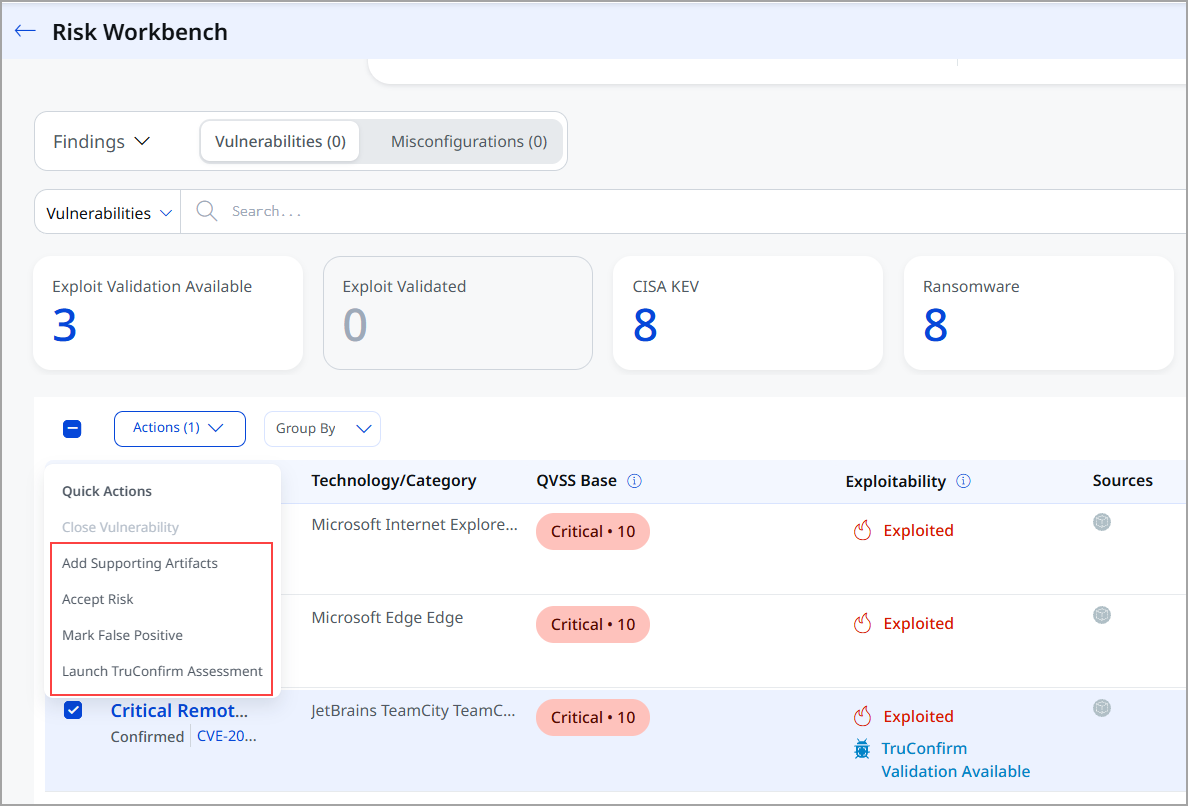
New Actions Available in Risk Workbench
Several actions previously available only in Findings or Risk Workbench are now supported directly within Prioritization. You can now perform the following actions from the Actions menu and the Quick Actions menu of selected Findings from the Prioritization tab:
- Add Supporting Artifacts
You can attach files or links as evidence to findings. This makes it easier to review or close findings while maintaining a clear record of supporting evidence. - Accept Risk
You can acknowledge risk, accept the potential impact, and assume accountability for it. - Mark False Positive
You can mark the finding that is incorrectly flagged as a risk or security issue. - Launch TruConfirm Assessment
Used to validate whether a finding is exploitable or not.To view these settings, navigate to Risk Management > Risk Workbench > Start Prioritization. Proceed with Prioritization. You find this option under the Findings tab.
Column Enhancements in Risk Workbench
Enriched with additional metadata compared to earlier versions. The following columns have been added or enhanced:
- Exploitability
This column helps you interpret exploit risk signals correctly by explaining what each status means and how validation is performed, reducing confusion and improving decision-making. - Supporting Artifacts
This column helps you to view how many supporting artifacts are attached to the finding.
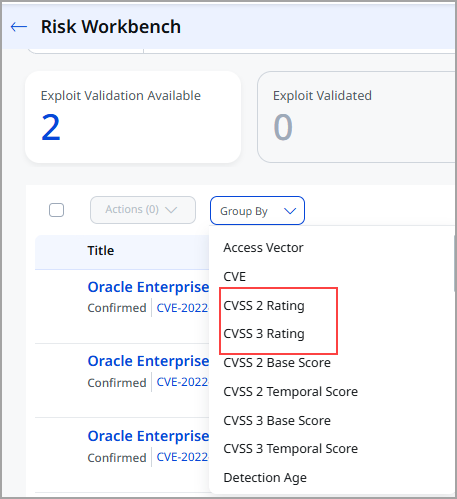
Group By Enhancements
Two new Group By options are now supported in Risk Workbench.
- CVSS 2 Rating
- CVSS 3 Rating
You can sort the findings based on their CVSS v2 and v3 ratings.
Download Report Enhancements
You can download the Prioritization report from hamburger menu. The generated report now includes enhanced, plan‑level contextual details, such as:
- Plan title and description
- Scope and applied filters
- CVSS metadata
- Vulnerability count
- Impacted findings
- Asset details and asset IDs
- Additional relevant metadata

For more information on Risk Workbench, refer to the ETM Online Help.
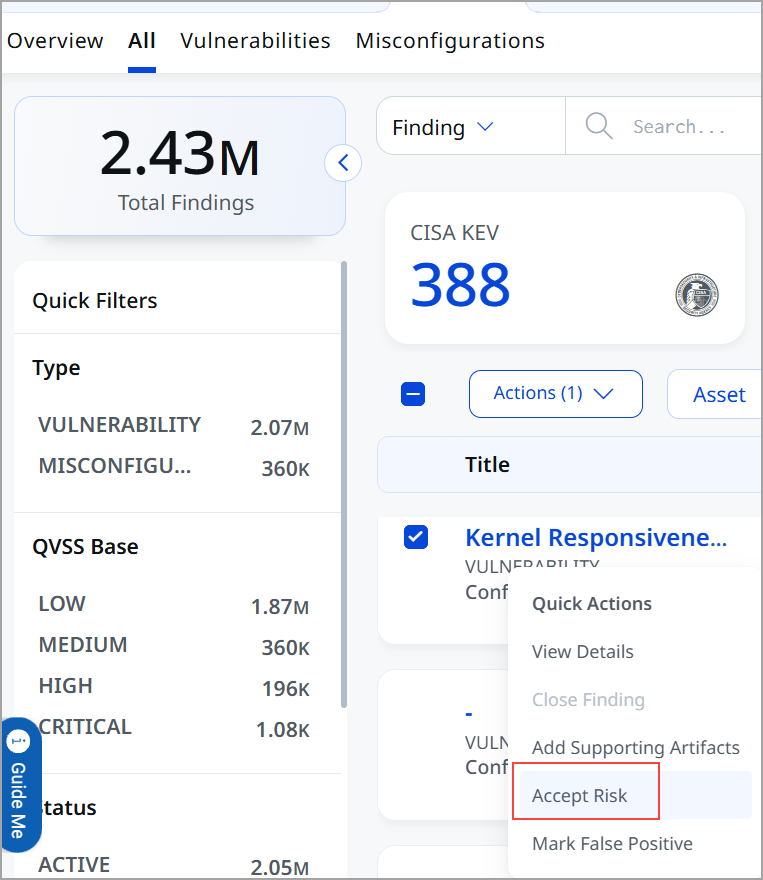
Bulk Risk Acceptance and Rule Creation
The Risk Acceptance feature allows you to process up to 200 findings at once. You can select multiple findings and accept the risk or mark them as false positives. When you accept a risk or mark a finding as a false positive, the TruRisk score calculator ignores the finding, and it no longer contributes to your TruRisk score calculation.
Now, you can create these risk acceptance rules directly from the All, Vulnerabilities, and Misconfigurations tabs.
This visibility helps you:
- Process large numbers of findings to focus on actual threats.
- Maintain an accurate true risk score by removing false positives.
- Streamline exception management for misconfigurations and vulnerabilities.
To access this feature, navigate to Risk Management > Findings tab > All, Vulnerabilities, or Misconfigurations tabs, select the findings, and apply the risk acceptance rule.
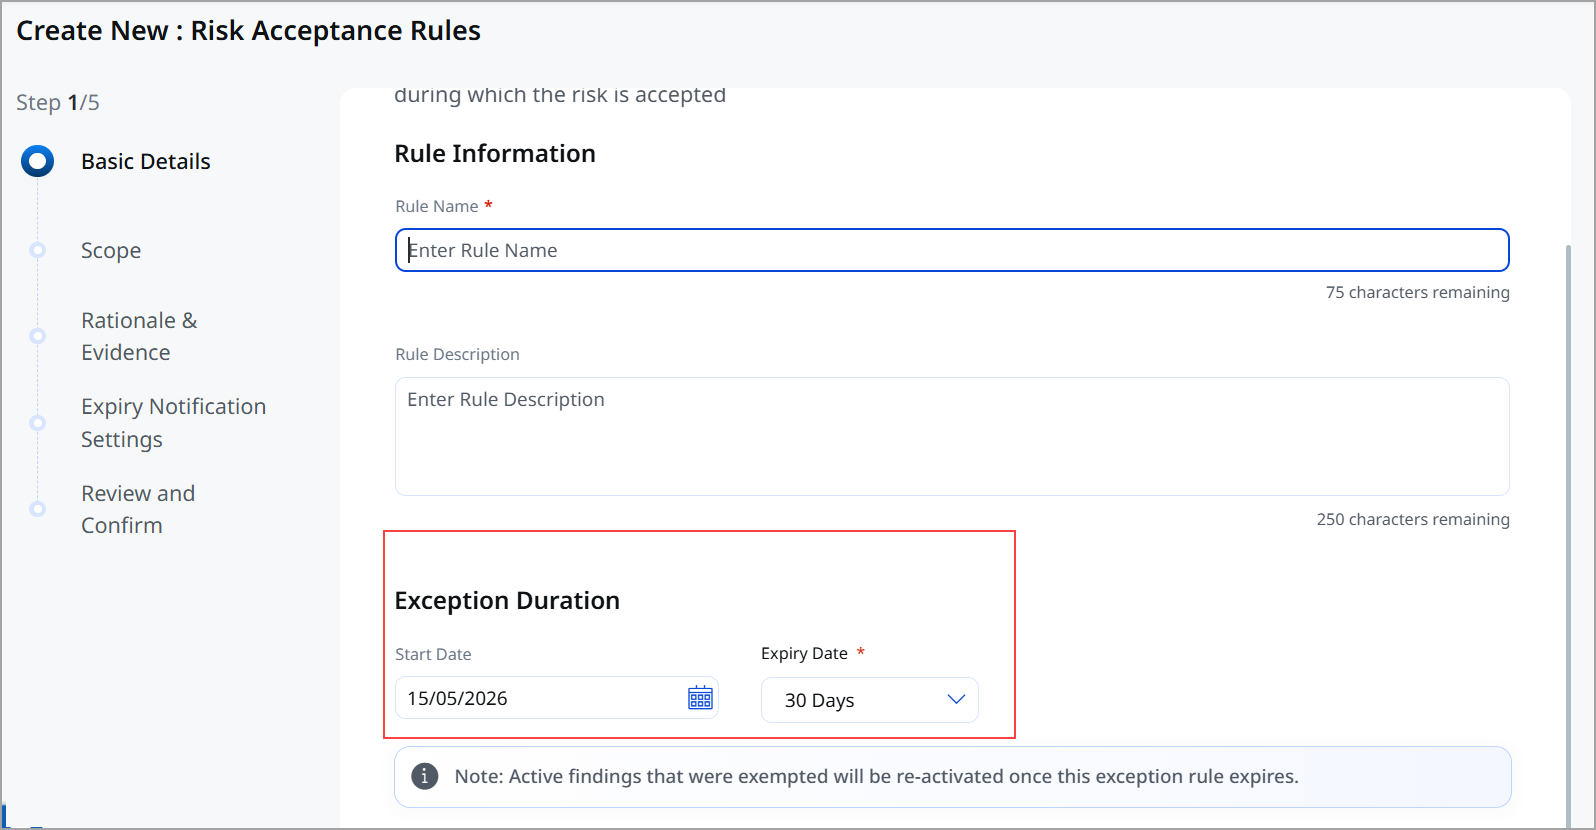
Advanced Risk Acceptance Expiry and Scheduling
Every risk acceptance rule now supports future start dates and an expiry age. You can configure a rule to ignore a finding until a specified date. Once the rule expires, the finding automatically becomes active again and contributes to your risk calculations. The ability to configure Risk Acceptance Rules with future start dates allows you to schedule exception windows in advance.
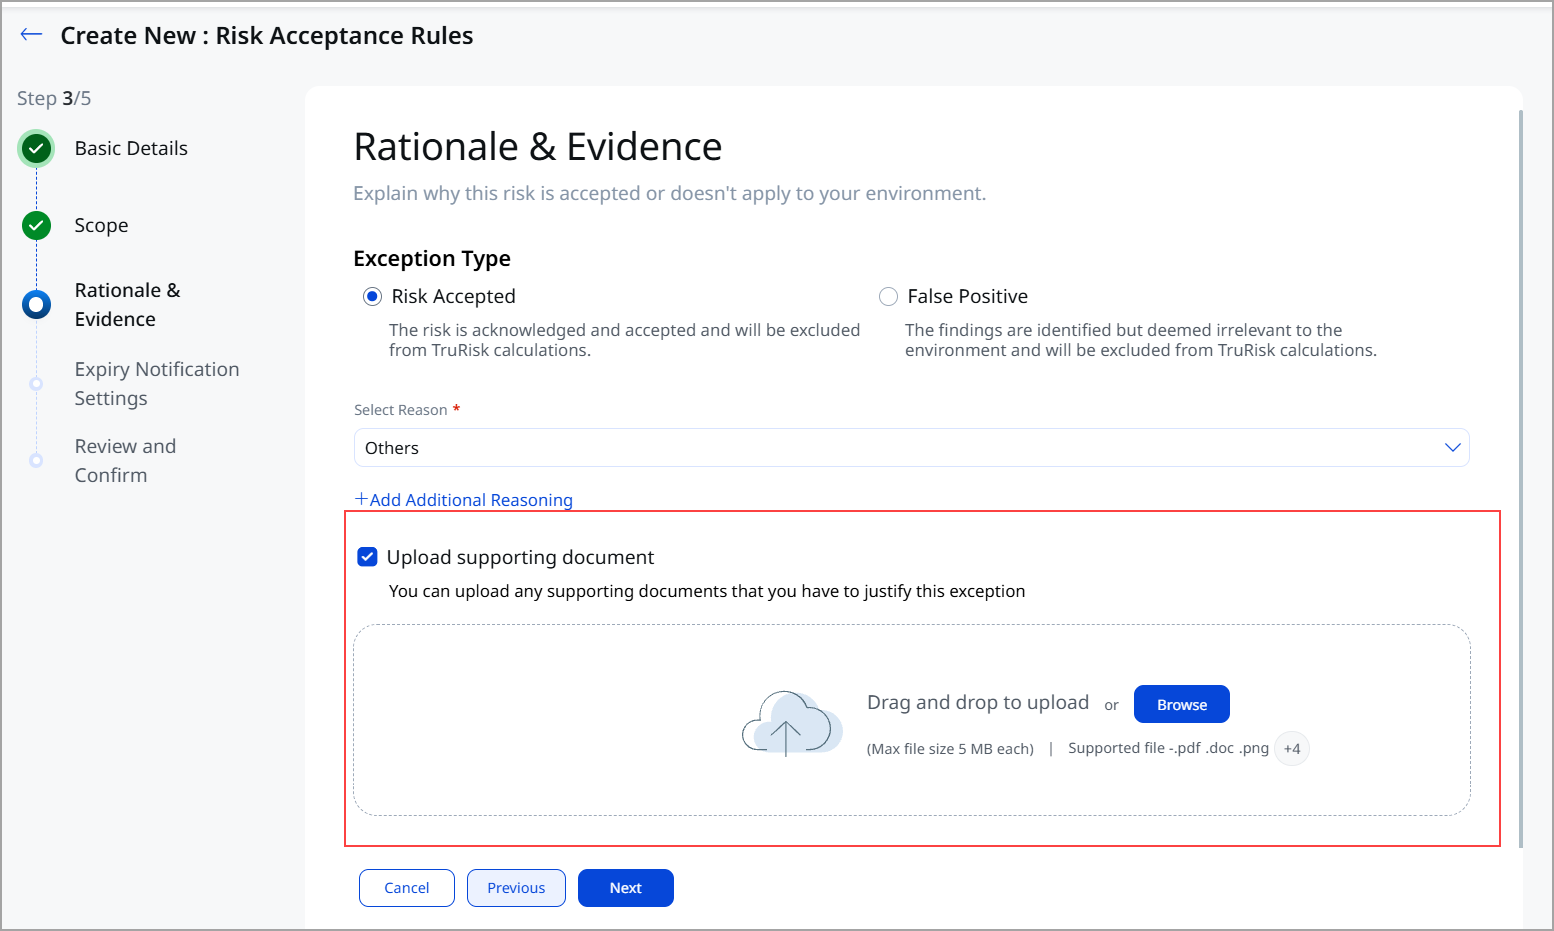
Add Supporting Artifacts for Risk Acceptance
You can attach files or links as evidence while creating rules for Risk Acceptance. It helps you to provide clear evidence (files or links) while defining Risk Acceptance Rules. It supports decision transparency for stakeholders reviewing accepted risks.
To know more about how to attach supporting artifacts, refer to the ETM Online help.
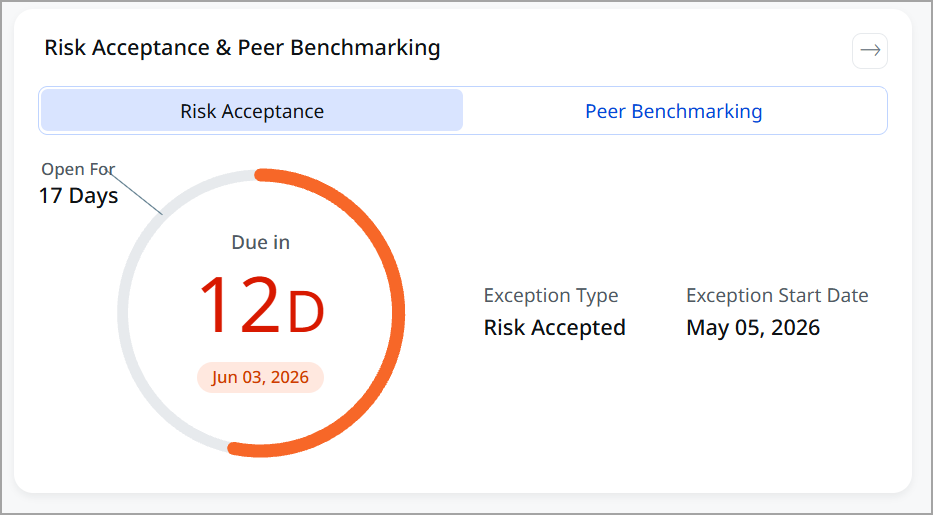
Risk Acceptance Card
We have introduced a dedicated Risk Acceptance card on the Finding Details page to provide a centralized, detailed view of risk acceptance information. This enhancement improves visibility and helps you understand the status and timeline of accepted risks.
Introduced a New Token for Risk Acceptance
|
Token |
Tab |
Description |
|---|---|---|
|
finding.riskAcceptance.reason |
Risk Management > Findings tabs |
Use this token to search for findings based on manually entered free-text reasons and comments. |
For more information on Risk Acceptance, refer to the ETM Online Help.
QQL Token Standardization
We implemented Qualys Query Language (QQL) token standardization across all Qualys applications, introducing a consistent <entity>.<attribute> format for ETM and common tokens. The UI now shows only new tokens in search suggestions, while maintaining backward compatibility with existing dashboards and saved queries. This enhancement improves consistency, interoperability, and cross-application query reuse. criticality is the attribute.
Updated Assets TokensUpdated Assets Tokens
| Old Token Name | New Token Name |
|---|---|
| sensor.activatedForModules | qualys.activatedForModules |
| agent.activations.key | qualys.agent.activationKey.id |
| agent.activations.status | qualys.agent.activationKey.status |
| agent.id | qualys.agent.id |
| agent.configurationProfile | qualys.agent.configurationProfile |
| agent.connectedFrom | qualys.agent.connectedFrom |
| agent.errorStatus | qualys.agent.errorStatus |
| agent.isPassiveSensor | qualys.agent.isPassiveSensor |
| agent.lastActivityDate | qualys.agent.lastActivityDate |
| agent.lastCheckedInDate | qualys.agent.lastCheckedInDate |
| agent.lastInventoryDate | qualys.agent.lastInventoryDate |
| agent.platform | qualys.agent.platform |
| agent.status | qualys.agent.status |
| agent.swCAIdealCandidate | qualys.agent.swCAIdealCandidate |
| agent.version | qualys.agent.version |
| agent.qualysCorrelationId | qualys.agent.correlationId |
| agent.passiveSensor.id | qualys.passiveSensor.id |
| sensor.pendingActivationForModules | qualys.pendingActivationForModules |
| caps.leader | qualys.caps.leader |
| agent.firstScanDate | qualys.scan:(firstScanDate |
| agent.lastScanDate | qualys.scan:(lastScanDate |
| agent.scanType | qualys.scan:(type |
Default Currency Updated to US Dollar for Business Entities
The default currency for the Business Entity has been set to US Dollar across all relevant screens, including the Company Profile creation flow, Business Entity creation flow, SMG graph, TruConfirm overview page, and Home screen.
Setting the US Dollar as the default standardizes financial representation across the platform, improves consistency in business value display, reduces manual currency selection, and minimizes the risk of discrepancies or misinterpretation in multi-currency environments.
Vulnerabilities Tab Enhancements
We have enhanced the Vulnerabilities tab to improve visibility and analysis of security findings. With new grouping options based on CVSS ratings, improved vendor product identification, and the ability to filter vulnerabilities related to non-running kernels, you can better prioritize risks and gain deeper insights across integrated vulnerability sources.
CVSS Rating-Based Grouping for the Vulnerabilities
Two new Group By options are now supported for vulnerabilities.
- CVSS 2 Rating
- CVSS 3 Rating
You can organize findings by their CVSS v2 and v3 ratings. This provides flexibility to analyze vulnerabilities using both legacy (CVSS v2) and modern (CVSS v3) scoring models. It enables clearer vulnerability prioritization by grouping findings based on industry-standard CVSS v2 and v3 severity ratings.
To group the findings based on CVSS, go to Risk Management > Findings > Vulnerabilities > Group by.
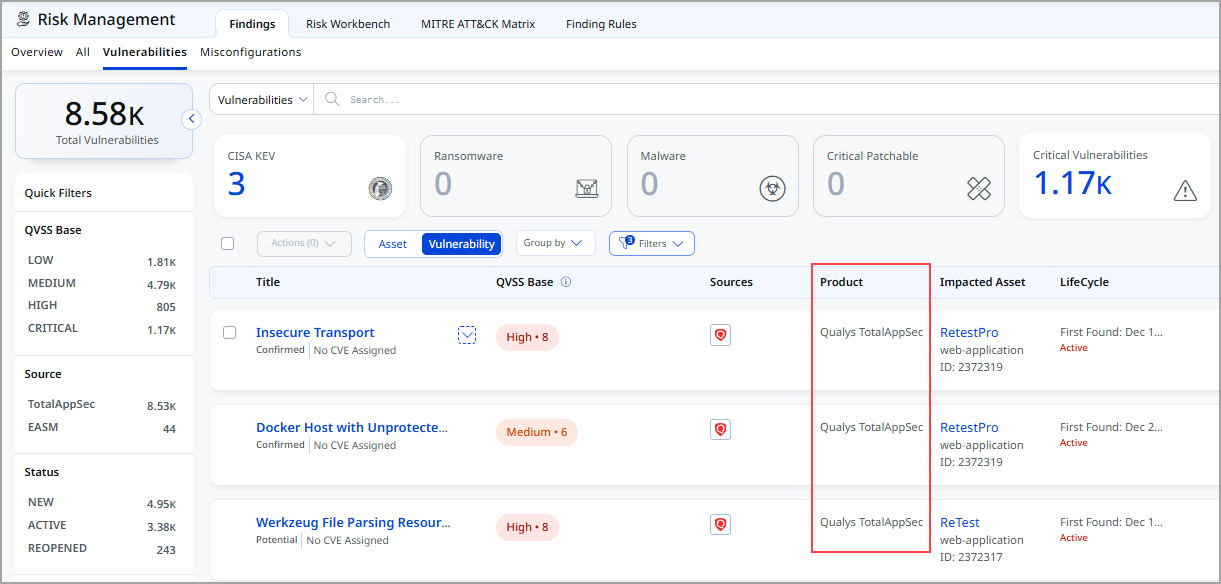
Vendor Product Name Support in Vulnerabilities
The Vulnerabilities tab now displays vendor product names alongside vendor icons for improved visibility and identification of vulnerability sources. The Product column is added to display details, such as Qualys VMDR, Qualys TotalAppSec , or CrowdStrike Spotlight, rather than just vendor icons.
You can enable a dedicated column to display both Sources and Product name together, improving clarity for environments with multiple integrated vendor products.
To view the product name, go to Risk Management > Findings > Vulnerabilities > Product column.
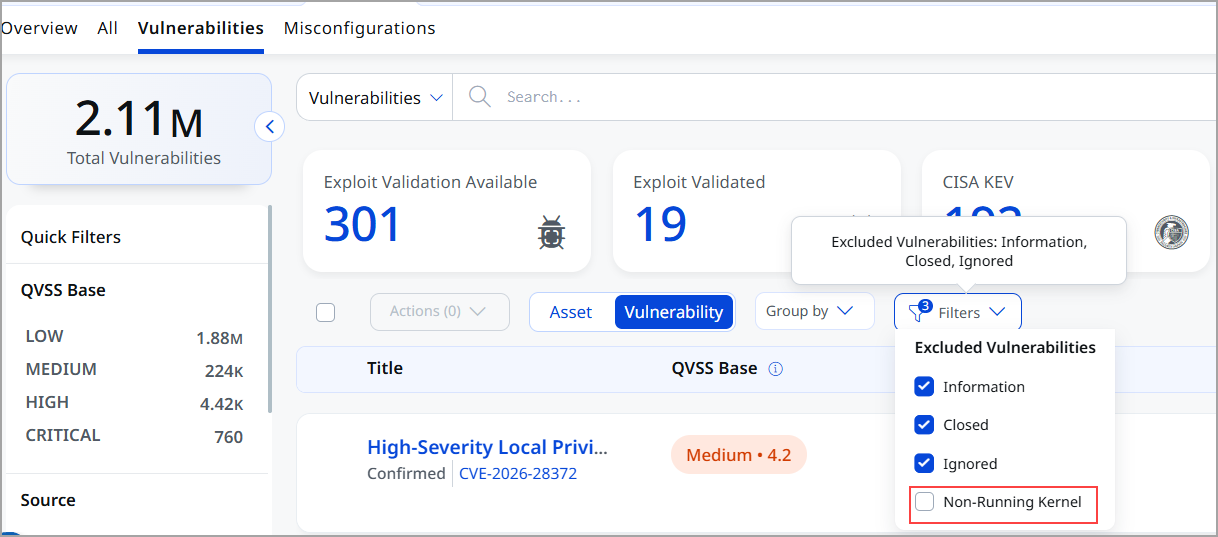
Filter for Non-Running Kernel Findings
We have added a new filter, Risk Management Vulnerabilities, to improve visibility into vulnerabilities associated with non-running kernels. This filter enables you to quickly identify and isolate findings linked to non-running kernels, which are not easily exploitable and pose minimal risk. By implementing this feature, we aim to streamline the total findings list, allowing you to focus on vulnerabilities related to running kernels or high-risk, high-priority application packages. This differentiation helps security teams take more informed remediation actions.
This enhancement improves investigation efficiency and supports better tracking of mitigated or addressed issues within the environment.
To view the filter, go to Risk Management > Findings > Vulnerabilities > Filters.
Dashboard Enhancement: Simple List Table Widget for Findings
We have enhanced the dashboard by introducing a new Simple List (Table) widget type that enables you to view vulnerability and risk management findings in a structured tabular format with configurable columns and sorting. You can create custom queries to display results in a table format. This allows you to view all findings for specific assets and identify the ones with the most findings. You can also analyze these findings using custom column sets and sorting options. Additionally, you can quickly drill down into the findings directly from the dashboard.
The enhancements for dashboards are:
- Simple List widget: Displays data in a standard row-and-column table format. Offers a clear, customizable view of Findings as an alternative to visualization widgets for users who prefer tabular data.
- Configurable Columns: Select which columns to display using the column selector (for example: Criticality, Type Detected, Title, and so on). The available columns vary based on the selected display result type (Findings or Assets).
- If Display Results As : Findings, the Finding ID column is displayed by default.
- If Display Results As : Assets, the Asset ID/Asset UID and Findings Count columns are displayed by default.
To create a simple list-type table widget, selecting at least one column is mandatory.
- Sorting Capability: Sort results by selected columns in ascending or descending order. Supports sorting by multiple attributes, including Created, Updated, Name, and more.Sorting is supported only when Display Results As = Assets is selected
-
Widget Navigation: When a widget is created with Display Results As: Assets, clicking the record redirects to the Risk Management Findings page and displays the findings count associated with the selected asset based on the searched QQL. When a widget is created with Display Results As: Findings, clicking a record redirects to the Risk Management Findings page and displays records corresponding to the selected finding based on the searched QQL.
To update the widget with a simple list, navigate to Dashboard, click Add Widget, and then add Build your Widget. You can view the option in Query Settings.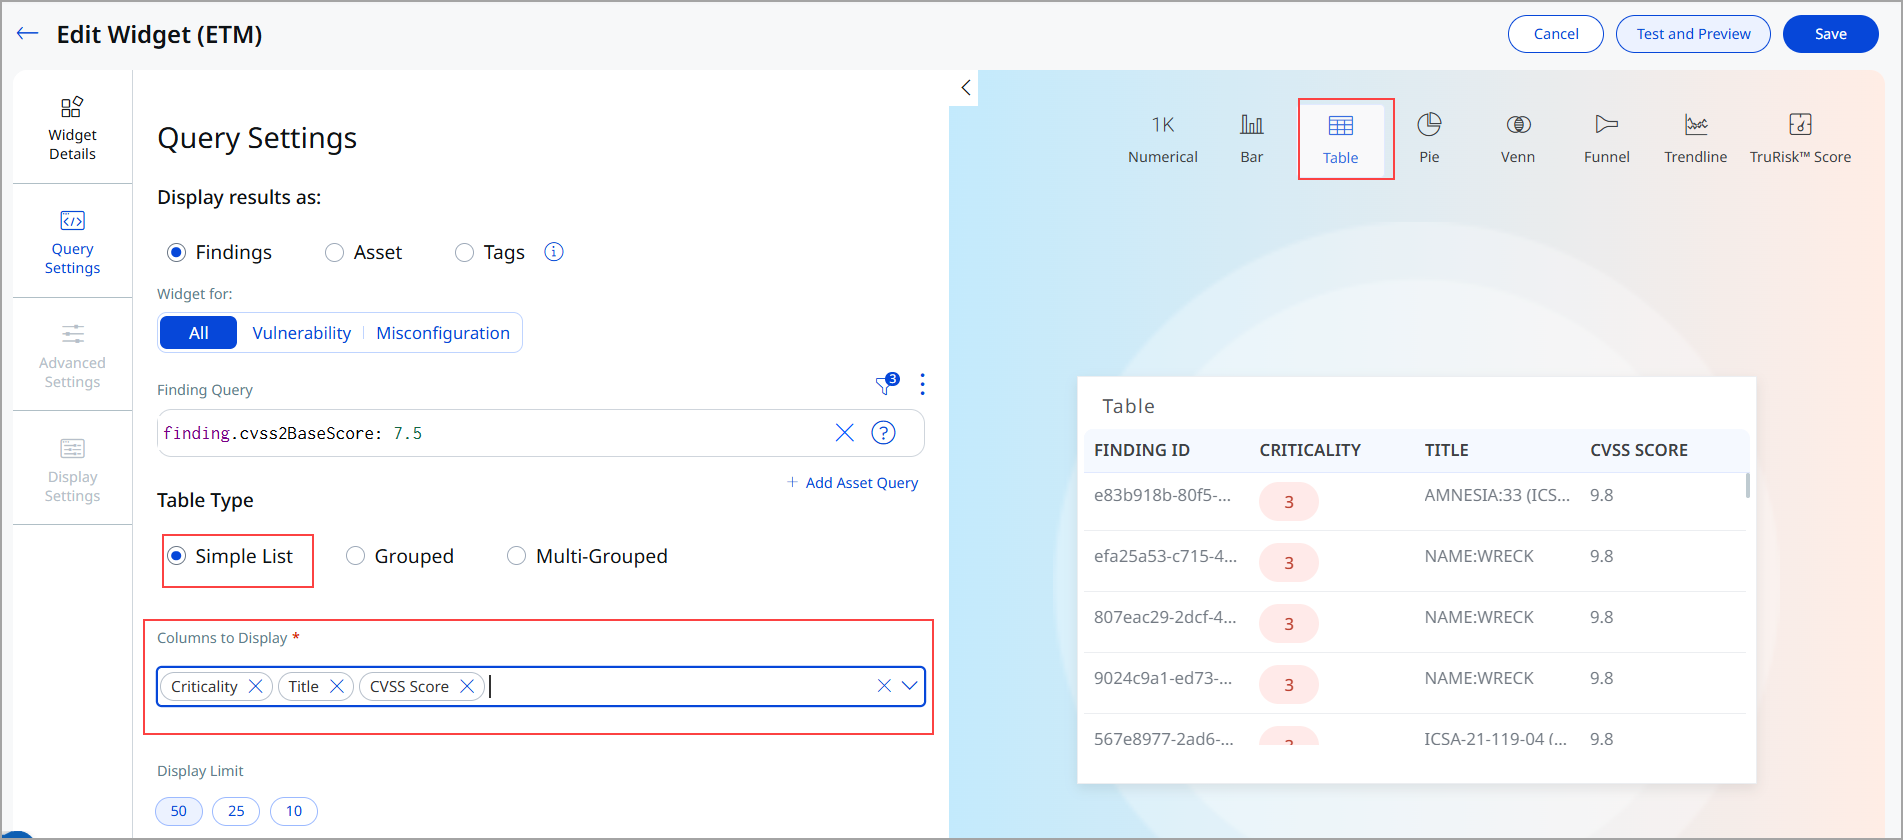
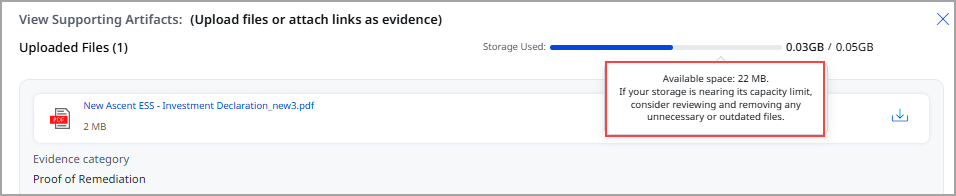
Available Storage for Supporting Artifacts Improvement
Enhanced the Available Storage display in the Add Supporting Artifacts modal to provide more accurate and user-friendly storage information. Storage values are now dynamically represented based on the configured upload limit, and you can hover over the available storage indicator to view the exact remaining storage capacity. This improvement provides clearer visibility into attachment space availability and improves the overall upload experience.
You can add supporting artifacts in several ways. Use the Supporting Artifacts column in the All or Vulnerabilities tabs, or choose Quick Actions or the Actions menu of findings.
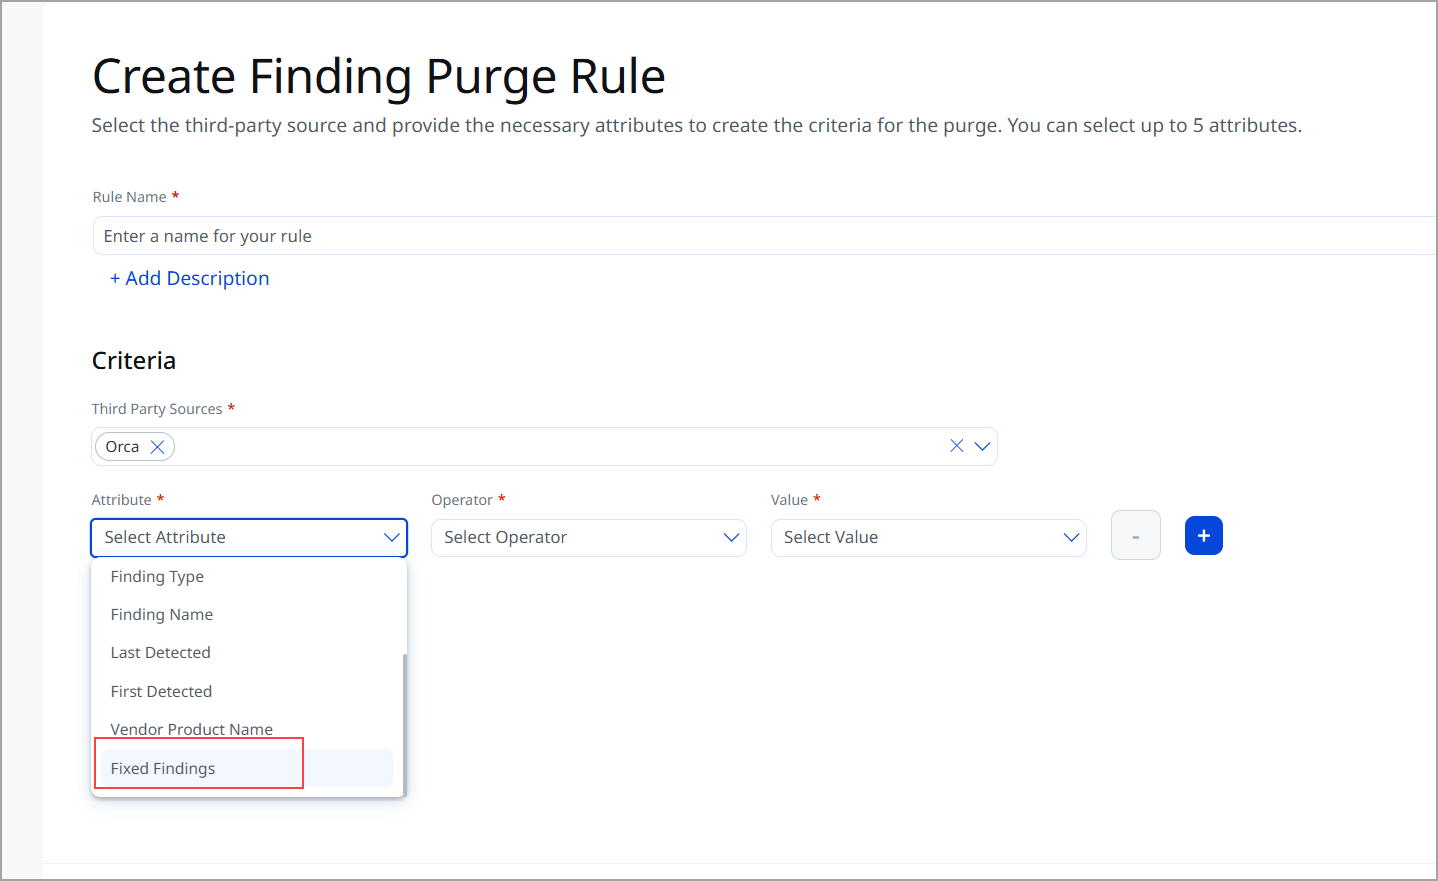
Purge Rule Enhancement (Fixed Findings)
A new attribute, Fixed Findings, is now available while configuring purge rules for Findings. The rule specifically targets Fixed Findings that have remained unchanged for a defined duration, ensuring safe cleanup without impacting active workflows. This enables automated cleanup of stale fixed findings
The following are the configuration details
- Attribute: Fixed Findings
- Operator: OLDER THAN (only supported operator)
- Value: Number of days (such as 180 days)
To create a purge rule, go to Risk Management > Finding Rules > Purge > Create Rule.
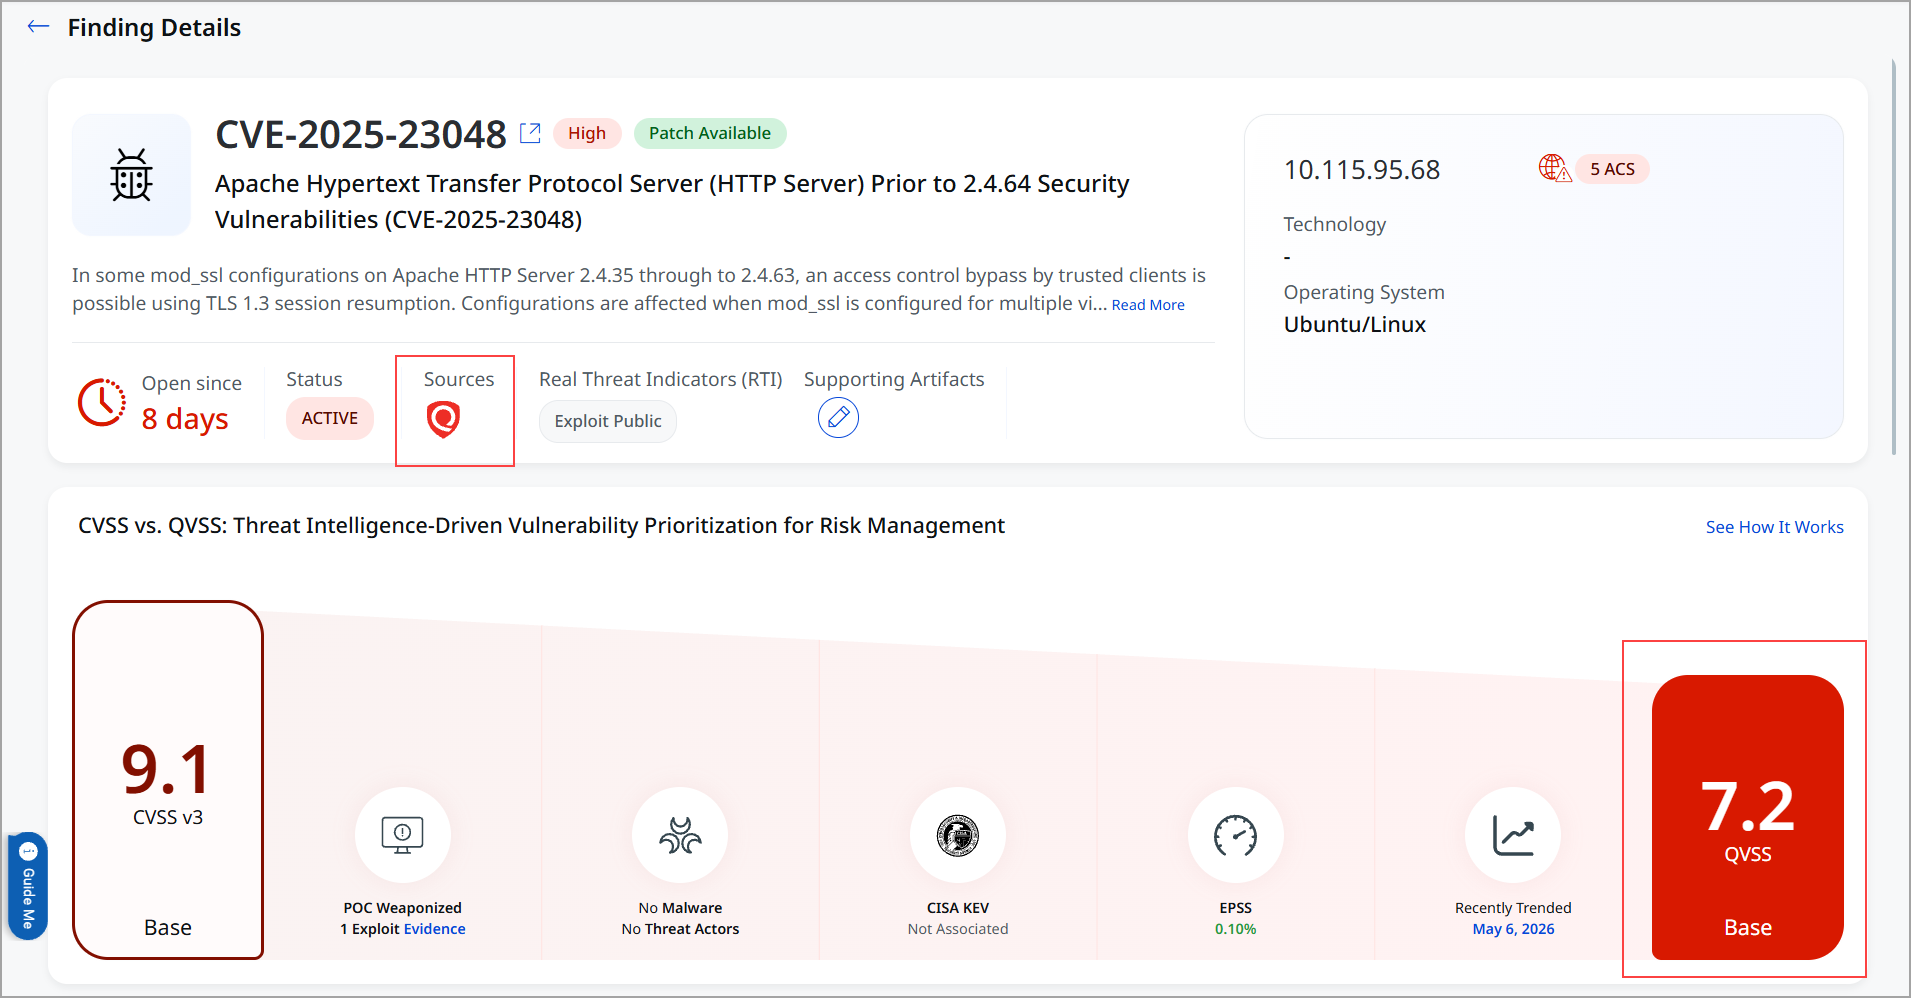
Finding Details Page Enhancements
We have introduced several enhancements to make it easier to use, clearer, and more helpful. Now, information is presented more straightforwardly, details about the lifecycle of vulnerabilities are easier to understand, and you can quickly see how long something has been exposed. All of these changes are designed to help you get the information you need faster and with less effort when reviewing your findings.
To view the finding details, navigate to Risk Management > Findings > Vulnerabilities > select the findings, and click View Details.
-
Qualys Source Display Optimization
We have improved the display of the Qualys source. When data is sourced from CTDB. The duplicate Source: Qualys information is no longer shown on the left panel. This avoids duplicate data presentation. This does not cause confusion due to repeated source information. This provides a cleaner UI and more intuitive data interpretation.
-
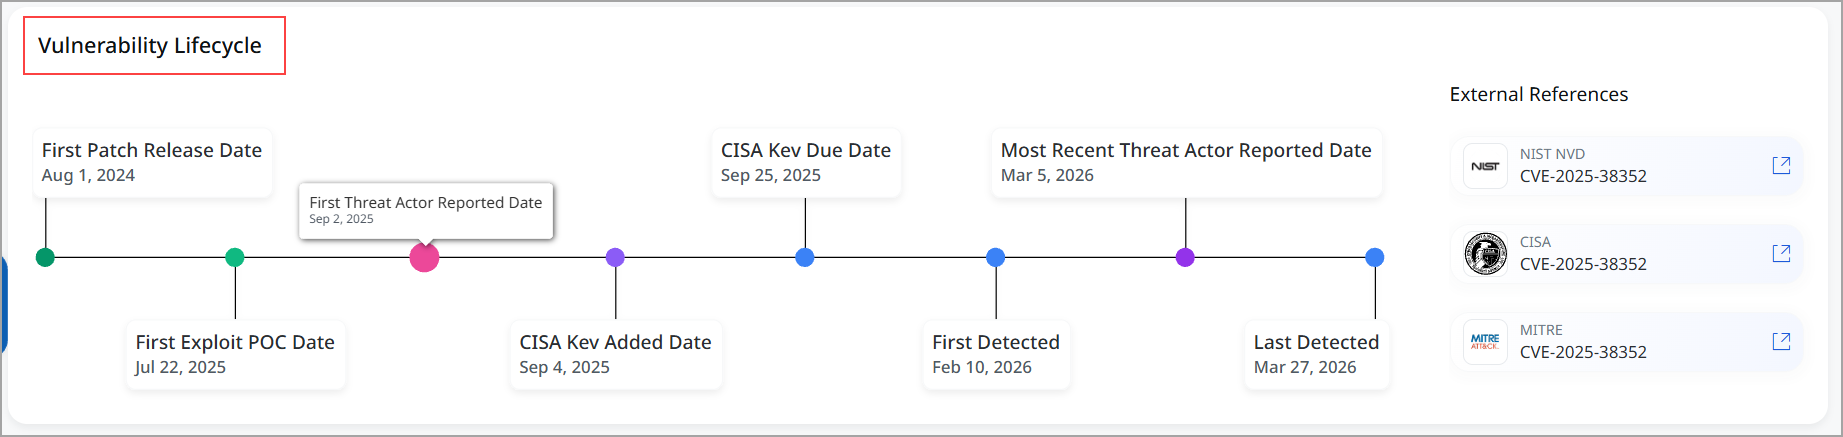
Vulnerability Lifecycle Data Expansion
We have enhanced the Vulnerability Lifecycle section and added new lifecycle-related fields to provide more insights. The newly added Lifecycle Data includes First Found, Last Found, Most Recently Exploited, and Exploitation.
-
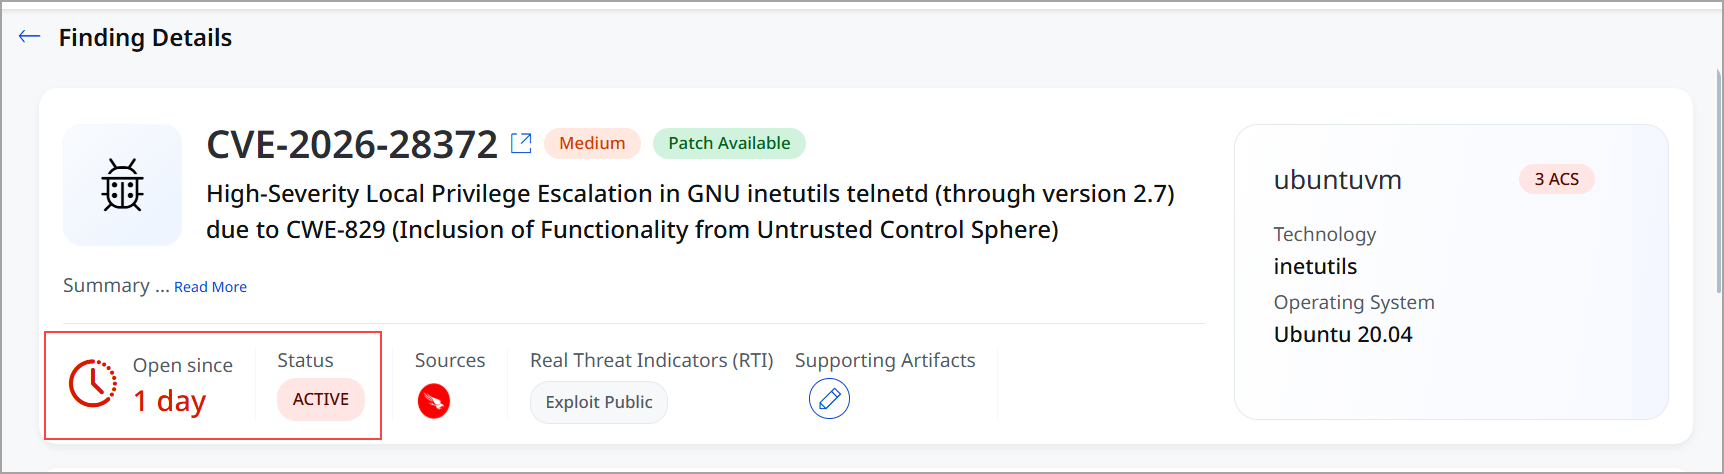
New Section to Display Open Since X Days in Finding Details
The Finding Details page now includes an Open Since X Days section, displayed prominently to highlight the age of a vulnerability. This value is calculated based on the last detected date (Days = Current Date – Last Detected Date), providing quick insight into how long a finding has remained unresolved.
This section shows only findings in New, Active, or Reopened status, helping you to prioritize remediation efforts based on exposure duration.
Group By Enhancements for Vulnerability Findings for Qualys Sourced Account (Non UAI Account)
We have expanded the Group By capabilities for Vulnerability Findings to provide analysis and more flexible data filtering. These enhancements are now available for Qualys Sourced Account (Non UAI Account) . You can organize and interpret findings more effectively across multiple dimensions. These group by options filter the findings using the relevant QQL token.
The new Group By options are:
- CVSS 2 Base Score (finding.cvss2BaseScore)
- CVSS 2 Temporal Score (finding.cvss2TemporalScore)
- CVSS 3 Base Score (finding.cvss3BaseScore)
- CVSS 3 Temporal Score (finding.cvss3TemporalScore)
- First Found (finding.firstFoundDate)
- Last Found (finding.lastFixedDate)
- Last Fixed (finding.lastFixedDate)
- Malware Name (finding.riskFactor.malwareName)
- Port (finding.port)
- RTI (finding.riskFactor.rti)
- Type Detected (finding.typeDetected)
- Published (finding.cvePublishedDate)
To view the group by options, go to Risk Management > Findings > Vulnerabilities > Group by.
New Tokens for UAI-Enabled Account Assets
|
Token |
Tab |
Description |
|---|---|---|
|
cloud.regionCode |
|
Use this token to search assets by cloud region code. cloud.regionCode: us-east-1 |
|
cloud.regionName |
|
Use this token to search assets by cloud region name. cloud.regionName: US East |
|
cloud.tenantName |
|
Use this token to search assets by cloud tenant name. cloud.tenantName: ProdTenant |
|
compute.hostId |
|
Use this token to search assets by their host ID. compute.hostId: 43954857 |
New Token for Vulnerabilities
|
Token |
Tab |
Description |
|---|---|---|
|
finding.cvss2Criticality |
Risk Management > All Findings tabs Risk Management > Risk Workbench |
Use this token to search vulnerabilities based on CVSS v2 criticality. finding.cvss2Criticality: HIGH |
Issues Addressed
The following reported issues are fixed in this release.
| Component | Description |
|---|---|
|
ETM UI |
Fixed an issue where tags containing the & character caused incorrect QQL generation. When navigating from MITRE&ATTACK Tactics to exposed assets, tag names were incorrectly truncated after &, leading to empty dashboards or incorrect Findings page redirects. This issue has been resolved, ensuring accurate filtering and redirection for tags containing & chracter. |
|
ETM Dashboard |
Fixed an issue where users encountered an Unauthorized access error when adding the Risk Arrival vs Remediation Burndown and Risk Reprioritization Flow widgets to dashboards, while other widgets functioned normally. The widgets now load and work as expected. |
|
ETM Dashboard |
Fixed an issue where the Trending widget displayed incorrect historical data for users with restricted access based on tags. This is now resolved for applicable users, ensuring consistent filtering across both current and historical data. |
|
ETM Findings |
Resolved inconsistencies in purge rule execution where eligible findings were not reflected correctly and UI counts differed after completion. |
|
ETM Findings |
Fixed an issue where the CVE description in Finding Details was truncated in the UI even after selecting Read more, preventing users from viewing the full content. The complete description is now displayed correctly, ensuring full visibility of vulnerability details. |
|
ETM Business Entities |
Fixed the mismatch in the number of Business Entities shown between the widget and the Business Entities list page, so they now use the same data and display consistent results. |